How to make a track in FL Studio 9
Getting started
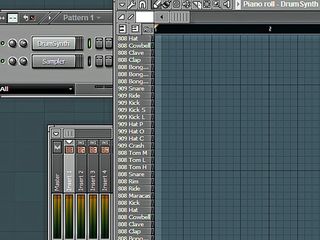
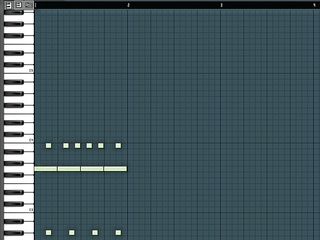
Step 1: If you don’t own FL Studio 9, download and install the save-disabled demo (click here to download). Create a new project at a Tempo of 125bpm. Delete the sampler instruments in the step sequencer, and create a DrumSynth by right-clicking the instrument slot and selecting Insert»Fruity DrumSynth Live. Right-click the DrumSynth instrument slot and select Piano Roll to bring up the MIDI editor. By default, the keyboard interface shows the drum sounds on each of the keys.
Making the beat
Step 2: While this view makes finding specific sounds easy when programming a beat, locating them in the DrumLive editor is a little trickier. Being able to see the actual MIDI note makes it easier, though, so change over to the larger view by clicking the bigger of the two keyboard icons near the top left-hand corner of the window. Copy the beat shown here.
Editing the drum sounds
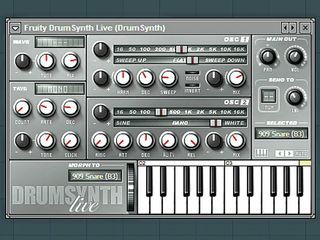
Step 3: To edit the drum sounds, click the DrumSynth slot in the step sequencer, bringing up the instrument’s interface. Select 909 Snare (B3) and copy the oscillator frequency settings shown used here - this turns our traditional snare into an abstract woodblock-style sound.
More drum editing
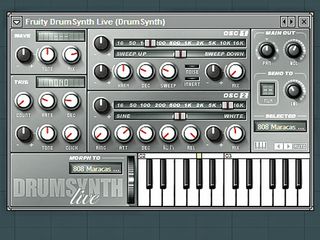
Step 4: Turn the Volume level of the snare sound to 60%, then select 909 Kick L (G3). Turn the Osc1 envelope Decay time down to 200 for a shorter, punchier kick sound. Next, choose 808 Maracas (G#2) and set its Volume level to 60%. Change the instrument’s FX out in the Channel Settings window to 1.
Adding the bass
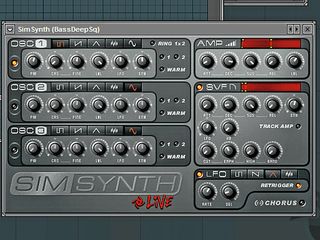
Step 5: In the browser menu on the left, open Plugin Presets»Generators»SimSynth and drag BassDeepSq onto the empty instrument slot in the step sequencer. Copy the settings shown here to get a modulated filter cutoff effect, then sequence a note lasting for the whole bar on G4 to trigger the sound.
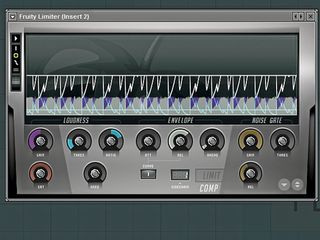
Ducking the bass
Step 6: Ensure that the DrumSynth and SimSynth are routed to Mixer channels 1 and 2 respectively. Route the DrumSynth track to the SimSynth’s sidechain input and add a Fruity Limiter as an Insert on the SimSynth channel. Copy the Fruity Limiter settings shown here to duck out the bass slightly whenever the kick drum plays.
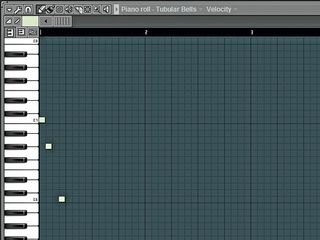
Adding atmospherics
Step 7: Let’s get some minimal atmospherics in the place. Add another instrument - this time the Wasp XP. Select the Tubular Bells patch and copy the Piano Roll pattern shown here. This sound could do with some reverb, so add a Fruity Delay 2 as an Insert on the Wasp XP channel and set the Time to 6.00.
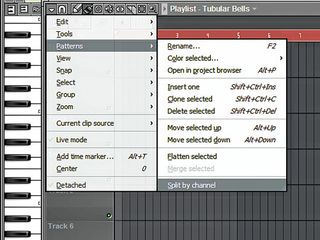
Arranging
Step 8: The step sequencer is great for creating a beat, but it’s easier to use the playlist view for arranging. Bring this up by activating it in the View menu or by pressing F5. FL Studio’s playlist works a bit differently to most sequencers. We want to be able to sequence each element of the song individually, so in the playlist menu, select Playlist Options»Pattern»Split By Channel.
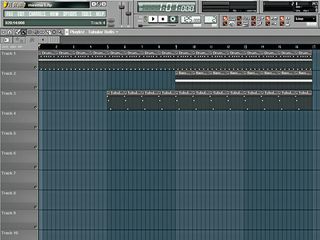
Finishing off
Step 9: It doesn’t matter which playlist track you place the elements on, as they’ll always trigger the correct instrument. For example, select DrumSynth from the top of the playlist and draw it onto the first eight bars. Then select BassDeepSq and draw it in it from bar 9. Finally, draw in Tubular Bells from bar 5. Using this technique, you can quickly create an entire arrangement with a few clicks.

Computer Music magazine is the world’s best selling publication dedicated solely to making great music with your Mac or PC computer. Each issue it brings its lucky readers the best in cutting-edge tutorials, need-to-know, expert software reviews and even all the tools you actually need to make great music today, courtesy of our legendary CM Plugin Suite.
