How to make a Jordan Rudess-style lead synth sound
Getting started
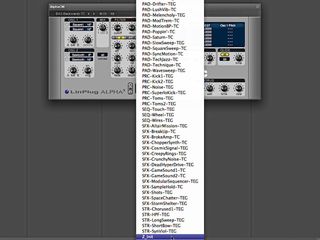
Step 1: Whipping up a proggy lead such as those used by Jordan Rudess in his Liquid Tension Experiment side-project is pretty simple, and can be done using nothing more than a bit of freeware. We’re going to use LinPlug’s AlphaCM, which you can find on the Computer Music magazine cover DVD every month. Alternatively, go and download Free Alpha 3, which is very similar. Fire it up and call up the Z-Init patch - it’s at the end of the preset list.
Oscillator 1
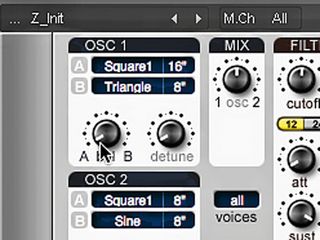
Step 2: We’ll get things rolling by changing Waveform A in Osc 1 - stick the waveform called Square1 into the A slot. Now, change the range of that waveform to 16" and crank the Balance knob all the way to the A side, so that this is the only waveform you hear when you play.
Oscillator 2
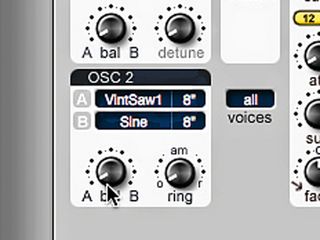
Step 3: Next, move to Osc 2. A sawtooth is required here, but let’s change the stock one for something more characterful, like VintSaw1. This time, we’ll leave the range at 8". However, we’ll still need to crank the Balance all the way over to the A side for Osc 2.
Tweaking the sound
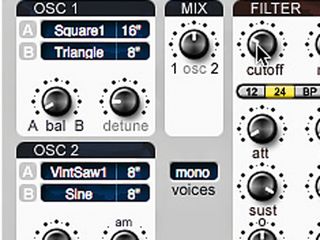
Step 4: The sound is still too clinical, so increase the Detune knob to 9 o’clock. Next, change the Voices parameter to Mono, for that classic monosynth lead sound. Moving on to the filter section, change its mode to 24, and set both the Resonance and Cutoff to around the 10 o’clock mark.
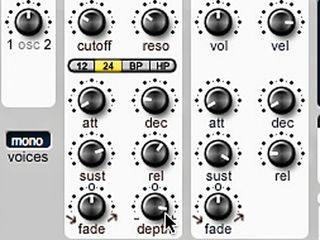
Filter envelope
Step 5: It’s time to get the Filter Envelope in on the action. Increase the Decay value to a little past 9 o’clock and set the Sustain to 2 o’clock. Turn the Release knob up past the halfway point and crank the Depth up nearly all the way.
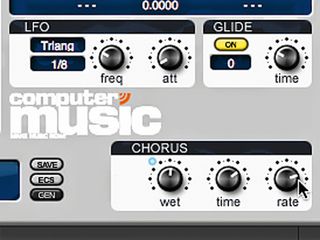
Glide and chorus
Step 6: It simply wouldn’t be a prog lead if it didn’t have some glide, so activate the Glide function and set the Time to around the 10 o’clock position - play in a legato style to bring this into play. Finally, turn the Chorus’ Wet knob up halfway and shove the Rate up to 2 o’clock.
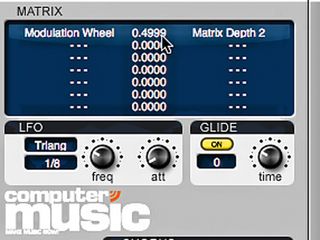
Performance controls
Step 7: Performance controls are vital to someone with Rudess’ skills, so we’ll set the patch up to respond to the mod wheel. In the Matrix, pick Modulation Wheel in the left-hand column, Matrix Depth 2 as the destination in the right-hand column and turn the amount (centre value) up to 0.4999.
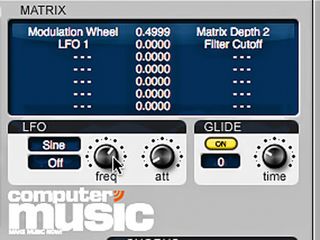
Finishing off
Step 8: In the next row, choose LFO 1 as the source and the Filter Cutoff as the destination. Leave the amount at 0.000. This will cause the mod wheel to bring in the LFO, which in turn modulates the cutoff. Now, set the LFO to taste, add a distortion plug-in as an insert effect and get ready to rock!

Computer Music magazine is the world’s best selling publication dedicated solely to making great music with your Mac or PC computer. Each issue it brings its lucky readers the best in cutting-edge tutorials, need-to-know, expert software reviews and even all the tools you actually need to make great music today, courtesy of our legendary CM Plugin Suite.

"If I wasn't recording albums every month, multiple albums, and I wasn't playing on everyone's songs, I wouldn't need any of this”: Travis Barker reveals his production tricks and gear in a new studio tour

“My management and agent have always tried to cover my back on the road”: Neil Young just axed premium gig tickets following advice from The Cure’s Robert Smith

"If I wasn't recording albums every month, multiple albums, and I wasn't playing on everyone's songs, I wouldn't need any of this”: Travis Barker reveals his production tricks and gear in a new studio tour

“My management and agent have always tried to cover my back on the road”: Neil Young just axed premium gig tickets following advice from The Cure’s Robert Smith


