How to find the perfect kick and bass combo
At the heart of any dance music track are the essential pairing of kick drum and bass – learn how to get yours sounding their best
While processing can make a huge difference to your mixes, choosing the right kick and bass sounds in the first place is key to crafting a truly professional low end.
Start by using sounds that complement rather than collide with each other - for example, a sustained, sub-heavy kick drum will clash with a huge, sub-heavy bassline, giving a muddy feel to your low frequencies.
To combat this, it's helpful to pick one sound to occupy the lowest frequencies before making the other one fit around it. If you'll be using a heavy, low bassline in your track, then try a lighter, higher-pitched kick drum to complement it. Similarly, if you're making a piece with a powerful, deep kick, then writing a bass part with the energy around 100Hz will give it room to dominate the low end without masking the bass.
Using a frequency analyser can really help with getting a more precise low end, as by carefully analysing the fundamental and harmonic frequencies of your kick and bass, you can choose the right sounds from the start, preventing your kick and bass frequencies from piling up on top of each other.
The simplest way to separate your kick and bass is to tune the kick so that the fundamental frequency doesn't clash with the bassline - but make sure the kick is tuned to a note that musically works with the root key of the bass and the track. Again, using an analyser will help.
As well as placing your sounds in the right area frequency-wise, pay close attention to the length of your kick drum. Styles such as DnB, breaks or dubstep will typically boast big basslines that could really clash with a kick, so a good way of making them fit together is to make the sustain of your kick as short as possible - either using audio fades or by loading your kick into a sampler and using the amp envelope to tighten its sustain and release.
In this walkthrough, we'll show you how to find and process the right kick drum to go with a synth bassline. For more on getting bass and kick drums working together, read the full Kick & Bass Power feature in the July edition of Computer Music (CM231).
Get the MusicRadar Newsletter
Want all the hottest music and gear news, reviews, deals, features and more, direct to your inbox? Sign up here.
Step 1: Finding a killer bass and kick combination is always a great way to give a track a solid foundation, so let's check out a few techniques for auditioning and selecting the ideal kick to fit with a programmed bass. Set your project tempo to 105bpm, then download and import Backing.wav and Kick.wav. First, we'll add a solid bassline to our loop by creating a new instrument track with Bass Engine CM.
Step 2: Select the 2010s Pure preset and turn the channel's volume down to -9dB, so the bass doesn't dominate the mix. After this, download and import Bass.mid to trigger the synth with a pre-programmed bass part. Our kick drum doesn't fit well with the bass part, as the kick and root note of the bass sit in the same frequency area, giving an unpleasant phase reinforcement effect - we can double check this using a frequency analyser.
Unpleasant phase
Step 3: Add Vengeance-Sound Scope (free with CM Plugins) to the master output, and solo the kick and bass channels. You'll see visual confirmation that they both collide in the same 50-60Hz area too often. We turn to brunsandspork's Grooove CM to find a more suitable kick sound. Mute the Kick channel, add Grooove CM on a new instrument track, and trigger it with Kick.mid.

Step 4: Open Grooove CM and click the yellow folder icon to load KickAudition.grk - this preset contains a selection of kick drums we can quickly audition by opening the kick's MIDI region and moving the notes up/down. Open a frequency analyser, solo the Bass channel and you'll see a gap between the lowest and higher frequencies of the bass at 80Hz - an ideal place for our kick's fundamental.
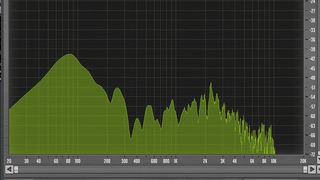
Step 5: Open the MIDI region on the Kick channel, select all the notes, and move them up and down together between E1 and C1 to audition different samples while the loop is playing. You'll hear how the kick drums sound in context, with the kick triggered by D#1 sitting nicely between the low and high notes of the bassline. Solo the Kick and open your analyser to confirm that its fundamental is at 80Hz.
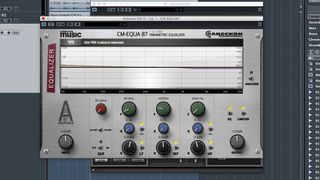
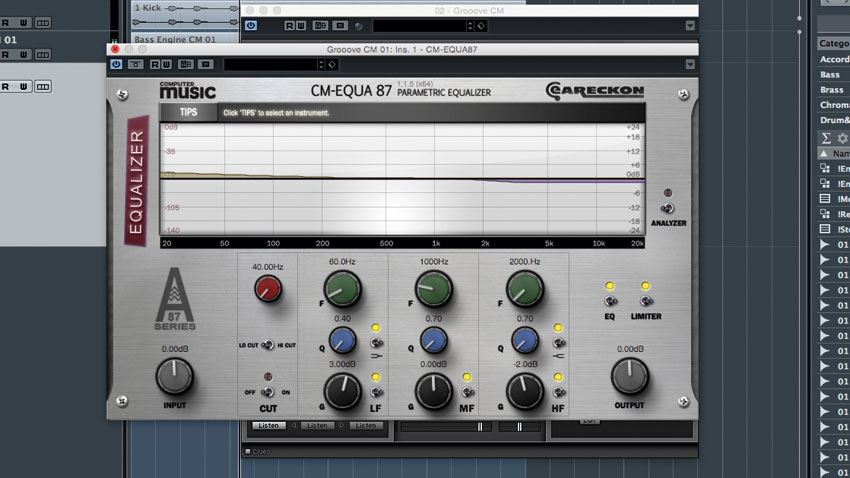
Step 6: Although it has a very low frequency, we can still give the kick some low-end richness without muddying the mix. Add an instance of CM-EQUA87 to the Kick, turning its Lo Cut off and adding a 3dB Low Shelf at 60hz with a Q of 0.4 - this'll give the kick extra depth. Finally, apply a -2dB High Shelf at 2kHz with a Q of 0.6 to subtly back off the high mids, giving the kick's bass more room to breathe.
Low-end richness
Computer Music magazine is the world’s best selling publication dedicated solely to making great music with your Mac or PC computer. Each issue it brings its lucky readers the best in cutting-edge tutorials, need-to-know, expert software reviews and even all the tools you actually need to make great music today, courtesy of our legendary CM Plugin Suite.

"If I wasn't recording albums every month, multiple albums, and I wasn't playing on everyone's songs, I wouldn't need any of this”: Travis Barker reveals his production tricks and gear in a new studio tour

“My management and agent have always tried to cover my back on the road”: Neil Young just axed premium gig tickets following advice from The Cure’s Robert Smith


