How to EQ for vintage analogue warmth
Mix tracks to replicate the warmth of '60s pop
The elusive warmth of analogue studio gear is a much sought-after sound in modern recording.
Here we show you how you can achieve the effect with mixing and EQing techniques in any DAW. In the video above and the step-by-step below, we demonstrate how to give a simple band recording the sound of '60s rock and pop hits in the vein of The Stones' Satisfaction.
For more on recreating analogue warmth, check out the March issue of Computer Music (issue 188) which is on sale now.

Step 1: We've got a simple band recording that we're going to process to give it a vintage, '60s sound along the lines of the Rolling Stones' Satisfaction. We'll do this using various standard effects that you'll find in nearly any DAW. To start, put the track stems (right click and Save As) on separate tracks in your DAW - we're using Cubase.

Step 2: Cubase has automatically named the tracks to correspond to the audio, but if your DAW hasn't, do it now to save confusion. We've also coloured the tracks. Most of the audio files are mono already, and Cubase is smart enough to place these on mono tracks; however, some are stereo (Organ and Tambourine), which isn't typical of the '60s era, so we'll have to do something about that later on.

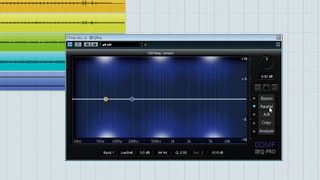
Step 3: The mix we've got here is very simple, with one mono track each for Tambourine, Kick drum, Snare drum, Drum kit (ie, a single mic capturing the room/overhead sound of the whole kit), Bass, Guitar and Organ. Our first port of call is to shape the sounds using EQ, and for this we'll use our very own IIEQ Pro CM (available in the CM Studio with each issue of Computer Music) - add it to the kick drum track, then click the graph to add two nodes.

Step 4: Change both nodes from AnaPeak to LowShelf by right-clicking them and using the pop-up menu. We'll mimic the overlapping bass shelves of Pultec's classic valve-based passive EQ, the EQP- 1A. Using a graphical EQ will make it easier to understand the why the dual shelves work. Also, IIEQ Pro has a passive mode, which is uncommon in digital EQs - click the Series label to flip it to Passive mode.
Get the MusicRadar Newsletter
Want all the hottest music and gear news, reviews, deals, features and more, direct to your inbox? Sign up here.

Step 5: The idea is to cut with one shelf and boost with the other, but set them to different frequencies, so we set the first shelf to 200Hz, 0.5 Q with a boost of 7dB, and the second to 400Hz, 1.2 Q with a cut of 7dB. Now we've got a bass lift with a tight cut above the boosted area, which helps to prevent a build-up of midrange mud, while still giving a warm low end. Copy this IIEQ Pro onto the snare channel.

Step 6: For the Snare channel, we set the lower shelf at around 200Hz, and the other at 1200Hz, boosting/cutting by 4dB and -2dB respectively with Qs of 1.3 and 0.5. This pushes the 200Hz range, which is where the body (the fundamental) of the snare sits. While we're at it, we stick an IIEQ Pro on the way-too-bright Tambourine channel and use an LPF12 filter at 5000Hz to low-pass filter the high end away.

Step 7: We don't EQ the drum kit channel or the organ, but on our bass, it's those dual low shelves again, this time at 100Hz/5dB/1Q and 250Hz/-7.4dB/0.5Q. The guitar is too forward and harsh around 2kHz, so we use a -6dB AnaPeak filter with a Q of 0.8 to rein it in. It still sounds too bright and glassy, however, so we apply an LPF12 filter at 11500kHz with a Q of 0.3 for a gentle roll-off.

Step 8: To further focus the sounds, we drop Sonimus Satson CM (from the CM Suite plugins) onto every channel, then adjust their High Pass and Low Pass knobs to roll away yet more treble harshness and bass build-up. We try to push each instrument into a similar range to that of Satisfaction, our reference track.

Step 9: On some of the channels, we want to push Satson CM harder, to add harmonic distortion. On the Snare, Kit, Bass and Guitar tracks, we ram the Drive knob all the way to 18dB. To compensate, we turn each of these channels down by about 18dB using their channel faders. Saturation can help stabilise dynamics - use it wisely and you may find yourself using less compression, or even none.
Computer Music magazine is the world’s best selling publication dedicated solely to making great music with your Mac or PC computer. Each issue it brings its lucky readers the best in cutting-edge tutorials, need-to-know, expert software reviews and even all the tools you actually need to make great music today, courtesy of our legendary CM Plugin Suite.


