How to create moving, modulated basslines in Cakewalk Z3TA+2
Cakewalk's power synth makes for an awesome bass machine
When it comes to modulation, Cakewalk's mighty Z3TA+2 soft synth is ridiculously well equipped, bristling with all the envelopes and LFOs you could possibly need to bring life and mobility to your patches.
In this walkthrough, we're going to build a throbbing, beefy bassline in Z3TA+2, drawing on various mod sources and targets. Volume, frequency and filter modulation - no parameter is left unwobbled as we show you how to really get that bottom shaking.
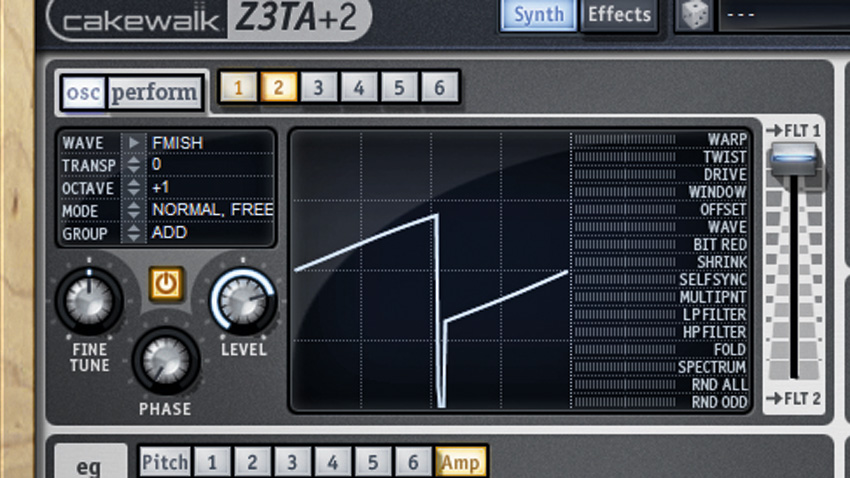
Step 1: Load Cakewalk Z3TA+ 2 in your DAW, then go to Program>Initialise to completely reset the synth. In the Oscillator section, click Osc 1's wave type box and browse to Instruments>Organ 2, then click on Osc 2 and load in Others>FMish (as shown). Turn up the Octave setting to +1 and change mode to Normal>Free. Move Osc 2's Filter slider all the way up to 1 to send the whole signal through filter 1.
Step 2: Go back to Osc 1 and change the Group setting to FM - this means that Osc 1's output is being used to modulate the frequency of Osc 2; that is, frequency modulation. Transpose it down an Octave to -1 and turn its Level down to 1.5%. You'll hear the effect it's having on Osc 2 if you hold down a note while you do this. Nasty!
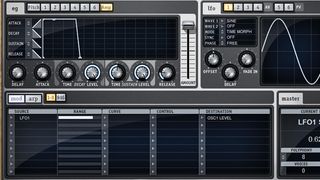
Step 3: Let's use an LFO to modulate Oscillator 2's level, for a cool pulsing effect. In the modulation section at the bottom of the synth, click first Source cell box and select LFO>LFO 1. Set the Destination to Oscillators>Osc 1 Level and bring up the Range slider to 80%. Now change LFO 1's Wave 1 to Sine and set the Speed slider to around 0.62Hz.

Step 4: To give our sound some low-frequency sub bass weight, head to Osc 3 and set the Wave type to Generated Sine at the bottom of the menu. Transpose it down an octave by changing the Octave to -1. Now move Osc 3's Filter slider all the way down to FLT 2 to send the entire Osc 2 output signal to Filter 2.
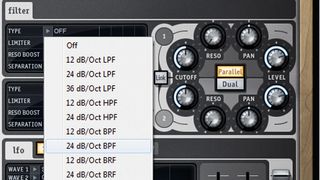
Step 5: We can now modulate a band-pass filter over the mid-range FM oscillator (sent to Filter 1), leaving the sine wave sub unfiltered and clean. In the Filters section, change Filter 1's Type to 24dB/oct BPF and set the Cutoff knob to 142Hz. Leave Filter 2 alone. Let's create some cool filter movement…
Get the MusicRadar Newsletter
Want all the hottest music and gear news, reviews, deals, features and more, direct to your inbox? Sign up here.
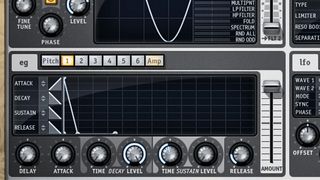
Step 6: In the modulation section, send Env Gen>EG1 to Filters>Filter 1>Cutoff, and move the Range slider up to 55%. In the envelopes (eg) section, select the first envelope. Set the Amount slider to 100%, turn the Sustain Level knob to 0 and move the Sustain Time knob to 0.34s. You'll hear the filter closing quickly on the mid-range part of the sound, creating a nice punch-in effect.
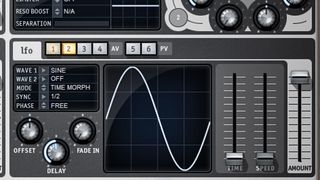
Step 7: Lets add even more funk to it. Back in the Modulation section, set Source 3 to LFO>LFO2, set the Destination to Filter 1 Cutoff, and Range to 55%. Set LFO 2's Wave 1 to Sine. To introduce the LFO's effect after our initial envelope punch in, set LFO 2's Delay knob to 0.46s. Set the LFO speed to taste. Now we have even more movement!
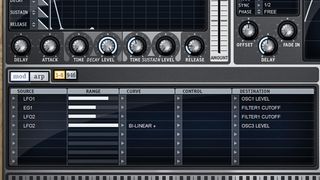
Step 8: To make the sub sit better with our throbbing, moving mid-range, we can modulate it too. To do this, go back to modulation Source 4, set it to LFO>LFO 2, with the Destination as Osc 3 Level, and turn the Range to 100%. It will sound terrible, as the sub is completely out of sync with the rhythm of the sound - to fix this, change its Curve type to Bi-Linear+. Now it sounds really cool!
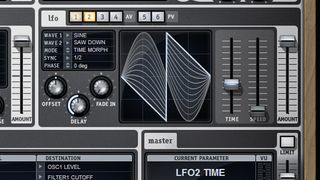
Step 9: Finally, set LFO 2's Wave 2 to Saw Down, move the Time slider up to around 0.32s, and set the Phase to 0 degrees. The LFO will gradually change to a Saw wave over time, making the rhythm much more obvious. For that finishing touch, go to the Effects page, turn on Distortion, crank the Decimator Amount up a little and increase the Gain.
Computer Music magazine is the world’s best selling publication dedicated solely to making great music with your Mac or PC computer. Each issue it brings its lucky readers the best in cutting-edge tutorials, need-to-know, expert software reviews and even all the tools you actually need to make great music today, courtesy of our legendary CM Plugin Suite.


