16 Cubase secrets you might not know about
Hidden tips and tricks for Steinberg's DAW

How well do you know Cubase? Have you peeked into every nook and cranny, scraping out every last bit of audio-wrangling power? If you're anything like most computer musicians, you'll have just figured out the features needed to get the job done. Secrets? What else could you possibly need to know?
Well, quite a bit we suspect: we've put together a list of 16 Cubase tips and tricks that you might not know about or be using. If you're already up to speed with all of them, pick up a Power User badge on your way out, but for everyone else, we reckon there'll be something here that will ease or speed up your workflow.
For a complete guide to Cubase's secrets check out Computer Music 206, which is on sale now.
Velocity rapture
MIDI velocity modulation can work wonders when you want to add life to a stilted performance, though it can be difficult to control during recording and tedious when adding notes one at a time in the piano roll. Either way, editing the velocities of individual notes can be more than a little time consuming.
Speed things up by simply holding down Shift-Ctrl (Shift-Cmd on a Mac), then click and drag on your notes to change the velocity levels in a hurry.
Octave doctoring
Here's a super-fast way to adjust the octave of your MIDI events in the Project view: simply select the MIDI notes you'd like to adjust and then hold the Shift key along with the up or down arrow keys to raise or lower the octave of the selected events. Neat.
Note taken
Cubase provides plenty of export options. Audio, MIDI, OMF and even tempo track information can be spat out of the program.
Get the MusicRadar Newsletter
Want all the hottest music and gear news, reviews, deals, features and more, direct to your inbox? Sign up here.
One often overlooked feature is its ability to export the text contents of the built-in Notepad available on each Cubase channel. This is terrifically useful when sharing projects with collaborators, particularly users of other DAWs.
Build a better toolbox
Most windows can be reshaped or scaled up or down in size - even some that may not appear to be possessed of such flexibility.
Take the Toolbox, for instance. You probably already know to right-click if you want to bring up the Tools menu, but did you know that right-clicking and holding (or Ctrl- clicking and holding on a Mac) for a few seconds will allow you to drag to reshape the Toolbox?

Colour Coordination
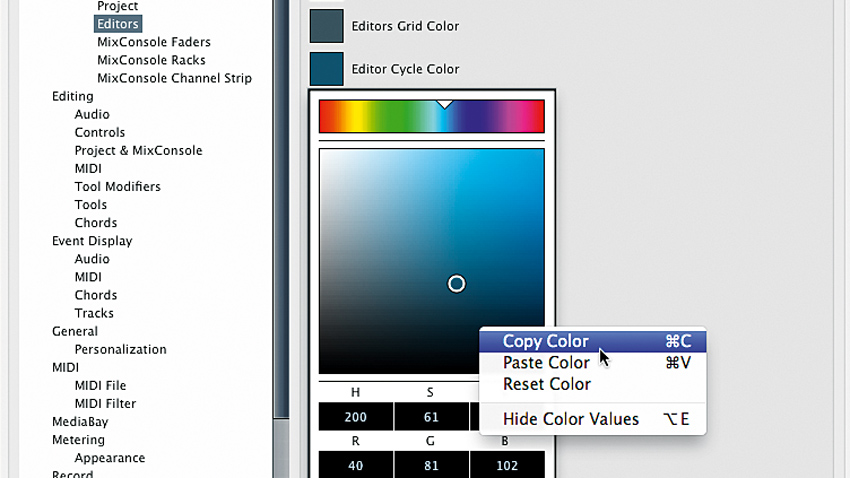
There are so many ways to customise Cubase that we almost hesitate to offer up even more. This one is all about colour, as in your colour settings in the Appearance section of Cubase's Preferences.
You probably already know that you can click on the assigned colour example for a given graphic bit and select a new colour. Yet right-clicking will bring up more options, including the option to copy or paste a colour, reset a colour or display HSV and RGB values numerically.
We don't need no stinkin' patches
If you still use any hardware synths or effects, they probably come loaded with hundreds if not thousands of preset patches, often divided into banks. This many patches can be quite difficult to manage, but Cubase has been making it a snap for eons.
Thanks to the one-two punch of MIDI Devices and Patch Scripts, you can import SPF files of the factory patch lists of your favourite synth. If such a file isn't already available, you might want to dig up a copy of Steinberg's ancient (and free) ScriptMaker program, which will allow you to roll your own Patch Scripts. It's for Windows 95/98, though we ran it just fine on Windows XP using a virtual machine.
Piling on the inserts
Steinberg has bundled loads of excellent effects plugins into Cubase, including many go-to insert effects like compressors, limiters and filters. However, there are only eight insert slots on each track.
Though that ought to be enough for even the most complex productions, you need not feel restricted by this limitation. You can simply route the track's Output into an empty Group channel. This will give you yet another full complement of insert slots with which to play. And one crucial point about Cubase's insert slots that is overlooked by many: the first six are pre- fader, but the last two are post-fader!
Point of insertion
Here's a real timesaver for those times when you have a track loaded with insert effects: Holding Shift-Alt and clicking on a track's 'e' button in the Track Inspector will instantly bring up the GUIs for all inserted effects for that track.

The keys to VariAudio
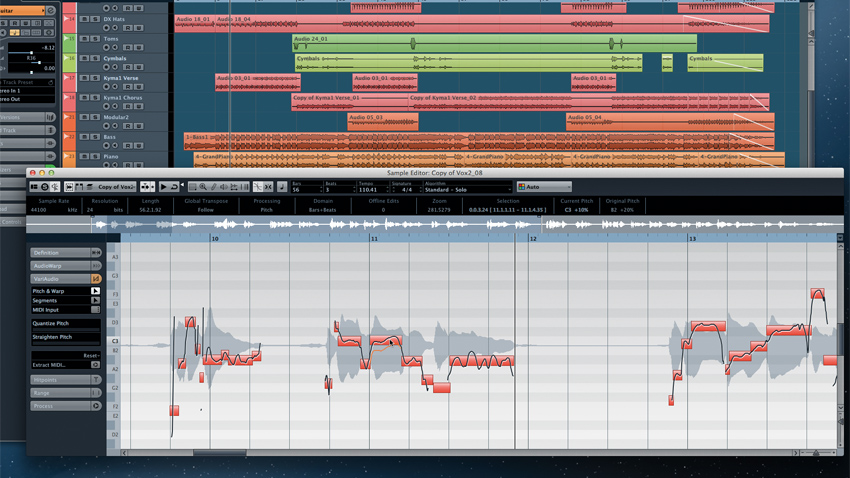
VariAudio's Pitch and Warp function can analyse your audio files, detecting both the pitch and timing of your mono recordings and splaying the results across a piano-roll style grid. You can then correct pitch and timing simply by dragging on each segment.
It's made even easier with shortcut keys. Hold Ctrl/Cmd to snap segments to notes, hold Shift to move them freely, and hit Tab to toggle between Pitch and Segment editing modes.
Grid (un)lock
Snapping events to a grid is one of the great innovations of modern music production, allowing you to correct and perfect timing, align events and clips, and otherwise ensure that your song's rhythmic structure stays lock-stepped to the clock. However, it's also useful to have freedom of movement within the project without conceding to the grid.
If you're constantly toggling the snap function on and off, though, did you realise that simply holding down Ctrl (or Command on a Mac) while moving or resizing audio or MIDI events will momentarily bypass the snap function?
Exclusive behaviour
There are lots of nifty functions in Cubase's MixConsole, some of which are less than apparent on first (or second, or third) glance. Take a look at the top of the MixConsole. You'll see a tiny star just to the right of the Racks drop-down. It's easy to miss, but it provides a lot of control options for adjusting the MixConsole's behaviour.
One such option is Exclusive Expanded Rack. Ticking this causes only the selected rack section to expand. Choosing any rack section will cause the others to collapse. That should help cut down on scrolling.
Hold that thought
As we've mentioned elsewhere in this article, there are some mouse-click tricks of which you may be unaware. Clicking and holding in Cubase 7.5 sometimes produces a different result than simply clicking. For example, clicking on a Solo button in the mixer solos a track or channel, but clicking and holding the same button puts the channel into Solo Defeat mode.
Running with scissors
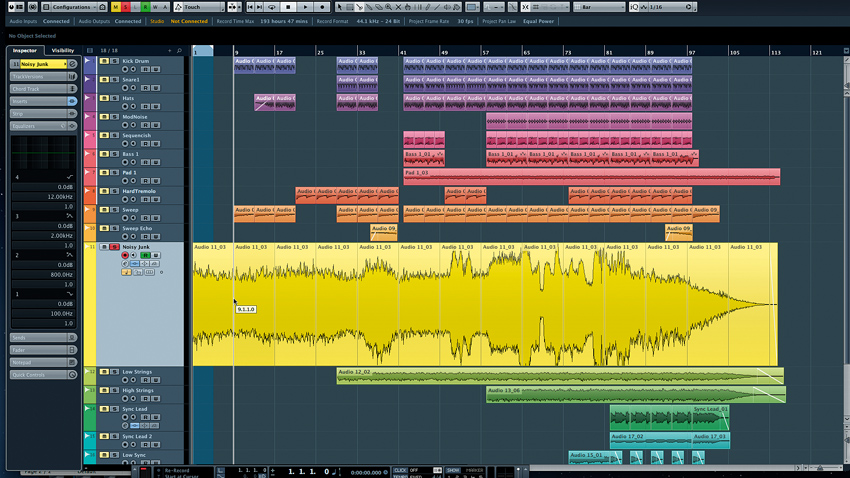
Ever needed to chop up an event into slices of equal length? It's easy to do in Cubase. Select the Scissors tool, determine the desired length of the clips, then hold Alt and click on the spot that should represent the rightmost end of the first segment in what would be the first clip. Your entire event will be divided into clips of that length.
On a related note, if you need quick access to the scissors tool while using the regular pointer, just hold Alt!

In with the old
With all the power provided by VST instruments and effects, it's easy to forget that Cubase still has a lot of features dedicated to integrating external hardware devices - though some of these features rarely get a look in.
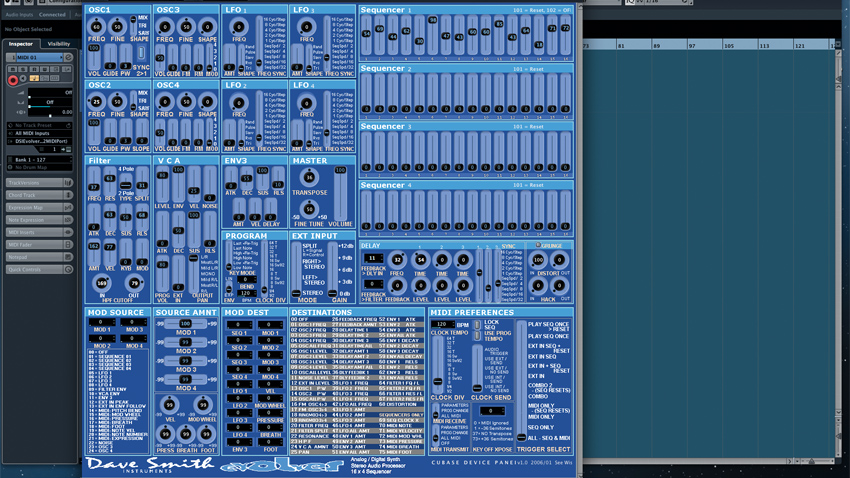
Device Panels (see above) are one such feature. Device Panels let you create virtual control panels for your MIDI hardware much as you can create Quick Control panels for your virtual gear. Rolling your own Device Panels is pretty easy, too. Cubase provides plenty of tools to use, including all the knobs, faders and buttons you'd need to create your own virtual hardware panels. Better still, there are lots of ready-made Device Panels freely available online. A carefully crafted panel will allow full automation of MIDI CC and SysEx parameters. They're quite cool, really!
In with the even older
Now that we've jogged your memory about Device Panels, we'll point out that they're not just for MIDI gear. Some intrepid Device Panel designers have whipped up a bunch of keen panels to serve as "dummy panels" for non-MIDI gear, such as those dusty (but highly prized) old analogue synthesizers. While you can't use these panels to actually control the gear, this is terrifically useful for making a record of the positions of the knobs and sliders for each patch - making it relatively easy to recreate a patch at a future date, even if your old instrument lacks patch storage.
You send me
You probably know that clicking on an insert effect slot in the MixConsole will bring up the inserted effect's GUI, but were you aware that you can do the same with Send slots? The trick? You need to hold Alt (aka Option on the Mac) while double- clicking the Send's slot. Boom!
Another plugin trick: open a plugin, and from the top-right drop-down menu, select Switch to Generic Editor to access its underlying parameters directly - sometimes you can gain access to 'hidden' parameters this way! Switch back to the normal graphical interface in the same way.
Computer Music magazine is the world’s best selling publication dedicated solely to making great music with your Mac or PC computer. Each issue it brings its lucky readers the best in cutting-edge tutorials, need-to-know, expert software reviews and even all the tools you actually need to make great music today, courtesy of our legendary CM Plugin Suite.


