11 Ableton Operator tips and tricks
Make the most of Live's excellent FM synth
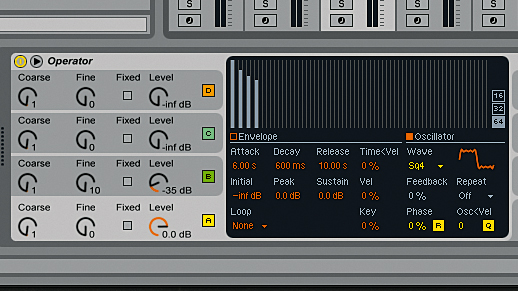
Frequency modulation (FM) synthesis allows for the creation of a huge array of sounds, ranging from tuneful and harmonic to dissonant and chaotic.
This is all made possible through the interplay between so-called oscillators designated as carriers and modulators. The frequency of one such oscillator - also called an 'operator' in FM terminology - is modulated using another that is also in the audible range, resulting in a more complex waveform.
Even using simple sine waves as the raw waveforms of the operators can result in timbres that are rich in harmonics. Increasing the amplitudes of the modulators will give increasingly harmonic-rich signals.
Taking the template laid down by classic digital FM synths like Yamaha's DX7 and SY77 considerably further, Ableton adapted this concept for their own Operator instrument, which is a €79 add-on for Live, or included as standard with Live Suite.
Combining the concept of FM with both additive and subtractive synthesis (which, curiously, do not cancel each other out), Operator is your gateway to a universe of complex timbres, all dialled in via an interface that is intuitive and simple to, well, operate.
With a solid selection of basic waveform types to choose from and the option to create your own using the waveform editor, you can arrange Operator's four oscillators in several predefined routings - known as 'algorithms', in a nod to the very similar system employed on the DX7 - to synthesise a wide variety of musical and non-musical tones.
Here we offer eleven handy tips and tricks to help you make the most of Operator's huge sound-sculpting capabilities.
Get the MusicRadar Newsletter
Want all the hottest music and gear news, reviews, deals, features and more, direct to your inbox? Sign up here.
• For many more Ableton Live guides go to our massive learning hub: Learn Ableton Live and Ableton Push: music production tips and tutorials
1. Custom waveforms and sampler
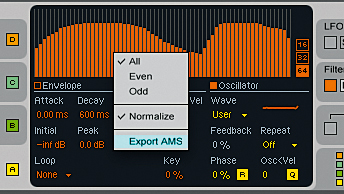
In addition to the simple waveforms available in Operator, you can create custom waveforms using the waveform editor. You can also save these custom waveform for later use as .ams files by right-clicking on the waveform editor and choosing Export AMS. One of the advantages of this feature is that you can drag these AMS files into other Ableton devices such as Sampler for use with their modulation capabilities and other processing functions.
2. Automate the algorithm
Usefully, Operator lets you map the algorithm selector to a Macro control or a MIDI controller. Changing the algorithm will have a significant impact on the result since it changes the global behaviour of the instrument. Therefore, you can start experimenting with changing the algorithm on the fly - try mapping the algorithm to a MIDI controller or an LFO for far-out results.
3. Sample And Hold
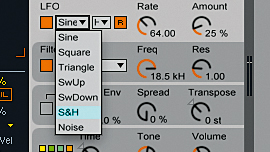
Operator's LFO can be set to output a range of waveforms, and one of the more interesting available waveforms is Sample And Hold (S&H). This signal uses random values chosen at a rate determined by the LFO, to create sci-fi-style sound effects as well as introduce random, unpredictable modulation to your sound.
4. Using the Coarse parameter
One of the main controls in Operator's oscillators is their Coarse parameter. Note that Coarse is a frequency multiplier and not an octave selector. This means that the frequency of the oscillator will be multiplied by its Coarse parameter. So if Coarse is at 1, an A4 note will be 440Hz; if the Coarse is at 2, the frequency will be 880Hz (an octave higher: A5); if Coarse is set to 3, the frequency is 1320Hz - E5; and so on.
5. The fifth oscillator
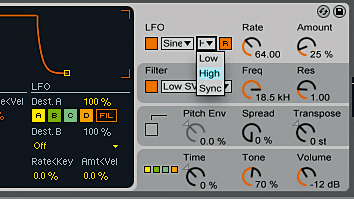
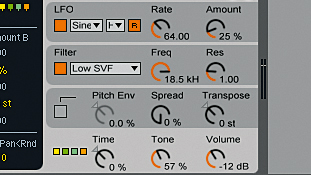
Typically, Low Frequency Oscillators (LFO) have subsonic frequency values. This means we will only hear their effect and not their actual sound. By setting Operator's LFO range to HIGH, you can push the LFO into the audible range, as for as 12kHz. You can think of Operator's LFO as the fifth oscillator.
6. Global time control
One of the other useful global controls in Operator is the Time parameter. Using this knob, you can scale all the envelopes' timing up and down. This can be used to change the sound drastically or can be modulated using the LFO for a more dynamic effect.
7. Built-in waveshaper
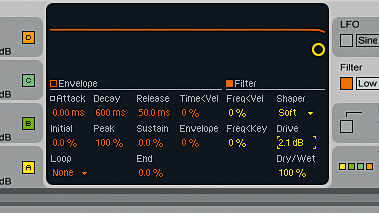
There is a built-in waveshaper in Operator's Filter panel. You can select the waveshaping curve via the Shaper menu to access the Drive and Dry/Wet controls.
8. CPU saving tips
Operator is an optimised native Ableton instrument, and its CPU usage is pretty low. Even so, when using several instances of this instrument, you might need to maximise CPU usage for a better overall performance, such as when performing live. You can do this by disabling the features that are not used, and most of Operator's CPU-intensive features such as Filter and Spread can be disabled.
9. Anti-aliasing
Digital FM synthesis techniques can result in aliasing artifacts when creating timbres with a lot of high frequency information - sometimes desirable, sometimes not, depending on the patch you're creating. To this end, Operator has a togglable high-quality antialiasing filter in the Global section, as well as the global Tone filter that can be used to curtail runaway treble frequencies as much or as little as you like.
10. Go negative
Playing with Operator's envelopes, you will notice that some parameters can be set to negative values; for example, you can apply -50% in the Filter Envelope. You can think of it as flipping the envelope upside down, so that a slow attack will cause the filter to gradually fall from its initial position, rather than rising, as with a normal, positive modulation setting.
11. Feedback
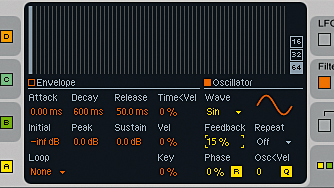
We already know that we can modulate an oscillator's pitch using one or more of the other oscillators, but there is another option: any oscillator that is not being affected by the others can modulate itself. You can control the amount of this modulation by adjusting the Feedback parameter in the envelope section of each oscillator.
Computer Music magazine is the world’s best selling publication dedicated solely to making great music with your Mac or PC computer. Each issue it brings its lucky readers the best in cutting-edge tutorials, need-to-know, expert software reviews and even all the tools you actually need to make great music today, courtesy of our legendary CM Plugin Suite.
"If I wasn't recording albums every month, multiple albums, and I wasn't playing on everyone's songs, I wouldn't need any of this”: Travis Barker reveals his production tricks and gear in a new studio tour
“My management and agent have always tried to cover my back on the road”: Neil Young just axed premium gig tickets following advice from The Cure’s Robert Smith


