MusicRadar Verdict
Although a few minor bugbears remain, Cubase 9's fresh features usher in a welcome new era for the mature DAW.
Pros
- +
Lower Zone simplifies single-monitor use. Sampler Track is an inspiring concept. Frequency EQ is lovely.
Cons
- -
No automation curves. No multisampling in Sampler Tracks.
MusicRadar's got your back
You can't stop progress at the forefront of technology, and as such, with every passing year we've come to expect a new version of Steinberg's DAW.
Placed at the cutting-edge of the professional market, Cubase is loaded with advanced features, but with so much history behind it, there are plenty of gripes to be had. It's all about balance when developing software as venerable as this, and for the changes in version 9, Steinberg has taken its cues from the community of Cubase users.
Let's get the basics out of the way. Cubase continues to come in three packages: Pro, Artist or Elements, with varying levels of functionality in each. We're focussing on the Pro option for our review. Projects saved in Cubase 9 can actually be opened in previous versions of the DAW, although none of the new features will work, of course.
In short, version 9 sees the addition of GUI changes, a handy Lower Zone for easy feature access in a single window, changes to the way plugins are handled, as well as changes and an addition to Cubase's onboard plugin collection. Elsewhere, there's undo/redo history, and a new type of track intended to bring the best of modern sampling to the DAW. Let's comb through the changes, then...
When I'm 32
As the originators of the VST plugin standard, Steinberg has always had the option to use Cubase to push plugin progress along. DAW by DAW, 32-bit plugins have slowly been ditched over the last few years as developers aim to modernise and standardise plugin usage. After holding out for a few years, Steinberg has now joined the 64-bit-only crowd, having left it long enough so that almost every plugin on the market in 64-bit as standard.
While Cubase has always scanned plugins on startup, version 9 has introduced the Plug-in Sentinel to the procedure. This startup process takes note of any potentially troublesome or unstable plugins and relegates them to a 'blacklist' where they're unavailable for use.
"After holding out for a few years, Steinberg have now joined the 64-bit-only crowd."
Alas, many instruments and effects that have worked perfectly well up until now have thrown up errors - for example, nearly all our iZotope plugs were blocked. Additionally, a known issue with Mac OS X (anything pre macOS) causes others to be blacklisted.
You can usually take such plugins back from the naughty step through the Plug-in Manager, though this isn't always successful and doesn't apply to 32-bit plugins. Blacklisted items must be reactivated one at a time - you can't shift-select and re-enable a bunch in one go.
Zoning out
Recently, the DAW world has begun to conform to an unspoken standard in GUI design, with a browser or track inspector on one side and an area for the mixer or other editors below the main project view.
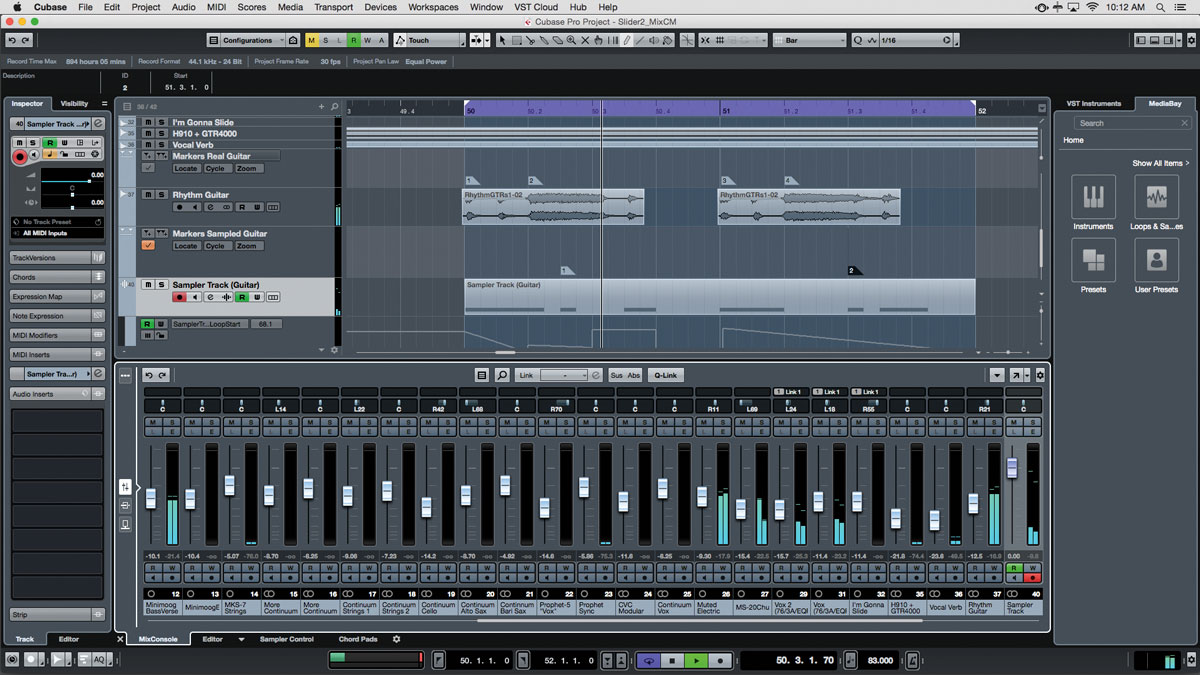
Cubase 9 has given in, adding the new, resizable Lower Zone to the main window. Here you can call up various editors such as for audio or MIDI, and best of all the MixConsole, for one-window operation of the most important parts of your project.
Elsewhere, the GUI has been tidied with the inclusion of customisable Transport functions built into the lower frame. You can still access the floating Transport bar if you like.
The version of the MixConsole presented in the Lower Zone is condensed, displaying only the fader/pan section, but you can toggle Inserts and Sends too. There's also a button used to display the MixConsole's customisable toolbar in the Lower Zone display (independent from the toolbar in the full MixConsole view), and a button that can take you to the full MixConsole.
What you won't see in the Lower Zone's MixConsole display is the new MixConsole History. This is a most welcome addition to the 'full view' MixConsole, as it allows you to undo and redo mixer moves or even compare mixes by simply stepping through the events in the History pane displayed on the left. Here, you can see what you've done and even a timestamp letting you know when you performed a given action.
The only caveat? Consecutive incremental changes of the same parameter are not individually denoted. Perhaps that's for the best, as the History would get pretty overloaded with entries in a hurry. If you'd prefer to stay in the Lower Zone, you can still use undo and redo buttons - you simply won't see your History.
Like any undo/redo, the slate is wiped clean each time you load a project, and that's a shame - we'd love to have a way to save the history of a given session.
Holiday sampler
Steinberg has long sold a fully kitted out sampler in the form of HALion, and a dedicated beat sampler called Groove Agent, a cut-down version of which is included with Cubase. Yet as time has moved on, other companies have outfitted their own DAWs with proper samplers, either by bundling an existing instrument or whipping up a dedicated model, leaving Cubasists to feel a bit left out.
This all changes with Cubase 9's interesting take on sampler integration. Sampler Tracks are a nifty new approach that deftly interweaves the most-needed sampler functions into the DAW itself. Sampler Tracks are added just like any other, with the exception that a feature-rich editor becomes available in the Lower Zone or in a floating window.
"The GUI has been tidied with the inclusion of customisable Transport functions."
You should be aware that the Sampler Track is not meant to be a competitor to the likes of HALion or Kontakt - there is no multisampling or layering. Instead, the Sampler Track is poised to act as an intuitive, integrated production and sound-design tool.
Dragging an AIFF or WAV file from your project, desktop or drive into the tabbed Sample Control Editor in the Lower Zone instantly creates a Sampler Track that allows your sample to be played back chromatically. Interestingly, samples can be played back legato (so that the sample doesn't restart with each new note), but only in polyphonic mode.
While we wouldn't expect Steinberg to include enough functions to pose a threat to its premium sampler products, the inability to map multiple samples across the keyboard seems a glaring omission.
Nevertheless, the Sampler Track is a potential goldmine for producers, remixers and sound designers. It's quick and easy to operate, and so thoroughly integrated into the project workflow that it does seem right to call it a 'Track' rather than an instrument.
Consider how quickly one might drag in a clip from an audio track, doctor it up in the Sampler Track and then resample through track effects only to drag it back in to the Sampler Track and start the process all over again - the possibilities abound.
Plugins empowered
Some (but not all) of Cubase's old plugins have been given a new coat of paint and even a new feature or two. The Maximizer, for example, now offers a Modern mode and a Recover control that affects the release phase coming right after the attack, independent of the dedicated Release parameter, meaning that you can shape overall release while maintaining punch.
Autopan acquires node-based user-definable shapes and the new look. The Brickwall Limiter, Expander, Gate and Envelope Shaper sport the new look, as does the fabulous Frequency EQ, an eight-band equaliser with Mid/Side and Linear Phase options, independent left/right/mid/side control and a gorgeous Spectrum Display.
It's also got a virtual keyboard that can show you exactly which frequencies you've pinpointed to boost and cut. This brings an obvious musicality to the process of equalisation and will make much simpler work of shaping individual tracks to fit busy mixes.
Another addition is the ability to send signals into VST3 instruments that support sidechaining. This can be achieved by assigning the target plugin as a track's output or using your channel Sends. Unfortunately, Cubase still sports a limited number of Sends per channel, something that surely should have been addressed to take advantage of this new functionality.
Sampler Control Editor
Using the Sampler Control Editor, you can perform typical sample playback functions like setting the root note or key range using a virtual keyboard. There's a Pitch Bend range, too.
You can use the expansive (and zoomable) waveform display to set start and end playback points, as well as loop start and end - all available for automation. A variety of loop playback modes are on offer, including Continuous, Alternate, Once, Until Release, and Alt Until Release.
Additionally, there's a built-in AudioWarp feature that provides pitchshifting without affecting the sample length. You can select Solo or Music mode, with the latter being more suitable for monophonic lead sounds such as voices. Selecting this mode provides access to an otherwise greyed-out Formant knob. There's tempo sync and a coinciding knob for setting the sample's original BPM should you choose to use it.
You also get command over a filter with a whopping 24 different filter shapes (low-pass, high-pass, band- pass, all-pass, notch, with a variety of slopes) and six types, including Tube, Classic and Clip. An Amp section offers Volume and Pan control, and its dedicated, loopable multistage envelopes are available for Pitch, Filter and Pan, providing a lot of sound- shaping potential.
Fixed pitch, reverse, and monophonic play can be switched with buttons above the display. There's a file browser for bringing in samples and a most welcome function for transferring your sample to another compatible instrument such as Groove Agent SE, Groove Agent or HALion.
The rest of it
As ever, Cubase installs with a wealth of pre-fab content to get you started, much of it in the form of the Caleidoscope collection designed for Sampler Tracks. Some of the sounds are pretty tasty, too, though they'll hardly supersede multisampled third-party collections. There are also 400 new loops for Groove Agent in tow.
Cubase Pro now allows up to ten Marker Tracks, the idea being to access different markers for, say, different instruments or performances. More useful still is the ability to export stems from varying sets of cycle markers.
We'd be remiss if we didn't mention the fact that hot-plugged USB MIDI devices are immediately available for use. It may seem like a small thing, but if you've a lot of them lying around, it'll be a real time saver.
Conclusions
Cubase 9 isn't perfect by any means. Some old quirks have been addressed, but some niggling aspects from previous incarnations remain. It seems inexplicable, for example, that Steinberg still hasn't implemented curves in automation lanes, and a mere eight each Insert and Send slots in the mixer hardly seem adequate, particularly since you can use Sends for the new sidechaining features.
It's easy to focus on our own personal wishlist of missed opportunities, but the fact is that Cubase 9 is more powerful than its already powerful predecessors. Little tucks and tweaks appear throughout the program and do much to speed up the workflow, and the entire program feels snappier and more responsive.
The Zones concept means getting a lot more done without the need to open countless windows. To our minds, that and the Sampler Track are worth the cost of upgrading. The rest is just icing on a very tasty cake.
Computer Music magazine is the world’s best selling publication dedicated solely to making great music with your Mac or PC computer. Each issue it brings its lucky readers the best in cutting-edge tutorials, need-to-know, expert software reviews and even all the tools you actually need to make great music today, courtesy of our legendary CM Plugin Suite.
“A fabulous trip through all eight songs by 24 wonderful artists and remixers... way beyond anything I could have hoped for”: Robert Smith announces new Cure remix album
“He knows what I'm thinking and feeling before I even know it": Billie Eilish suggests that she and brother Finneas can read each other's minds
“A purpose-built solution for bassists seeking unparalleled sound-shaping capabilities”: Darkglass Electronics unveils the Anagram Bass Workstation – a state-of-the-art multi-effects for bass guitar with neural amp model support and a 7” touchscreen
