The track MTS 2020 special: Machinedrum's The Relic feat. Rochelle Jordan
"I do understand the importance of intention"
"I do understand the importance of intention"
Fans of envelope-pushing electronic music will need little introduction to Machinedrum AKA Travis Stewart: his glittering career includes releases on prestigious labels such as Planet Mu, Vision and Astrophonica, a long-running collaborative project with Jimmy Edgar as JETS, and remixes for likes of Om Unit, Kelis and Bonobo. We caught up with Travis to find out how he created the neuro-footwork-R&B-orchestral hybrid The Relic from his new album A View of U.
Hardware:
> Apple Mac
> RME Babyface Pro
> Audient ASP800
> Adam A7X monitors
> Adam S8 Sub
Software:
> Ableton Live
> Michael Norris
> Soundmagic Spectral
> FabFilter, iZotope and Native Instruments plugins
For The Relic you designed the neuro bass sound in its own dedicated project. Is that typical of your workflow?
“My organisation with all my sessions in the past couple of years has gotten super meticulous and I have a whole separate folder for sessions of just general sound design and stuff like rhythmic ideas. Just things that I’m experimenting with, but aren’t necessarily going towards a specific song. So there was a larger, bass sound design session.
"The one that I opened up in the video was a lot more simplified, because the one that I originally made was pretty messy and kind of an eyesore to look at. Generally I try to keep the sound design project separate, and then Ableton makes it super easy to just drag presets that I’ve made over into sessions for new tracks that I’m working on.”
The track is full of contrasts in terms of pacing, sound selection and feel. Was that your intention from the start?
“Not necessarily. Certain tracks tend to lean that way as a sort of necessity because I’ll be listening back to it and realise, especially with tracks like The Relic where you’re just getting pummelled by sound, there needs to be some sort of release at a certain point.
"I don’t try to sit down with an intention like ‘today I’m going to make a track that is full of bass sound design that’s going over footwork-type rhythms, and that’s going to have a breakdown with a beautiful R&B vocal and a violin section.’ If I did that, I don’t think I would ever get anything done!
Want all the hottest music and gear news, reviews, deals, features and more, direct to your inbox? Sign up here.
“But I do understand the importance of intention. I think that the only times I do make tracks that are based off of a certain intention is if I’m going for just a specific genre, like ‘it would be fun today to make a classic ’90s jungle-sounding track’. Or, like when I was living in Berlin I would spend a whole night out at Berghain, and come back the next day and I couldn’t help myself but make a techno track. So the intentions are usually limited to maybe experimenting with a genre, but more broadly I try to avoid that and let my subconscious take over.”
In the video you use elements such as arpeggiators and Max for Live modulators that seem to add elements of randomness to the project. Are those things that will be present from the beginning?
“The unexpected twists and turns usually come later in the process. Generally when I have an arrangement going I have a better idea of where I start to lose attention by listening back to the track. I’m like, ‘OK, I could need something here that wakes me up or sucks me back in’, or maybe a transition needs some work.
“For instance on the track Sleepy Pietro, I intended for it to just shift to the polyrhythmic house section just once. Once I was listening back, I felt like I needed to revisit that again, as it’s just such a powerful shift to feel like you’re listening to jungle and then suddenly it’s a house track.”
I don’t sit down like ‘today I’m going to make a track that is full of bass sound design that’s going over footwork-type rhythms, and that’s going to have a breakdown with a beautiful R&B vocal and a violin section.’
You mention a separate mixing stage where you stem down the elements from the original project. How long did The Relic take?
“The Relic had the most versions out of any of the songs on the album as there’s just so much going on. The writing process itself didn’t take that long, maybe two to three days. But then the mixing was the endeavour, just the nature of the track being so sonically assaulting, it can be quite ear fatiguing when in a mixing situation.
"I ended up having to take lots of breaks on it then come back to it, because I’d notice on the days that I spent a lot of time trying to mix that song, I wouldn’t end up getting that far. I’m not super experienced and mixing live orchestral instruments, so I had to learn a lot with that as well. I thought it would be the best track to present to everybody through Future Music, as there was so much involved in it!”

Making The Relic’s Reeses using Ableton Live
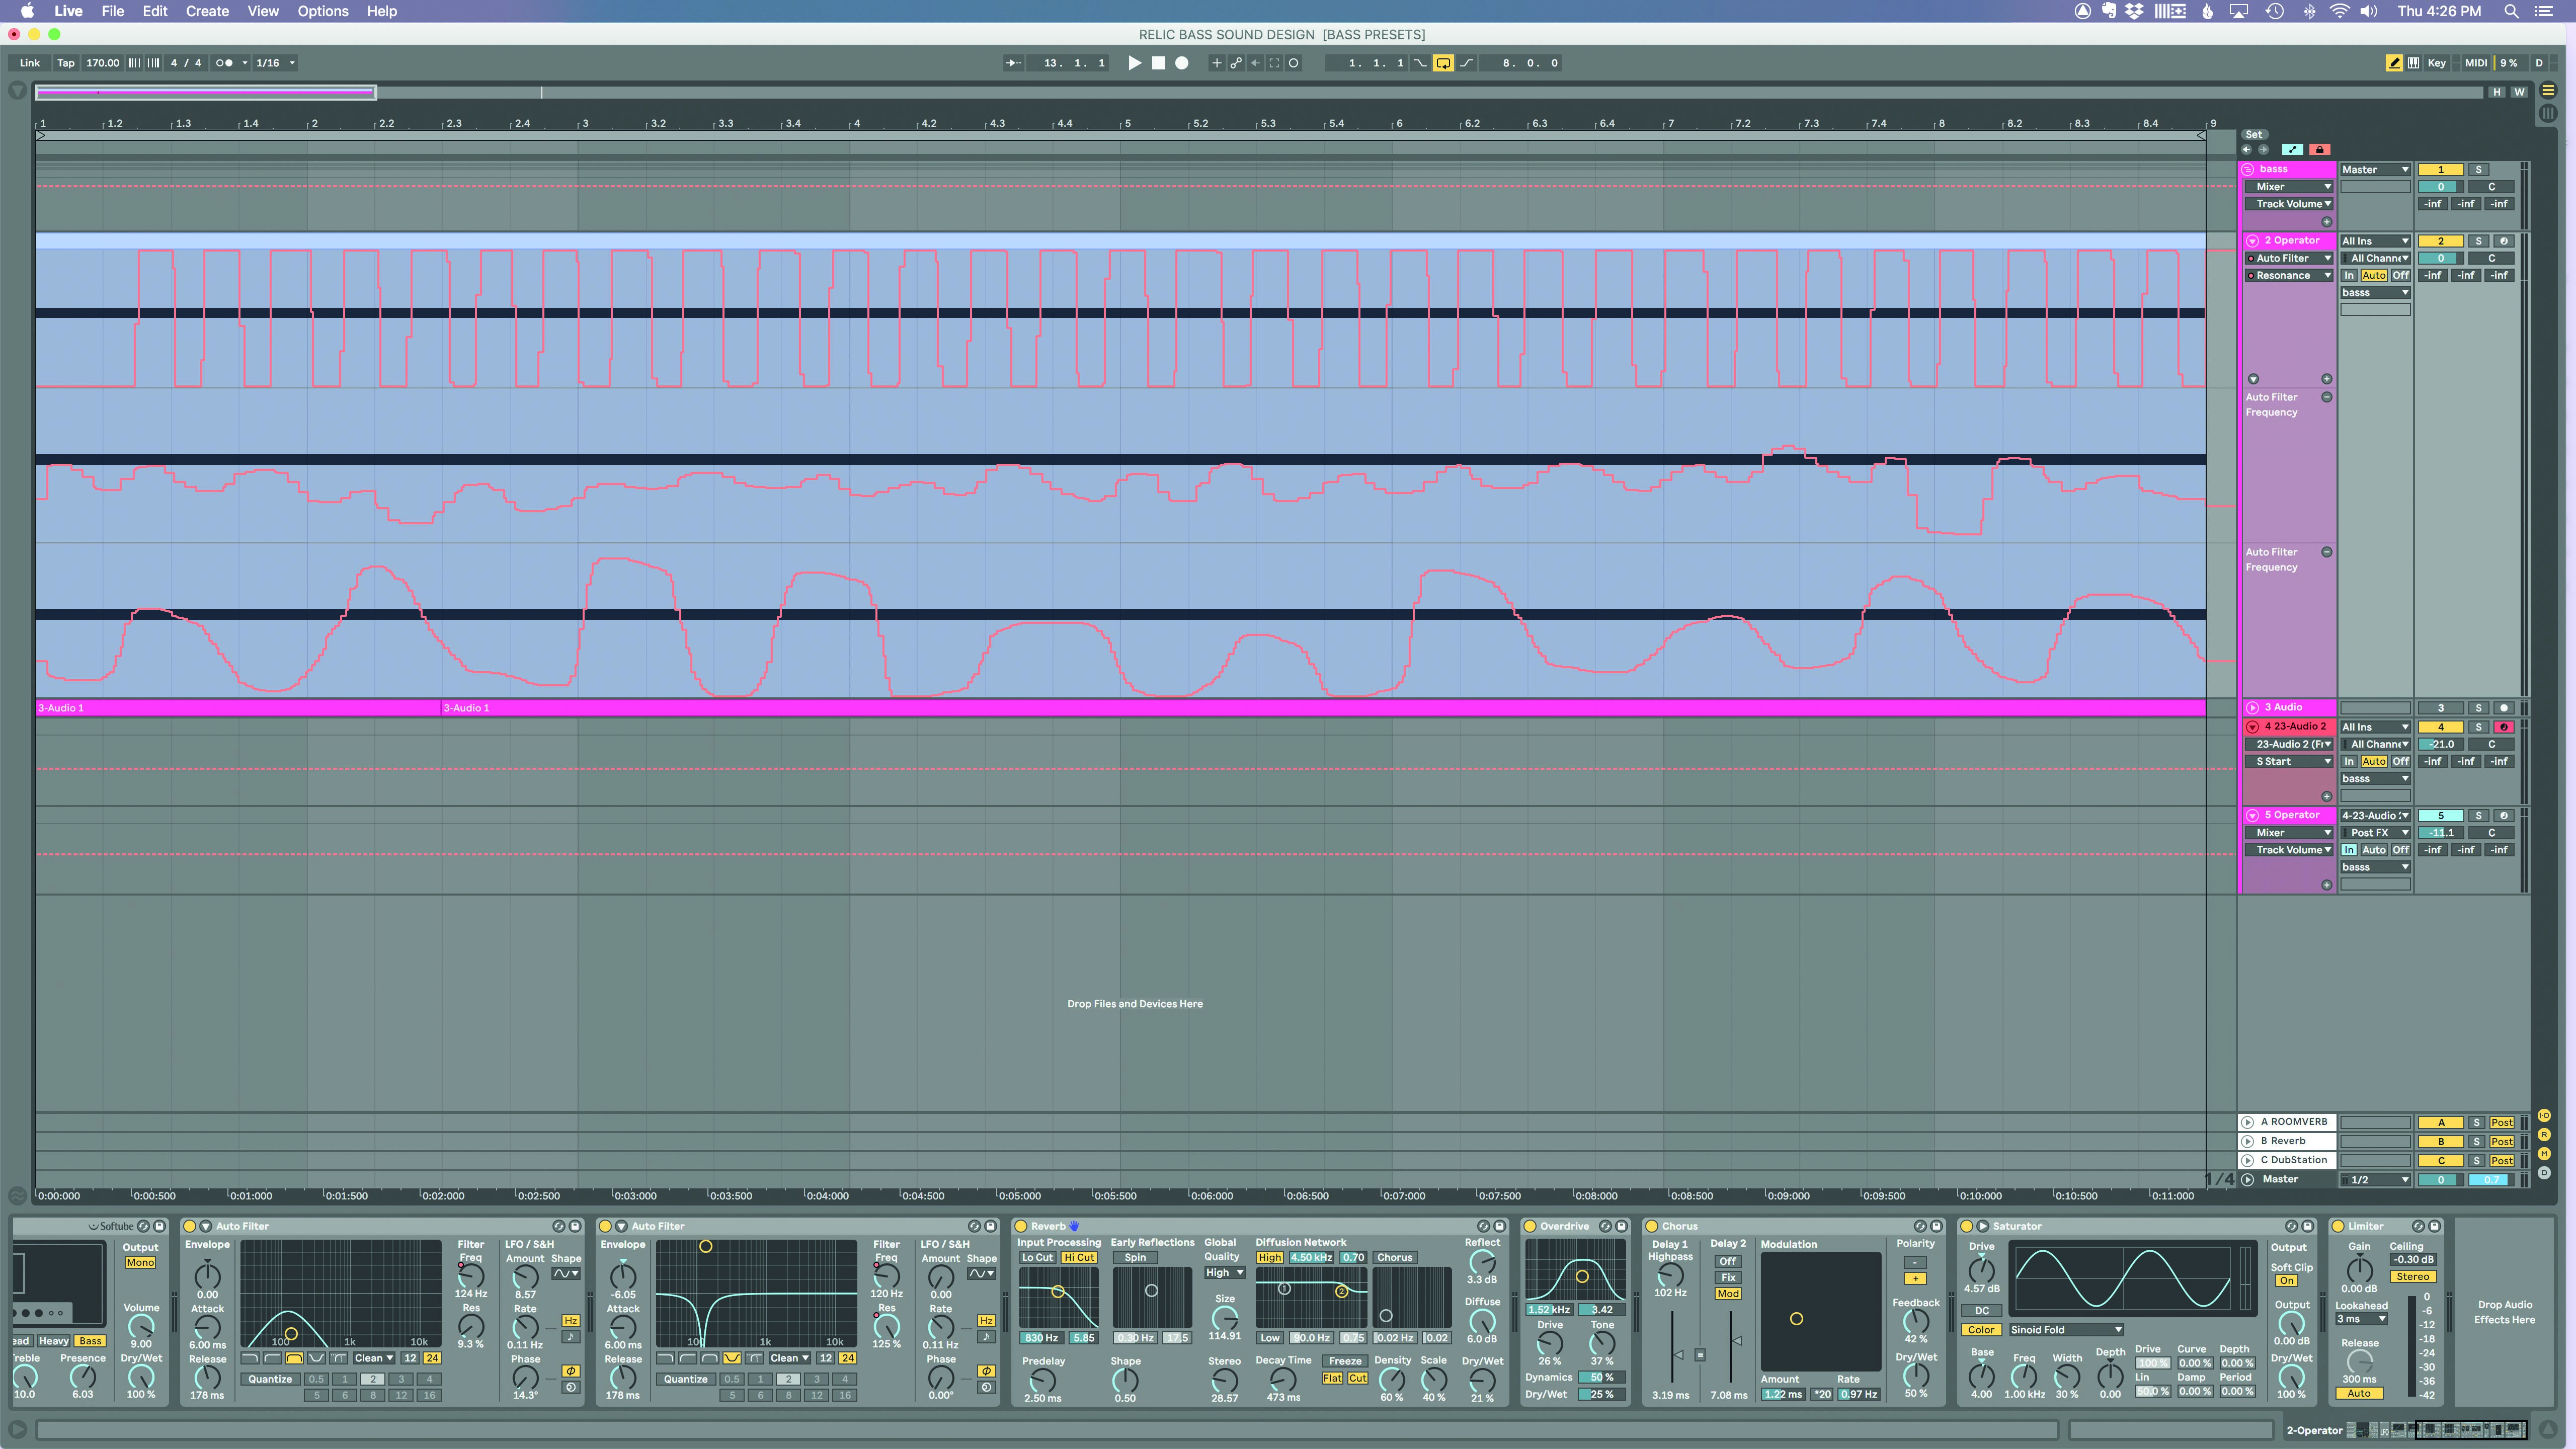
Travis makes a resampled Reese in its own dedicated project, before importing it into the track proper.
01> Operator

The sound starts with an Operator patch featuring a modulating oscillator with a Coarse setting of 4. The Level of the modulating oscillator is modulated by a Max for Live LFO set to a sine shape. This is run through Live’s Saturator in Waveshaper mode and an Amp effect set to Bass mode to add further harmonic interest.
02> Auto Filter

The signal is then filtered with an Auto Filter set to bandpass mode with an automated filter cutoff frequency. This is then filtered again with another Auto Filter this time set to notch mode, and this time both the Frequency and Resonance are automated.
03> Overdrive

This is followed with Live’s Overdrive to add yet more harmonic richness, a Reverb, a Chorus, and another Saturator set to Sinoid Fold. This is followed by a Limiter to control the signal’s amplitude level. “It’s really up to you how you want to do this, the goal is to make a chain that’s constantly warping the sound,” reveals Travis.
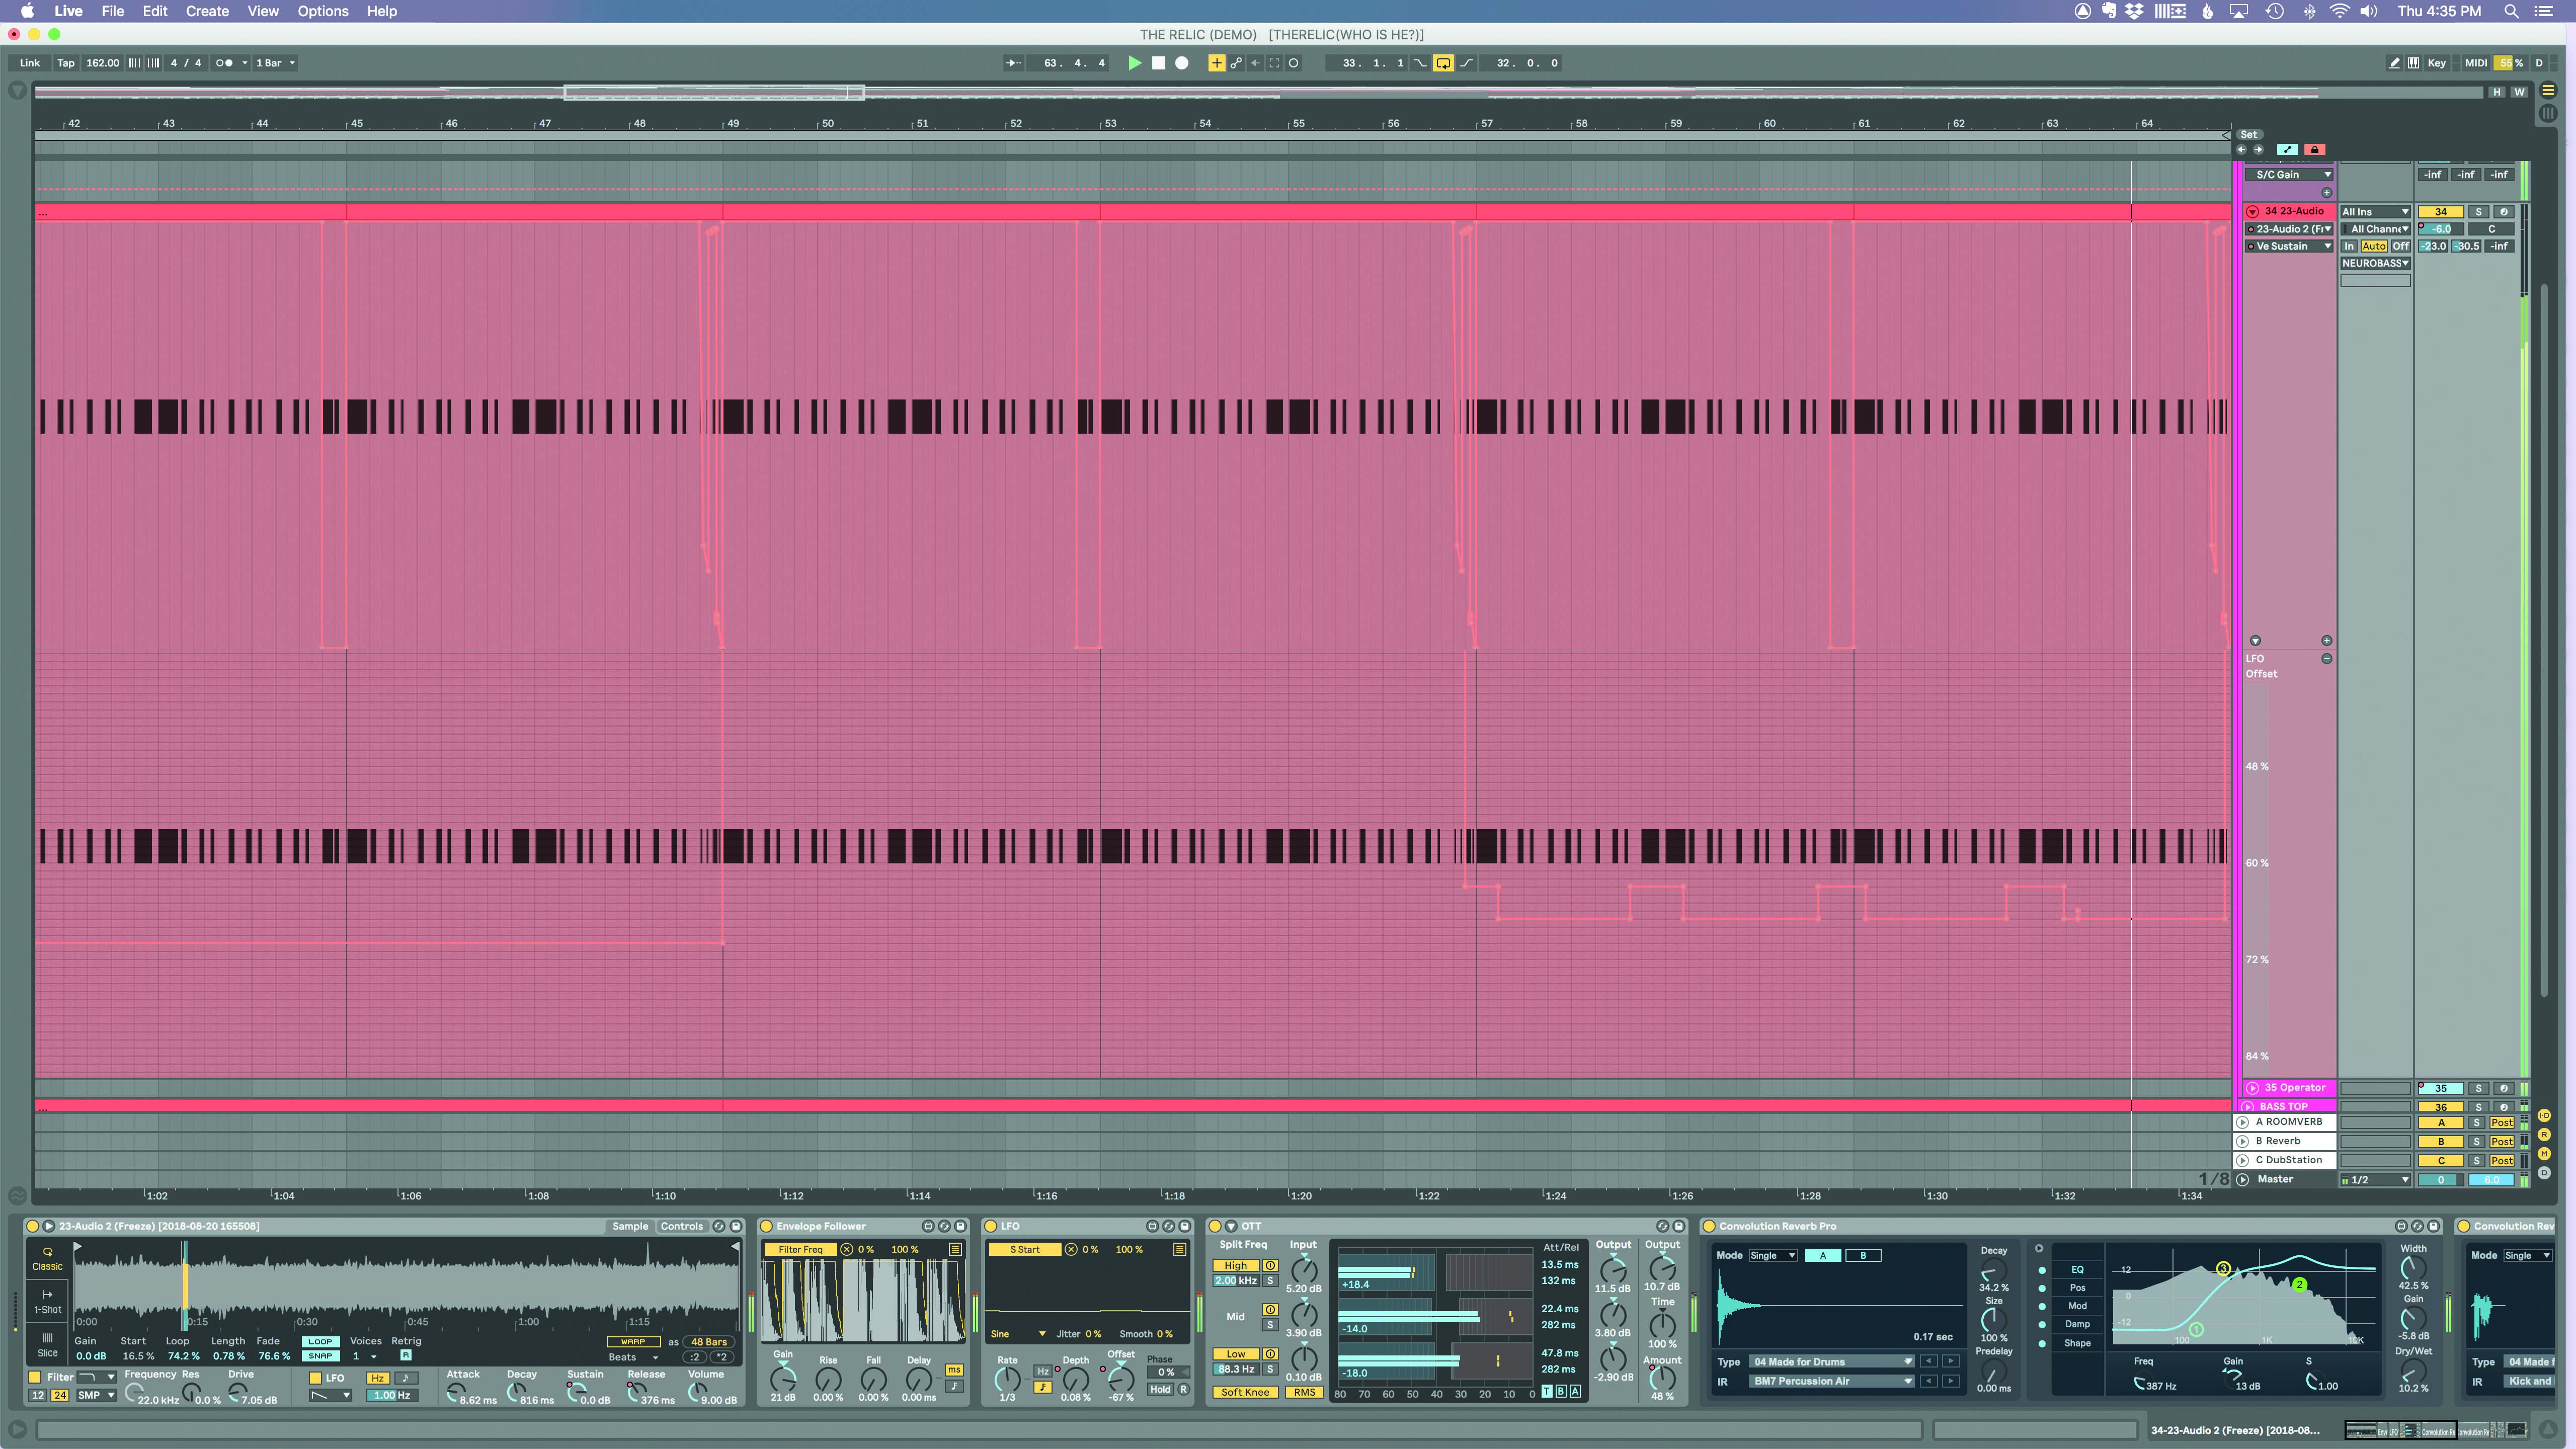
04> Simpler

Travis bounces a long note with plenty of filter modulation to a sample, which is loaded into an instance of Simpler in the main project. Max for Live’s Envelope Follower is set to control the frequency cutoff of Simpler’s filter, and the LFO modulates the start point of the sample.
05> OTT and more

The LFO’s offset is automated to change the character of the Reese, and the audio is run through Multiband Dynamics’ OTT preset, two Max for Live Convolution Reverb Pros. This signal is then limited with Limiter, its stereo width is reduced by Utility, and EQ Eight rolls off the bass frequencies.
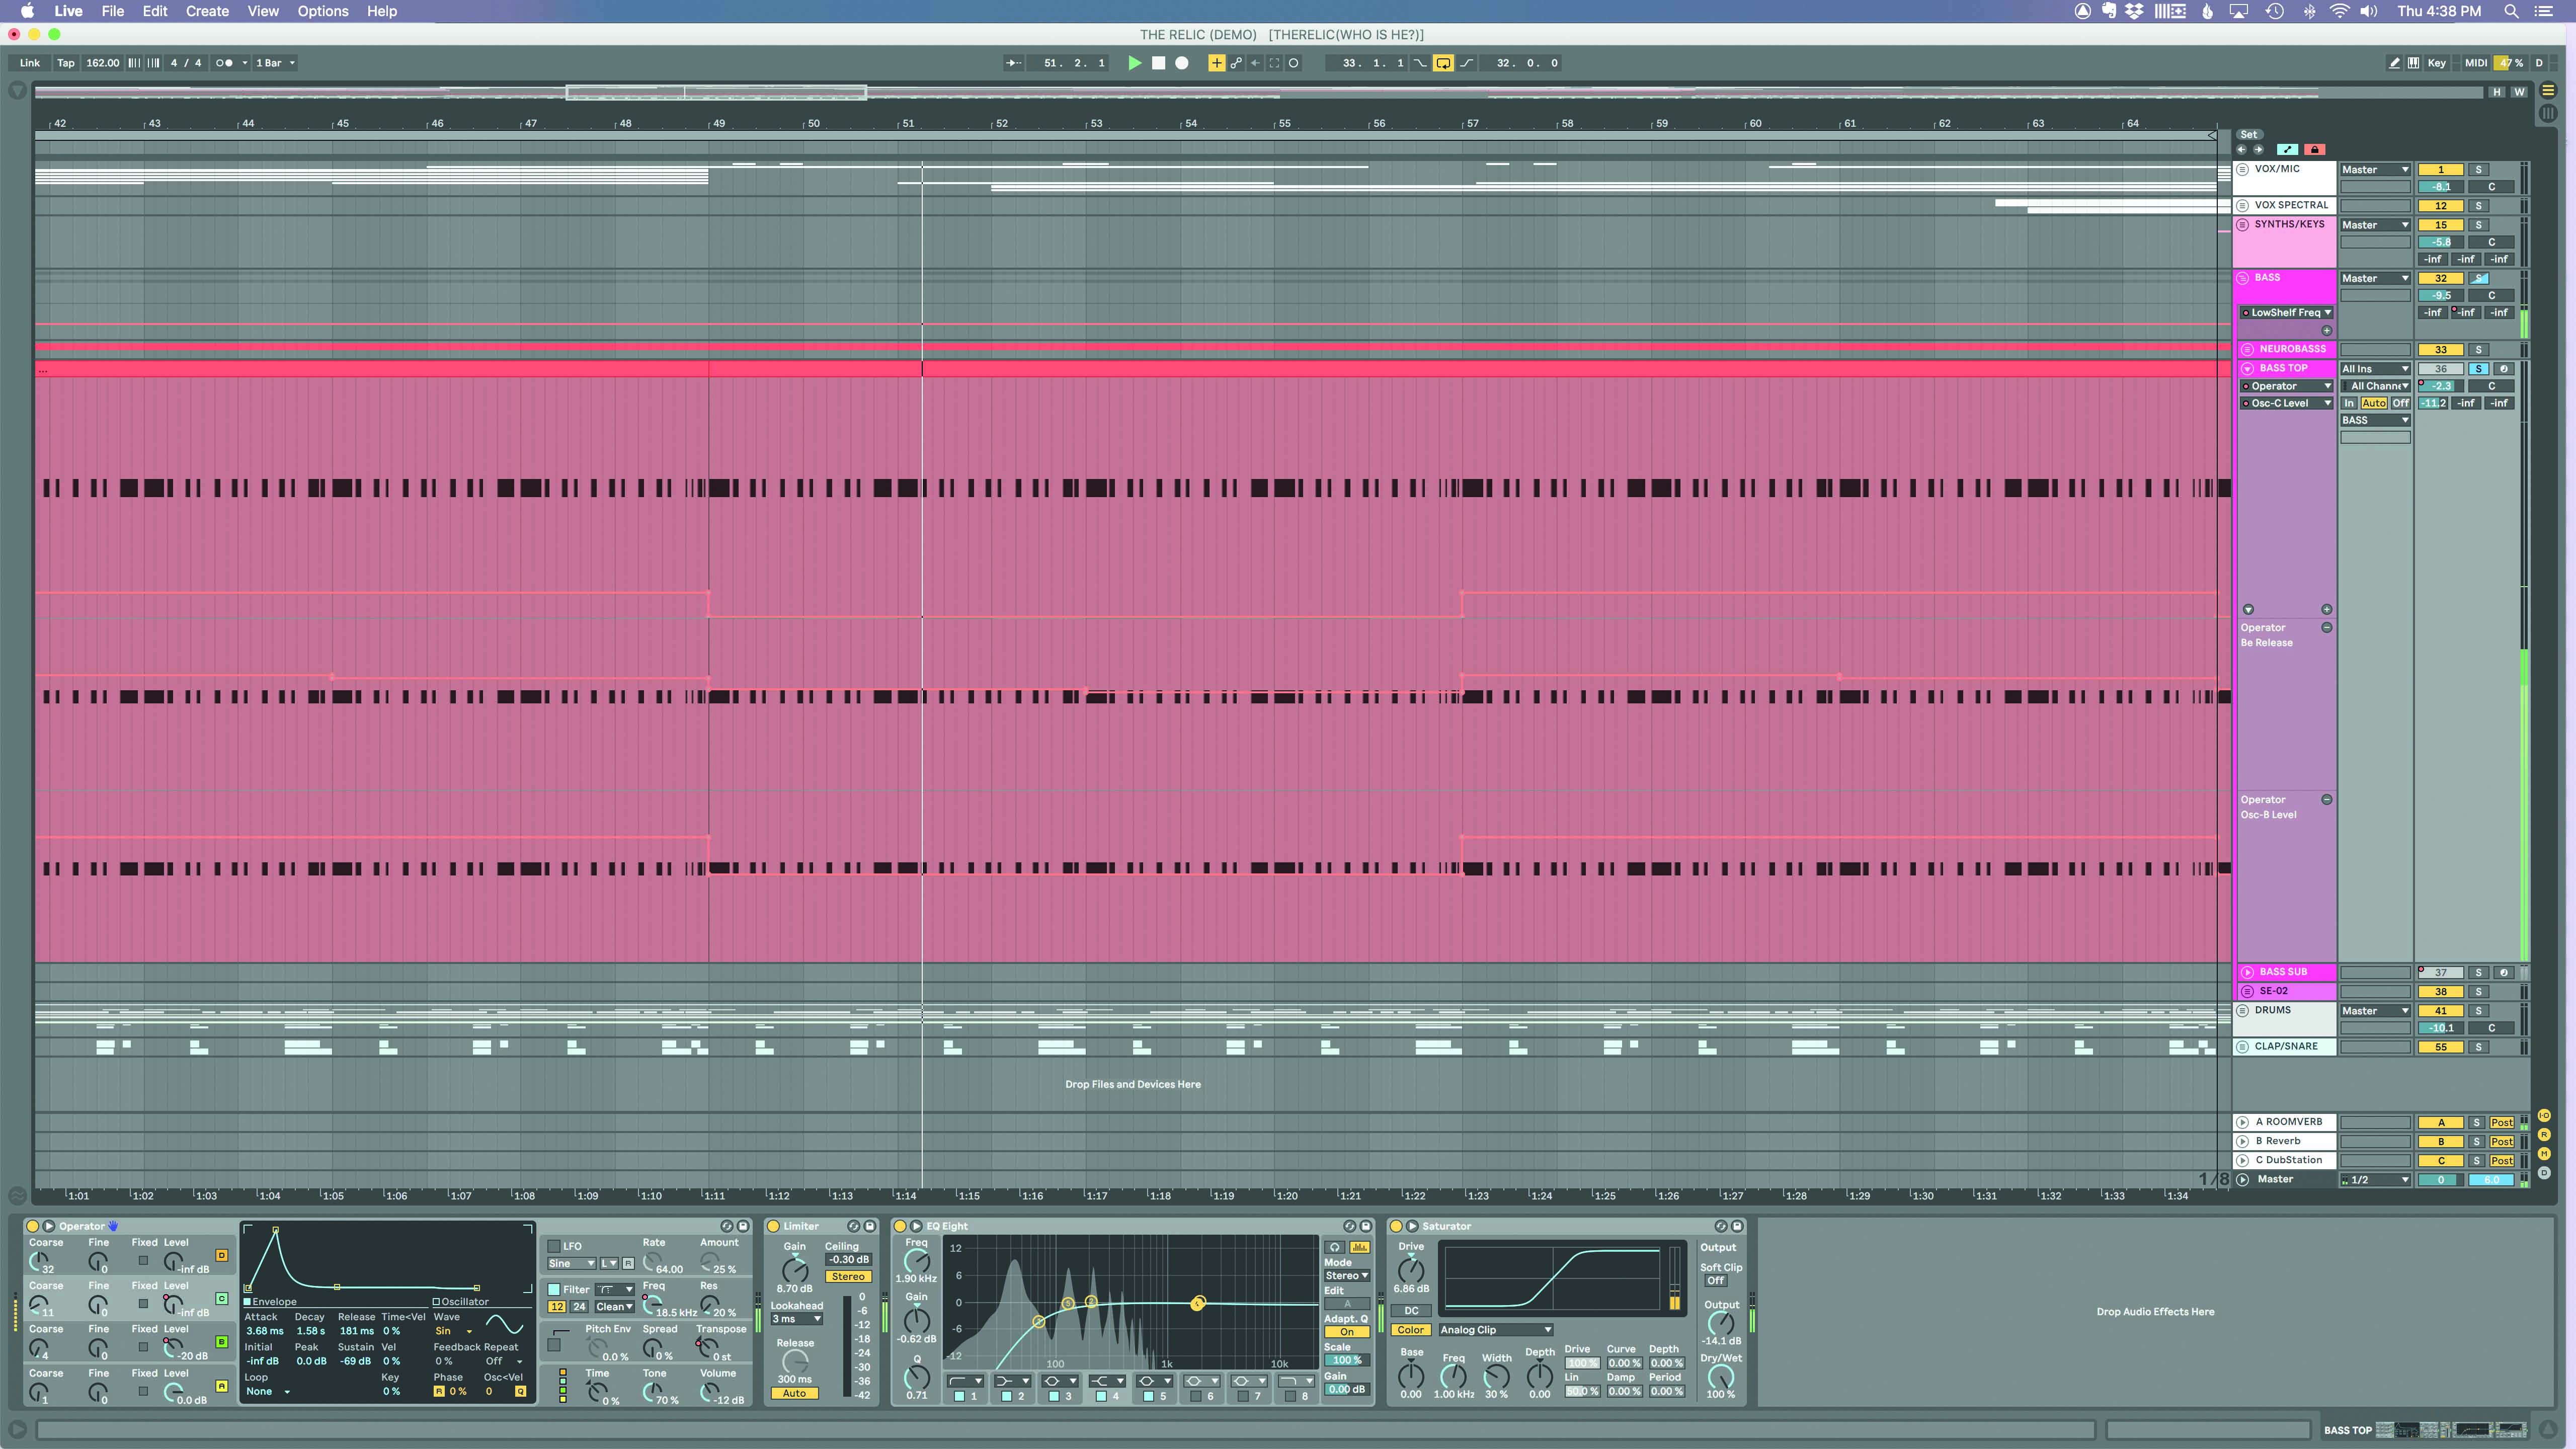
06> "Unnecessary"

The filtered bass frequencies are replaced with two instances of Operator playing sub-style patches. “Unnecessary, but this kind of thing happens in creative mode!” Travis notes. There’s an additional top layer with another instance of Operator playing a ‘donk’ patch, and all four bass tracks are processed further together on their group.


Future Music is the number one magazine for today's producers. Packed with technique and technology we'll help you make great new music. All-access artist interviews, in-depth gear reviews, essential production tutorials and much more. Every marvellous monthly edition features reliable reviews of the latest and greatest hardware and software technology and techniques, unparalleled advice, in-depth interviews, sensational free samples and so much more to improve the experience and outcome of your music-making.
