The producer's guide to iZotope Neutron 4
Go in-depth with the new modules and features in iZotope’s AI-assisted mixing package
Neutron has come a long way since its first versions, and iZotope’s flagship mixing package now sports a wide array of tools for perfecting almost any signal.
As well as components like the Tonal Balance Control and Visual Mixer (added for version 3), Neutron goes beyond simple channel strip functionality with its new Assistant View. This takes the AI technology we’ve come to expect from iZotope and rolls it into a more beginner-friendly take on the software, all without compromising on the power that’s behind the scenes.
Just because Neutron’s got an ‘easy mode’, doesn’t mean that you can’t still access the Master Quest version. The Detailed View is the new name for the comprehensive channel strip setup that should be familiar to previous Neutron users. All your favourite modules are here, toting their usual functions, although there are a couple of additions to widen
the scope.
Neutron’s Compressor now sports a Punch mode, aiming to cut through the technical side of dynamic range by removing any mention of Threshold and Ratio. This type rests somewhere between compressor/expander and transient shaper identities, then.
Neutron 4’s Exciter is much expanded, with extra distortion types from iZotope’s Trash distortion plugin, plus a couple of new ways to rein in the madness if you’ve gone too far. Just a few tweaks have led to the Exciter being one of the most interesting modules in the plugin. Also of particular note for this release, is the Unmask module.
Unmask
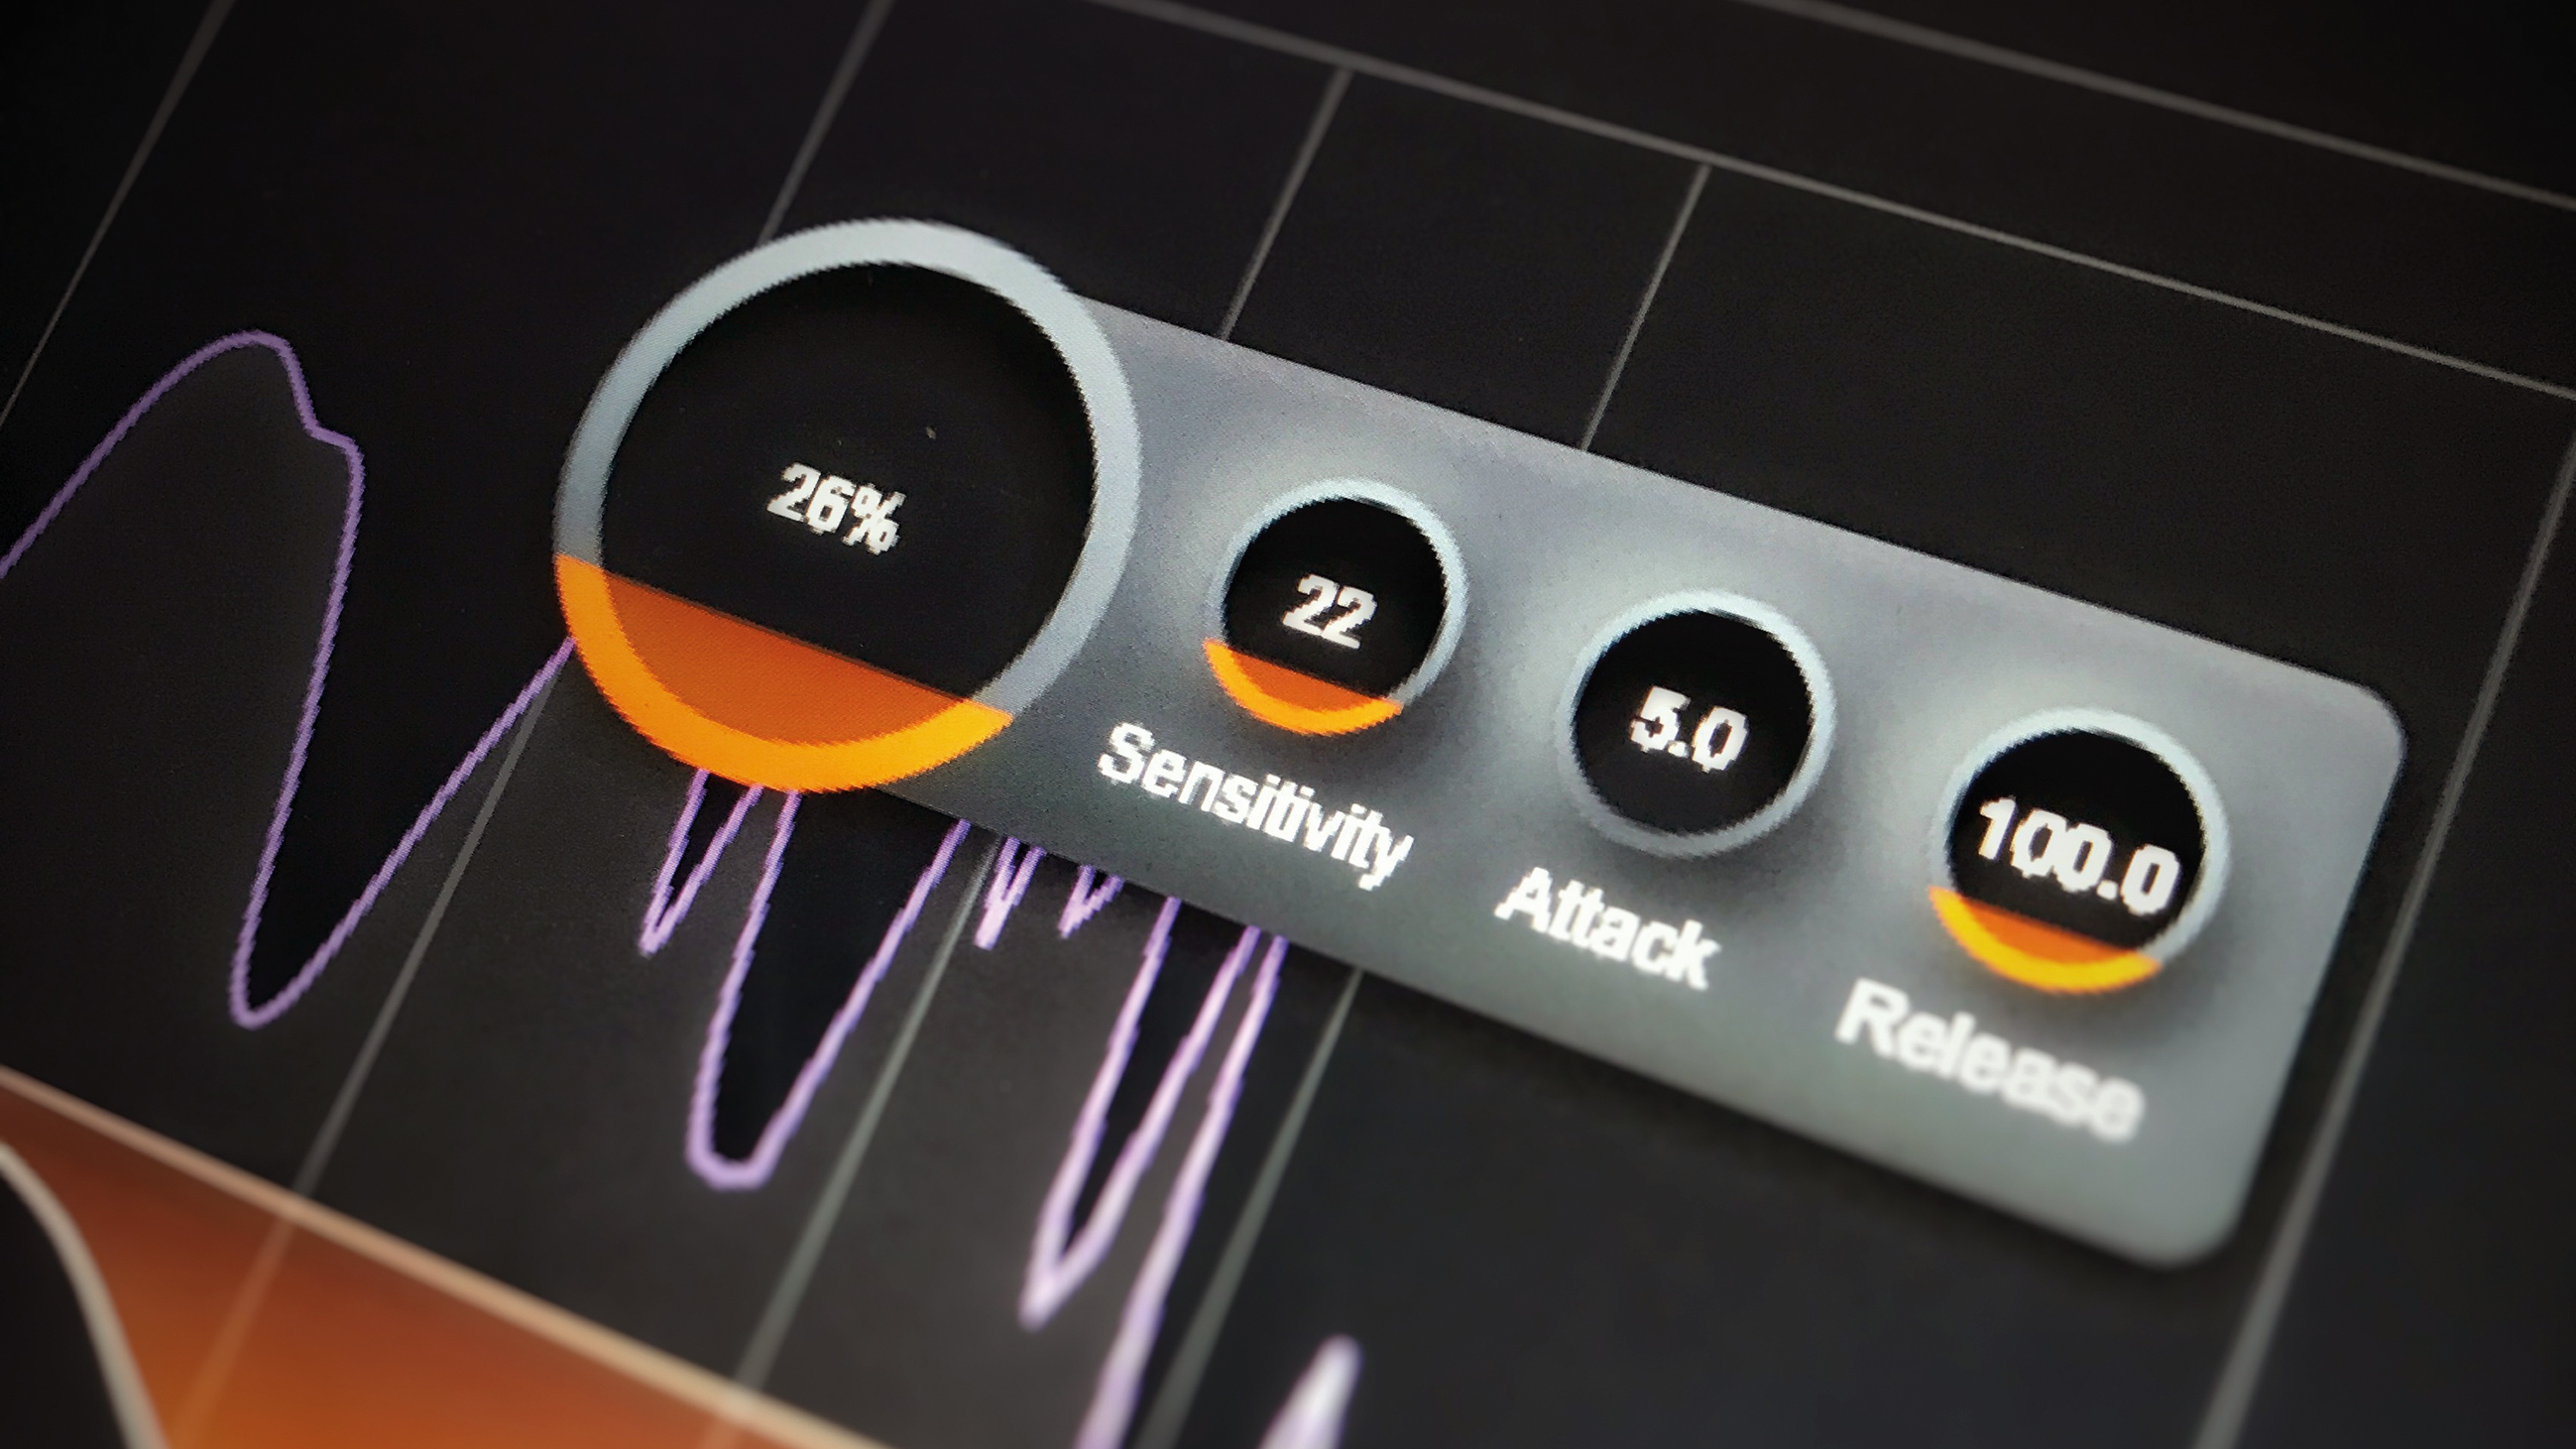
Processing one instrument to ‘move it out of the way’ of another is, practically speaking, the essence of what mixing is. With the Unmask module in Neutron 4, iZotope have, you could argue, created a one-stop-shop processor to instantly do just that. We’ll show you exactly how the Unmask module works in operation in our tutorial, but first, a few of the implications of this little device.
Especially since the Unmask module is available as its own plugin in addition to the Neutron-encapsulated version, a quick mix is very easy to lay down. The module works by splitting the signal into a large number of bands, and reducing each when that band is playing in the sidechained signal. To a point, this is very much like a dynamic EQ, but you’ll also notice the uneven shape of the cut (sharper towards lower frequencies), which is completely in line with how our ears perceive masking – where a sound will far more easily mask another if it’s lower in frequency.
Get the MusicRadar Newsletter
Want all the hottest music and gear news, reviews, deals, features and more, direct to your inbox? Sign up here.
The Unmask module is placed over the signal that you want sculpted, and the signal you want to make space for is connected to Unmask as its sidechain input. When there’s a single sidechain input available, there are some limits to the effectiveness of a single Unmask module, but with a dedicated plugin version available (except in Neutron Elements), there’s room to set up trickier networks with multiple instruments ducking multiple other instruments.
Quick mixing with Neutron 4's Unmask module
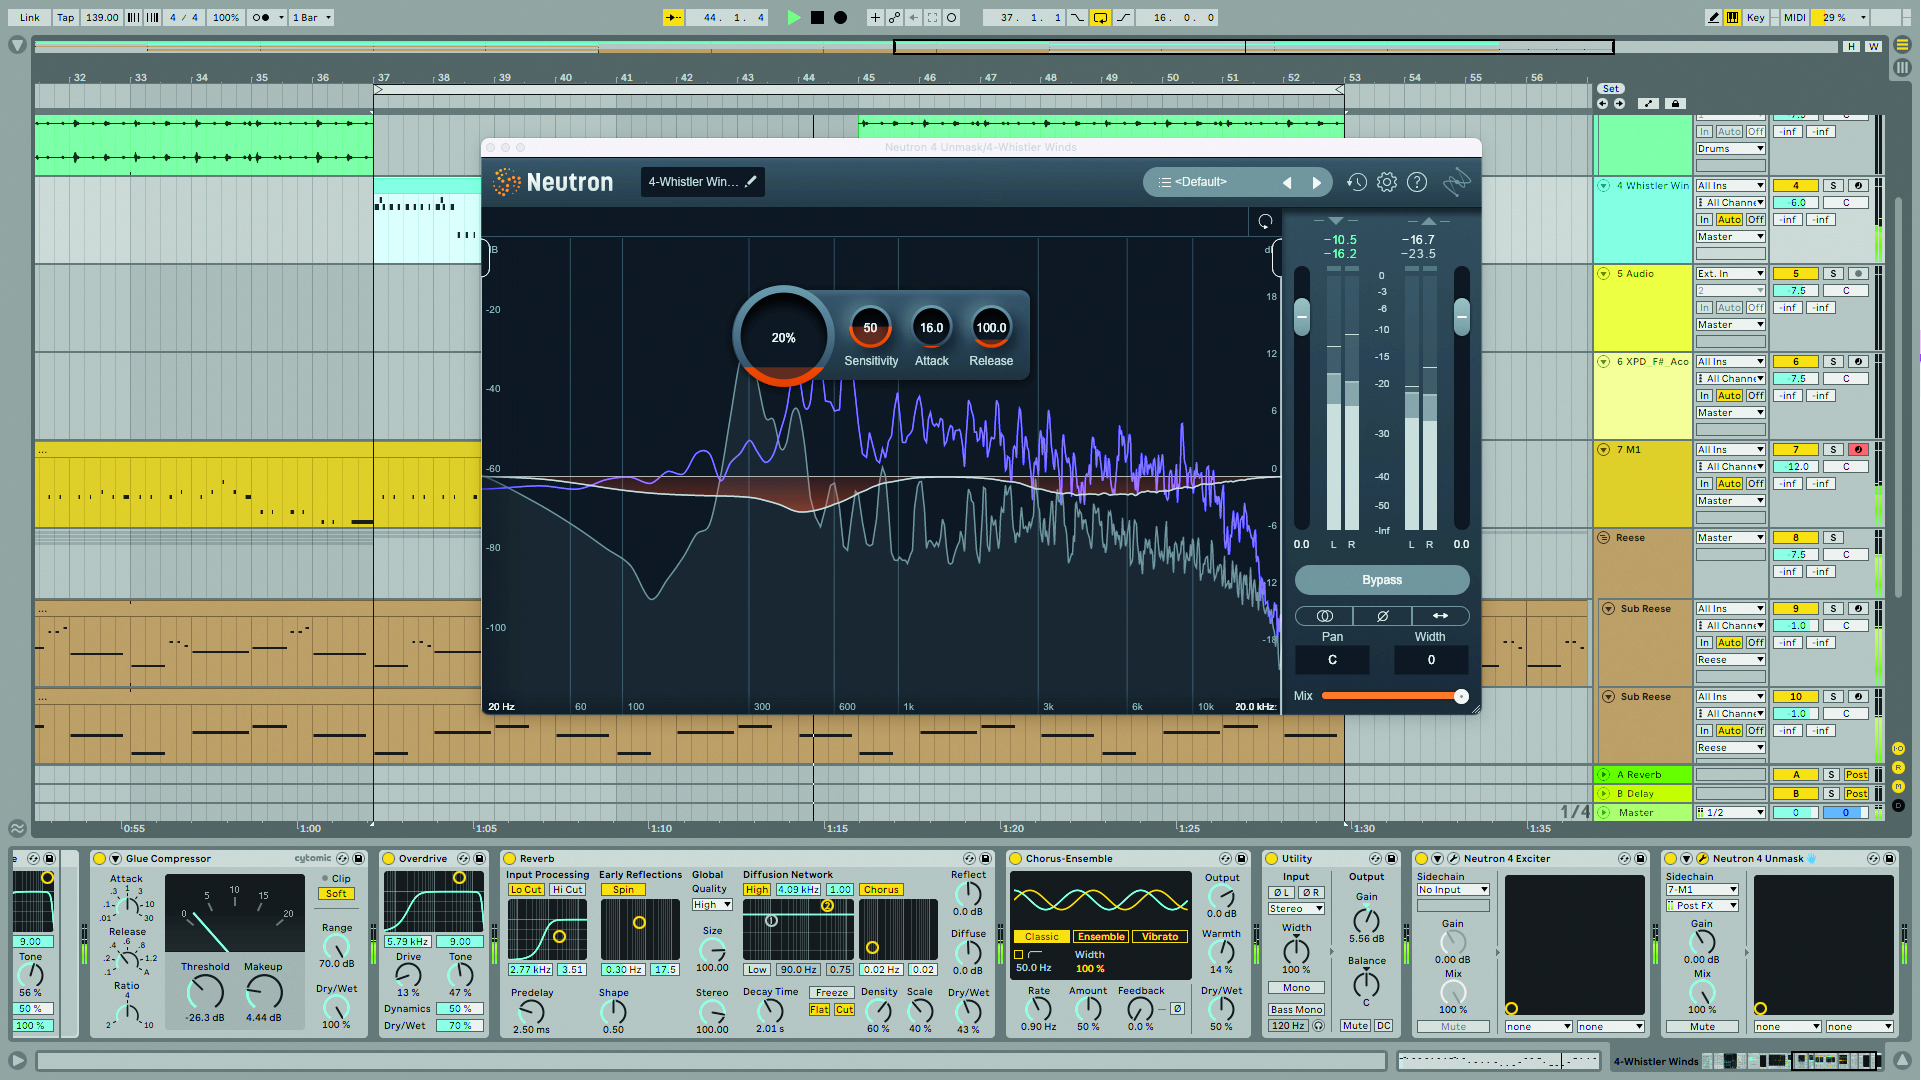
Step 1: Start by inserting Neutron and its Unmask module (or simply the Neutron Unmask plugin, if you have it) on the track you want to make some space on. The track you want to make space for should be routed into the plugin’s sidechain input.
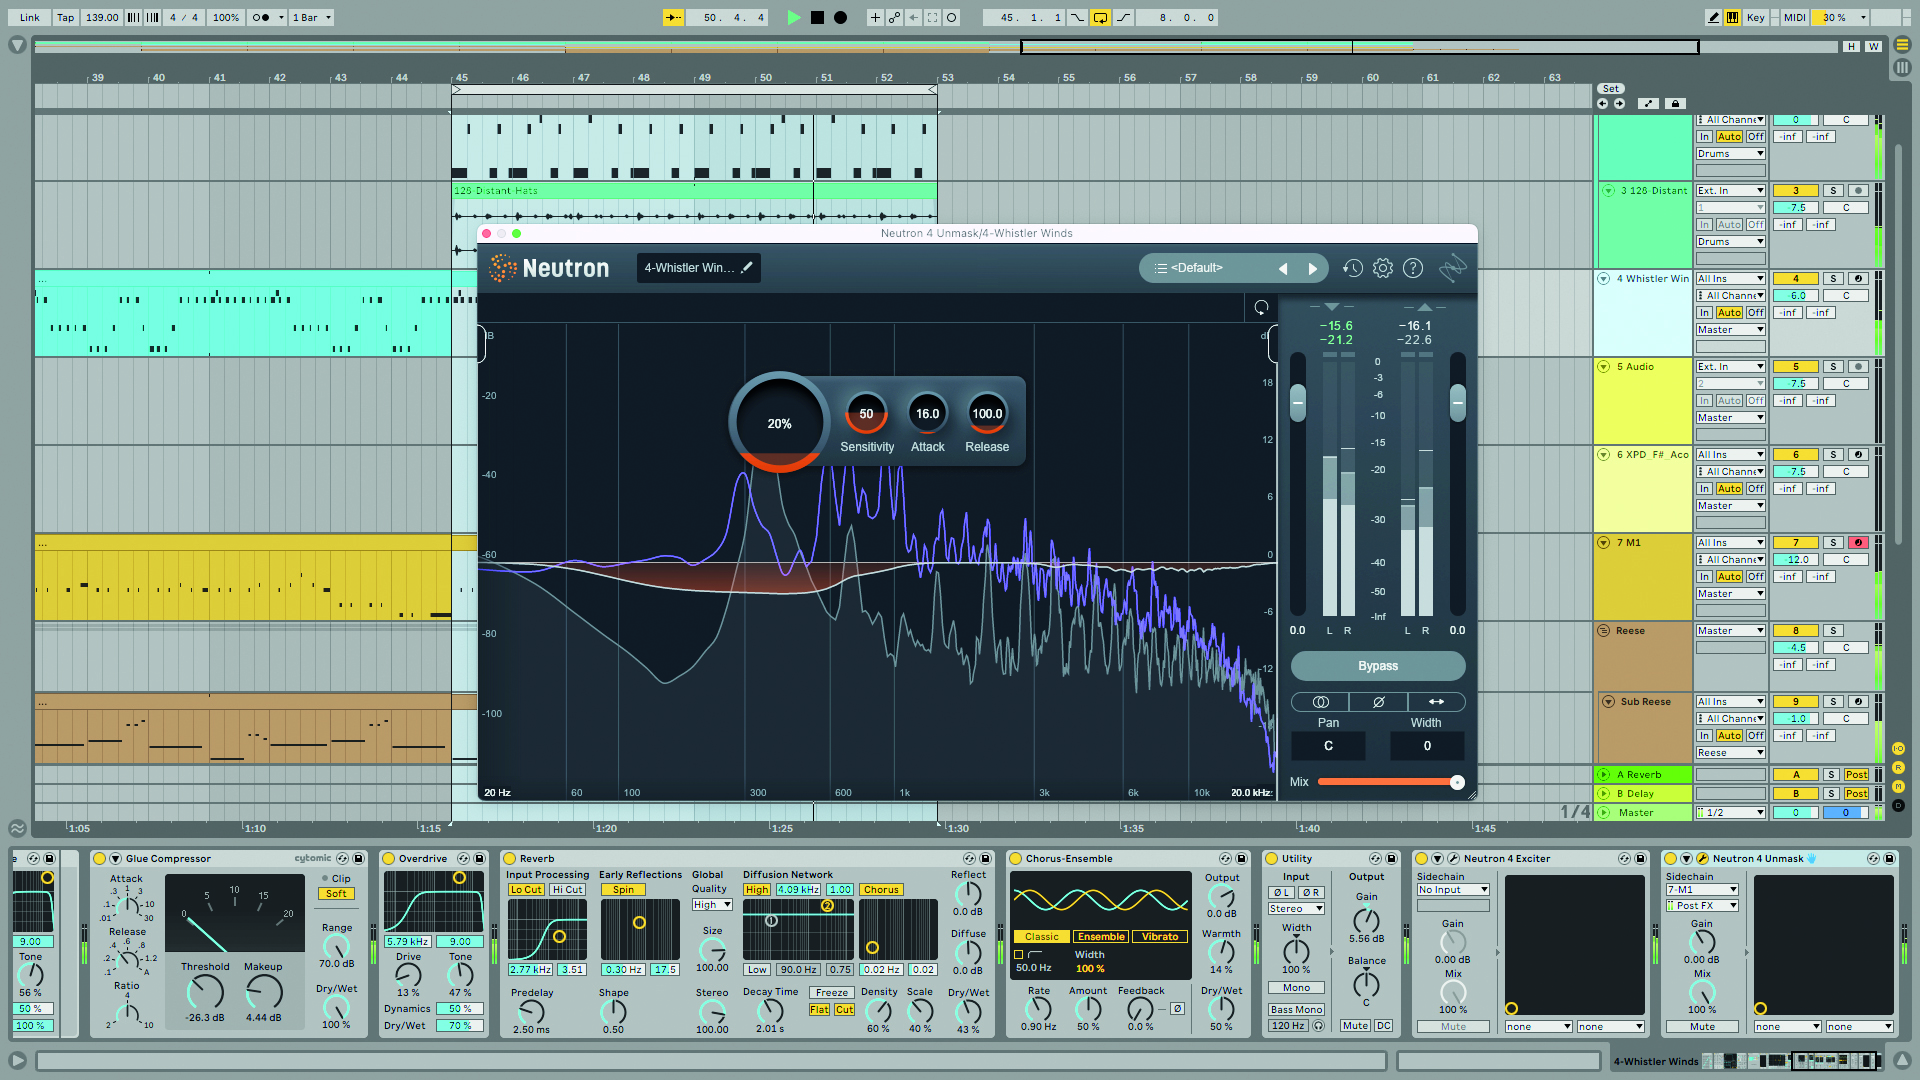
Step 2: Immediately, playing the project back should give you a reaction in the Unmask module. The cuts made are directly related to the presence of the signal in the sidechain input, and you should be able to hear an instant difference when bypassing.
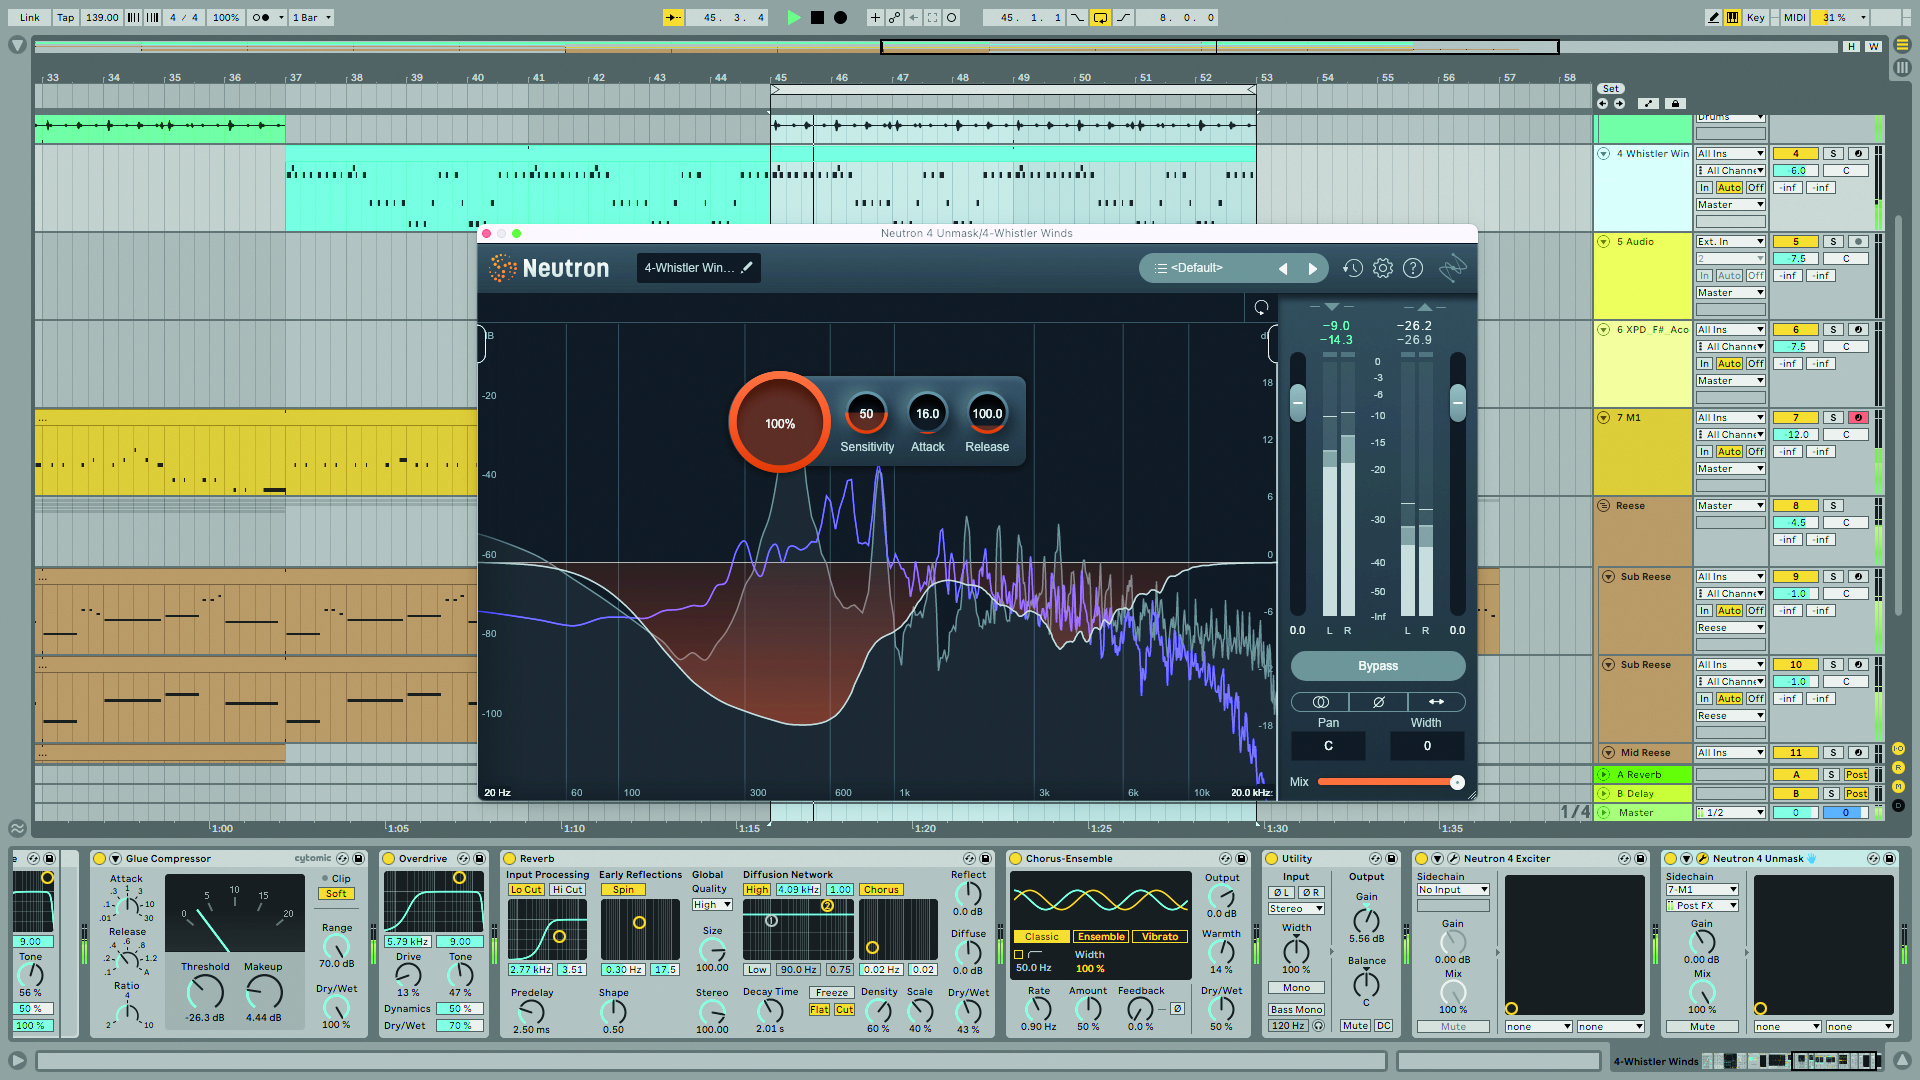
Step 3: The ‘amount’ control (the main circular knob) makes this processing more or less intense. It’s unlikely you’ll want to crank it all the way to the top, as there’s more chance for artefacts to occur in the signal being processed.
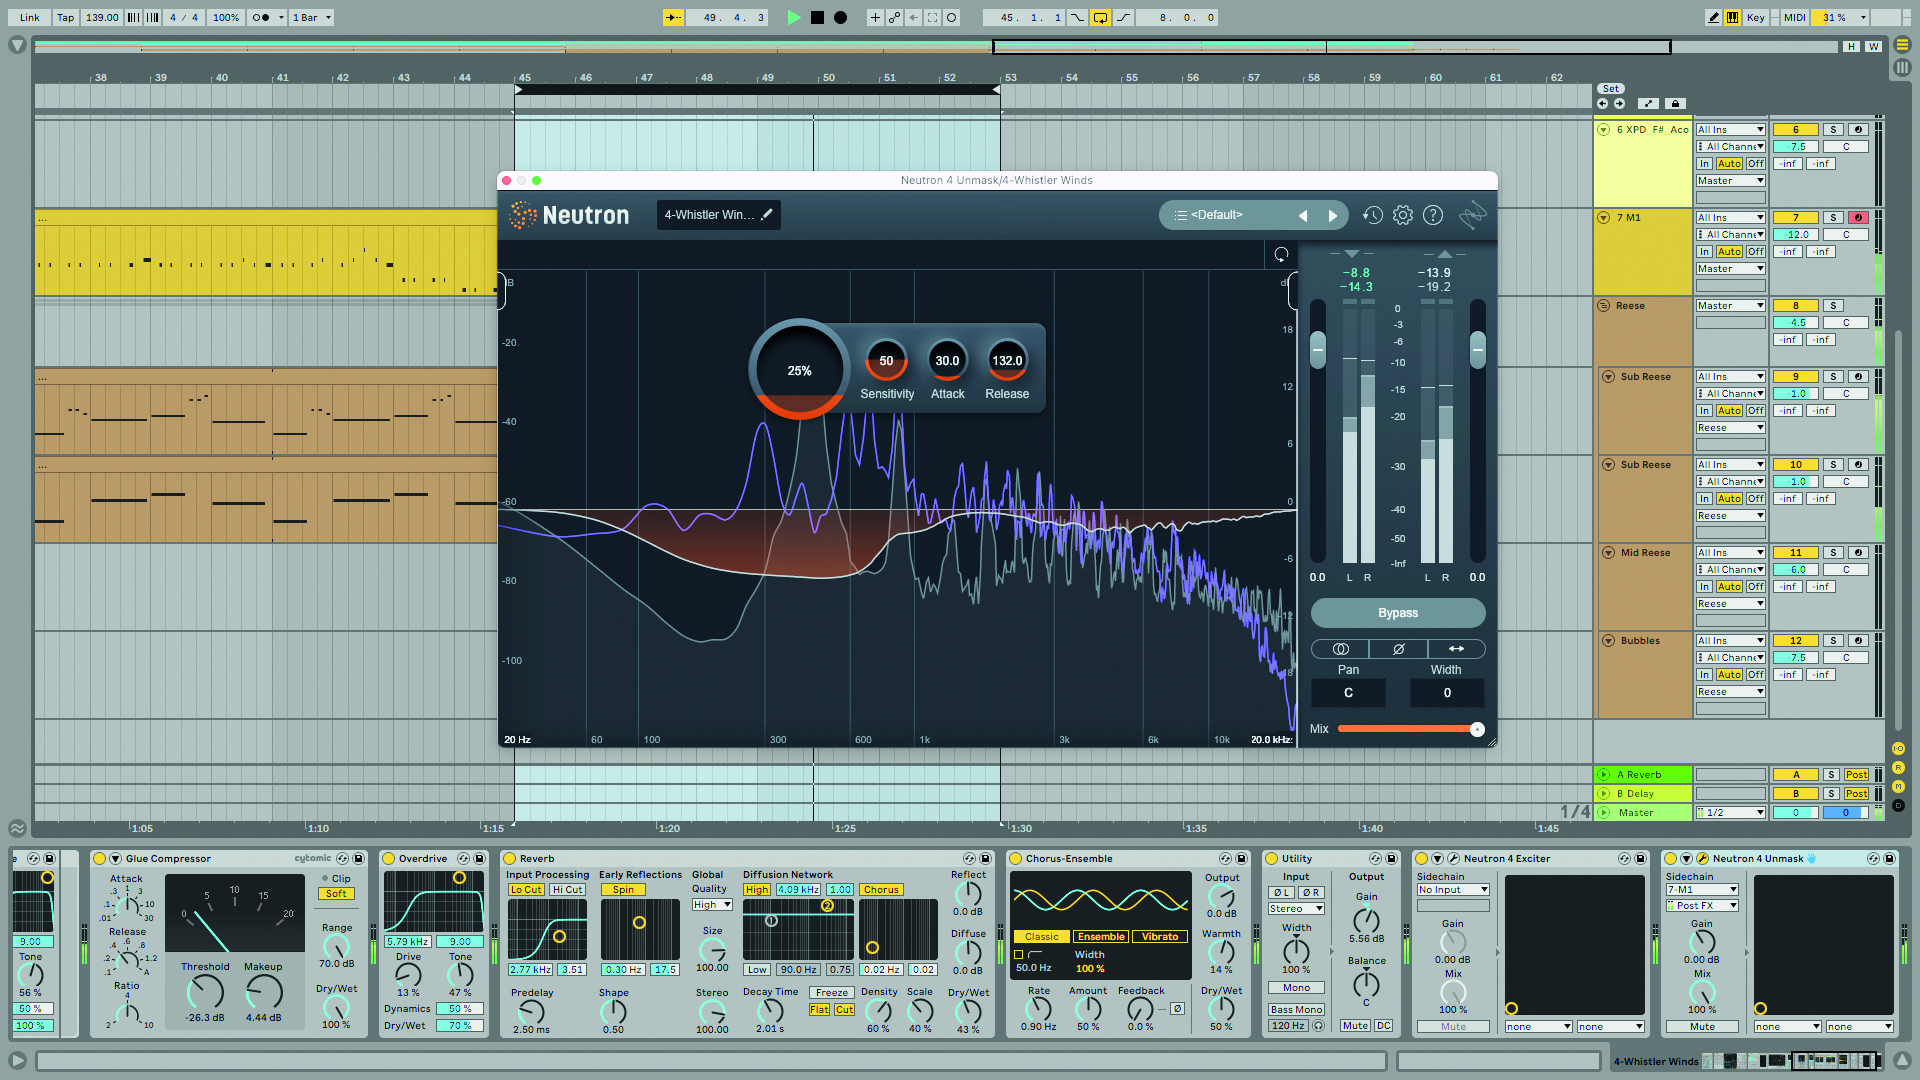
Step 4: Attack and Release controls help you get the timing right. For harsher unmasking, you might want a quicker Attack; and the Release time depends on exactly what you’re up to. This part is particularly reminiscent of a dynamic EQ setup.

Step 5: Setting Attack and Release times short is a way into another use of the plugin – as a processor for getting kick and bass to groove together. Faster times work for a more transparent kick when it’s sidechained in on the bass channel.
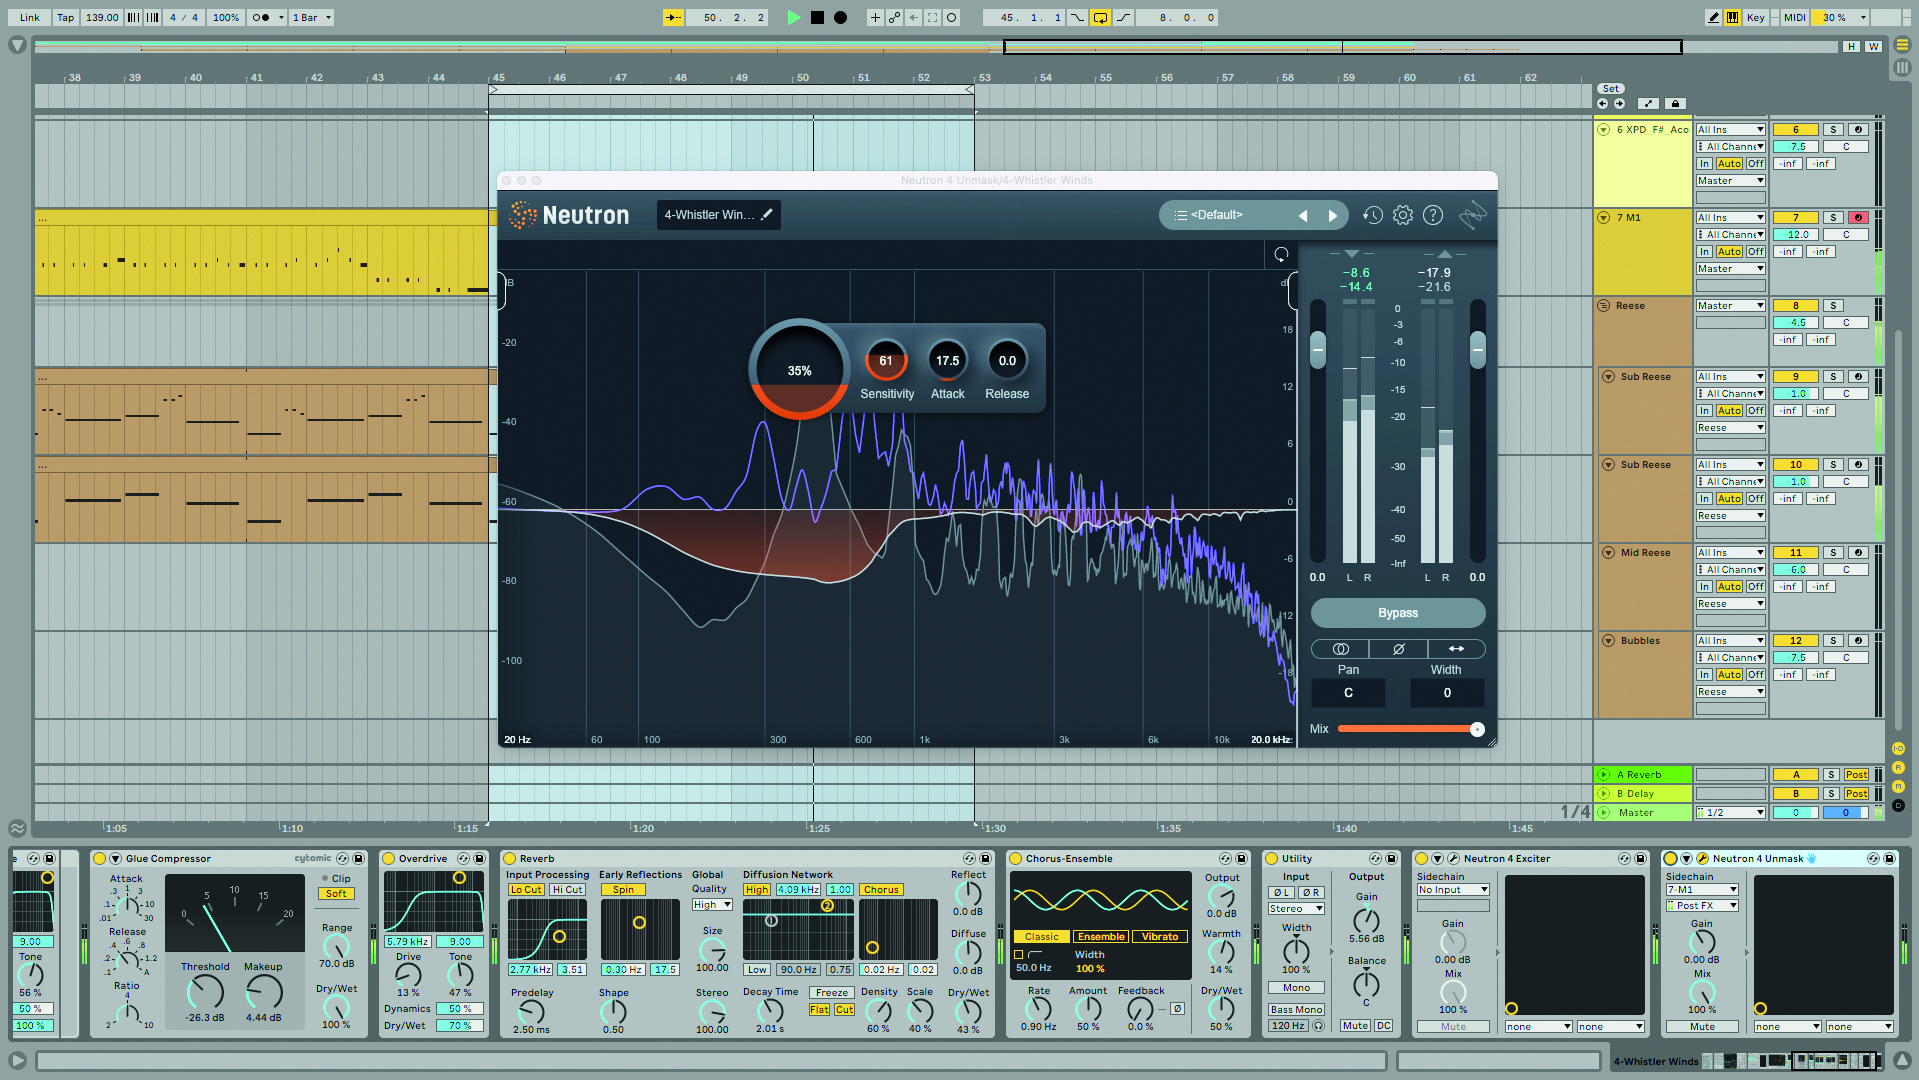
Step 6: Sensitivity increases how easily the Unmask module is triggered. Balance it alongside the Amount control once you’ve set everything else up. High- and low-pass filters help restrict the effect to certain frequencies – great for kick and bass.
Exciter
The Exciter module has been heavily redeveloped for Neutron version 4. First up, there are four additional distortion modes to blend between using the X/Y display. These have been taken from iZotope’s Trash 2 distortion plugin, and they give a great selection of extra variety.
Elsewhere, the new Tone slider helps to weight the distortion type between low and high frequencies (or anywhere in between), serving as an emphasis control to target only the bands that you feel you need to. This allows more options in analogue-style saturation for the low end, screaming high-end distortion, or any number of midrange flavouring options for instruments or vocals.
Finally, a Tame button within the processor lets you reintroduce dynamics once you’ve obliterated them with over-the-top distortion. This is quite useful for retaining the character and drive of your chosen distortion but not fully swamping the sound in it.
Trashing it up with the Exciter
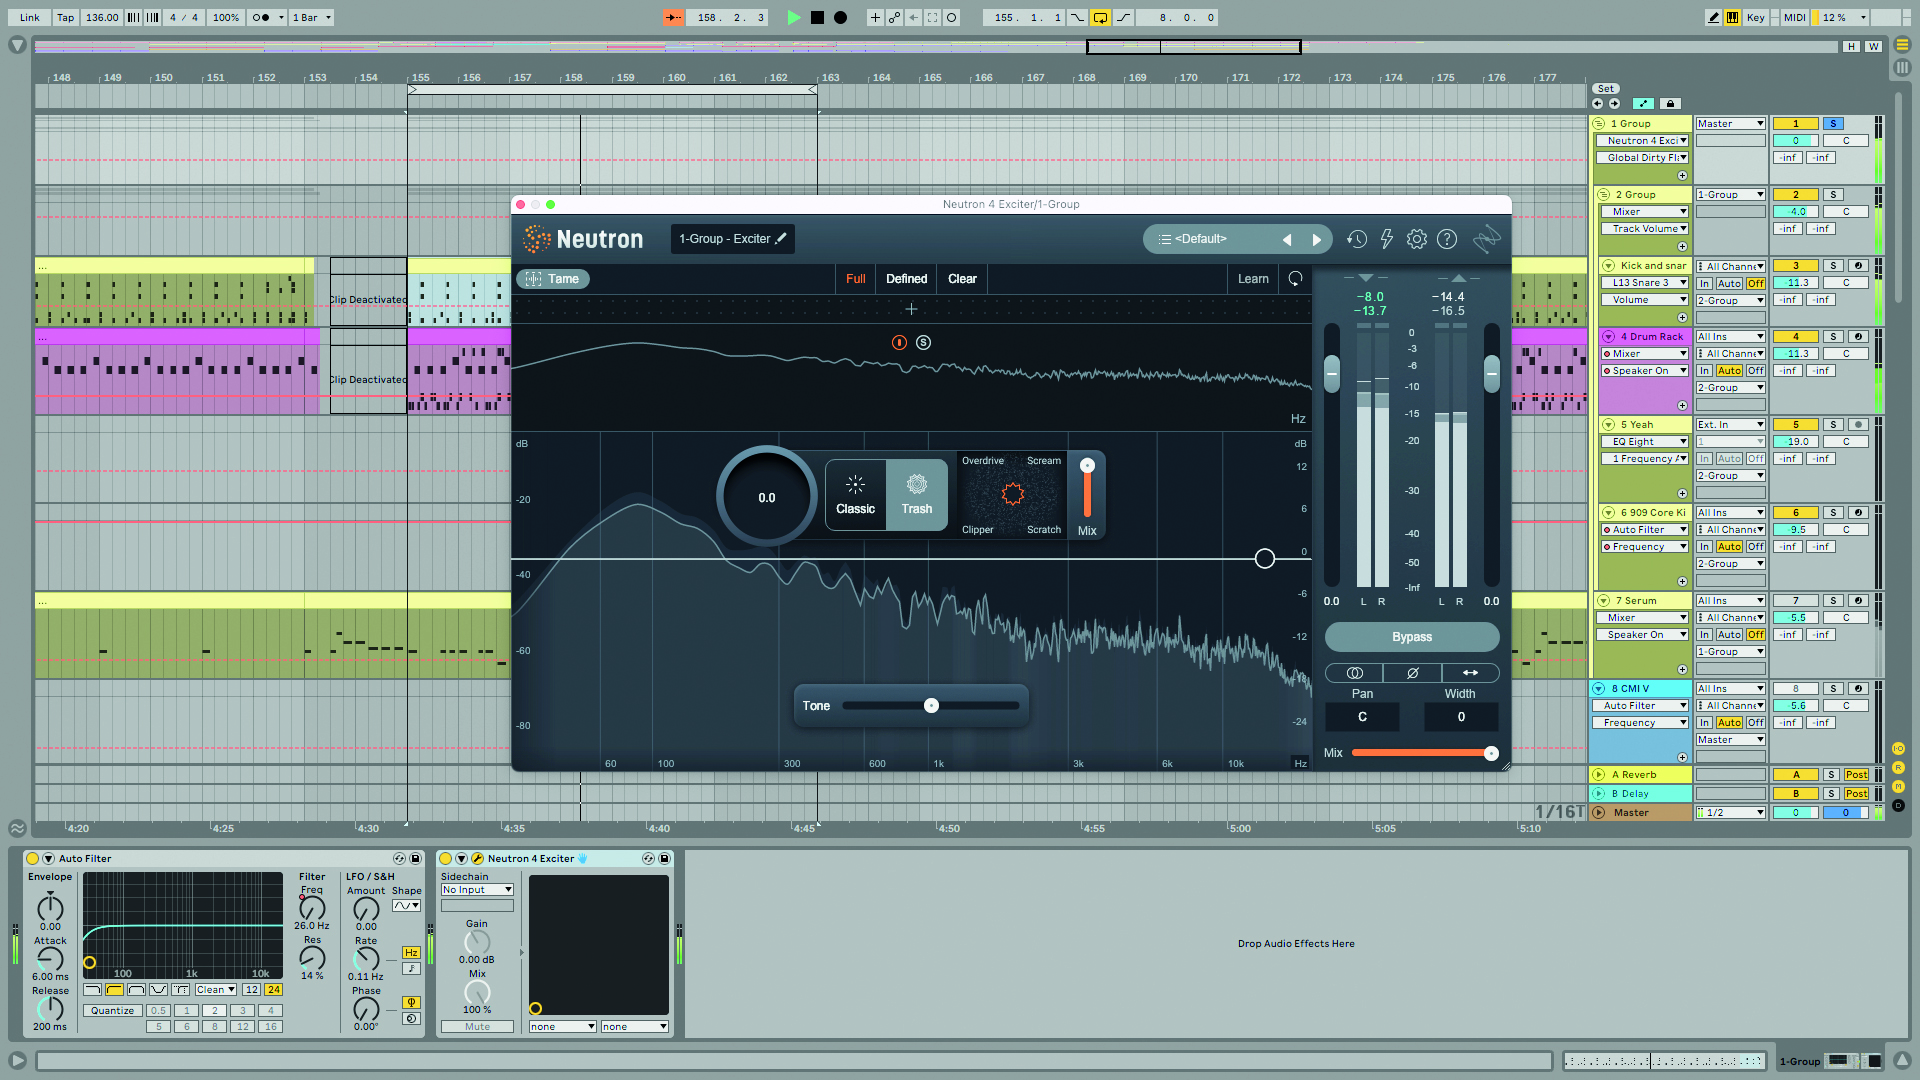
Step 1: The distortion options available in Neutron’s Exciter have doubled. In addition to the Retro, Tape, Warm and Tube options from before, click the Trash button to access Overdrive, Scream, Clipper and Scratch. It’s time to blend…
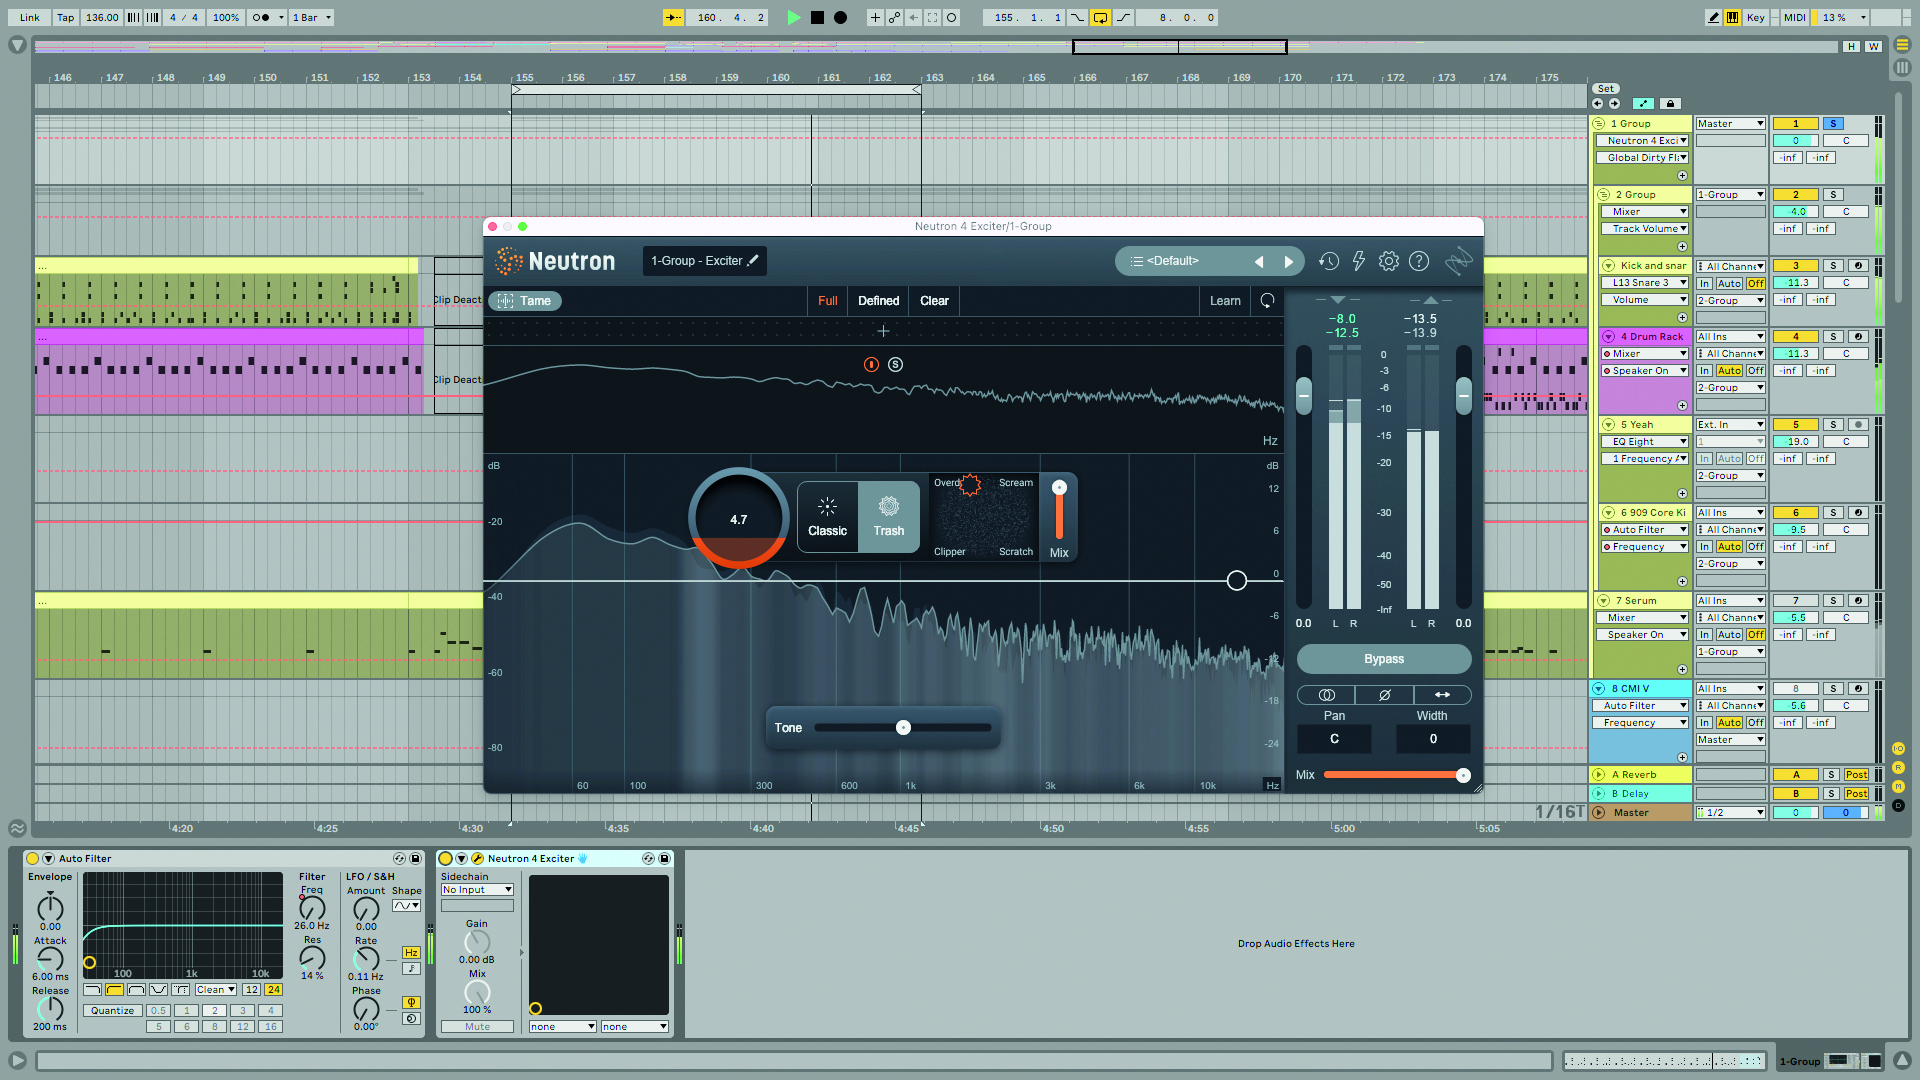
Step 2: Overdrive gives you that transistor flavour with a fuzzy sustain to add weight. Scream can be a squelchier distortion that clouds clear signals or bulks up already-capable ones. Anything between these two gives a balance between hiss and grumble.
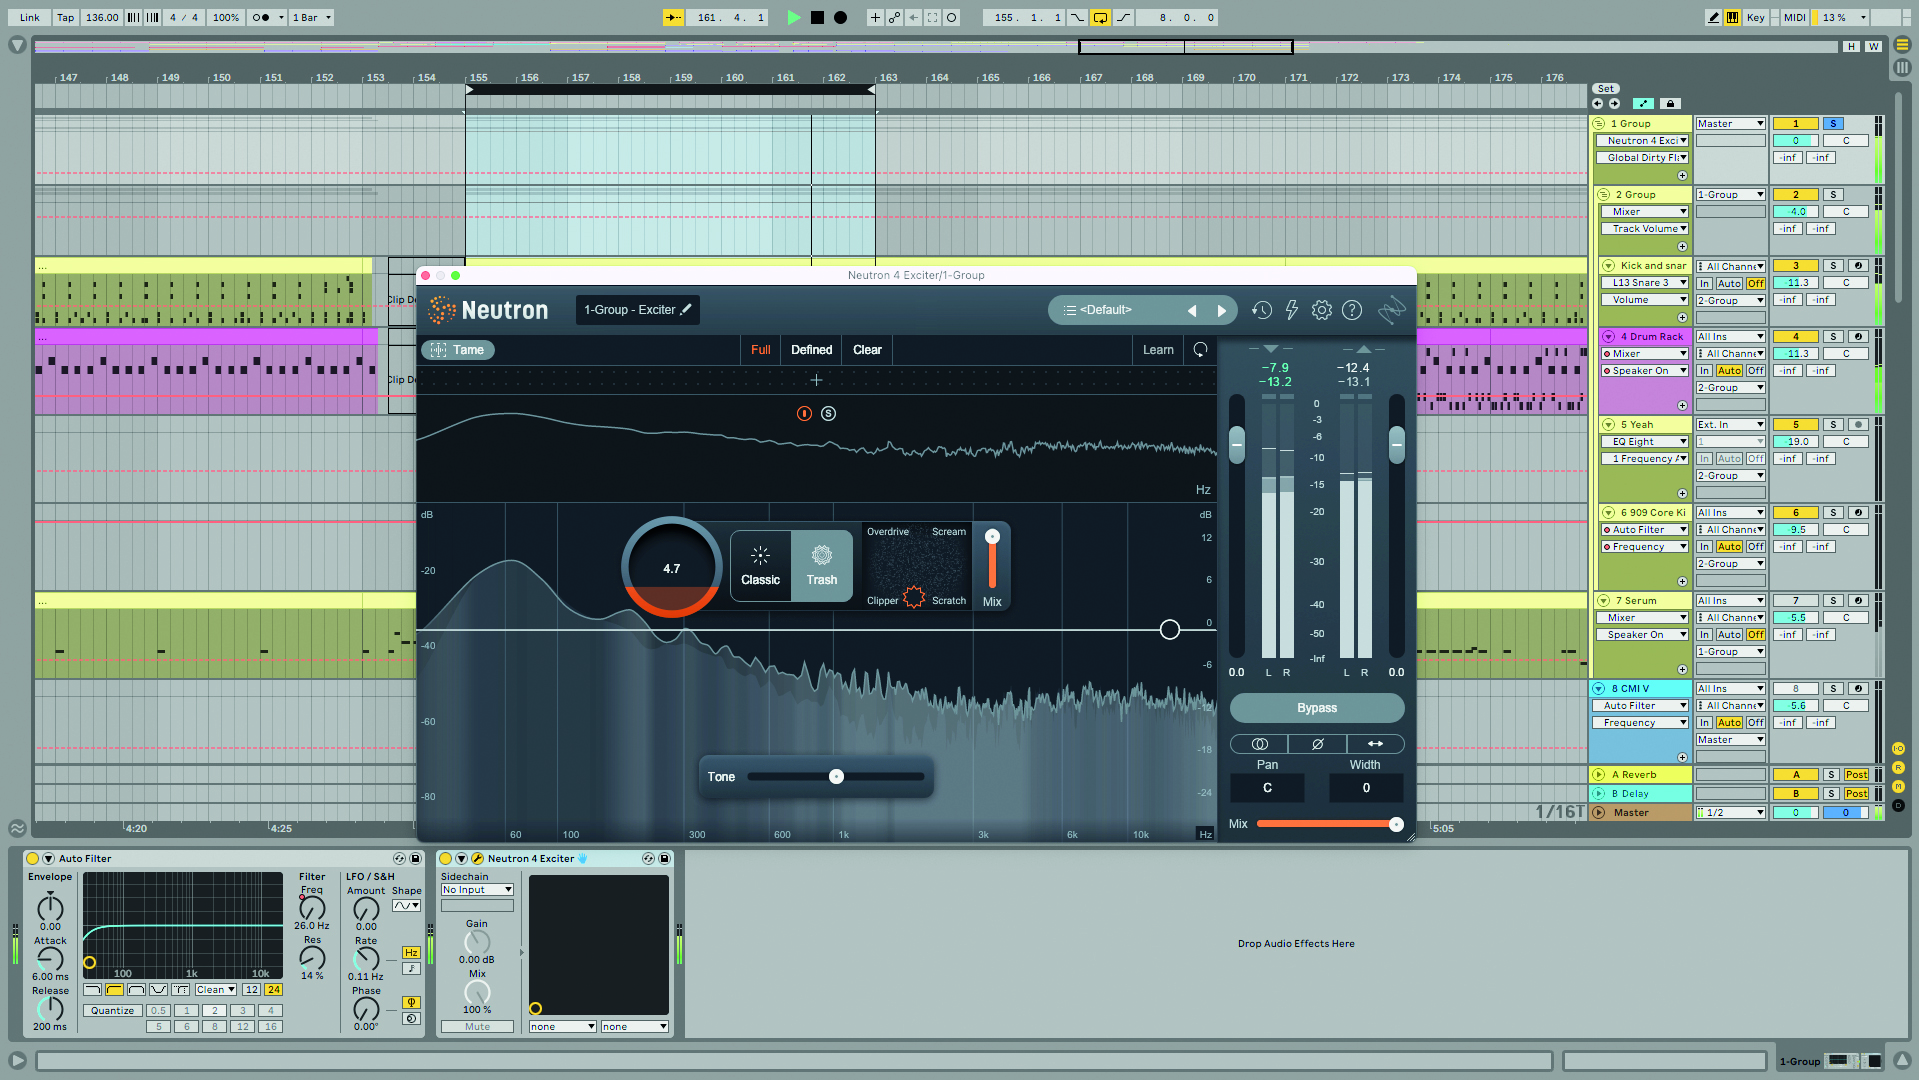
Step 3: Clipper gets you that harsh, buzzy distortion provided by scalping off a signal’s top and bottom peaks, and can generate subharmonics for power. Scratch is a hissy, spaced-out distortion that gets very in-your-face but can be plasticky.
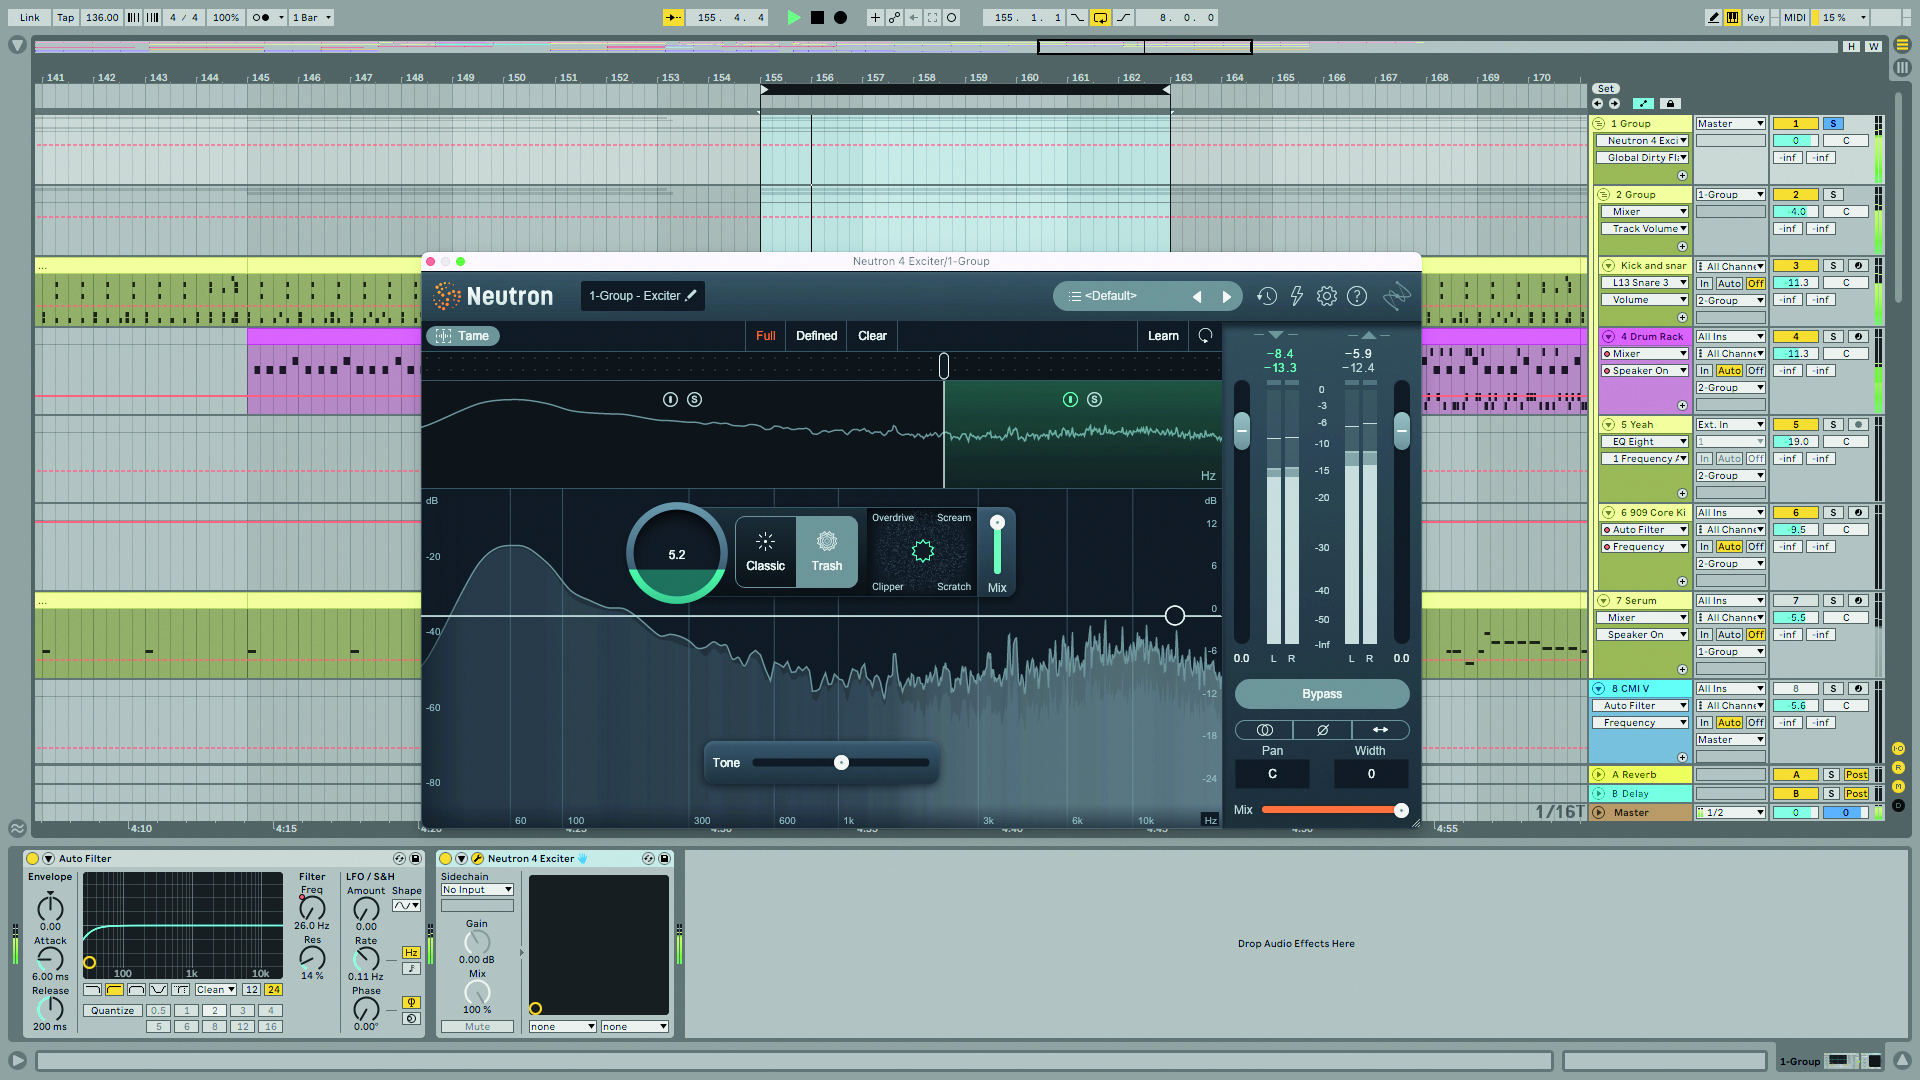
Step 4: Blending two – or all four – Trash distortion types gives you a solid, signal-warming toolkit. Your exact position on the X/Y controller, as well as the amount you apply to the signal, depend on the instruments you’re working with and your objective.
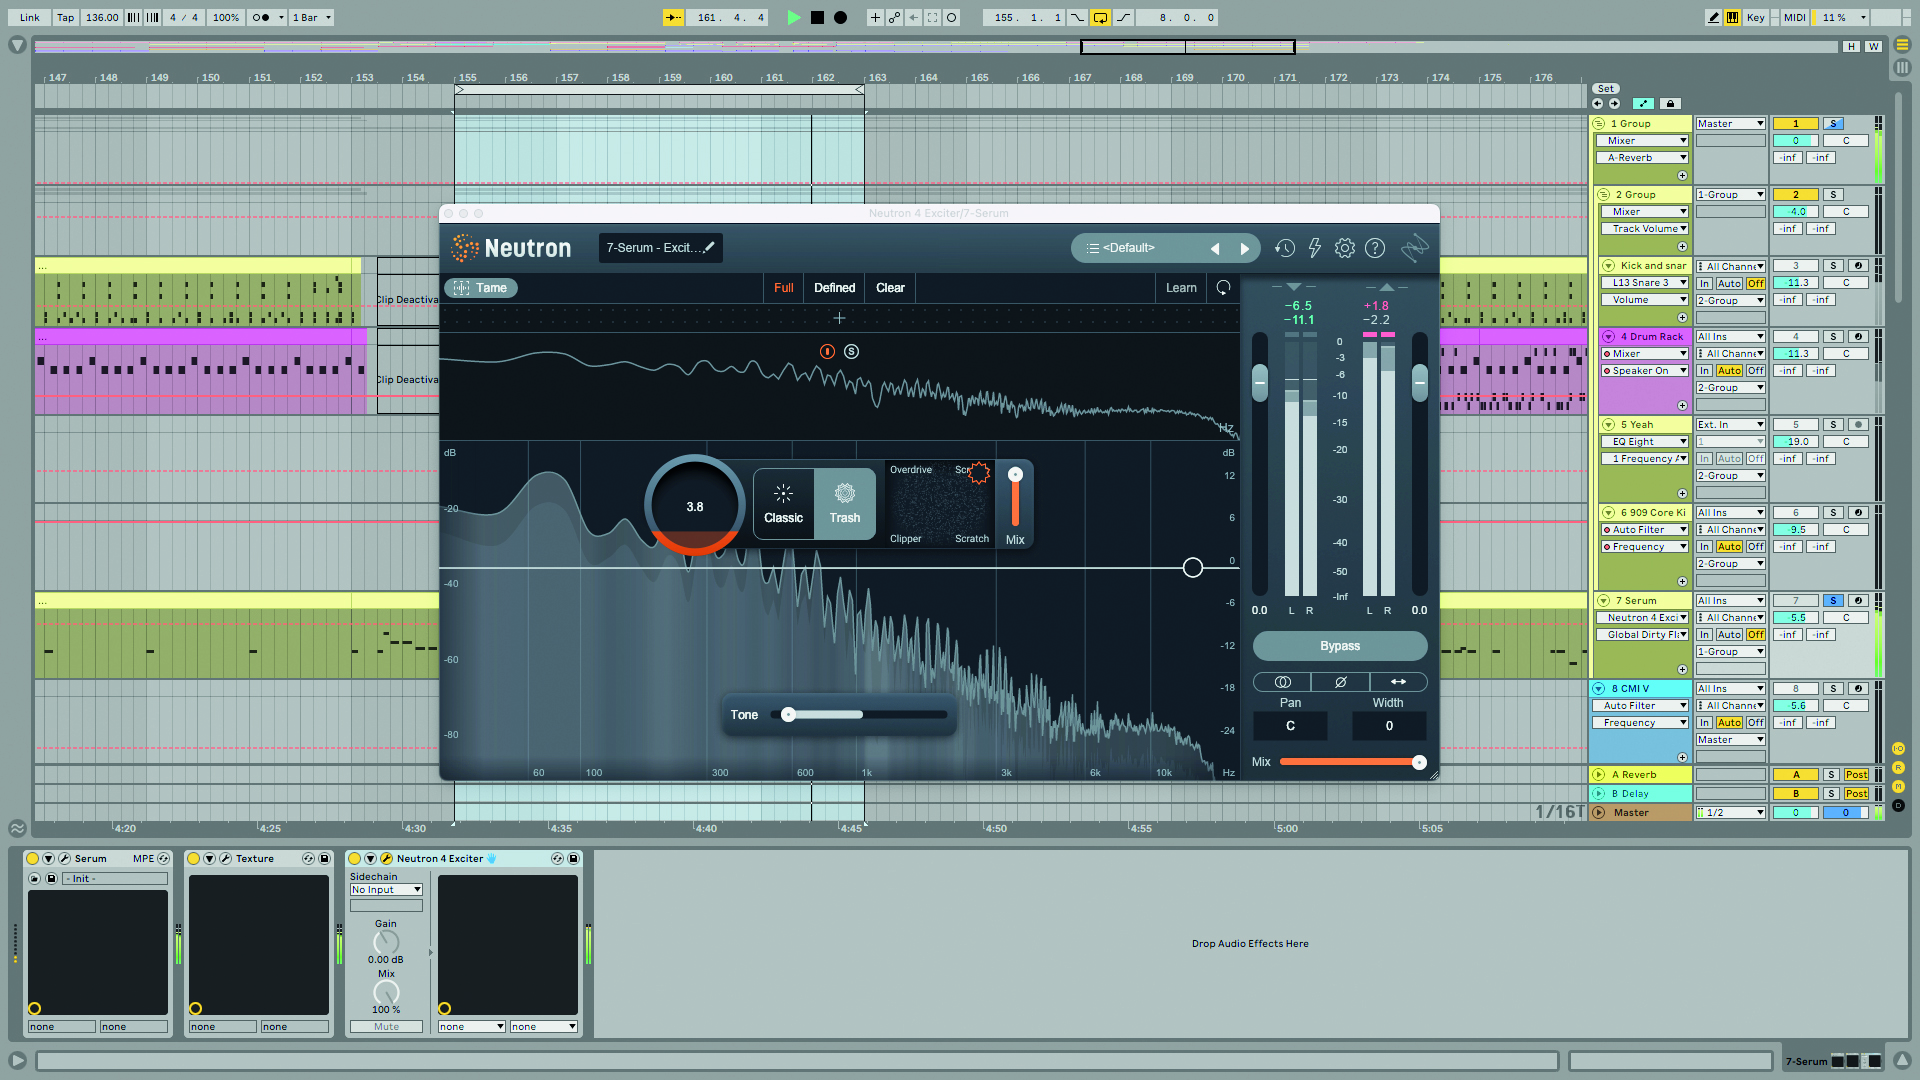
Step 5: The Tone slider gives the distortion emphasis in the frequency spectrum. Here at its lower reaches, the bass frequencies are pushed more heavily through the processing, working nicely with Overdrive and Clipper styles to add saturation to the low end.
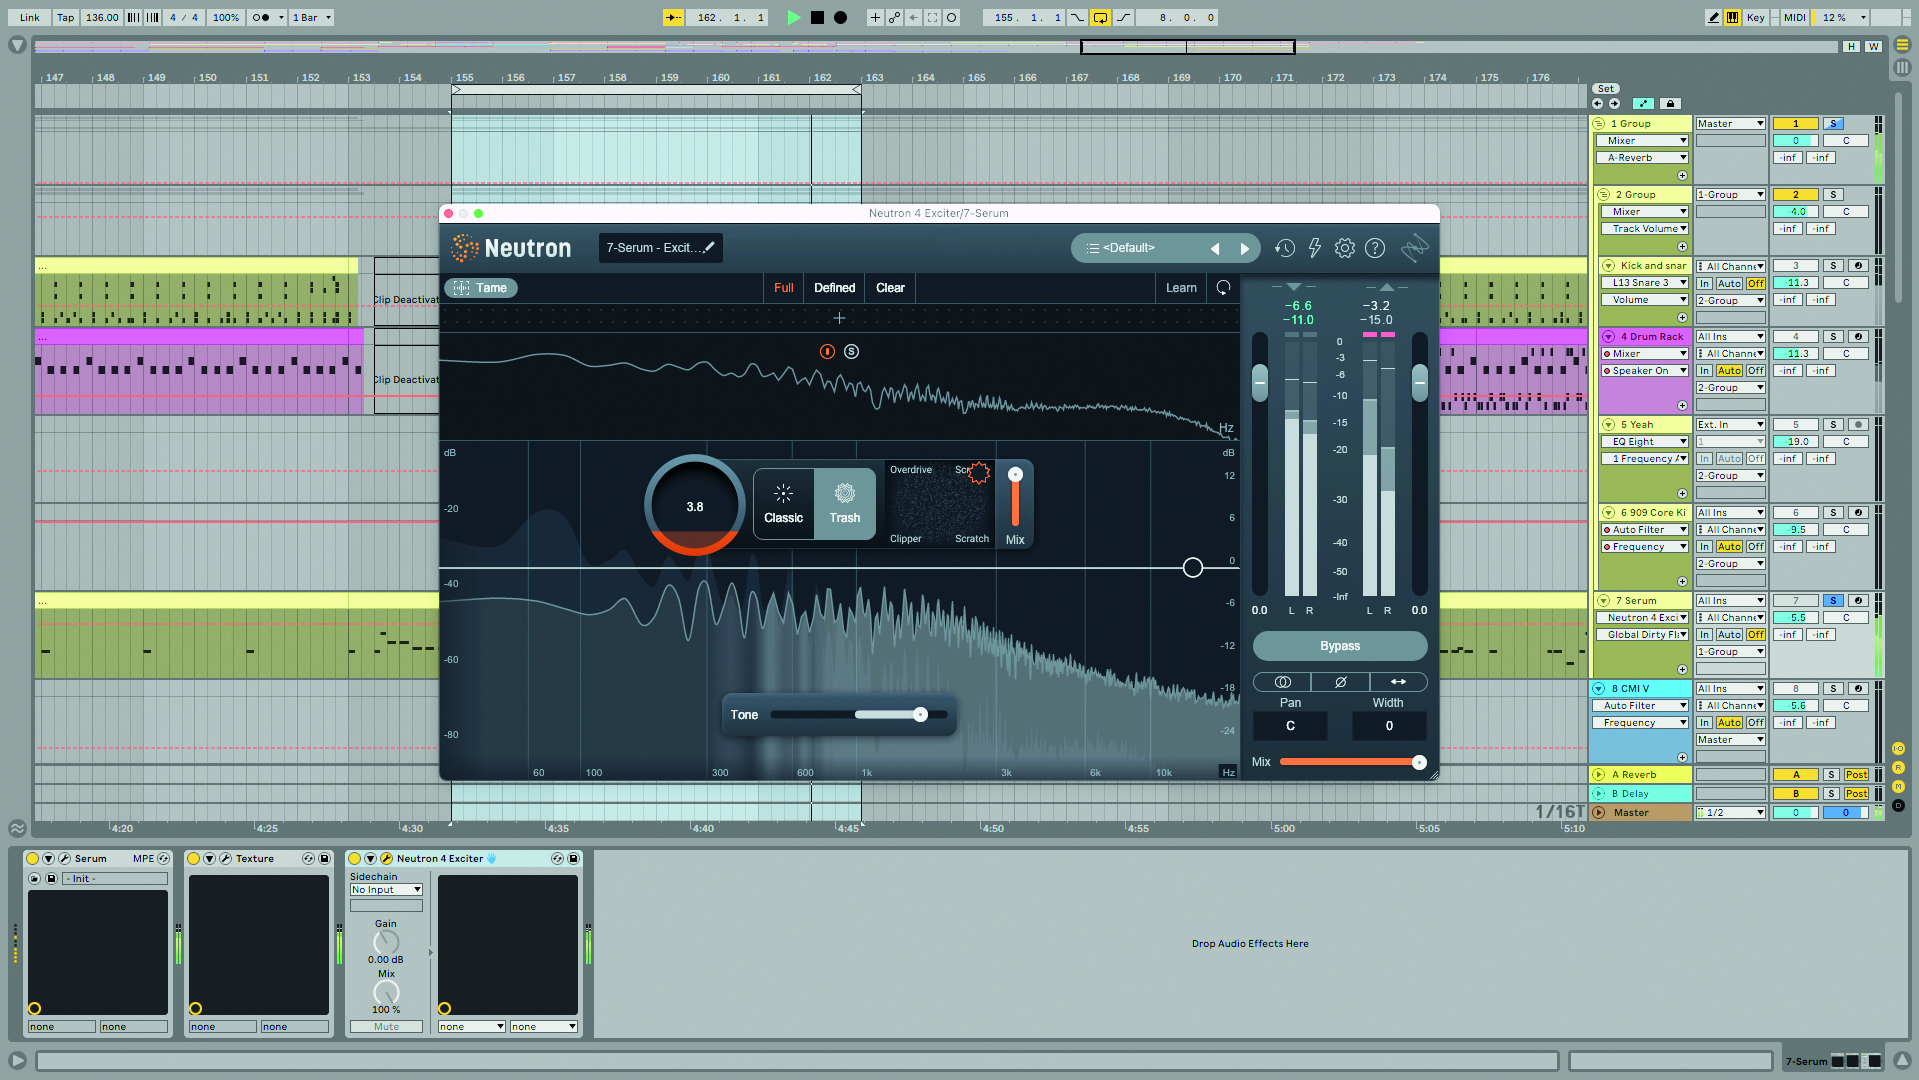
Step 6: At the higher end of the slider, the Tone slide gives you a high frequency emphasis, adding a top layer of aggression and grit to a signal. Scratch might be driven enough already, but Scream and Clip can be good candidates for this position.
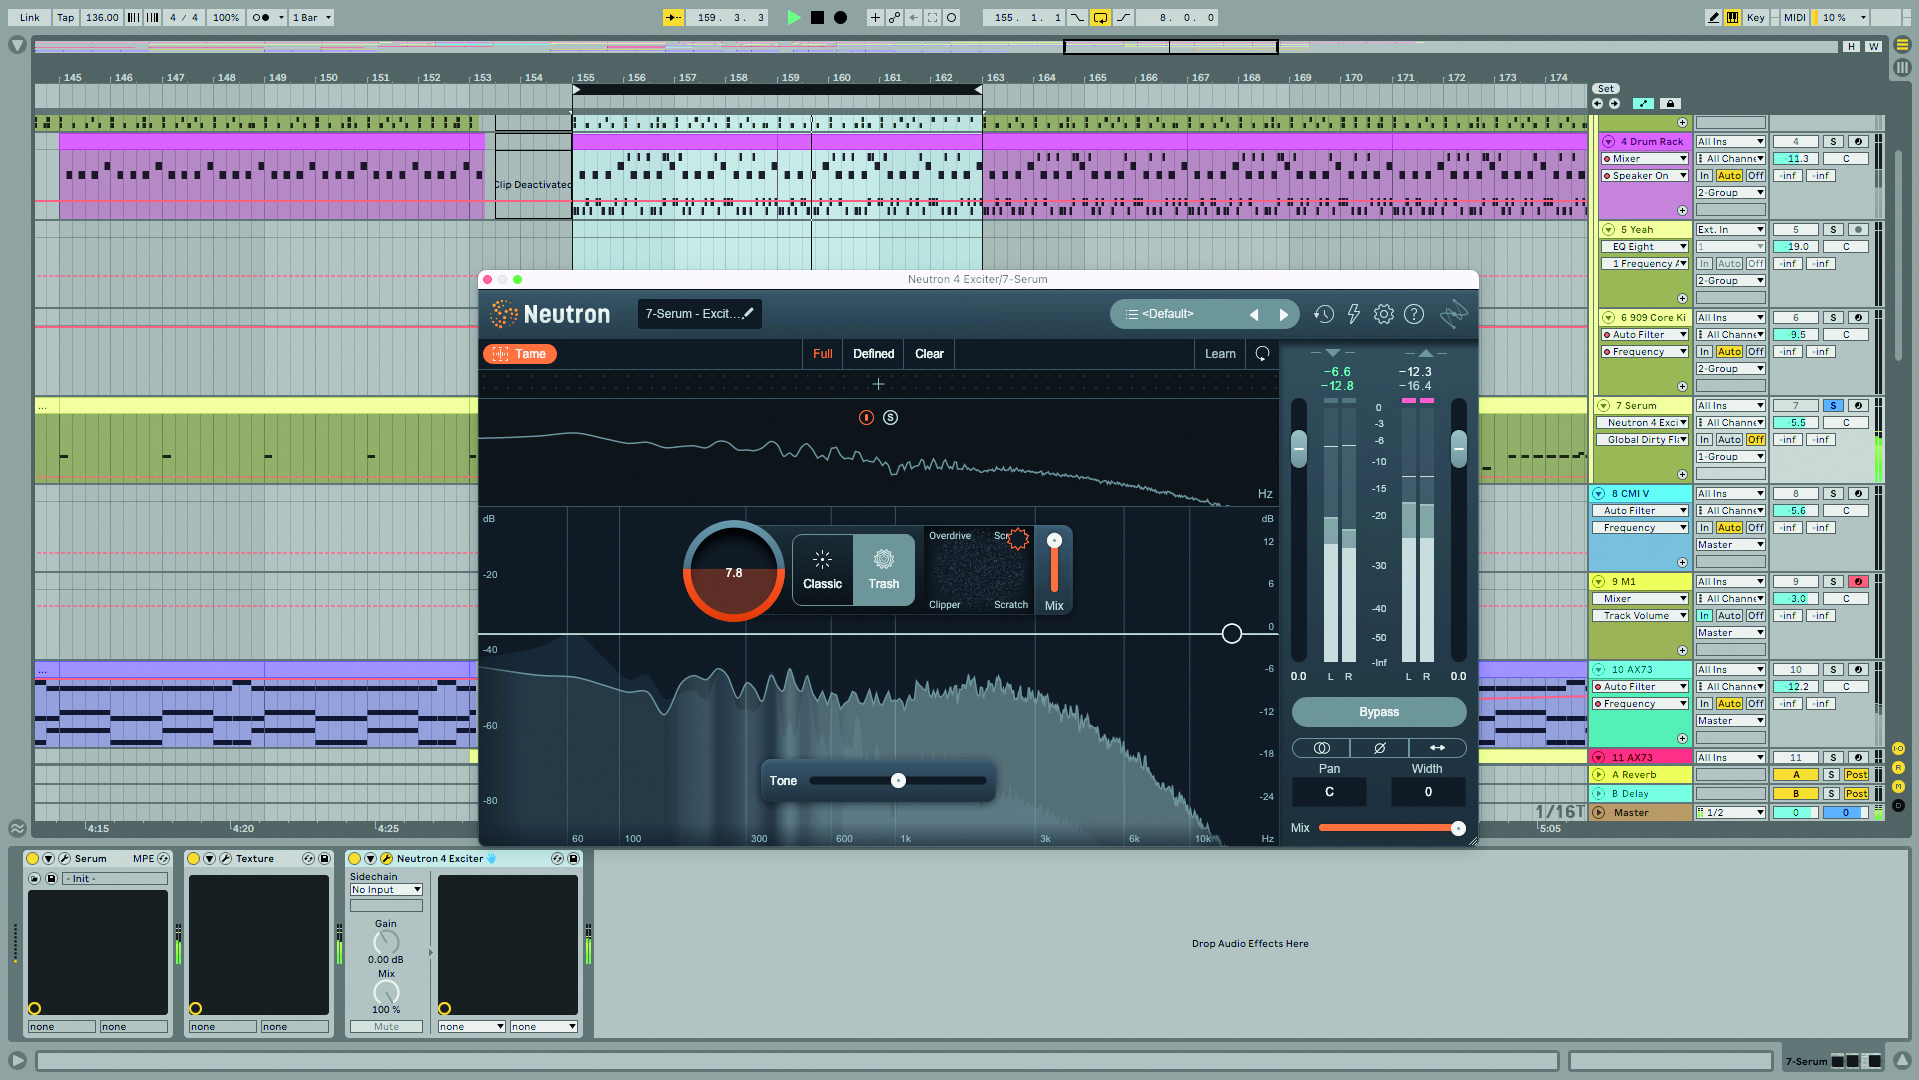
Step 7: The new Tame button at the top-left of the interface acts to add dynamics back into the signal. You can push the distortion amount and Mix very harshly and then bring things back under control by switching it on.
Assistant View
Neutron’s AI technology is one of its biggest selling points, but that part is entirely optional. There are clever little processes scattered throughout the plugin, such as Learn buttons on the EQ to suggest frequency bands of interest you might want to use and on the multiband processors to suggest where the crossovers could be, but the major component of Neutron’s AI capabilities is the Assistant View.
Clicking the View tells Neutron to analyse the audio of the track it’s on. After a few seconds, it sets about setting up a range of processors and making mix decisions. What remains is a group of modules behind the scenes – which is a starting point ready for you to scrutinise and make
changes to.
But Assistant View doesn’t automatically land you back at the main screen with the Neutron processor modules – this is now known as Detailed View – instead, it brings you to a new screen where a handful of controls take command over a few of the most crucial and characterful elements of the loaded processing. In other words, the controls seen in Assistant View are macro controls for a few of the loaded Neutron modules in the main strip.
You can skip back to the Detailed View and make more microscopic tweaks, or stay on Assistant View to make more broadbrush changes. iZotope don’t recommend skipping back and forth between these screens as the two are meant for alternative workflow. Here we’ll take you through the process, step by step.
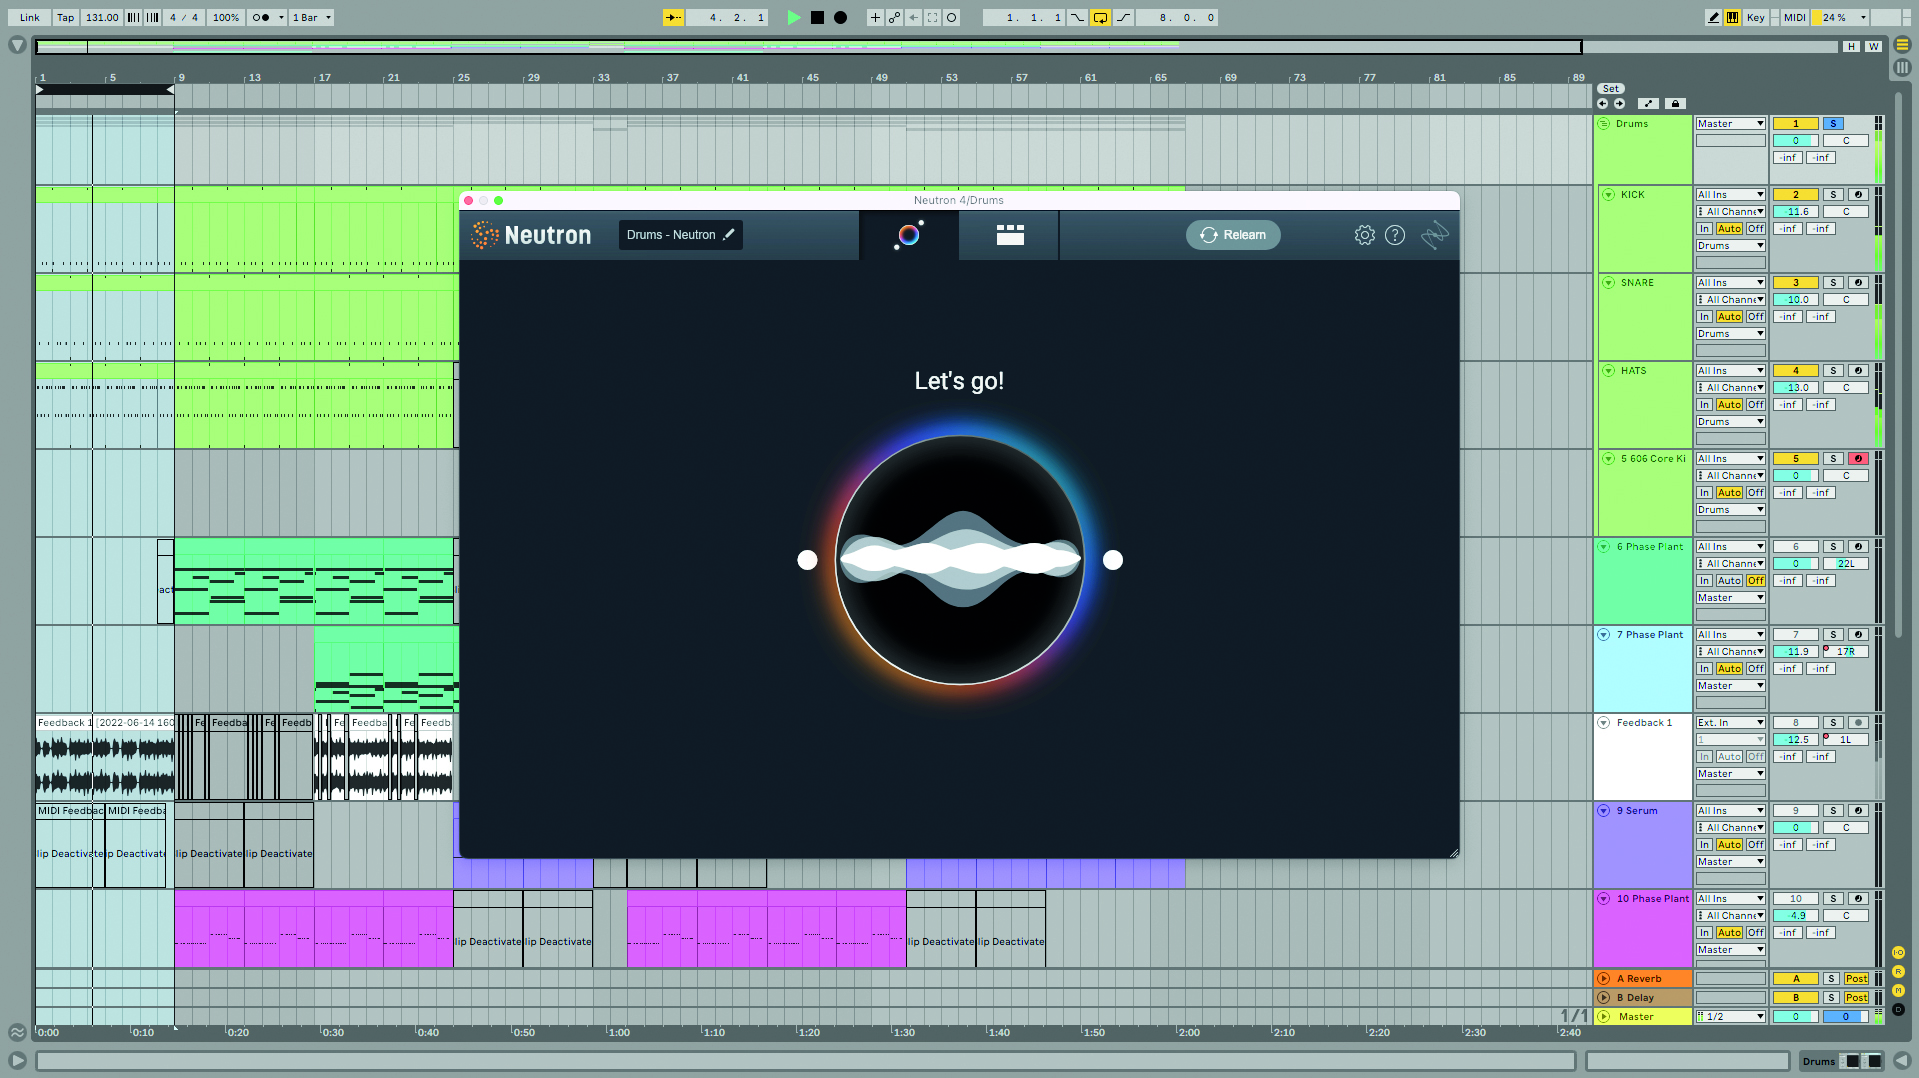
Step 1: Here we have a drum bus track with Neutron loaded on it. Let’s see what Assistant View makes of this. Click onto the ‘bubble’ icon, play back some of the track (with the drum bus sounding), and let Neutron 4 make some recommendations.
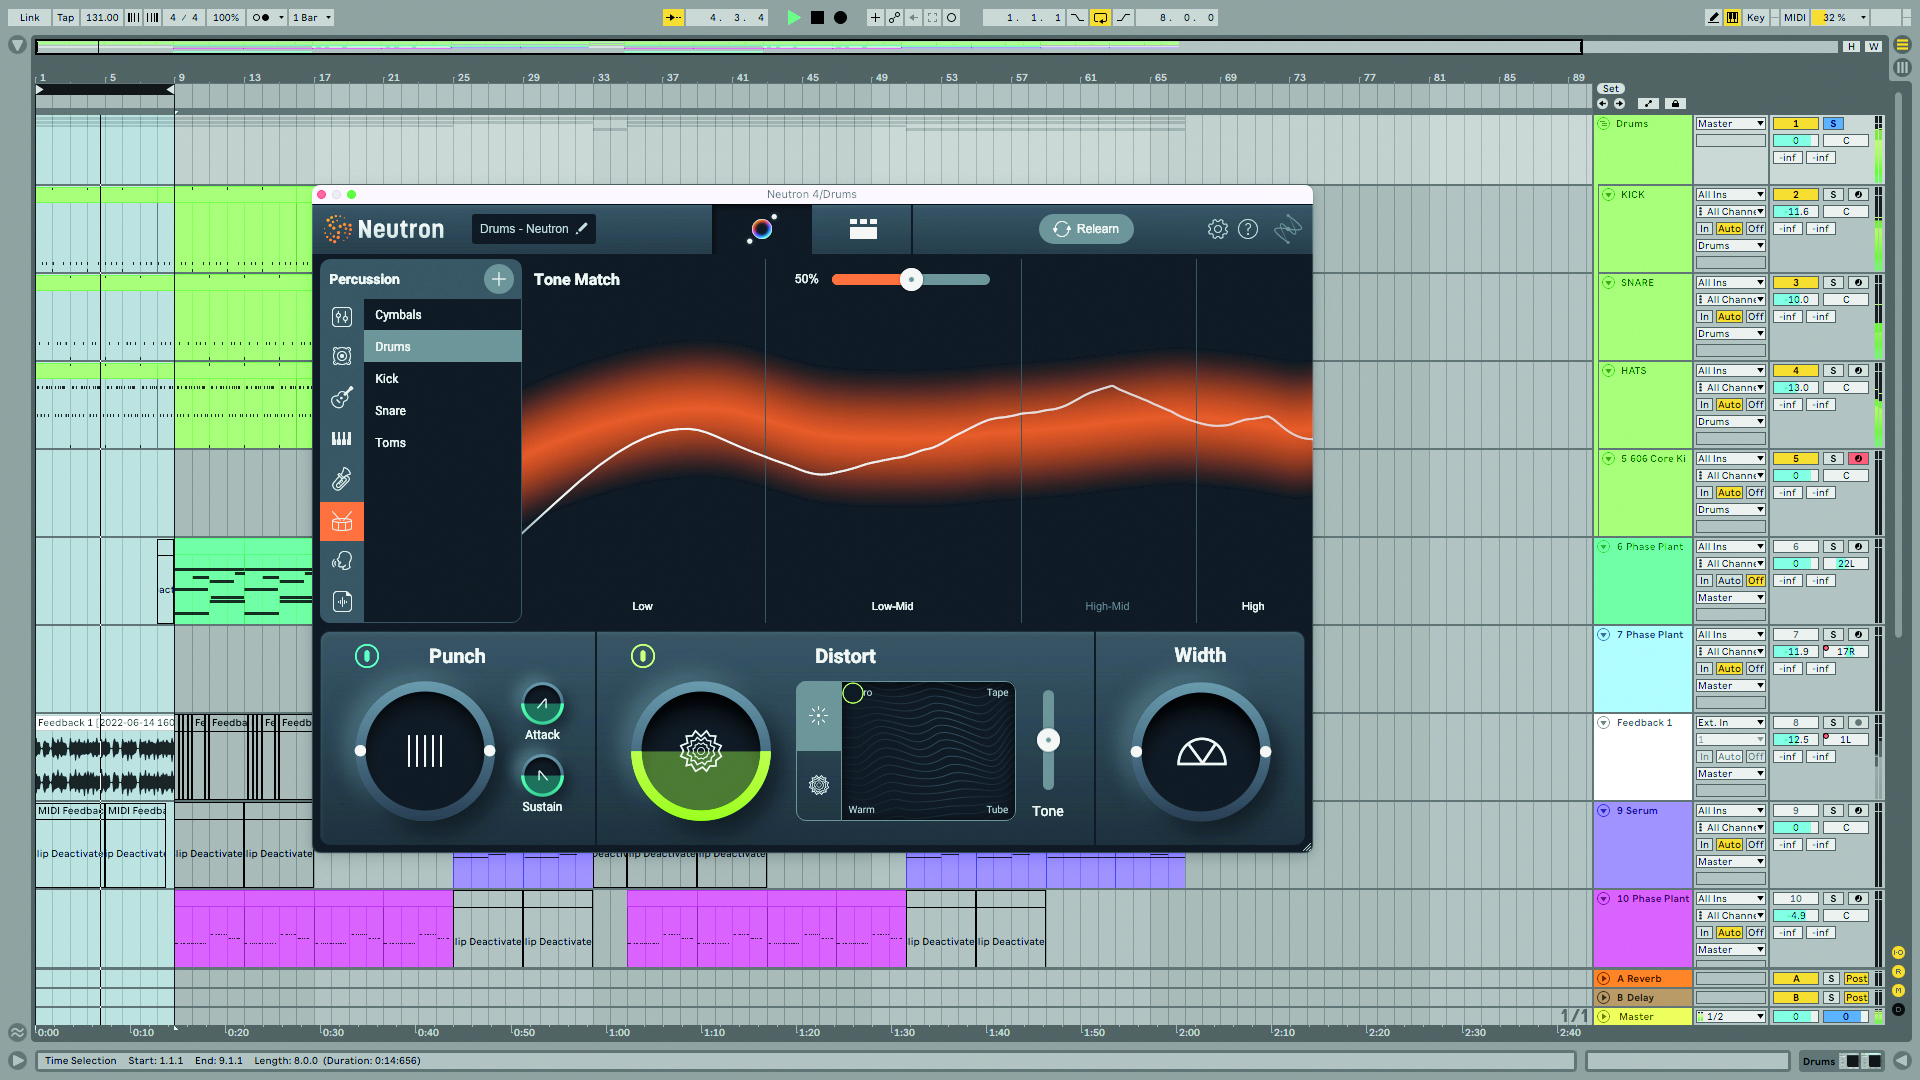
Step 2: In the Assistant View, in the left menu the track has been correctly identified as ‘Drums’. This information informs the Tone Match spectrum, the orange area showing where an ideal ‘drums’ track should be, and ours appearing in white.
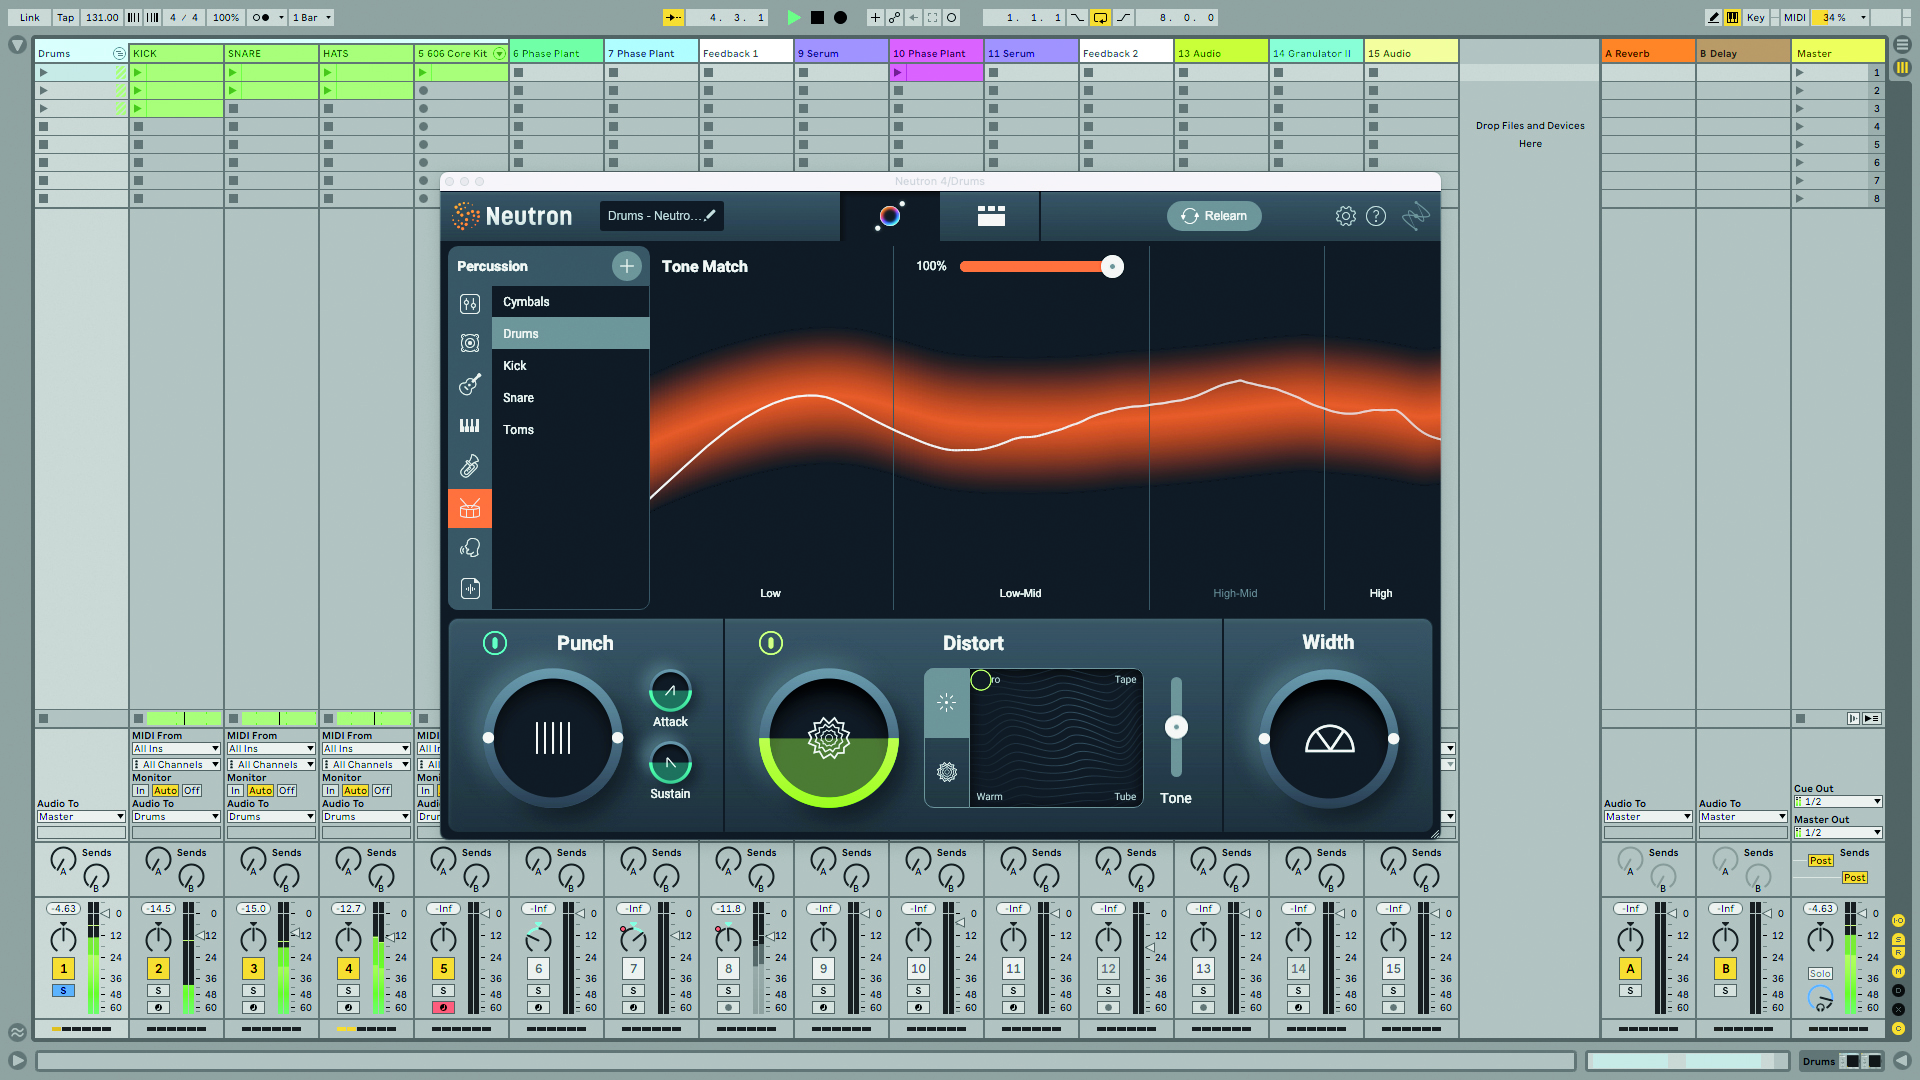
Step 3: Slide up Tone Match to have our drums conform more closely with the orange area. Behind the scenes, a Sculptor module is what’s doing the actual processing here. There are a lot of other modules loaded thanks to the AI analysis.
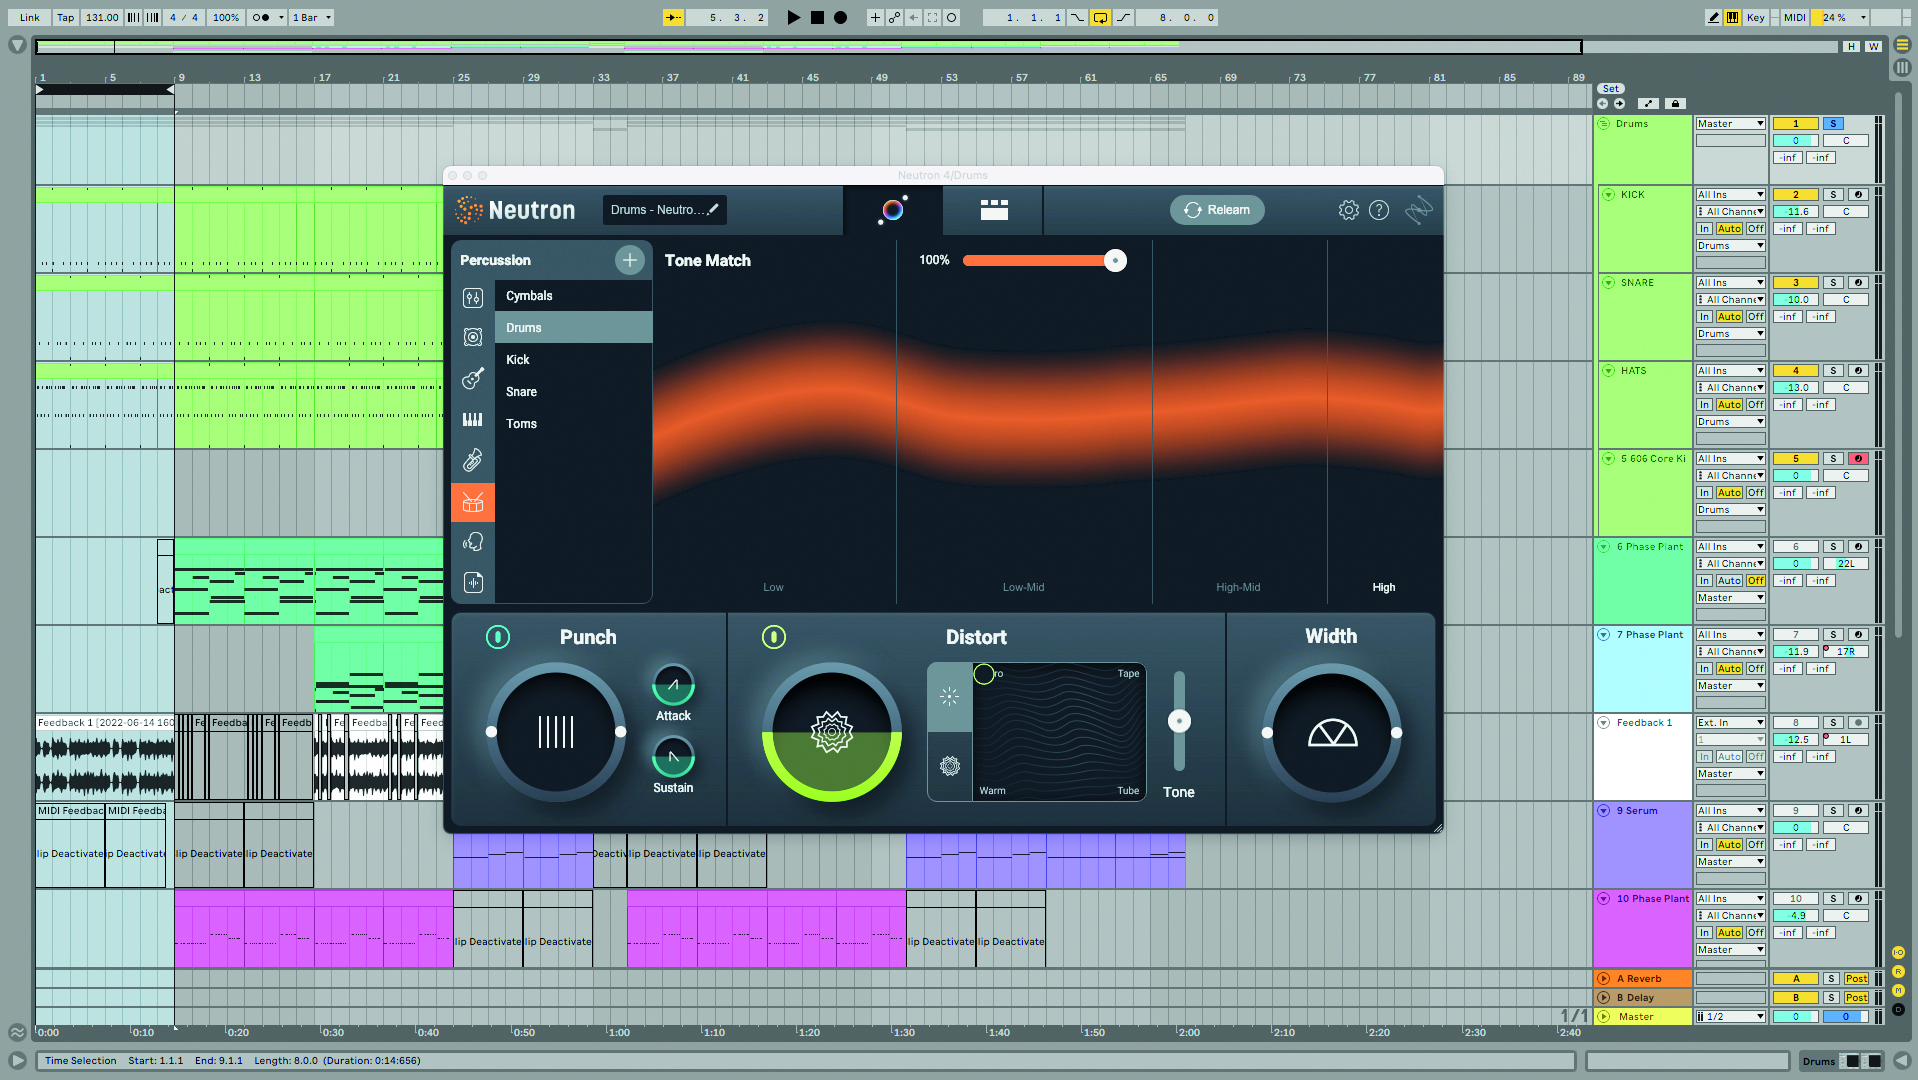
Step 4: At the bottom of Assistant View there are three more significant processors. Punch has amount, Attack and Sustain controls linked to a Punch Compressor in the Detailed View. These take a modern slant on compression and transient shaping.
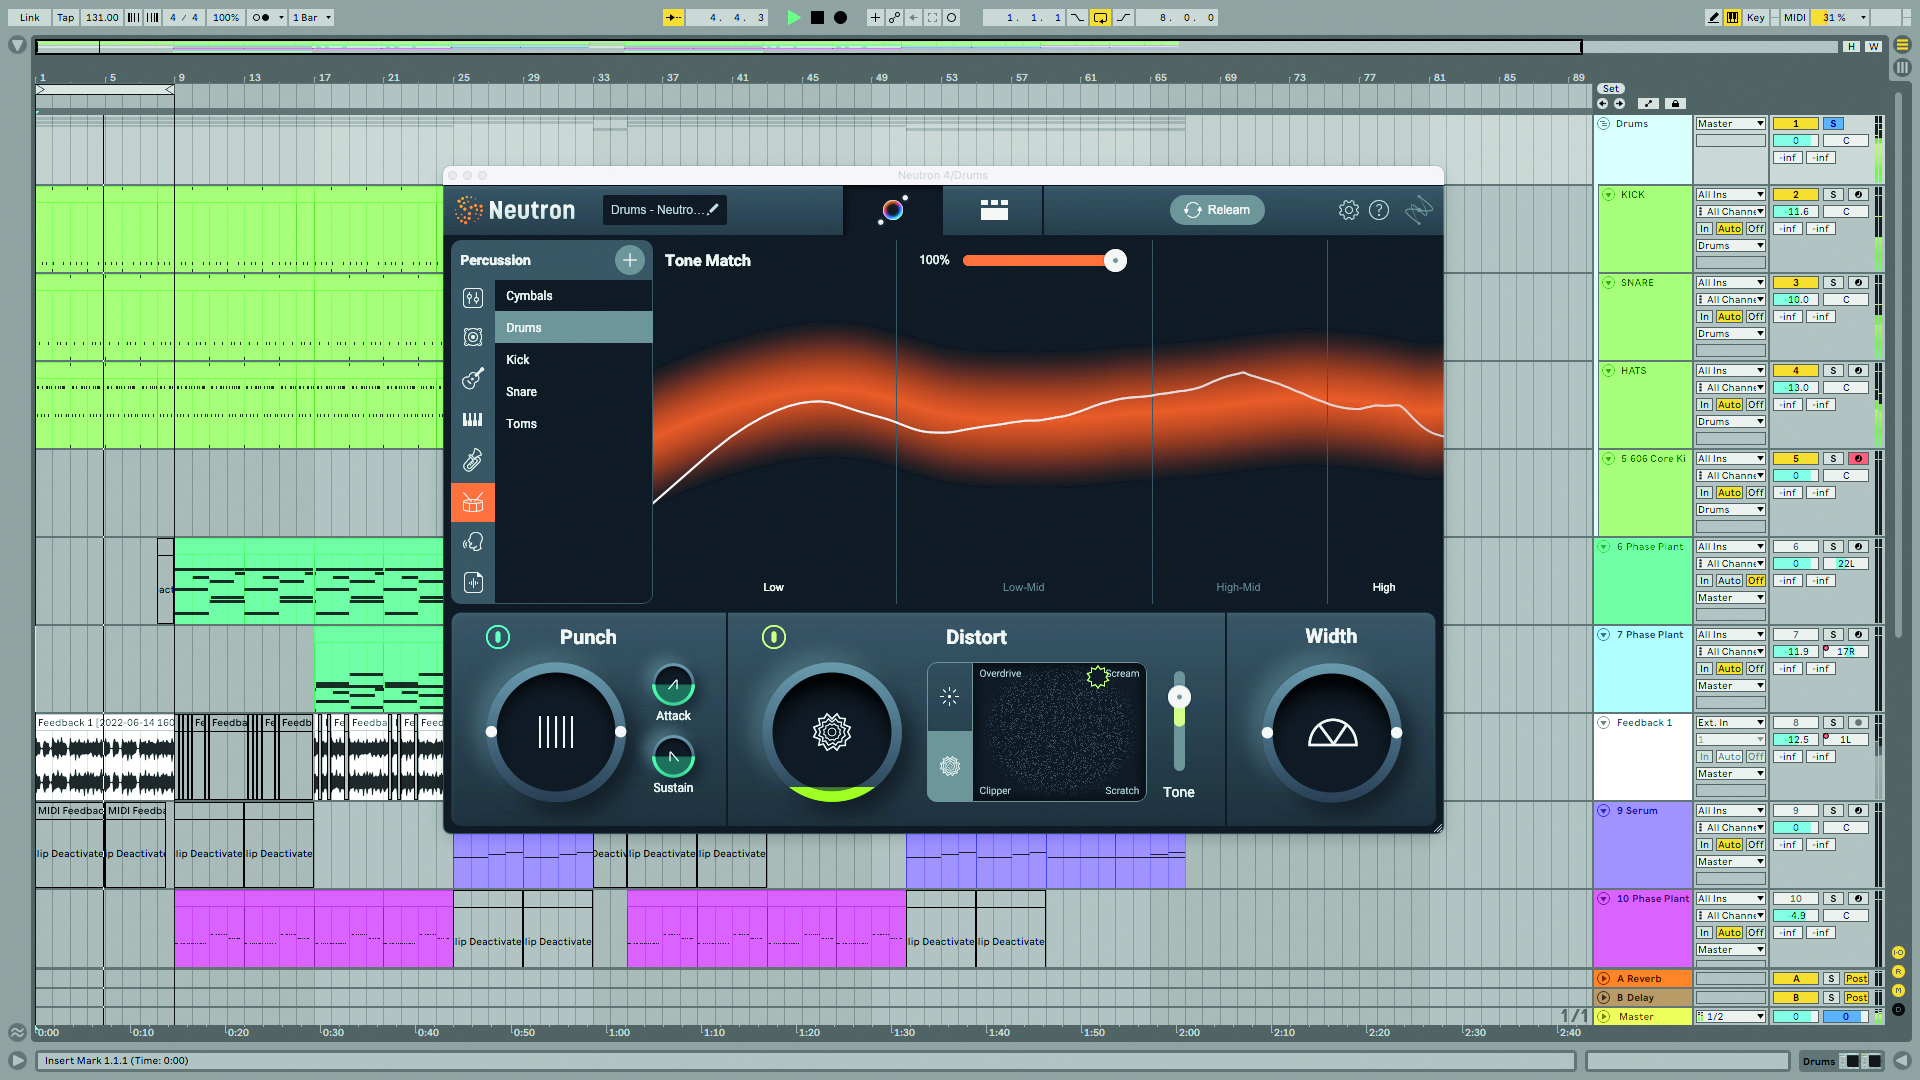
Step 5: Distort brings the amount, Tone and distortion type X/Y pad from an Exciter module. The multiband settings of that module have been set by Neutron’s AI in the analysis process. Here we can take quick, global control of the distortion properties.
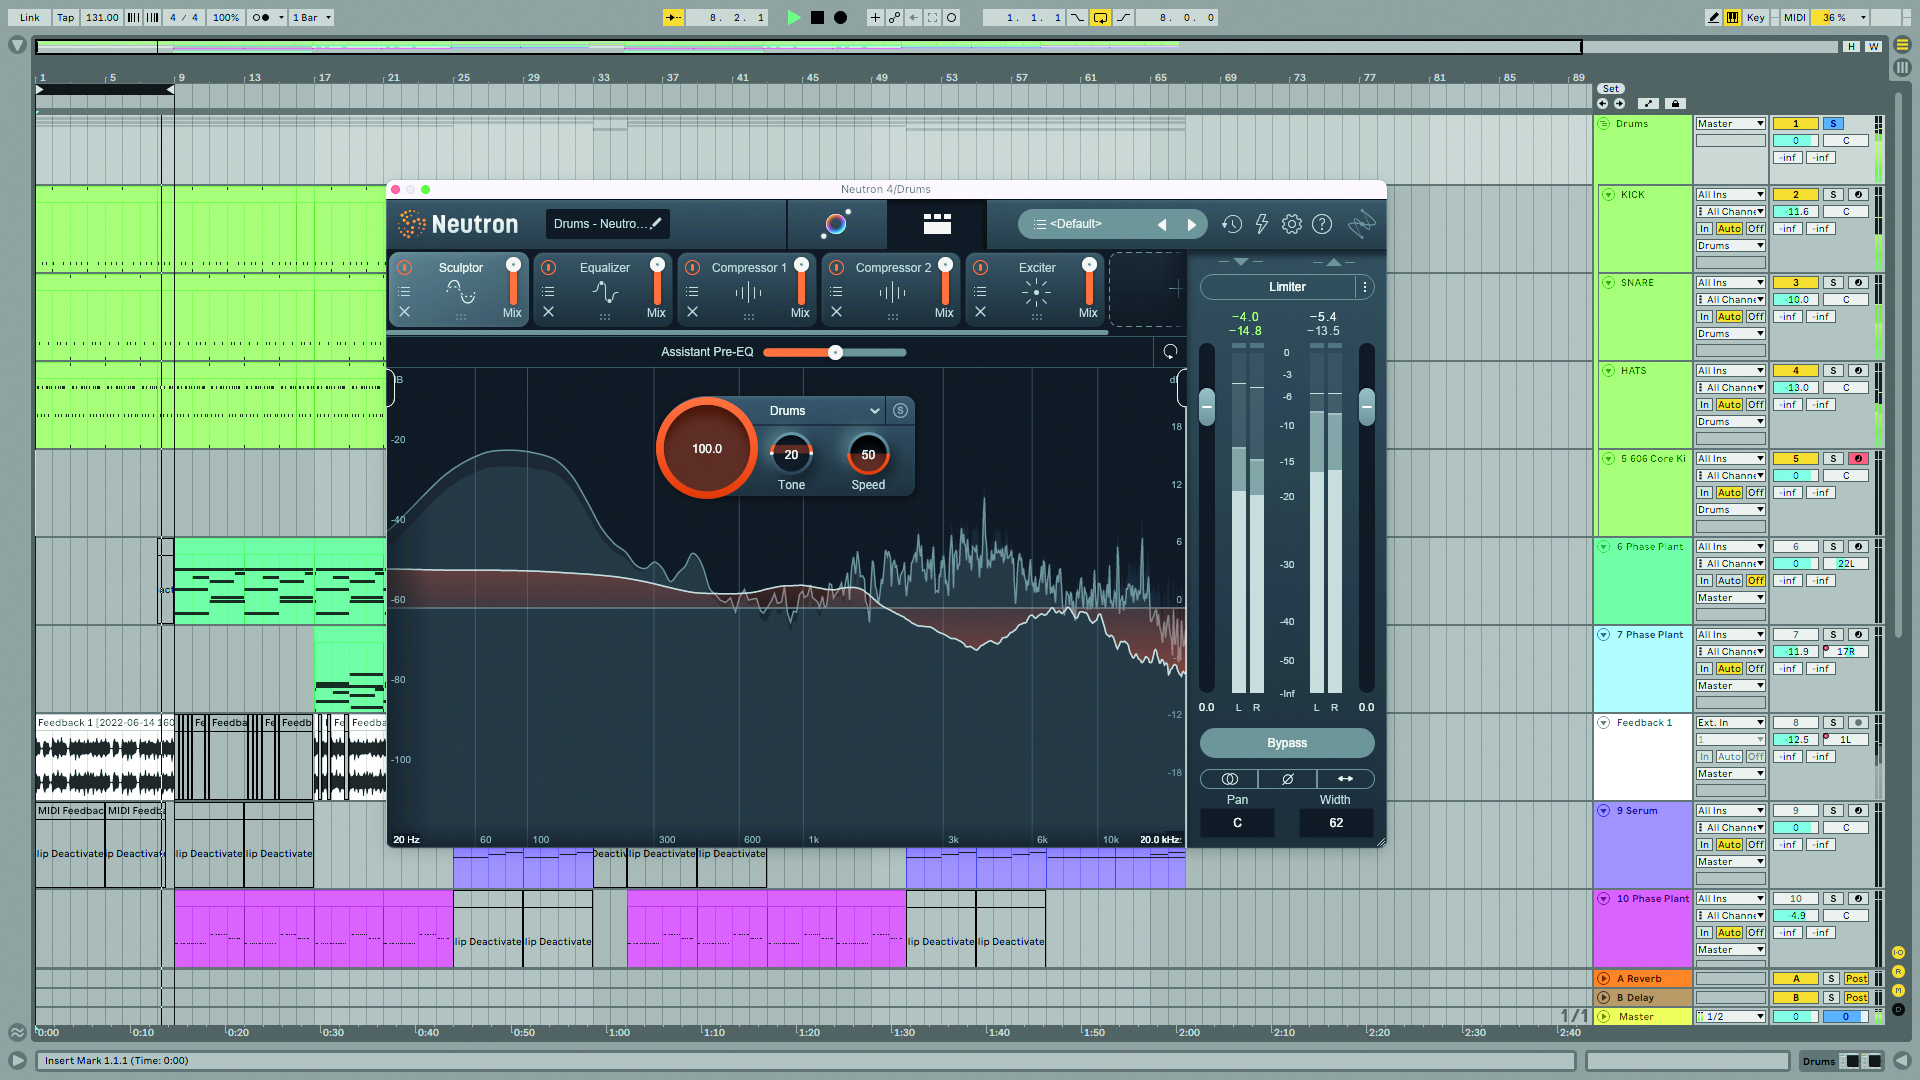
Step 6: Finally, the Width control is hooked up to the Detailed View’s output section’s Width control. We can check out the Detailed View itself, or tell Neutron to Relearn the input to feed it a different part of the project and start over.
Real-life mixing with the Assistant View
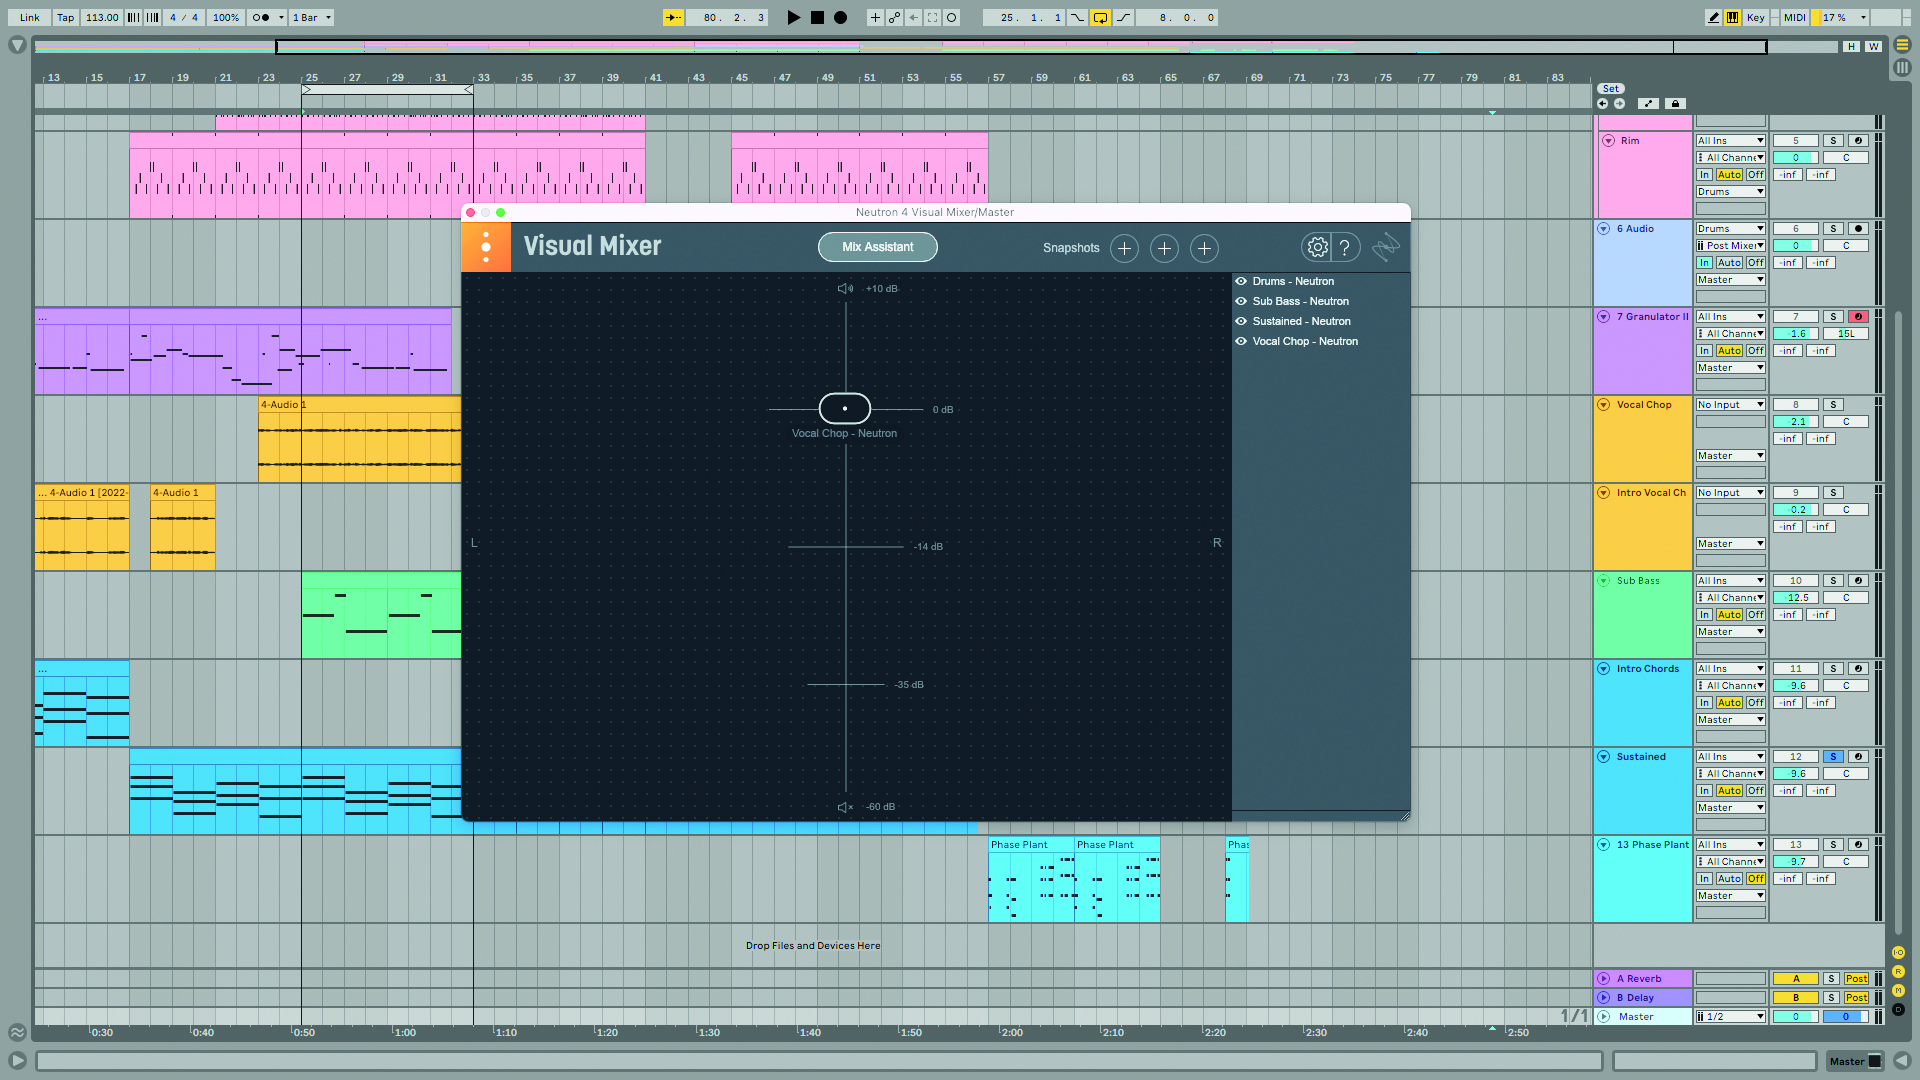
Step 1: iZotope’s visual mixer comes with the Neutron 4 bundle. When loaded in a project it detects all instances of Neutron 4 or Relay, and then allows you to visually mix your project from within the visual mixer. Mix Assistant works in Visual Mixer, listening to your track and suggesting levels based on AI learning.
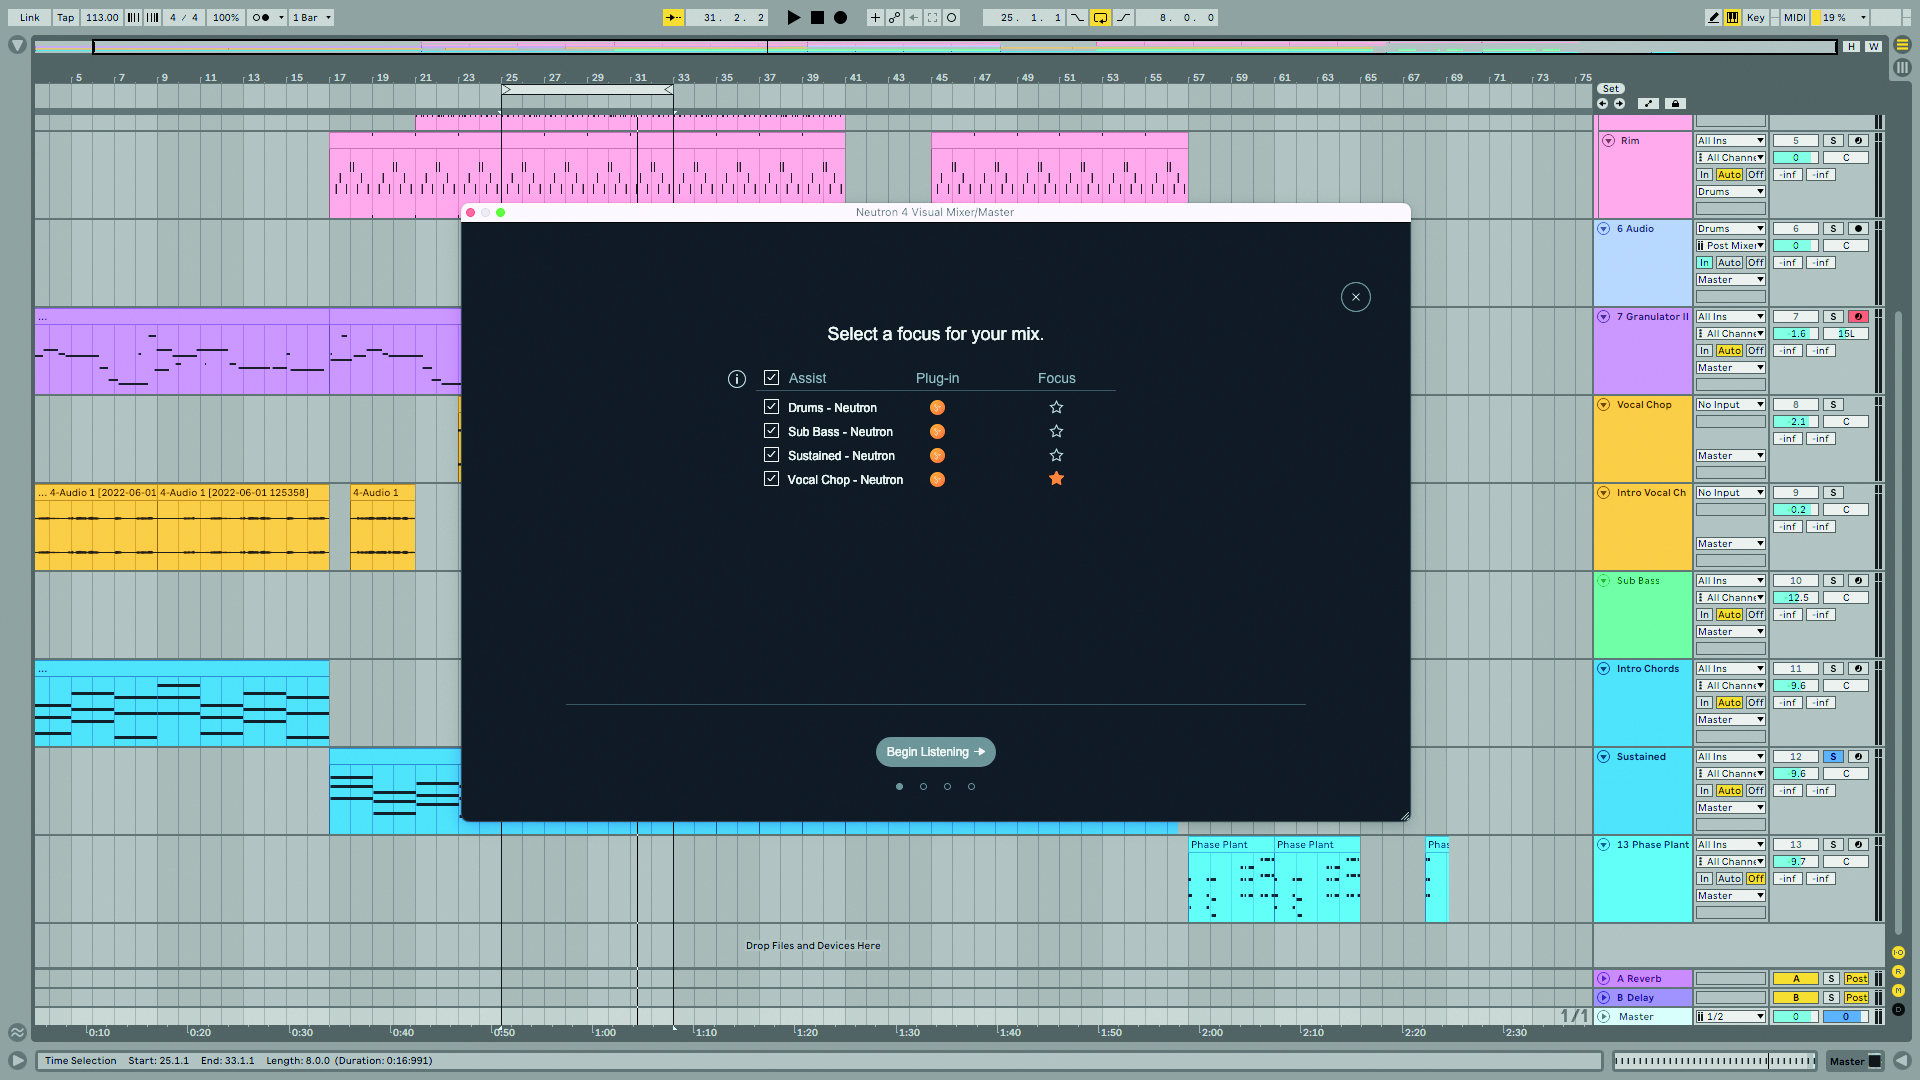
Step 2: In this mix we have Neutron 4 loaded on our drum, sustained chords, sub bass and vocal chops channels. Load Visual Mixer on your master bus and click the Mix Assistant button at the top to access the assistant view. Select which tracks should be mixed and a focus, or focuses, for your mix.
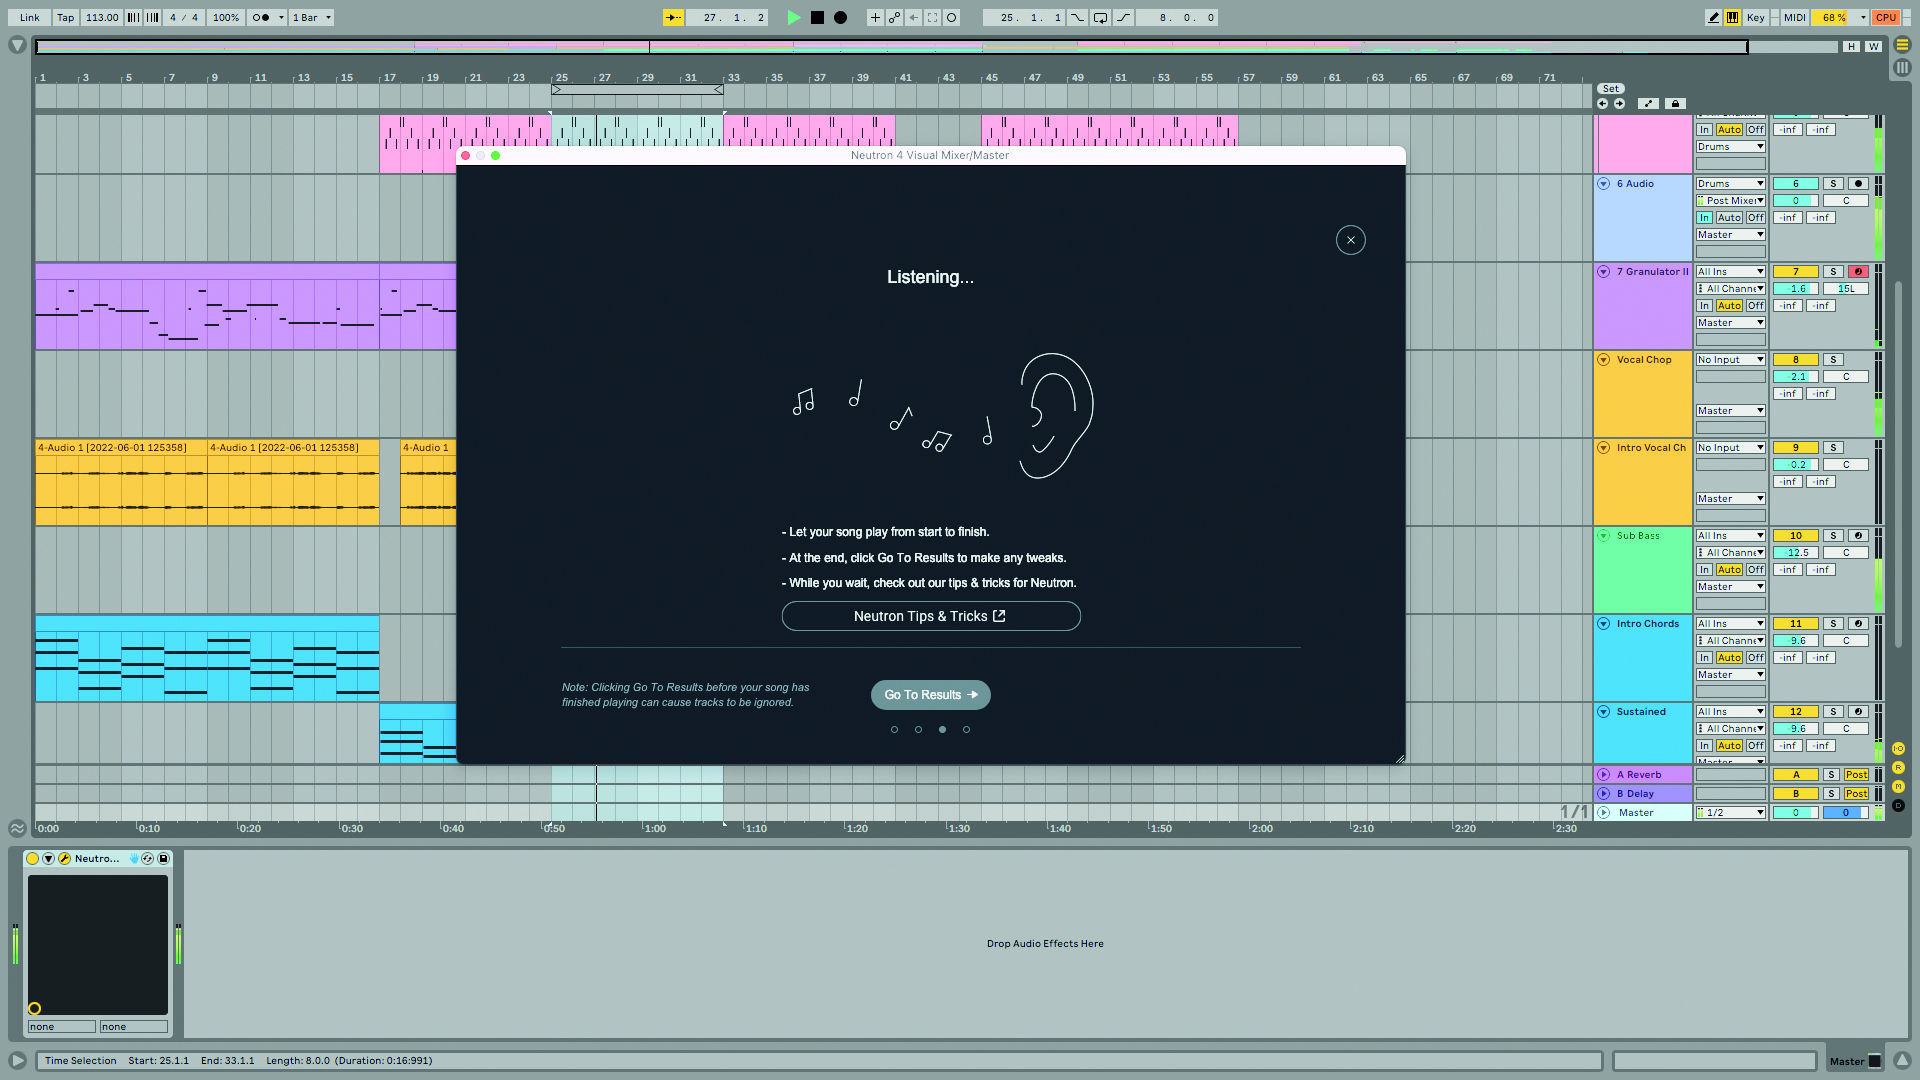
Step 3: Now play back your track, Mix Assistant will listen to your project and analyse it. Make sure you play the entire track back so that Mix Assistant doesn’t make decisions based on just a section of your song. When finished click Go To Results to see the mix decisions that have been made.
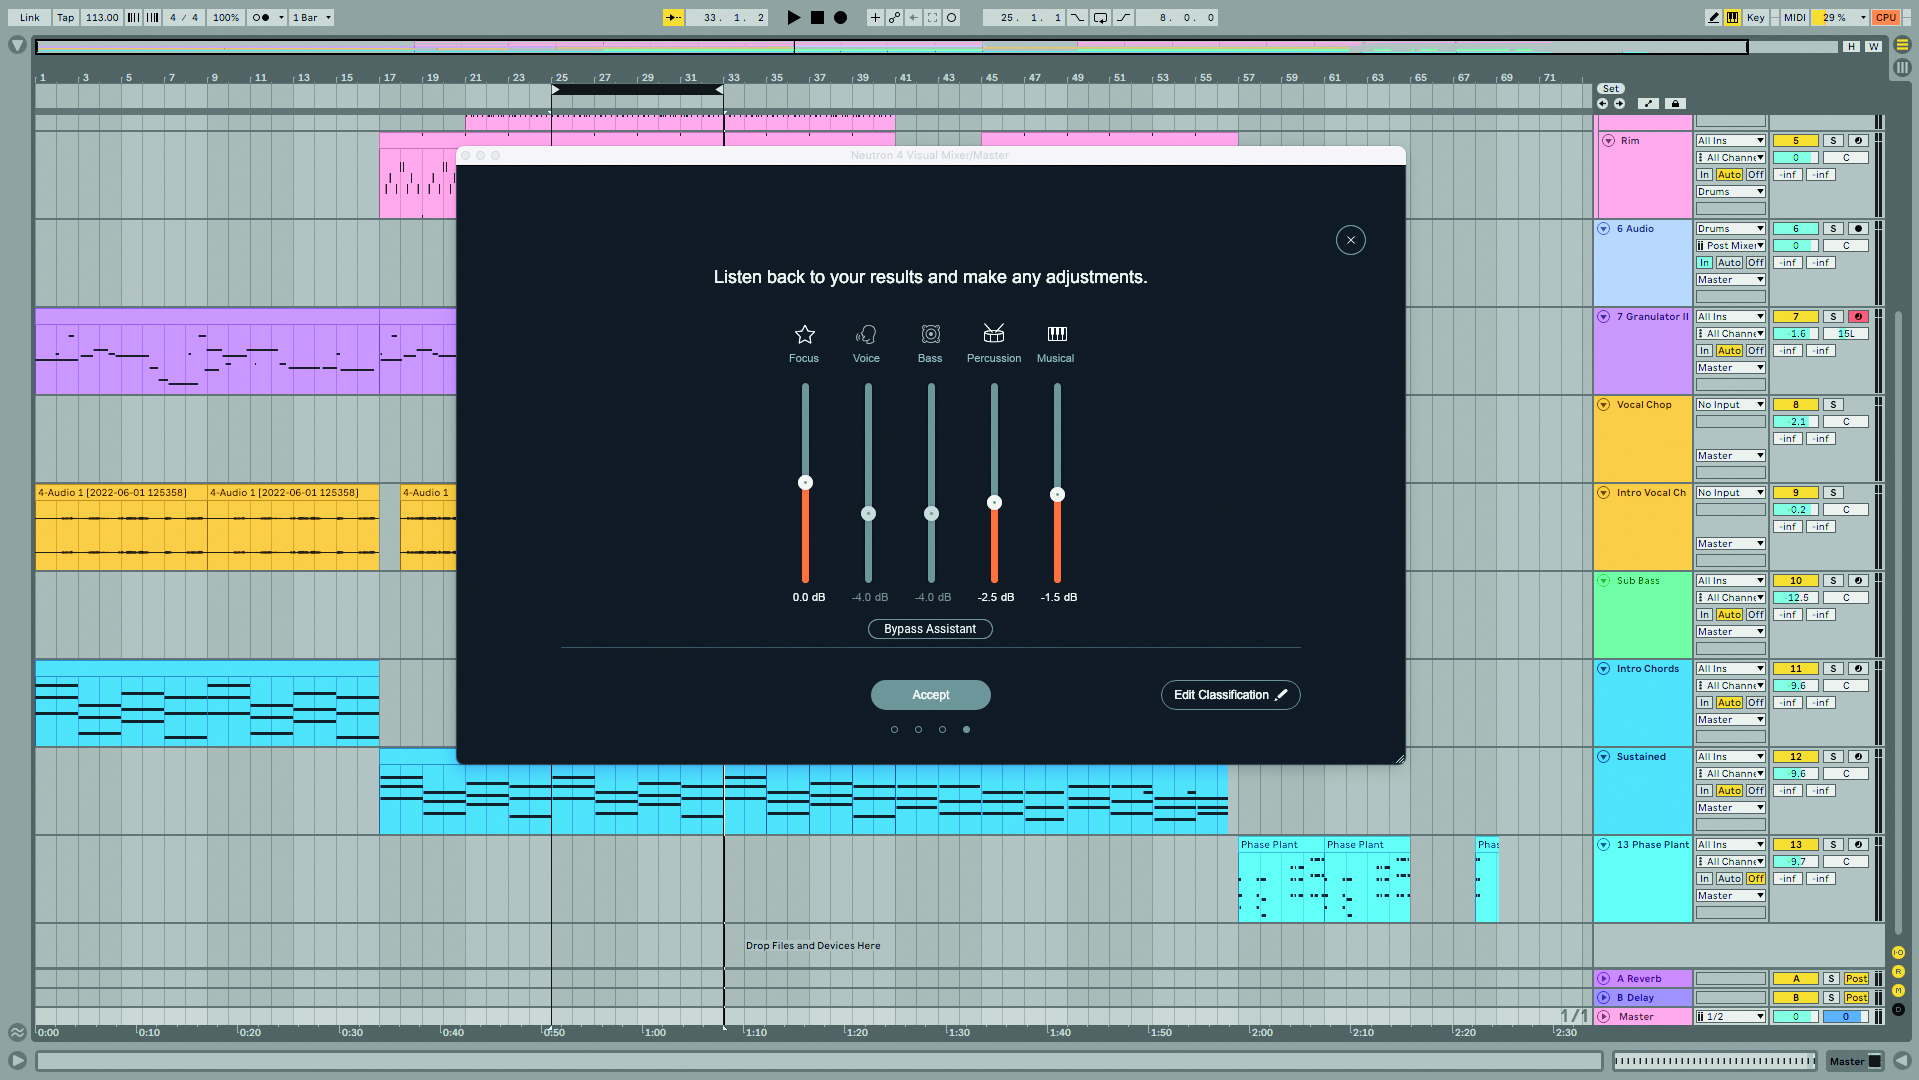
Step 4: The vocal chop is now much more prominent in the mixdown. We selected this track as a focus so that makes sense. Mix Assistant has achieved this by turning down the percussive and musical elements (aka the drums, sub bass and chords).
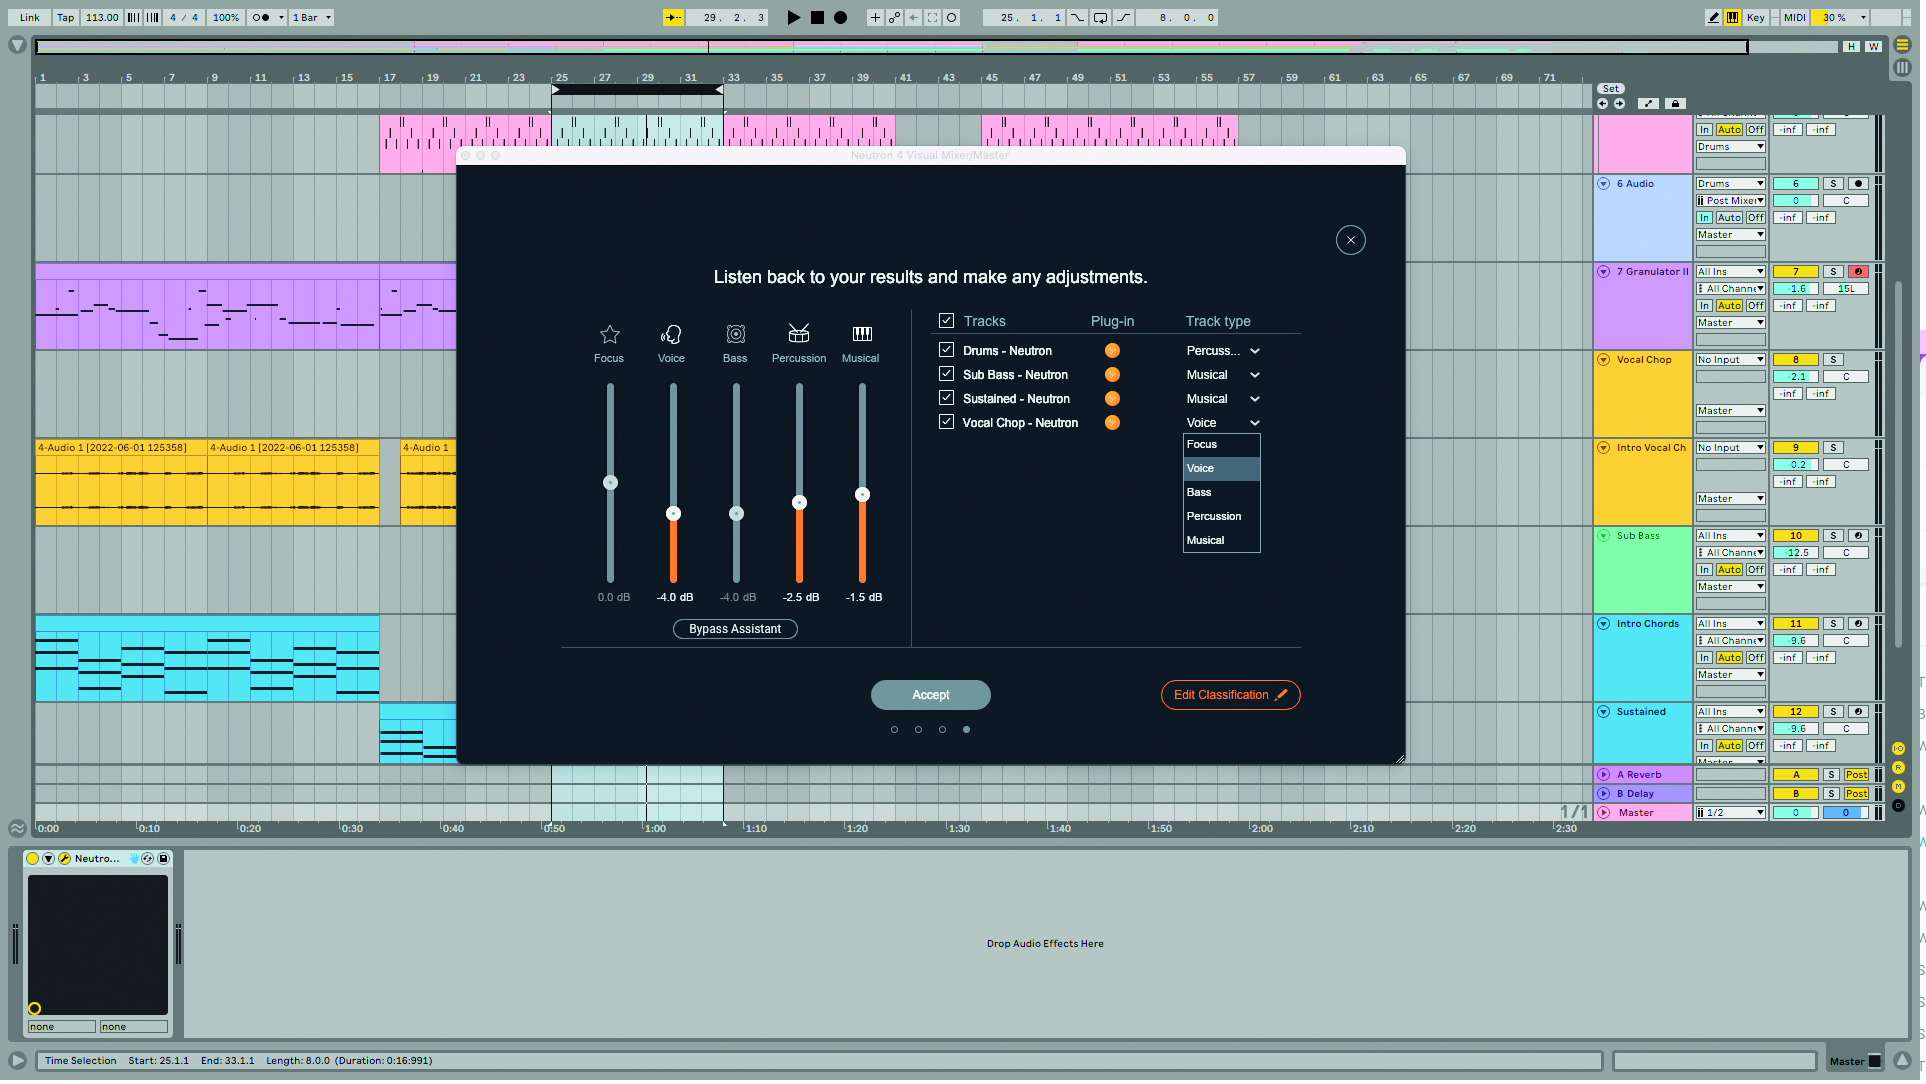
Step 5: If we’re not happy with the Mix Assistant’s decisions we can alter the volume of different groups. Mix Assistant has auto assigned tracks to different groups; if it has got anything wrong we can also edit classifications. We’ll change the vocal chops from focus to voice as they’re a bit too prominent.
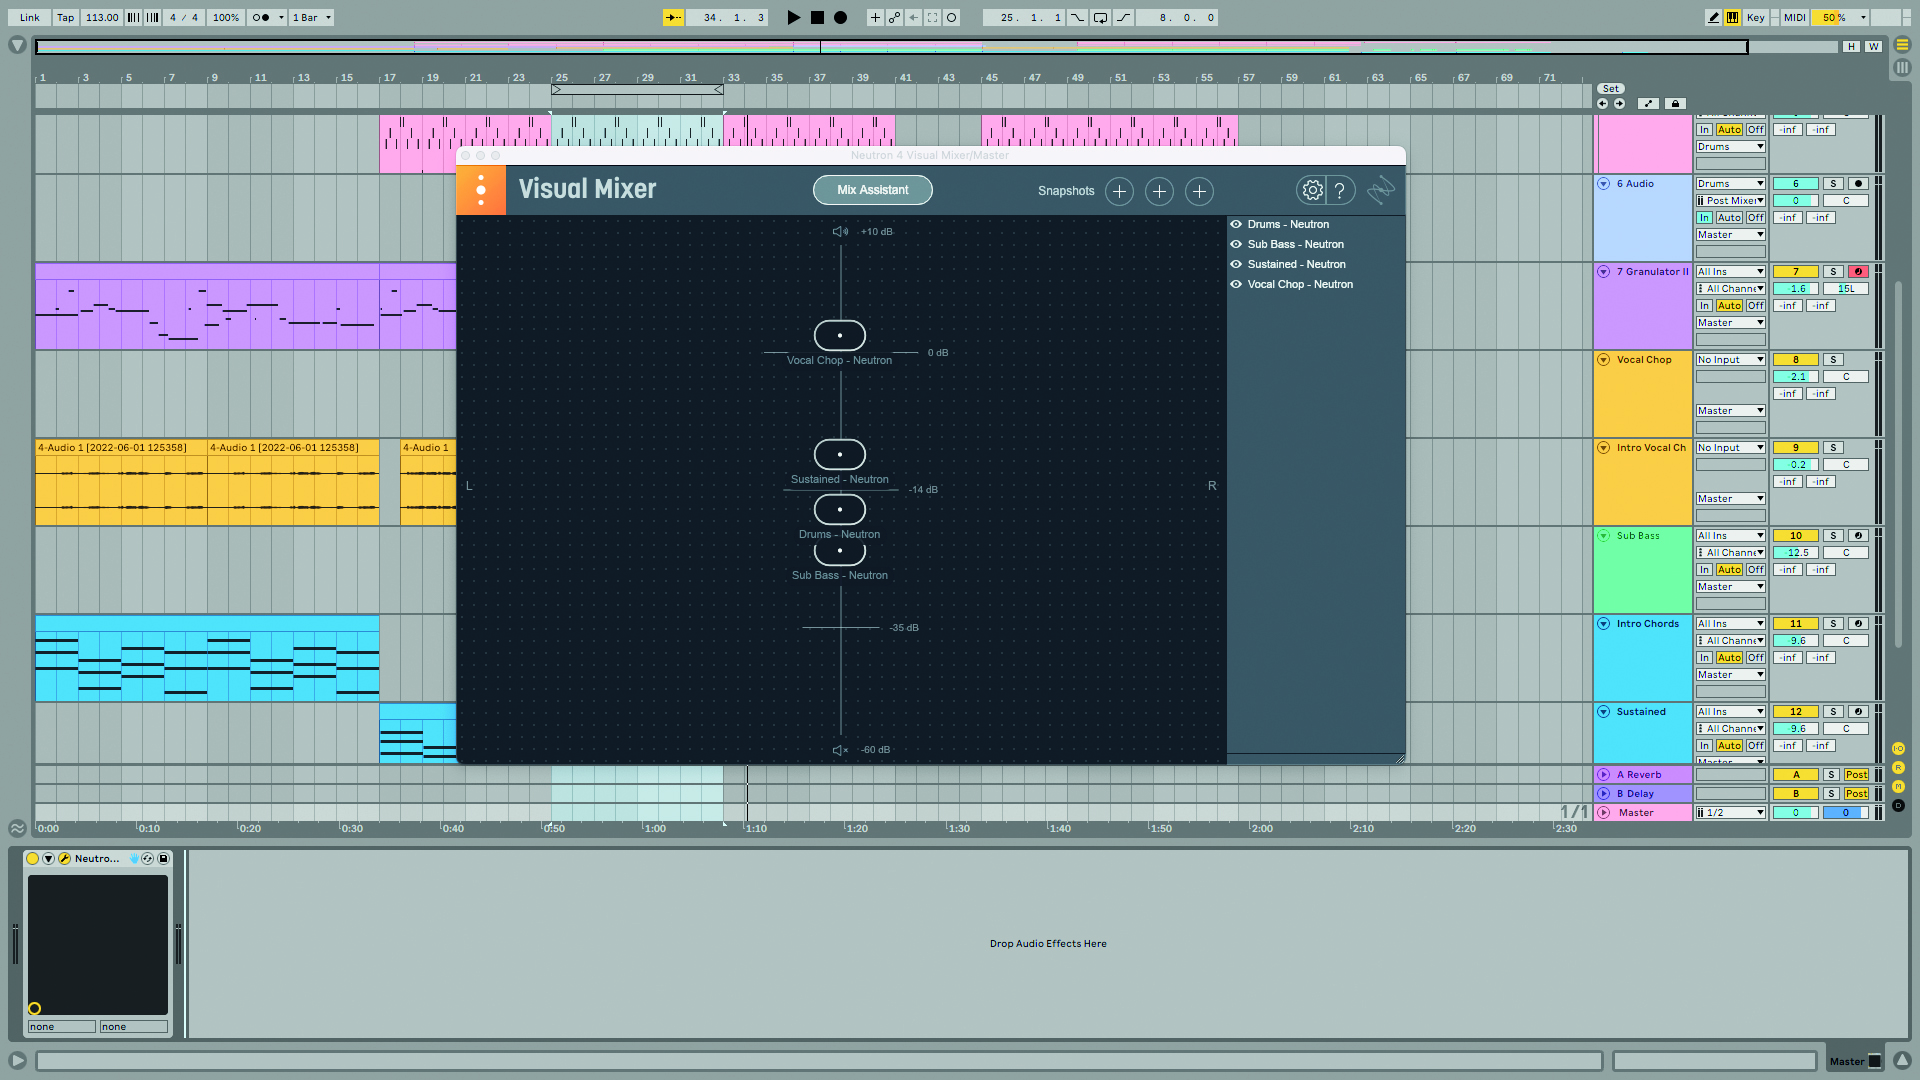
Step 6: Now the mix is sounding good we can accept Mix Assistants’s decisions with the Accept button. This will take us back to the main visual mixer window where we can see how each individual track has been mixed based on the Mix Assistant’s decisions.
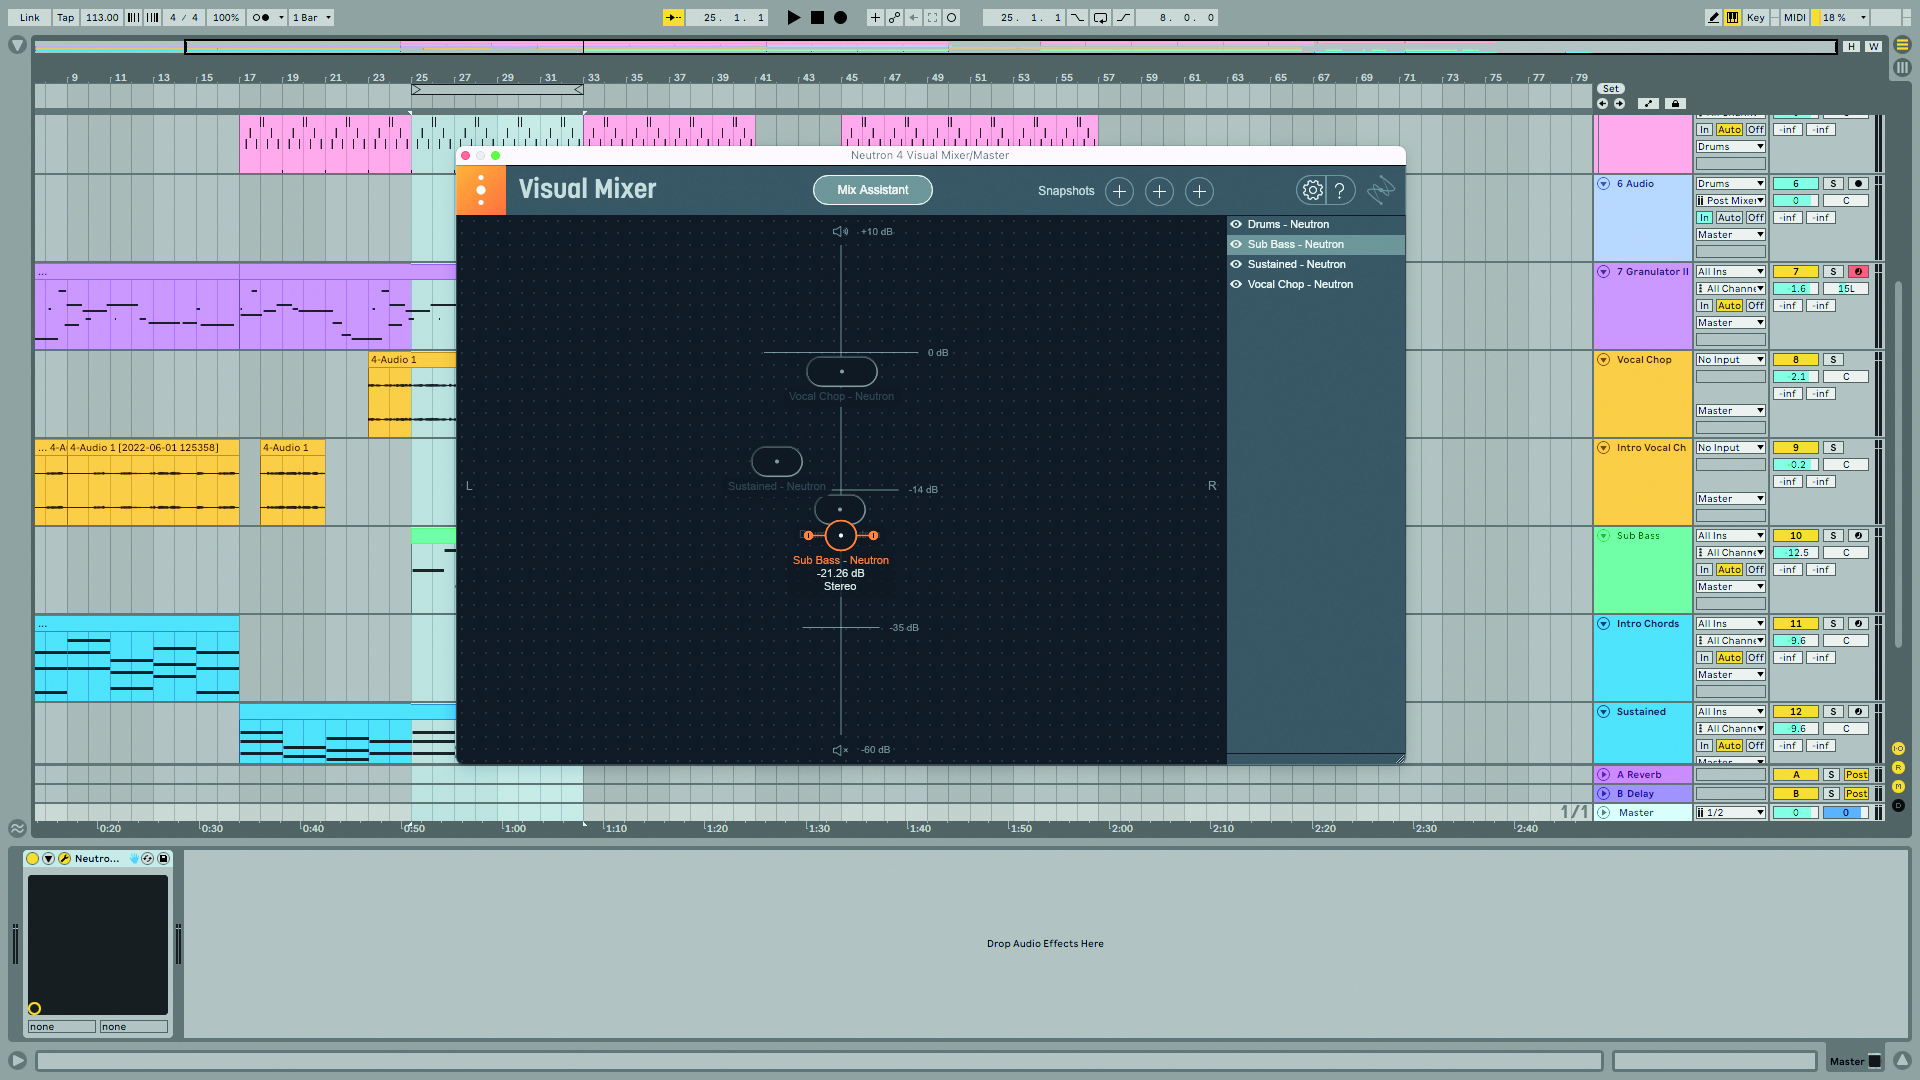
Step 7: We can now make further adjustments to the mixdown. Tracks can be turned up and down by dragging each floating bubble up and down. We can pan tracks in the same way by dragging them left and right, and adjust the stereo width of tracks with the handles on each bubble.
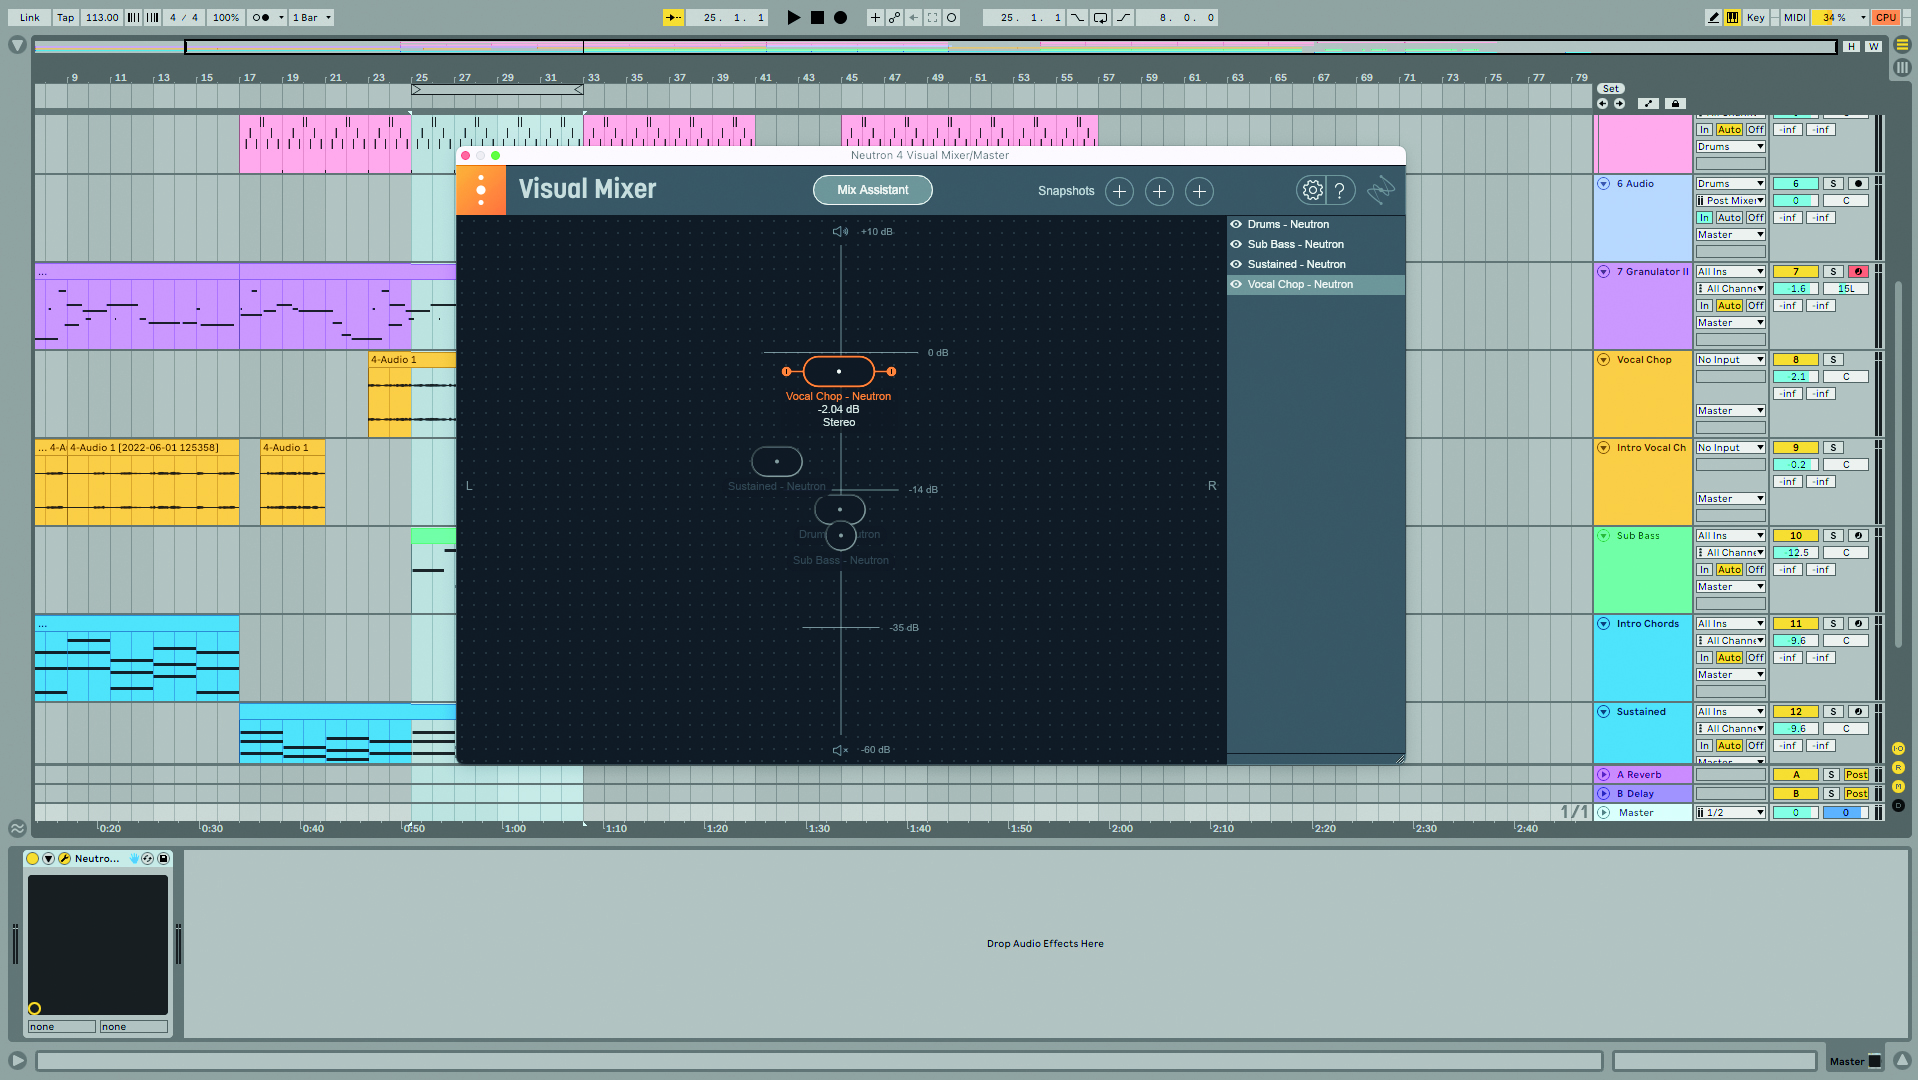
Step 8: This visual mixing style can be useful if traditional mixing desk style interfaces aren’t your thing, or if you’re a beginner who is feeling overwhelmed by those rows of faders and dials!
Punch Compressor
With the addition of a third compressor, Neutron reveals the bias mixing has towards dynamic range. There’s the three compressor types, which can be loaded in two slots in the channel strip; plus we have Neutron’s multiband Transient Shaper and multiband Gate modules.
With the Punch Compressor filling in some of those transient shaper-esque duties, the lines are blurring between what each module can do and what it’s actually for. The busy mix engineer may not notice or will enjoy having more than one tool to suit a task – if the multiband gate doesn’t take the edge off a reverberant sound, maybe the transient shaper will. Or even the Punch Compressor set to expand a signal.
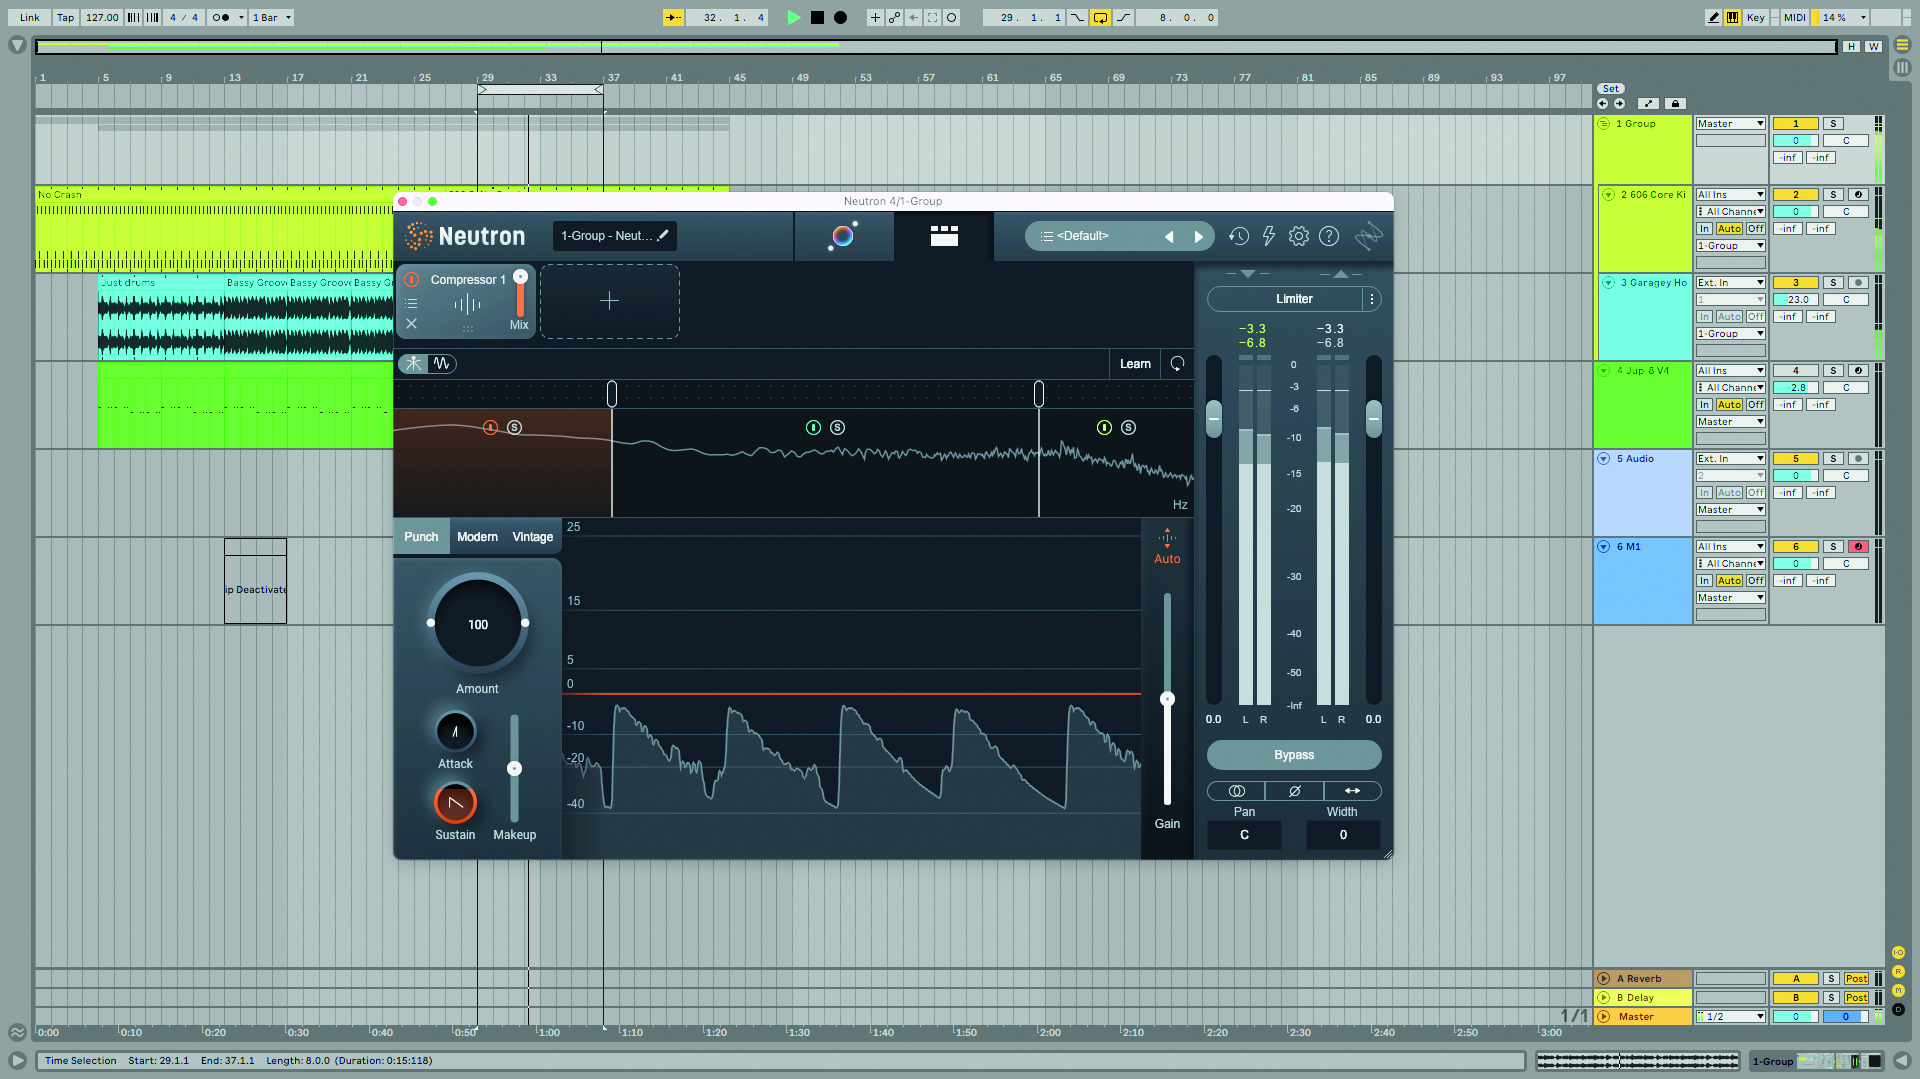
Step 1: Neutron’s Punch Compressor is a new addition and a third style of dynamics control that brings a simpler experience. Switch any Compressor module (Neutron lets you load two) into Punch mode to get going.
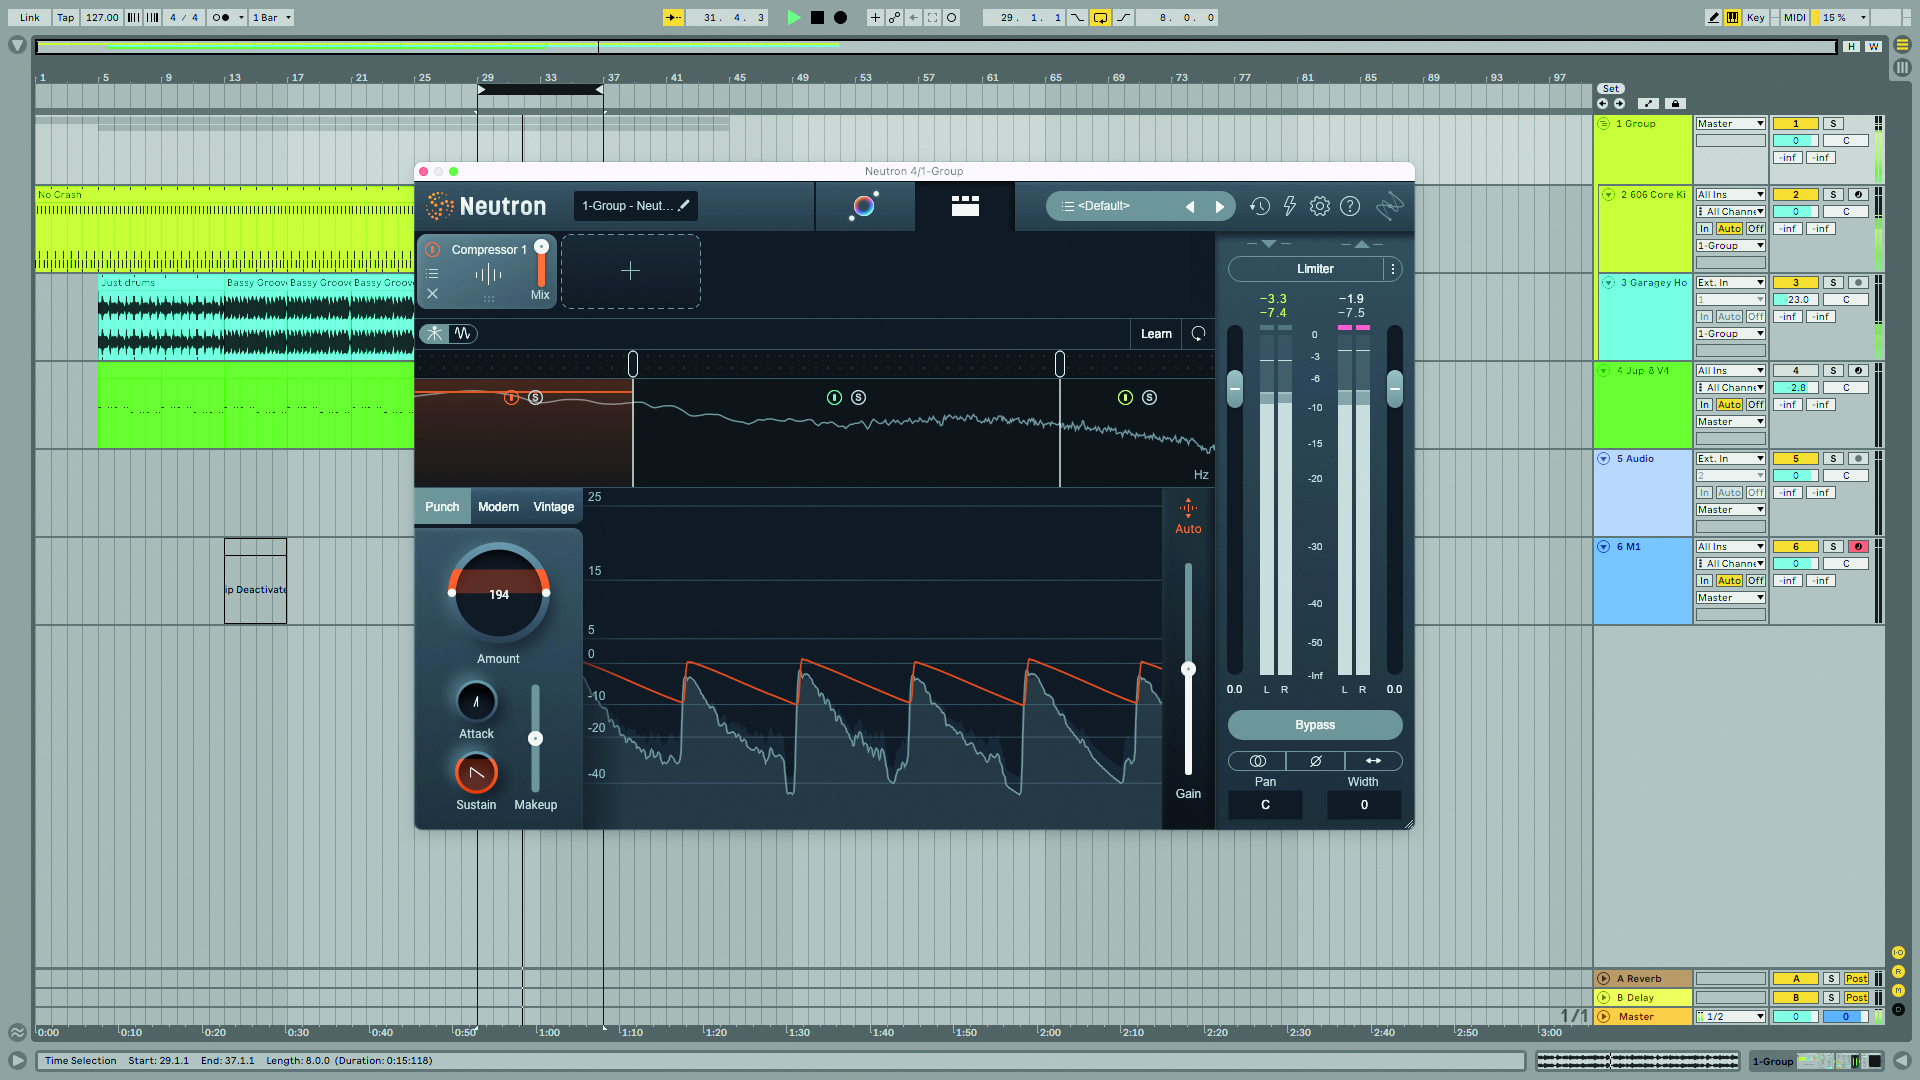
Step 2: The main knob takes effect over the dynamic range of the signal, and operates in a bipolar fashion for simple selection of compression (dynamic range reduction) or expansion (dynamic range increase). Timings are taken care of under the hood.
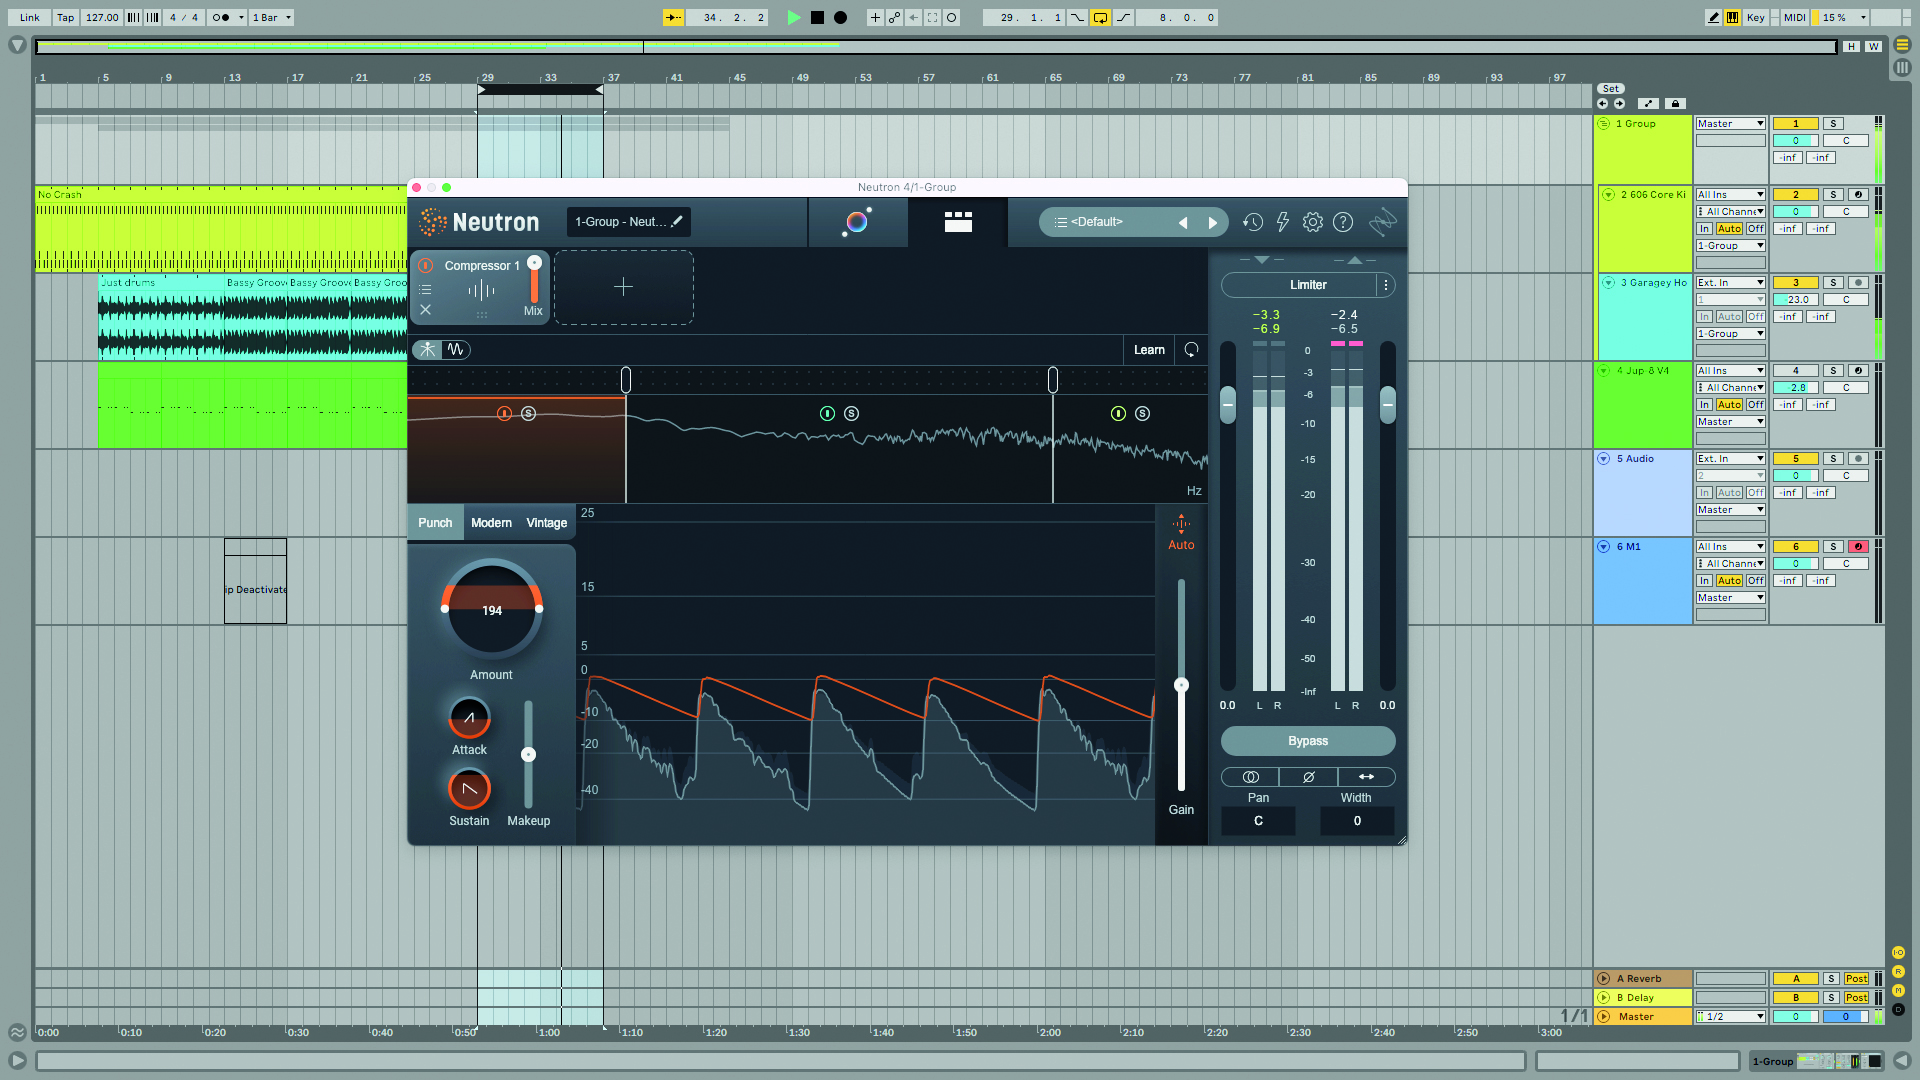
Step 3: The Attack control determines how quickly the processing type is applied when the signal is subject to compression or expansion. Sustain determines how much processing is applied after a sound’s attack to get the signal into line.
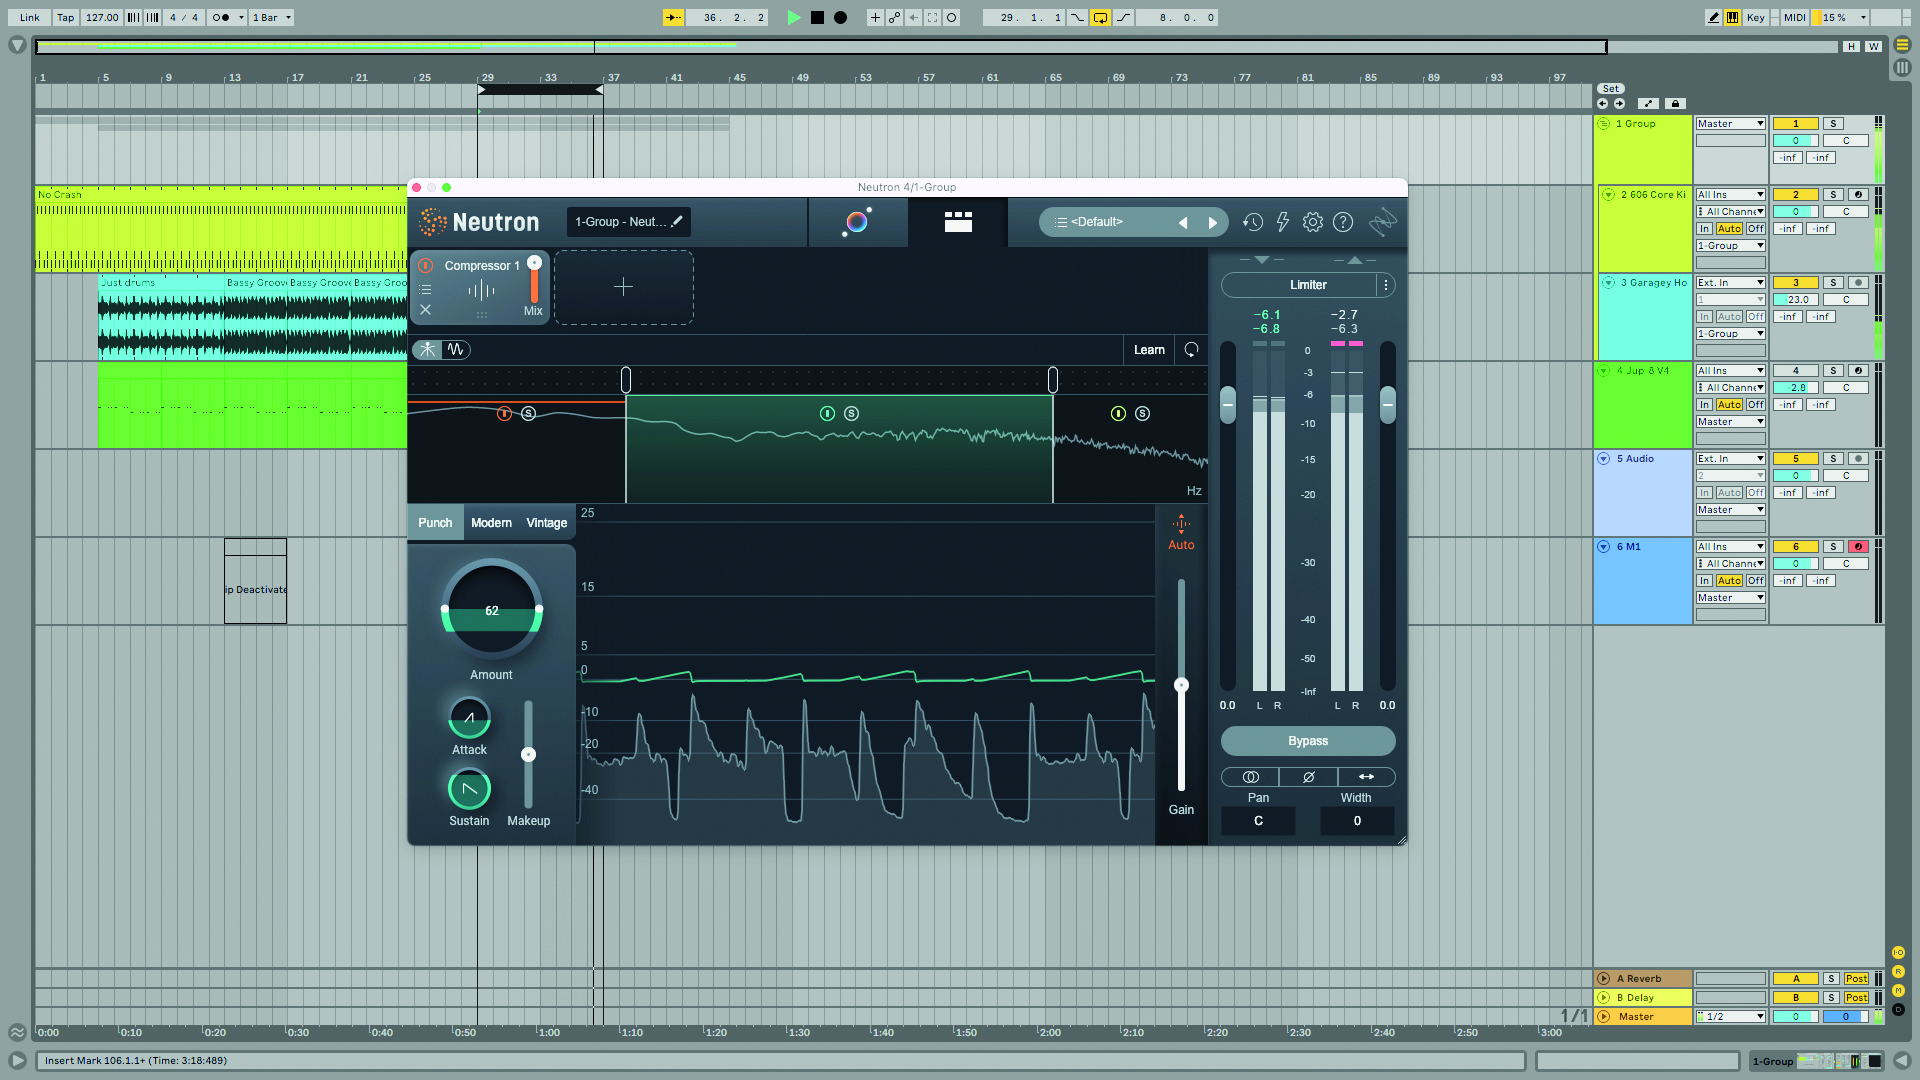
Step 4: Remember, the compressor is a multiband model, even in Punch mode. So you can tailor different parts of the frequency spectrum with different Attack and Sustain values, acting somewhat akin to Neutron’s Transient Shaper module.
Three alternatives to Neutron 4
1. Universal Audio Spark
Price: $19.99/mo | Buy
UAD software has ‘gone native’ with Spark, the new subscription service to UA’s line of analogue-modelled mixing plugins. It’s not the cutting-edge AI direction like Neutron; it’s for the analogue-loving producer who wants bags of character in their mixdowns.
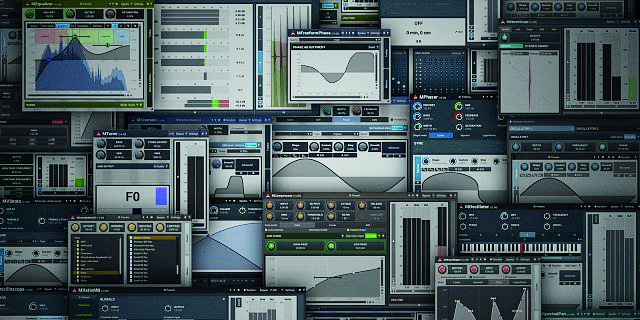
2. MeldaProduction MMixingFXBundle
Price: £553/$600 | Buy
33 effects plugins to get you a huge number of tools from the characterful to the clinical. It’s not integrated in one strip à la Neutron, but there’s a lot more variety here if you want to mix and match processors as you see fit.
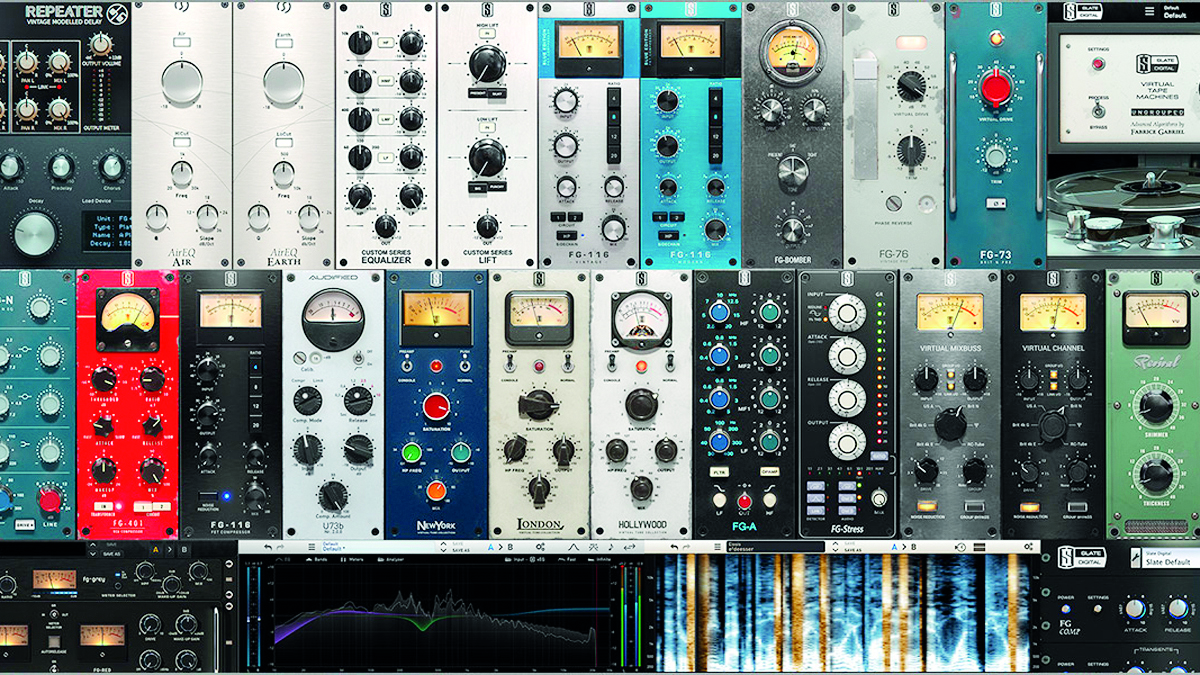
3. Slate Digital All Access Pass
Price: $24.99/mo | Buy
A huge number of plugins including Slate’s analogue-style VMR, and many by other developers too. The focus is on analogue but there’s a good amount of digital stuff here too.


Future Music is the number one magazine for today's producers. Packed with technique and technology we'll help you make great new music. All-access artist interviews, in-depth gear reviews, essential production tutorials and much more. Every marvellous monthly edition features reliable reviews of the latest and greatest hardware and software technology and techniques, unparalleled advice, in-depth interviews, sensational free samples and so much more to improve the experience and outcome of your music-making.
“From a music production perspective, I really like a lot of what Equinox is capable of – it’s a shame it's priced for the post-production market”: iZotope Equinox review
"This is the amp that defined what electric guitar sounds like": Universal Audio releases its UAFX Woodrow '55 pedal as a plugin, putting an "American classic" in your DAW


