How to use a digital guitar amp, part 1: getting started and creating presets
Get to grips with the Marshall CODE

Whether this is your first amp or a new addition to your existing arsenal, the CODE amp has a wealth of features that ensure it can cover just about any sound you might need.
Despite its affordable price tag, there’s a staggering array of features, including just about every classic Marshall sound, plus Bluetooth functionality, USB computer interactivity and much more.
Suffice to say, there are a lot of options available within this diminutive guitar amp, but there’s no need to feel intimidated: the basics of using the CODE are a breeze, so we’ve put together an in-depth guide to getting the most from your new amp.
First up, let’s take a look at dialling in tones and saving presets.
Basic controls
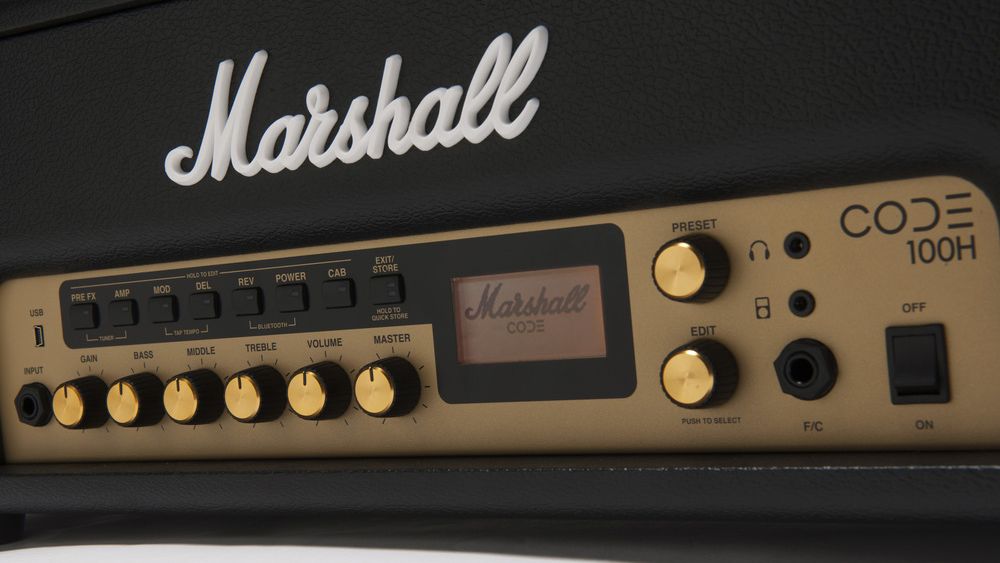
Aside from the master volume, five parameters are immediately at your fingertips in every patch. These are Gain, Bass, Middle, Treble and Volume, and are identified with dedicated knobs on the front panel of the CODE amp.
When on a patch, if you want to change these from the default value, then simply turn the knob - it's as easy as that!
Signal path controls
Above the main control knobs is a row of buttons that are intended to replicate a standard guitar signal path. In order, the buttons are 'PRE FX', 'AMP', 'MOD', 'DEL', 'REV', 'POWER' and 'CAB'.
'PRE FX' covers guitar effects that you'd expect to see in front of the amp, for example an auto-wah, pitch-shifter or compressor.
'AMP' is the amp model being emulated; choose from a smorgasbord of vintage and modern Marshall designs like the JCM800, JTM45, Plexi or Dual Super Lead.
'MOD' covers modulation effects like tremolo and chorus, while 'DEL' and 'REV' are delay and reverb, respectively. A variety of space sizes are available for the reverb besides a classic spring reverb, and the delays run from a clean studio-style delay to more wacky reverse delay options.

'POWER' lets you set the power amp emulation, meaning you can simulate differing degrees of headroom, or, put another way, play with the point at which the amp will begin to 'break up' or hit saturation.
Finally, 'CAB' gives you access to cabinet simulation, so you can try a variety of sizes and models.
Several other options are available via these buttons: a tuner, tap tempo functionality and Bluetooth. Pressing 'PRE FX' and 'AMP' together will activate the tuner, while tap-tempo is accessed by pressing 'MOD' and 'DEL' together.
In tap-tempo mode, pressing the Preset knob in time will change the tempo, as indicated by the display panel. To exit, press 'STORE'.
Selecting a preset
When you first turn the amp on, it will be on Preset 0, 'EL34 Heaven'. Turning the Preset dial on the amp control panel will page through the available presets, each with their own settings ready to be recalled.
As you switch between patches, you can see what options are on by default by looking at which of the signal chain buttons are lit, for example 'REV' for reverb, or 'CAB' for cabinet simulation.
Editing a preset
As you turn the knob, you'll see that the default, or original, value is on the right-hand side of the display, and your currently set value is on the left. This allows you to audition your new setting clearly against the original value, which is particularly useful when, say, editing EQ parameters.
The signal chain elements do not have their own dedicated control knobs. To change the parameters of one of the signal chain elements, for example 'DEL', or delay, hold the button until the green indicator lights up.
Now you can use the Preset dial to choose which effect patch you want to use for that signal element. Again, using the example of delay, you might select the 'Reverse' option. To change the parameters of this effect patch, press the Preset dial, and it will enter a sub-menu to edit the effect. On the CODE 50 or CODE 100, use the Edit dial instead of the Preset dial.
In this sub-menu, pressing the Preset dial moves on to the next user-editable option, and turning the dial alters the value for that parameter. Set these to your taste, then press 'STORE' to leave the editing screen.
If there are any signal elements that you do not want, for example 'REV', reverb, or 'MOD', modulation, on a given patch, you can press their dedicated button to deactivate them prior to saving, and that patch will no longer have them activated by default.
To quick save your changes, hold down the 'STORE' button. The amp will display a success message once the patch has saved.
Alternatively, you can save and rename the patch. To do this, press and briefly hold the 'STORE' button, and once the preset name is flashing, press and again briefly hold the button. A cursor should appear on the patch name.
Use the Preset dial to change the letter under the cursor, then press the dial to move to the next character. When finished, press 'STORE' to exit the editor. After this, hold down 'STORE' until the unit confirms your changes have been saved.
Finally, if you wish to restore the unit to its factory settings, hold down the 'AMP' option button, turn the CODE amp on, and press 'STORE' to confirm.
Naturally, all of these features can be controlled via the Marshall Gateway app as well. The app is available for both Android and iOS devices, and offers a feature-rich and intuitive way of editing these same parameters on-the-fly.
That about wraps it up for creating and saving tones - head over to our dedicated tutorials on integrating with mobile, and downloads, forums and community for more info on these expanded features.
Get the MusicRadar Newsletter
Want all the hottest music and gear news, reviews, deals, features and more, direct to your inbox? Sign up here.