How to build a delay effect in Reaktor
Create your own effects in Native Instruments' visual programming environment
Want all the hottest music and gear news, reviews, deals, features and more, direct to your inbox? Sign up here.
You are now subscribed
Your newsletter sign-up was successful
Reaktor enables you to build your own audio processors, tools and instruments from the ground up. Billed as the "ultimate creative toolkit for deep sound exploration", it's a complex beast that offers boundless creative possibilities.
Building synths in Reaktor is quite an accessible process, because even if you only know a little bit about synthesis you’re likely to understand the concepts involved – oscillators, envelopes, and all the rest. And if you understand these concepts, you’ll understand most of Reaktor’s synthesis-based modules too.
The same cannot be said for effects because we tend to see them as magical black boxes, rather than a collection of interconnected modules. So you may know what a particular effect does to a sound, but do you know what components and processes are actually used?
Article continues belowDelay is a very simple effect, and so building a delay processor will allow us to focus on finding out more about Reaktor itself, in particular its Core level and how to customise panel graphics, rather than the deeper details of how different effects are created.
Before taking on our guide to creating your own delay module in Reaktor, sharpen up on the basics with our tutorial on how to build your first Reaktor synth.
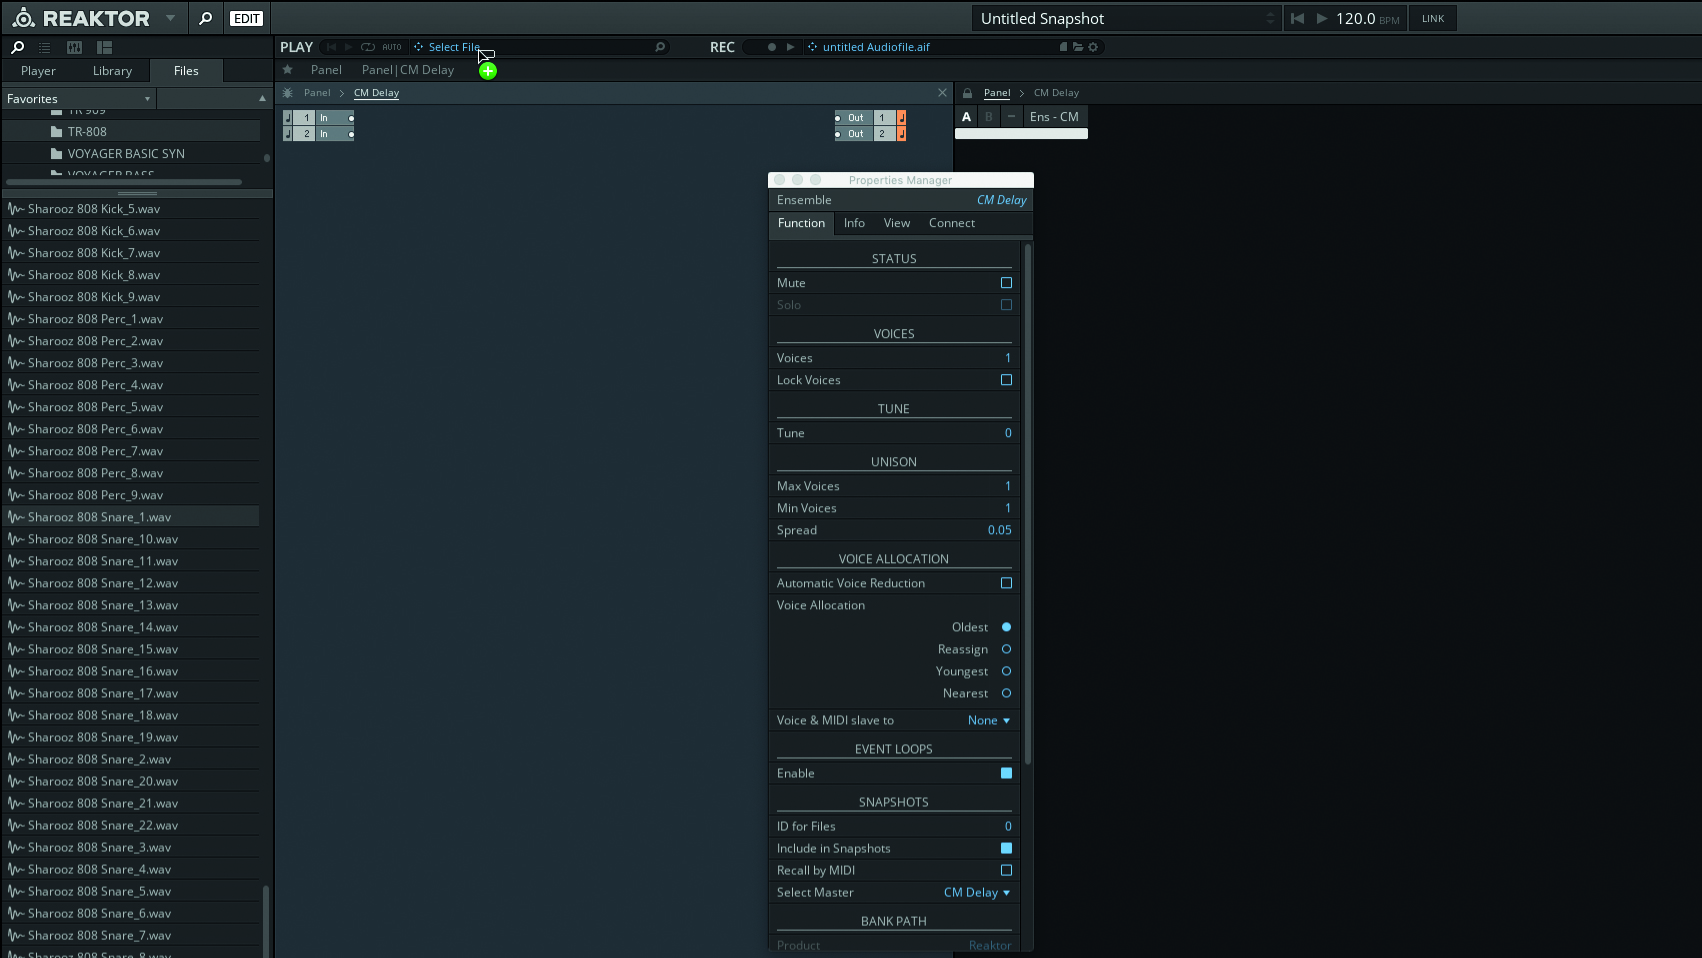
Step 1: Launch Reaktor in standalone mode, create a new Ensemble and give it a name (like “CM Delay”). Set up a sound source with which to audition your delay processor. This could be a live input or an audio file loaded into Reaktor’s Player. To load a file, open the sidebar’s Browser and drag a file from it to the Player.
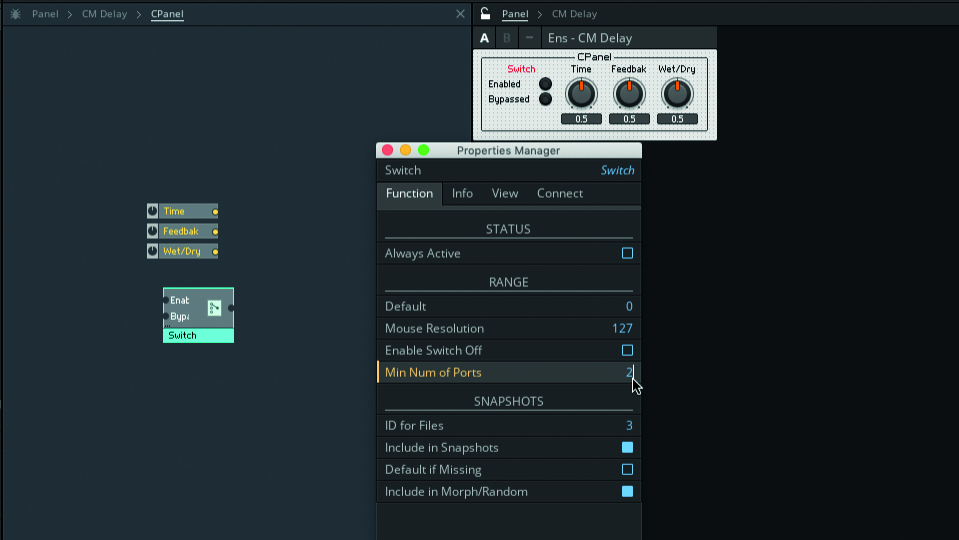
Step 2: It’s common to group the controls for a device into a dedicated Macro, which helps with keeping your structures neater and easier to manage. Create a Macro, name it “CPanel”, and navigate into it. Create three Knob modules and name them “Time”, “Feedback” and “Wet/Dry”. Create a Switch module, name it “Bypass”, and give it two ports called “Enabled” and “Bypassed”.
Want all the hottest music and gear news, reviews, deals, features and more, direct to your inbox? Sign up here.
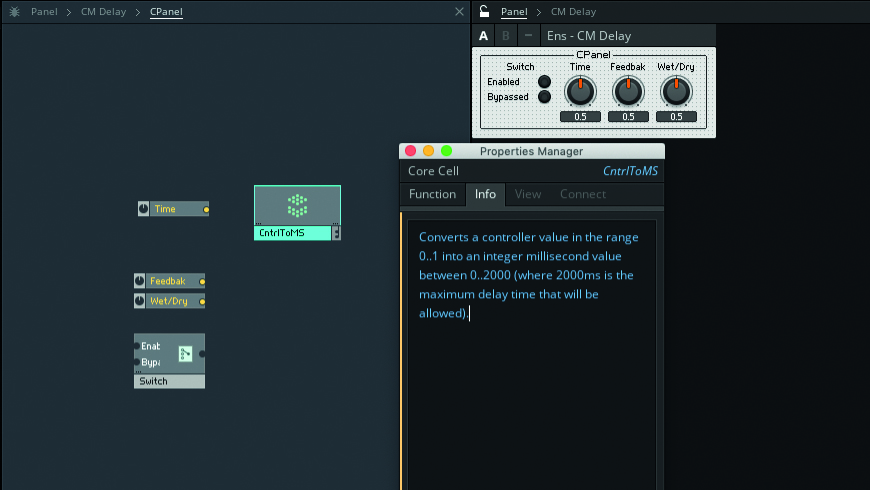
Step 3: Another common practice is to retain a Knob’s default value range of 0 to 1, and then scale this value if necessary. This is the ideal range for our Wet/Dry and Feedback Knobs, but Time needs to be scaled to integer (ie whole number) milliseconds of up to our maximum delay time of 2000ms. Create a Core Cell and name it “CntrlToMS”.
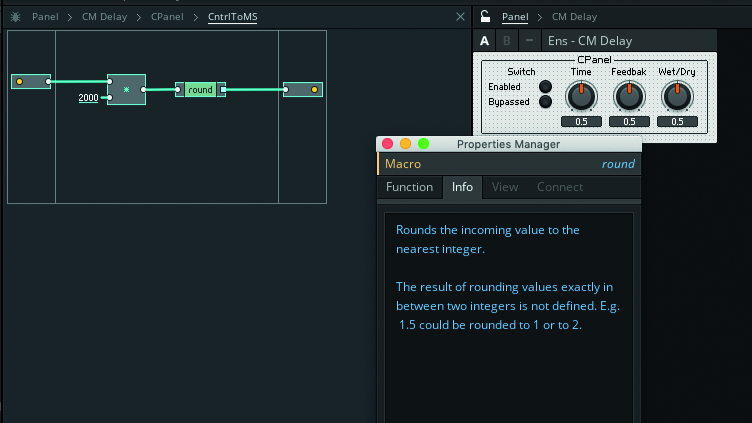
Step 4: Open CntrlToMS and create In and an Out event ports. Create a Multiply module, right-click its lower input terminal and select Connect to New QuickConst. Set the QuickConst’s value to 2000, then connect the In port to Multiply’s upper input. Create a Round module and connect it between Multiply and the Out port. Return to CPanel when done.
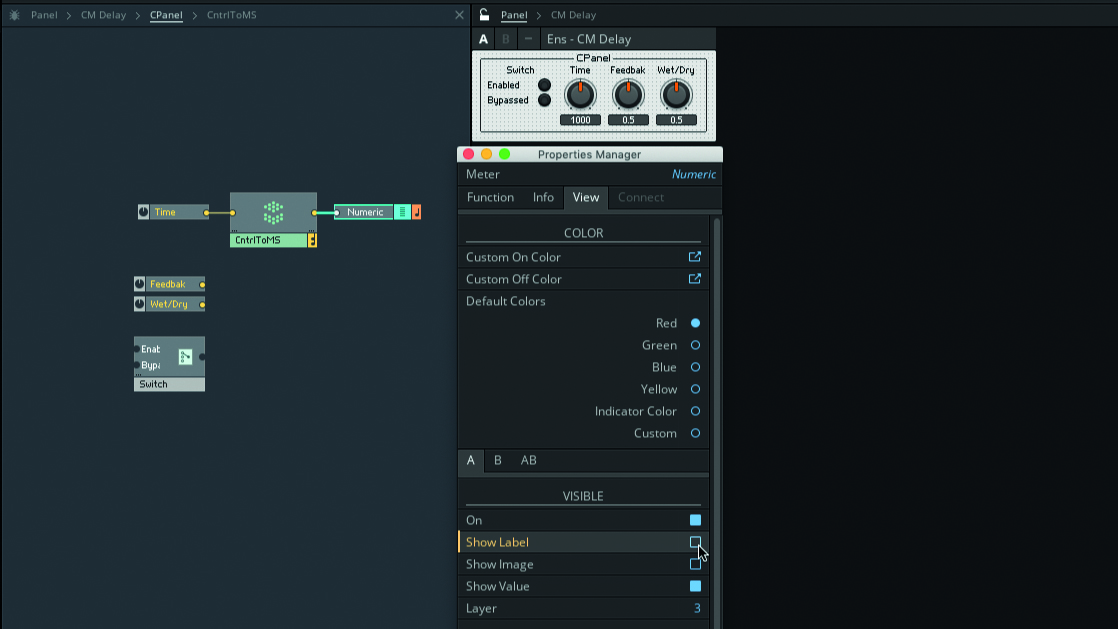
Step 5: Connect the Time Knob to CntrlToMS. The problem now is that Time’s readout won’t tell us what we need. Select the Knob, open View from the Properties Manager, and deselect Show Value. Create a new Numeric Readout, deselect its Show Label property, and put it under Time in the GUI panel. Connect CntrlToMS to the Numeric Readout.
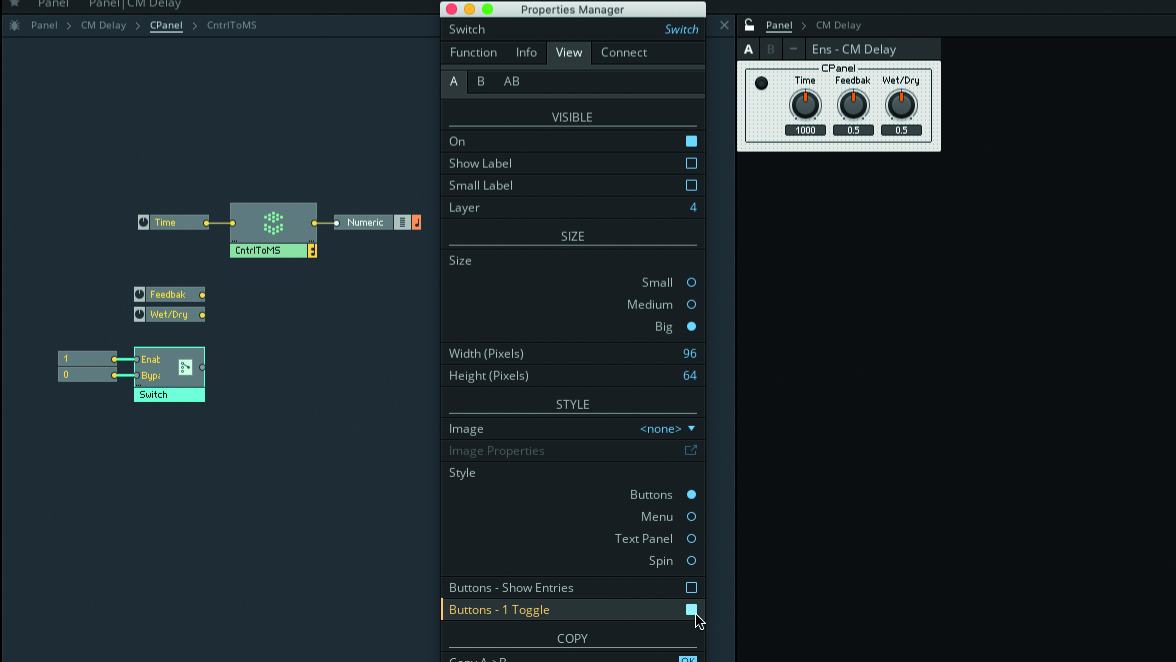
Step 6: The Bypass Switch needs to send a value of 1 to indicate an enabled state, and 0 to indicate a bypassed state. Create Constant modules with these values and connect them to the Switch. The Switch needs to just be an on/off indicator, so open the Switch’s View, disable Show Label and Button - Show Entries and enable Button - 1 Toggle.
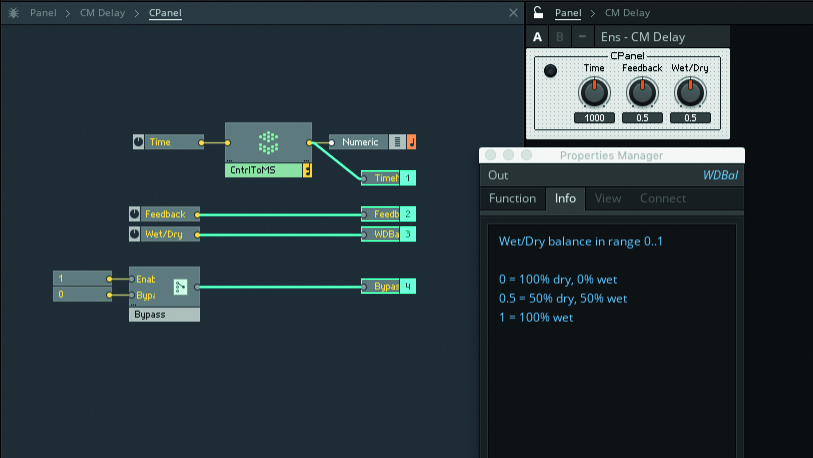
Step 7: Create Out Ports for each of your controls, naming each to indicate the control it is connected to; for the Time value, you should be sure to connect to CntrolToMS rather than directly to the Time Knob. Use the Properties Manager to enter info describing each port and the value range that it outputs. When done, return to the Ensemble.
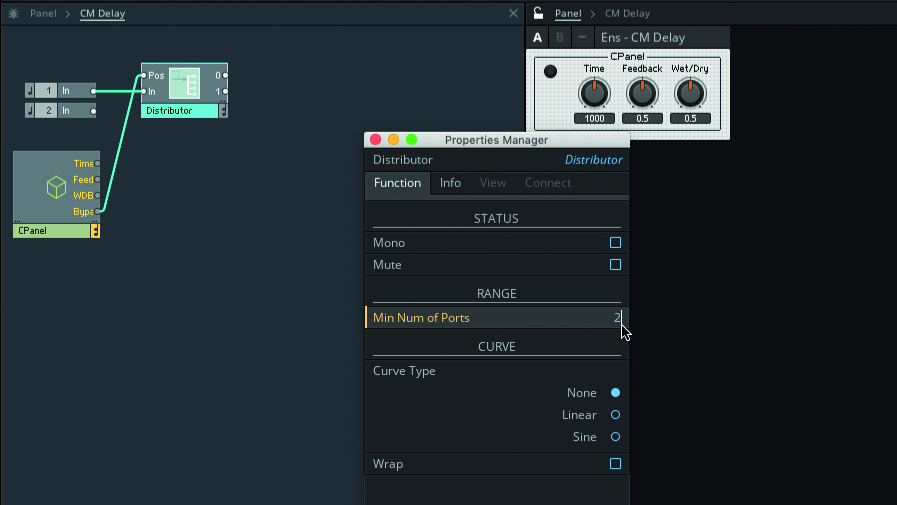
Step 8: A Distributor/Panner module will allow us to switch the signal between bypassed and processed pathways. Create one now, set its Curve Type property to None, and Min Num of Ports to 2. Connect its In terminal to one of the Ensemble’s In Ports (we’ll ignore the other for now), and its Pos terminal to CPanel’s Bypass Output.
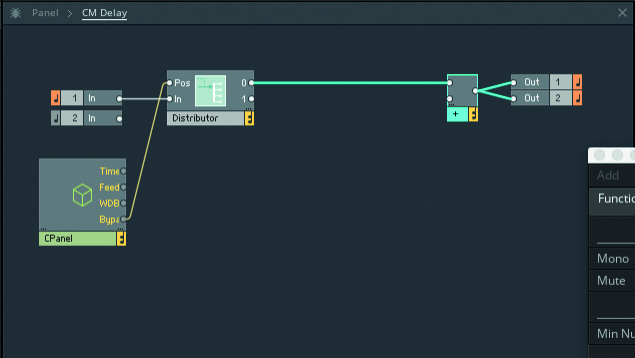
Step 9: The bypassed and processed pathways will have to rejoin before the Ensemble’s Out Ports. There are a few ways we could do this, but an Add module allows the processed signal to peter-out naturally when the processor is bypassed. Create the necessary module, connect its input to Distributor’s 0 output, and its output to both Ensemble Out Ports.
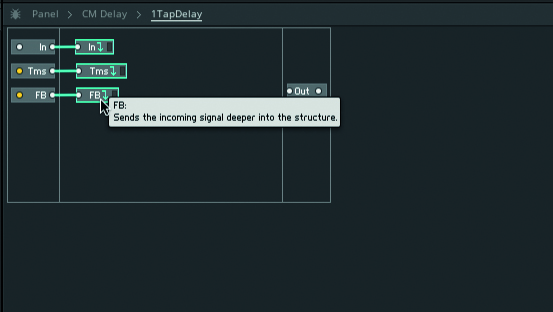
Step 10: Create a new Core Cell, name it 1TapDelay and navigate into it. Create audio In and Out ports, and two event In ports named “Tms” and “FB”. Connect each In port to new Distribution (Scoped Bus) modules, each named like the connected In port. These Distribution modules pass signals deeper into the structure minus wire clutter.
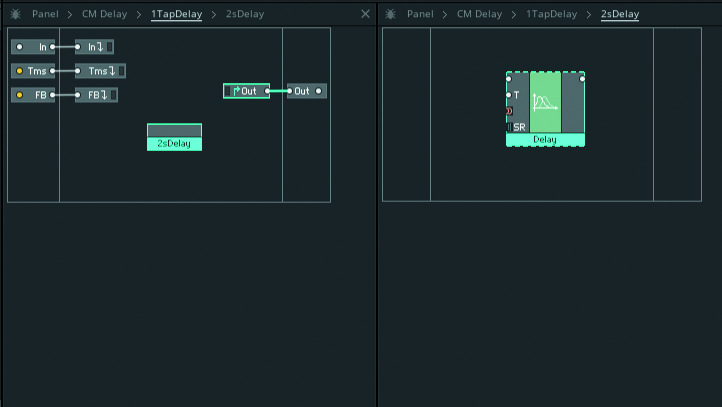
Step 11: Create a Reception (Scoped Bus) module, name it “Out” and connect to the Cell’s audio Out port. The Reception module is the flip-side of the Distribution one, getting signals from deeper in the structure. Make a new Macro named “2sDelay”. Create a Delay (Audio) module, and note the OBC Array connector…
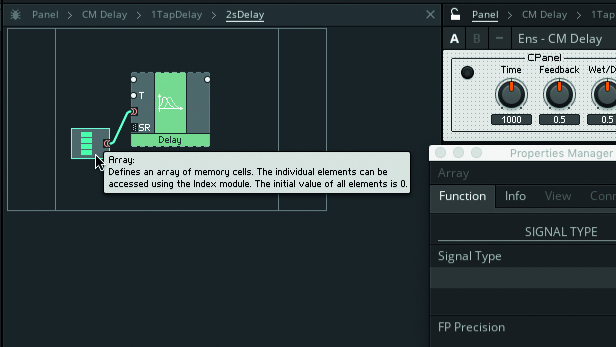
Step 12: A delay processor must store the incoming signal in memory; its multiple samples can’t be stored in a single location. An Array, however, represents a series of memory locations, so is the memory storage we need. Create an Array (Memory) module and connect it to the Delay module’s OBC Array terminal.
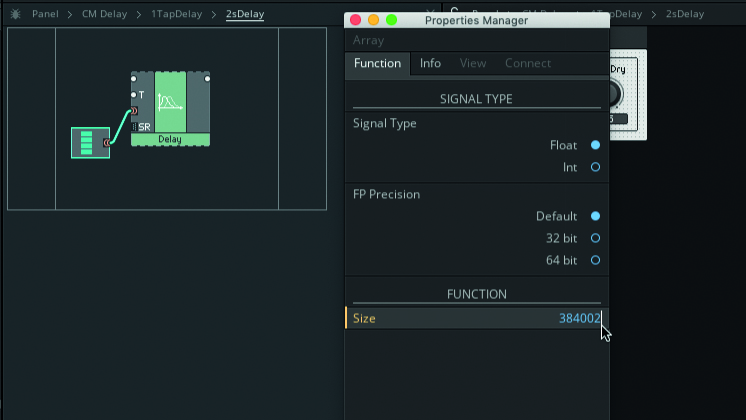
Step 13: Reaktor needs to know how many values we intend to store in an Array. For a delay processor, that number depends on the sample rate, so for two seconds of storage at 192kHz you’d need an Array with a size of 384,002 (the extra 2 is to do with sample interpolation). Set the Array’s Size property to this number.
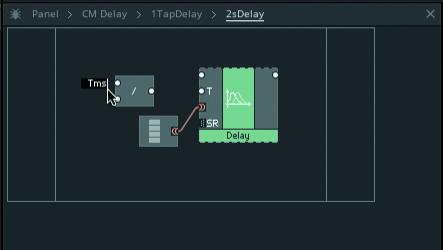
Step 14: Delay needs a seconds value at its T input. Create a Divide module, click its upper input and select Pickup Distribution Bus. A small type-in field appears, next to the terminal. Type “Tms” into the field, the name of the Distribution module sending 1TapDelay’s Tms input value. Red means you typed wrong.
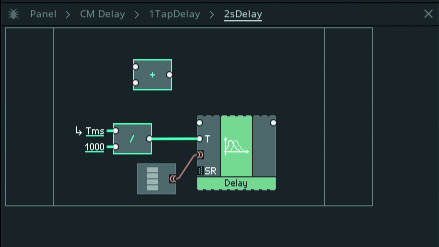
Step 15: Click Divide’s lower Input, Connect to New QuickConst: enter “1000” in the field that appears. We regularly need constants in Core, and QuickConsts are good for creating them. Connect Divide’s output to Delay’s T input. The audio Input needs to mix with the feedback signal. Create an Add module to do this.
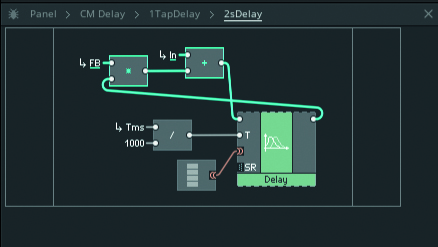
Step 16: Link Add’s upper Input to the In Distribution Bus, and output to Delay’s top connector. The feedback signal is Delay’s Output multiplied by the Feedback control’s value, found via the FB Dist Bus. Make a Multiply module, connect Delay’s Out to an In and FB bus to the other. Link Multiply’s Out to Add’s lower Input.
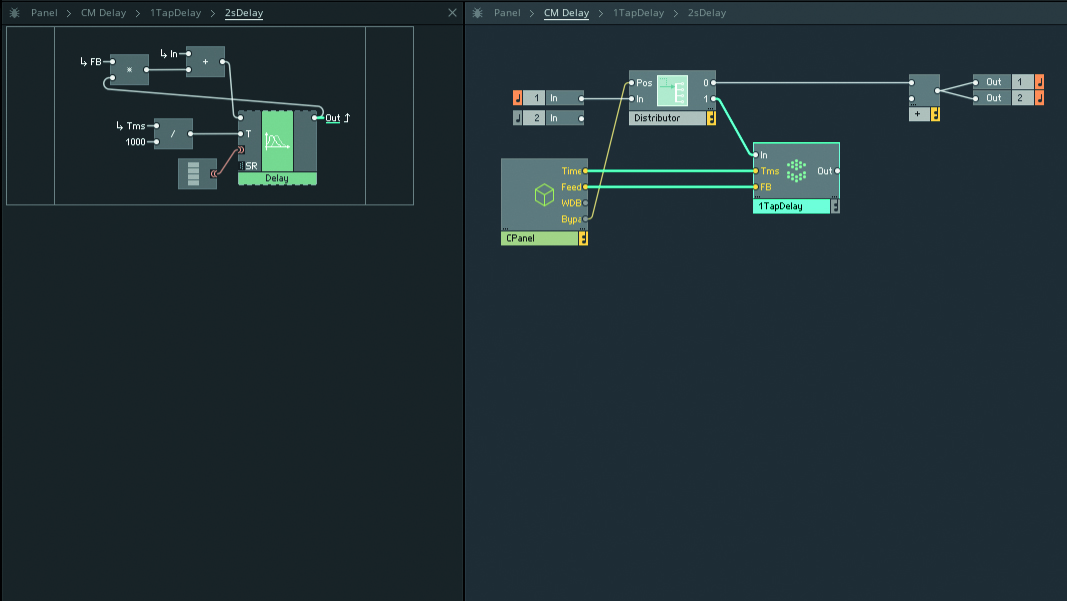
Step 17: Right-click on Delay’s Output, select Connect to Reception Bus, and type “Out” in the field that appears. This sends Delay’s Output back to the Reception module in 1TapDelay, which is in turn connected to 1TapDelay’s Out port. Navigate back to the top of the Ensemble and connect Distributor’s lower Output to 1TapDelay’s Input. Also connect up the CPanel Output.
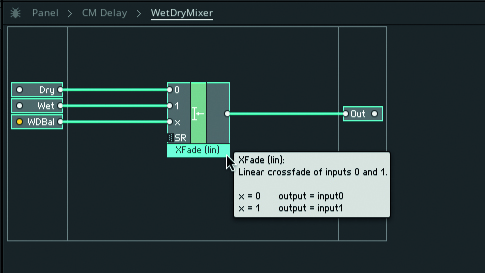
Step 18: Create a Core Cell, name it “WetDryMixer”, and navigate into it. Create audio In ports named “Dry” and “Wet”, an audio Out port named “Out”, and an event In port named “WDBal”. Create an XFade (Lin) (Audio) module. Connect the Dry input to XFade’s 0 input, Wet to its 1 Input, and WDBal to its X Input. Connect XFade’s Output to the Cell’s Out port.
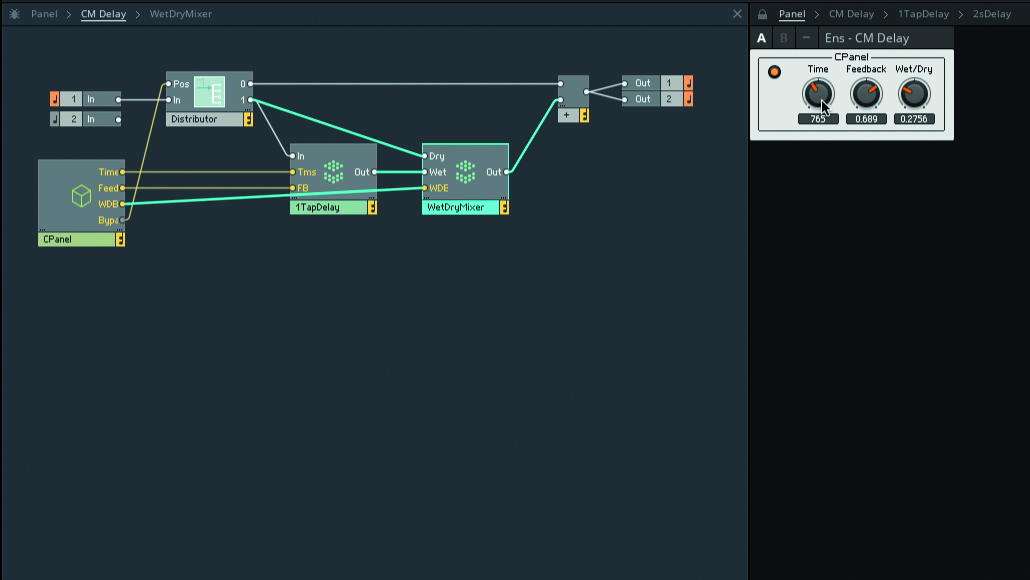
Step 19: Return to the Ensemble. Connect Distributor’s 1 Output to WetDryMix’s Dry Input, and the output from 1TapDelay to its Wet Input. Connect CPanel’s WDBal Output to WetDryMixer, and WetDryMixer’s Output to the Add module that comes just before the Ensemble’s Out Ports. Your processor should now be working. It’s somewhat plain, though, so let’s make it a bit more interesting.
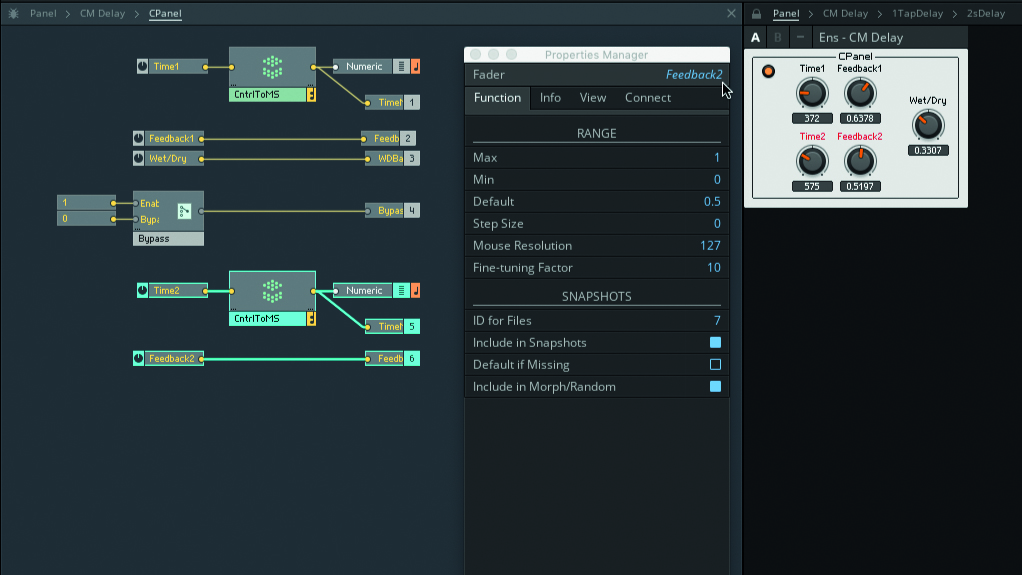
Step 20: Open CPanel. Rename the Time knob to “Time1” and its Out Port to “TimeMS1”, then duplicate the whole Time Knob to Output structure. Rename the duplicated Knob to “Time2” and duplicated Out Port to “TimeMS2”. Repeat the process to duplicate and rename the Feedback Knob/Out Port – then rearrange the controls in the GUI panel too.
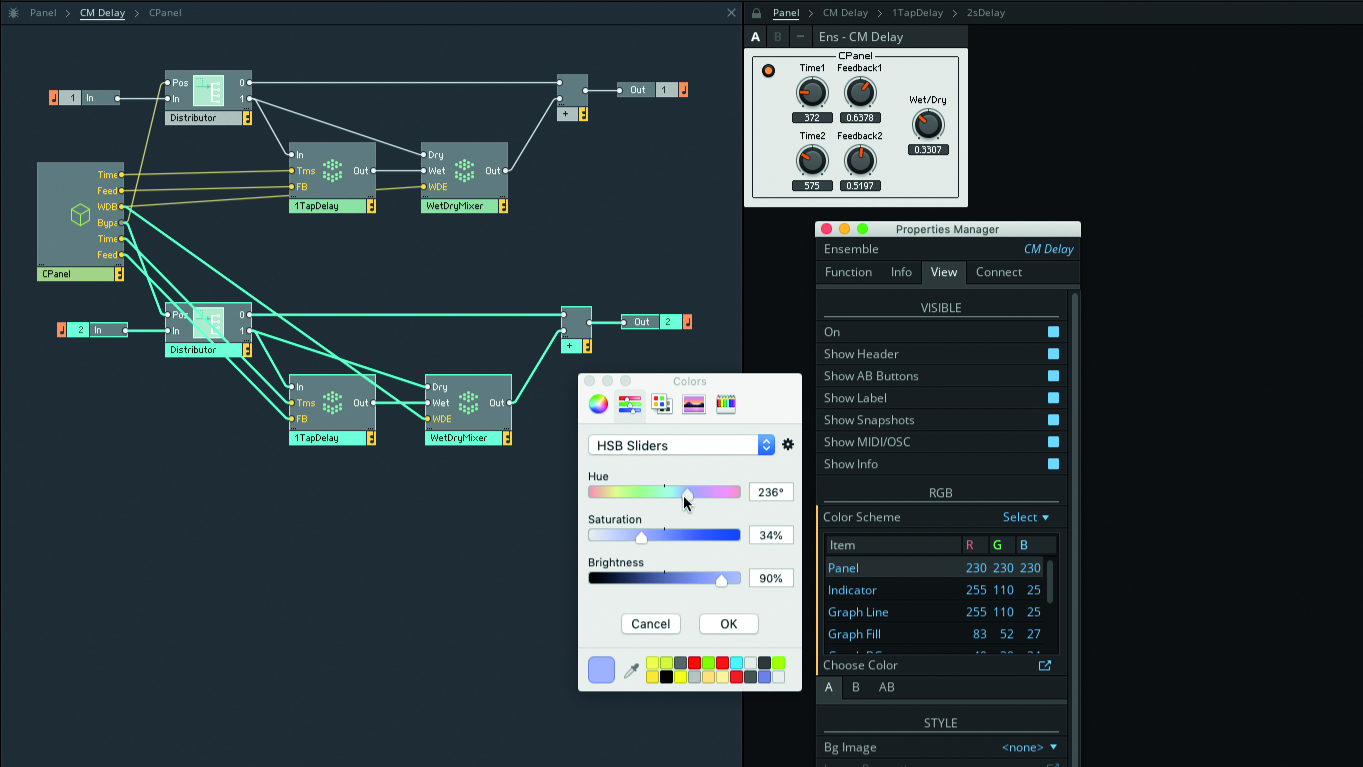
Step 21: In Ensemble, duplicate the Distributor, 1TapDelay, WetDryMixer and Add modules. Connect the Ensemble’s unused In Port to the duplicated Distributor, and the new CPanel control outs to the duplicated 1TapDelay and WetDryMixer. In Ensemble’s View properties, change the Panel and Indicator colours, selecting their entry in the Color Scheme list.
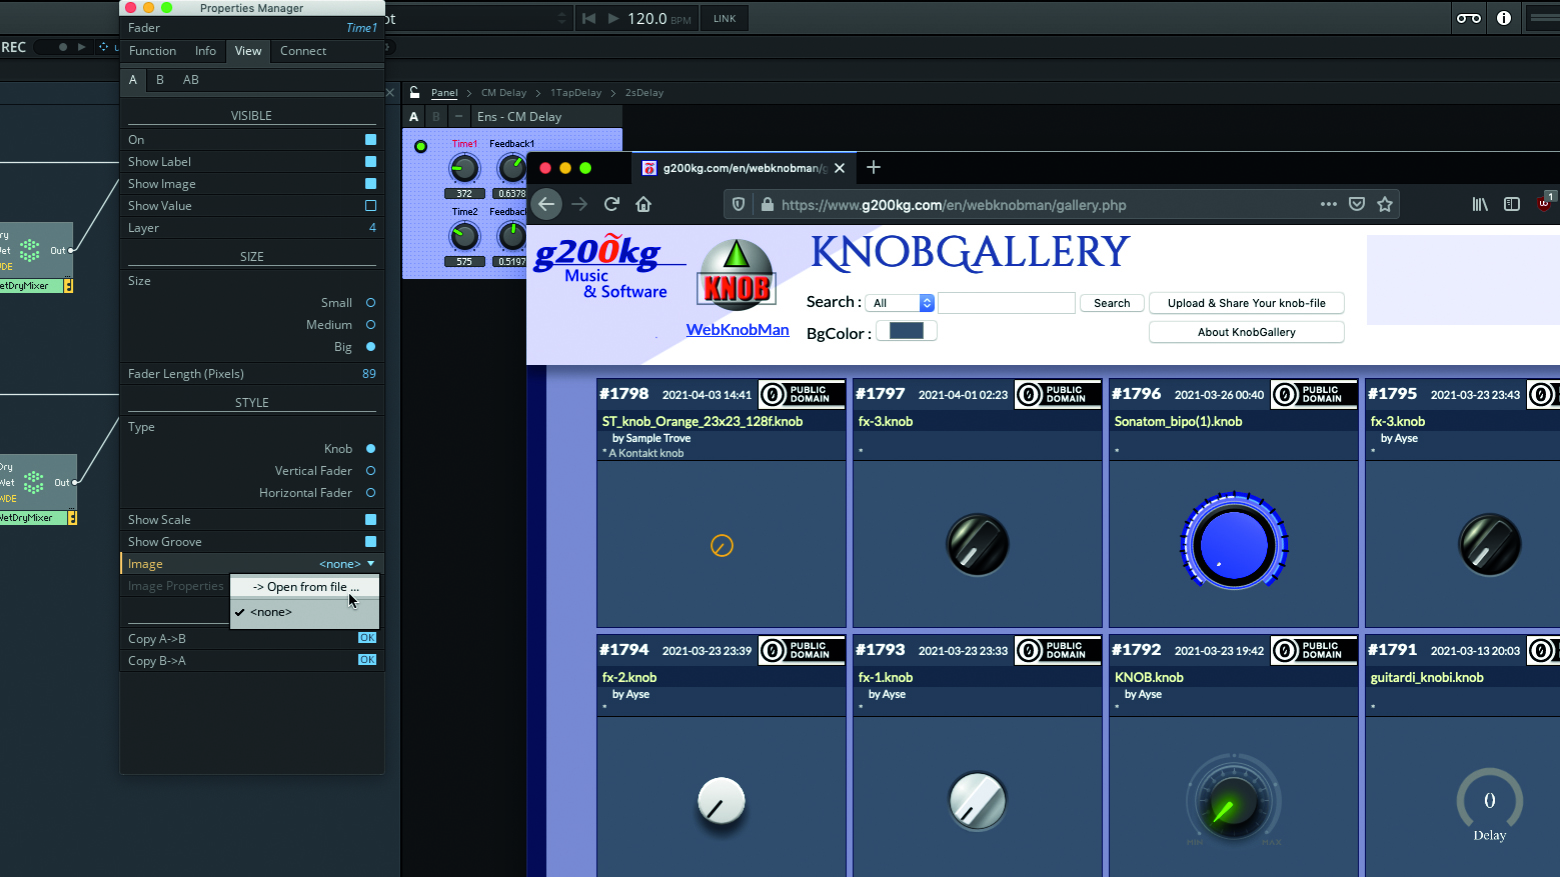
Step 22: Select CPanel and, in its View properties, change Frame to None then adjust the Borders properties to taste. Go to bit.ly/knobgraphics and download a nice knob graphic. Back in Reaktor, select the Time1 Knob in the GUI panel (being sure the panel is unlocked), click the Image drop-down in the View properties, and select Open From File.
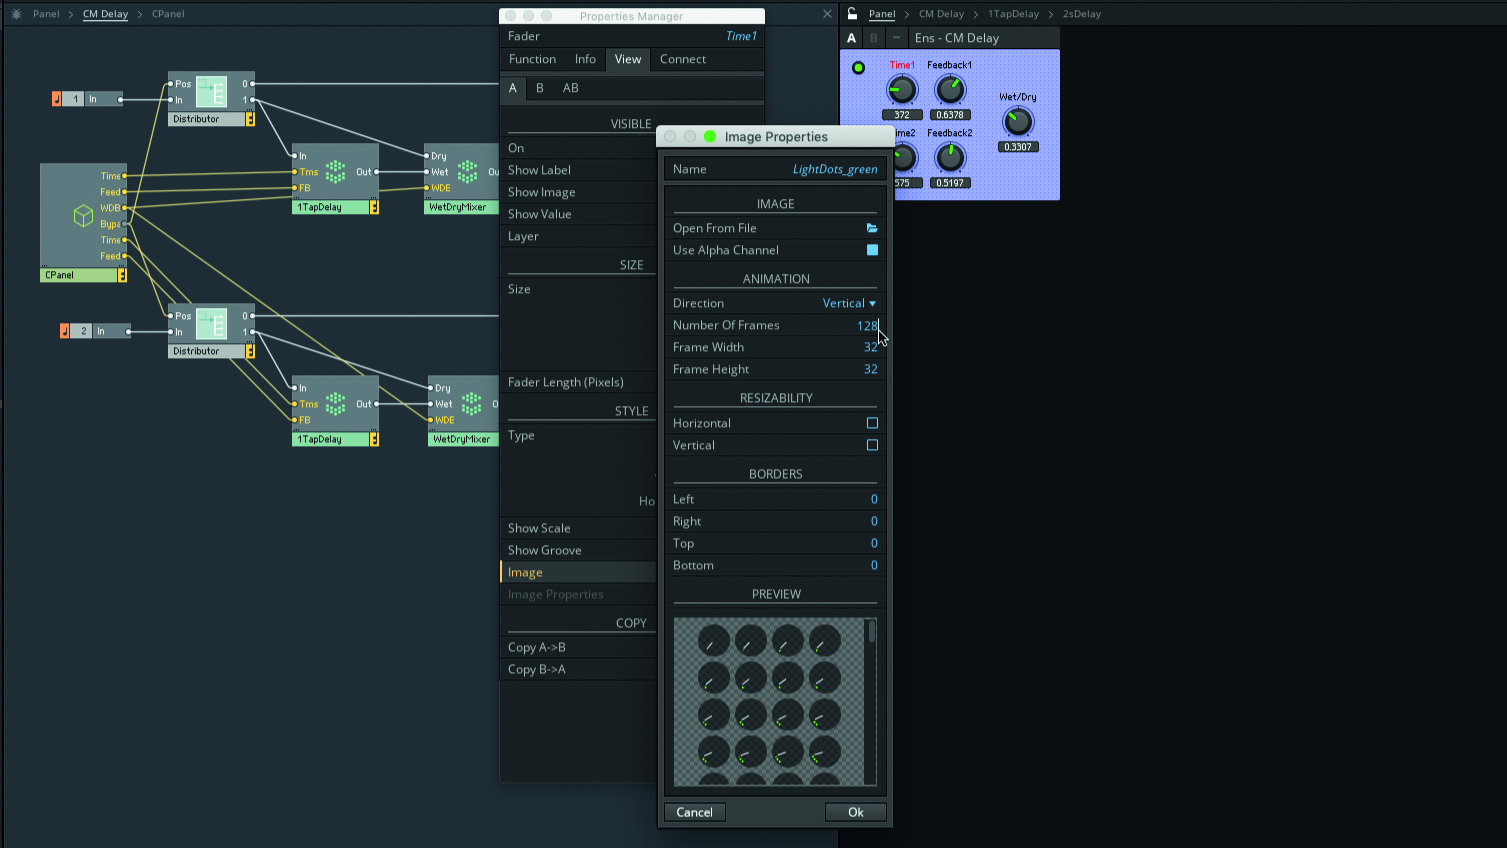
Step 23: Browse to your downloaded graphic and select it to load – the Image Properties panel will open. Knob graphics contain multiple versions of an image, one for each position of the knob, laid out horizontally or vertically like a film strip. Enter the number of frames in the graphic (typically 100 or 128) and click OK – the Custom knob should now be visible.
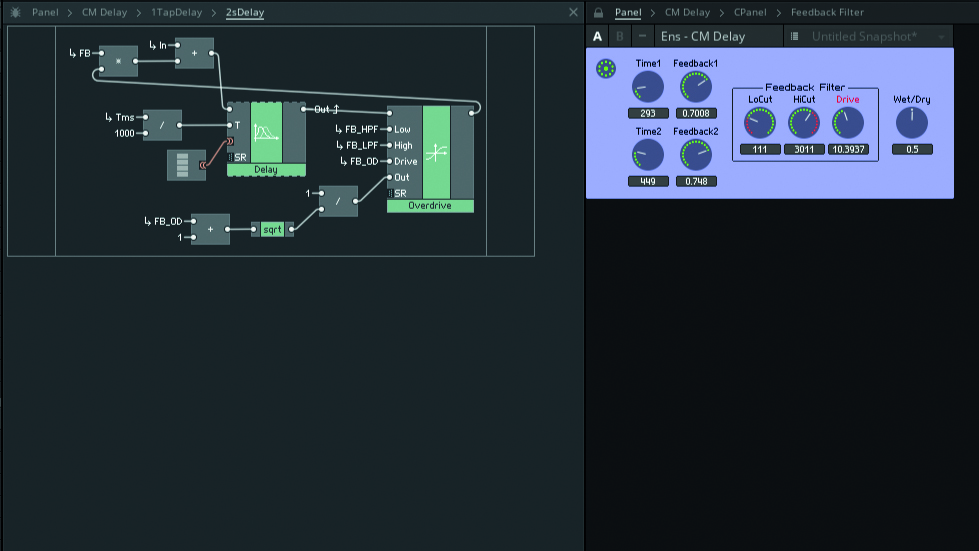
Step 24: Select the next Knob in the GUI and open View properties’ Image drop-down again – this time you can just re-select the previously used graphic. Once done customising your panel, have a think about other improvements you could make – try adding filters and/or overdrive to the delay feedback loops… you know what to do.

Computer Music magazine is the world’s best selling publication dedicated solely to making great music with your Mac or PC computer. Each issue it brings its lucky readers the best in cutting-edge tutorials, need-to-know, expert software reviews and even all the tools you actually need to make great music today, courtesy of our legendary CM Plugin Suite.
