Everything you need to know about Ableton Live 11
Your whistle-stop guide to what's set to be the biggest DAW release of the year
The team at Ableton has been honing Live, its DAW, carefully and skilfully since 2001, creating a massive cult following in the meantime, and with the announcement of Live 11 - coming in the first quarter of 2021 - newcomers and veterans alike are equally excited, and for good reason.
Live 11 is impressive for many reasons, as it adds workflow tweaks that are both large and small. It finally adds a few improvements that long-time users have been requesting for years, including the ability to comp audio and MIDI tracks into take folders, and the ability to link tracks together and edit them all together.
MIDI editing has been drastically overhauled, as there is now probability, velocity ranges, and a new Scale mode that can be enabled on a per-clip basis.
Several flagship Ableton Live devices are also seeing drastic overhauls, increasing their functionality in the meanwhile. The Chorus and Ensemble effects are now grouped together in a new plugin that allows the user to select between the two effects and a vibrato setting. A Dry/Wet control and the addition of a Warmth knob, which adds some vintage character, greatly increase the usefulness compared to Live 10’s Chorus effect. The Phaser and Flanger have seen similar upgrades.
Ableton also added a few new things that are totally new to Live 11. These include three new effects - a Hybrid Reverb that allows the user to blend convolution and algorithm-based reverbs, a Spectral Resonator plugin with a unique audio Freeze function, and a Spectral Time plugin that is as trippy as it sounds.
Live 11’s overall look will be quite familiar to long-time users, though there are a few new browser improvements that show the team behind Live 11 isn’t content to rest on its laurels.
Now, plugins are grouped together by category instead of by name, and Max for Live effects are integrated with the stock Ableton plugins. Furthermore, templates are now in their own category in the left browser window, making it easier to refer to and pull up more than just one template.
Get the MusicRadar Newsletter
Want all the hottest music and gear news, reviews, deals, features and more, direct to your inbox? Sign up here.
The small things add up in Live 11
Live 11 has added the option to ‘Save Live Set as Template’ straight to the File menu as well (it was previously buried in the Preferences panel). Grooves can now be viewed in the main browser window, and they are now all grouped together as opposed to by source, which helps in finding the appropriate groove for your track.
Sometimes, it’s the small things that really make a difference and one such game-changer for many is going to be the introduction of CPU meters on individual tracks in Live 11. Located at the bottom of each track (including busses and the master) in Session View, these small horizontal meters mean that you can see exactly which track and plugin chain is causing your computer to freeze up.
Similarly, the CPU meter that you’re used to in Live’s top-right corner has been improved. It now shows both the average and current amount of CPU being used, and clicking on the meter gives a shortcut to the Audio Preferences panel.
One of the most essential improvements to Live 11 for many producers is going to be the new MIDI scale functionality. Scale mode can be enabled or disabled on a per-clip basis, though when Scale mode is turned on, all subsequently created clips will start with the same scale settings as clips already created on that track.
This speeds up workflow considerably. The user can choose both the scale and the root note. When editing MIDI information in the MIDI note editor window, Ableton has now made it possible to Fold the notes shown based on scale, so notes not in the scale will not be shown. Any scale information chosen is now automatically visualised on the Push, strengthening the connection between the bespoke controller and Live 11.
Your pleas have finally been answered: Live now has comping!
Live 11 introduces Take Folders and Comping into the Ableton workflow, and it couldn’t be easier to start using right away
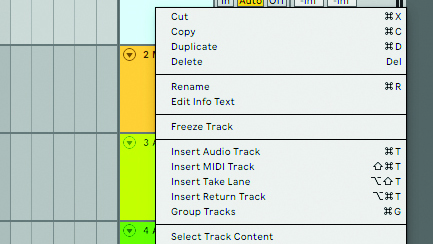
Step 1: Many have been requesting it for years and Live 11 finally has it – track comping. To use comping on an audio track, simply arm it, loop a section of your track, and then record as many takes as you’d like. Take folders will be recorded automatically, which can be seen by right-clicking on the track header and selecting ‘Show Take Lanes’.
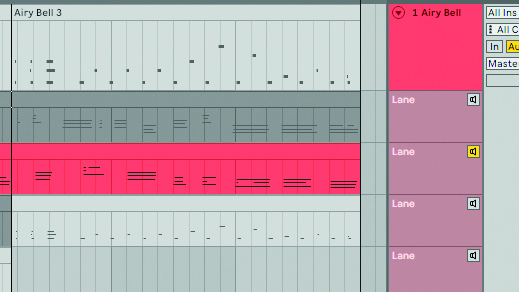
Step 2: In order to choose which lane is heard, you can either select a Lane in full with the small Speaker buttons on the Lane headers, or you can select the Draw Tool by Pressing B and then highlight the takes that you’d like to hear. You’ll see the comp above update when you add parts from other takes to it.

Step 3: Comping works with MIDI tracks as well, which makes dealing with multiple takes much easier than it was in Live 10, where it was possible to overdub or overwrite a MIDI take but nothing else. In Live 11, you can record as many takes as you’d like, and just like audio, right-click on the header of the track to select ‘Show Take Lanes’.
And there's more...
Follow Tempo from an external audio source
While this was previously available as a third-party Max for Live plugin, Ableton Live 11 introduces the ability to Follow Tempo from an external audio source. This opens up the doors to jamming with Live using an audio source such as a real drum kit as a time-keeper.
Linked Track editing
Ableton Live 11 finally introduces another feature that will streamline the workflow of those who work with groups of phased-lock tracks, including multi-miked drum kits or multitudes of vocal takes – Linked Track editing. While in Arrangement view, simply highlight several tracks at once and right-click, then select Link Tracks. Now, any editing done to one of the tracks will be carried out on all of the tracks you’ve linked.
New content
Amongst the multitude of workflow upgrades, Ableton have also included several new Instrument additions, including a few orchestral instruments from Spitfire Audio that sound impressively realistic, as well as a wealth of new Packs content.
Live 11, now with probability
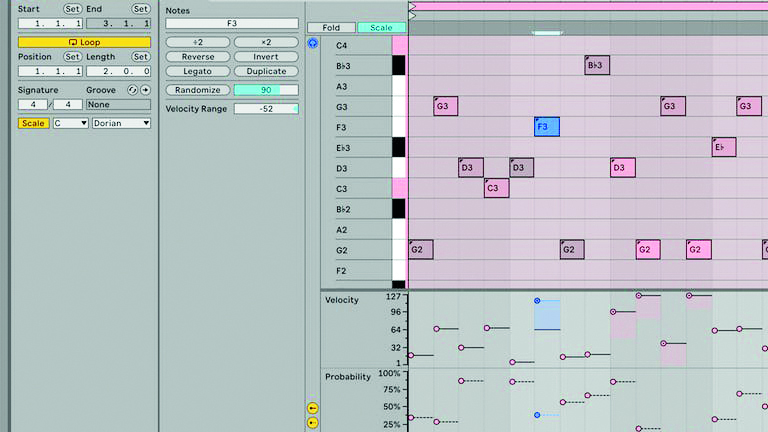
Live 11 takes a huge step forward with its new MIDI probability and velocity probability features, bringing Elektron-like functionality to the Ableton world. These two features are going to be amongst the most talked about improvements of Live 11 and for good reason - both add a quick way to add the inherent subtle randomisation of probability into static MIDI programming, easing the burden on the producer to create tracks with pre-programmed variations and fills.
Adding probability is as easy as opening the Probability editor and then selecting which notes you’d like to edit. Dragging vertically down reduces the chance of that note being played. It’s also now possible to introduce a range of velocities for each note. Do this by going into the Velocity window and holding down the Command button while dragging vertically. Now the note will trigger within a range of velocities instead of one static value. Both of these features help make Live 11 a more human-feeling DAW.
New Follow Actions
Another workflow area with important new tweaks is the Follow Action functionality. The Follow Action tab is sometimes overlooked, partially because it lies hidden until expanded by an arrow in the Clip Header. Follow actions, which essentially state what action to perform when a clip is finished playing, can now also be assigned to Scenes, giving Live 11 even more arrangement power from the Session View. There’s also a quick way to create a Follow Action chain in Live 11 – select the clips you want to play sequentially, right-click, and select ‘Create Follow Action Chain’. The clips will now play in order.
To Follow, just unlink
Follow Actions have previously been limited to happening at the end of a clip, but with Live 11, it’s now possible to set the Follow Action to happen at any point in the clip.
This is achieved by clicking the ‘Unlink’ button in the Follow Action clip menu to the left of the MIDI note editor. A light blue arrow in the note editor now indicates where the Follow action will occur. Follow Actions can now also be turned on and off globally via a dedicated button in the master channel strip. Furthermore, when a scene or clip has a Follow action enabled, its Play button changes to indicate the Follow Action with vertical stripes.
MPE control for familiar tools
Live 11 now features deeper integration with MPE controllers. Sampler, Arpeggiator, and Wavetable also now include options for MPE control. Ableton has created a dedicated MPE Control plugin, which allows shaping and warping of all three (pressure, slide, pitch) curves, and lets you convert MPE data to regular MIDI information.
Push 2 now features polyphonic aftertouch – each pad transmits pressure information separately. MPE data can be edited as you’d expect after it’s recorded, and Ableton has included a host of MPE-featuring presets for the new versions of Wavetable and Sampler.
A new look at macros
Macros, the cornerstone of controlling automation and instruments in Live, were once quite inflexible. They came in groups of eight, and you either got all or none.
With Live 11 you can have between 1-16 macros, allowing you to customise your own devices and get unused Macros out of the way. Plus, it’s possible to save Macro Variations in Live 11; these function as preset snapshots for the Macros in the Device, allowing you to recall stored states of all the parameters mapped. This is useful for creating build-ups or drops and then returning to a stored state where all of the elements of your groove are playing.


Future Music is the number one magazine for today's producers. Packed with technique and technology we'll help you make great new music. All-access artist interviews, in-depth gear reviews, essential production tutorials and much more. Every marvellous monthly edition features reliable reviews of the latest and greatest hardware and software technology and techniques, unparalleled advice, in-depth interviews, sensational free samples and so much more to improve the experience and outcome of your music-making.

