6 cutting-edge plugins that blew our minds this year
Get to know the past year’s most forward-thinking plugins with this tour of the state of the art

Many of us have been witnesses to a golden age of music technology, one in which digital music tools have come of age, developed their personalities, honed their craft, and become stone-cold masters of audio jiu-jitsu.
In the last decade or two, digital tools have gone from barely passable, to completely viable, to indispensable and widely adopted. So where now for music software?
We still live in a time where a lot of plugin tools aim to emulate the workings of vintage gear: analogue circuit components, amp sims and vintage reverbs. While the technology of these are sophisticated enough to make a time-travelling ’70s mixing engineer fall to their knees, the tools would still have been familiar for the most part. In this article we’re looking in the other direction: at the tools that look toward the future of audio.
What will be the next Melodyne or Auto-Tune? Which bold new tools will become indispensable? What software releases will change the face of music and inspire whole new genres? Well, we can’t tell you… but we can give you a feel for the cutting edge of today’s digital technology by highlighting a few of the most interesting virtual devices to appear in 2022. Ready to see the world of tomorrow? Buckle in and prepare for countdown…
1. Waves Harmony
Since Waves hit the scene back in 1992, they’ve earned a place at the head of the audio software table with an expansive, ever-changing line of signal processing tools. Regardless of which bag of music production tricks you wish to rummage through, Waves have no shortage of options. Mixing and mastering, noise reduction and restoration, sound design, plugins for live sound – all corners of the audio world are covered, and in exhaustive fashion.
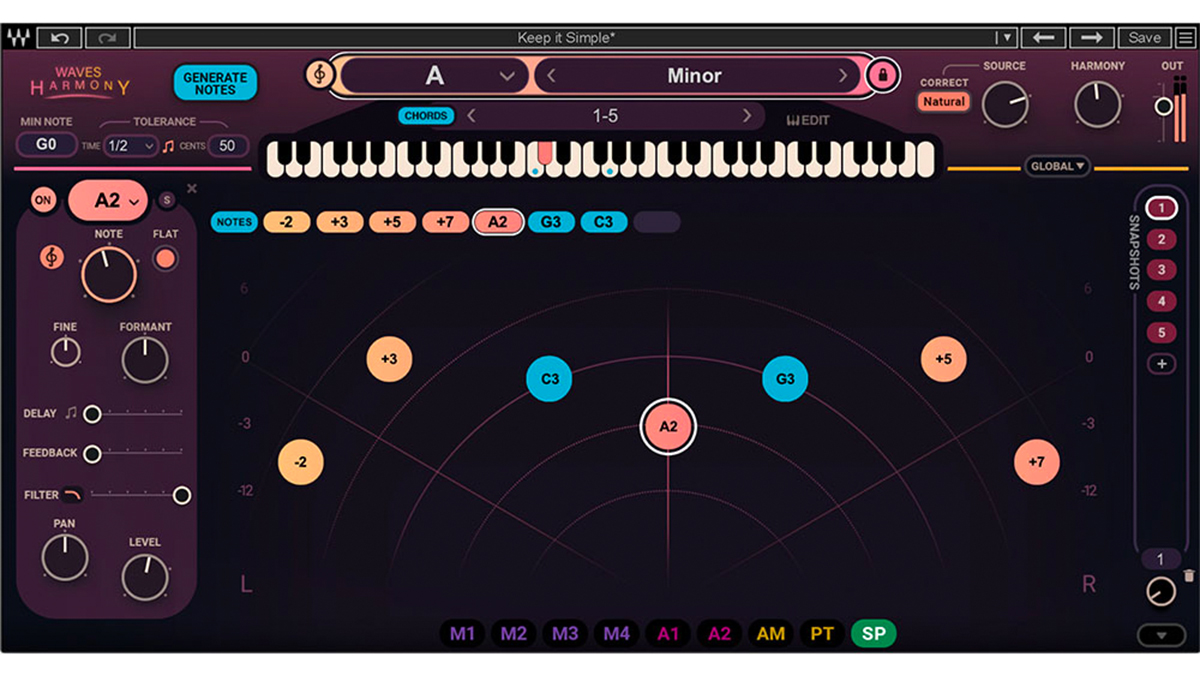
One of the areas in which Waves specialise is vocal plugins, having released a plethora of premium tools that handle tuning, de-essing, double-tracking, creative vocal effects and more. Their latest arrival at the party is Harmony, a “real-time vocal playground” that creates instantaneous harmonies and chords from solo vocals. Complex vocal harmonies can be gorgeous to listen to, and are usually the preserve of virtuoso musician types like Jacob Collier and Bon Iver, but Harmony aims to make things a little easier for the blue collar producers among us.
The plugin can generate up to eight additional voices from a sound source, with adjustable pitch, formant, panning, delay, filtering and modulation for each voice. This means you can employ Harmony for natural-sounding harmonies or push out the boat for some creative voicings and epic vocal stacks. And, the best thing about it is that all of this can be performed live in real time, in the studio or on stage.
Get the MusicRadar Newsletter
Want all the hottest music and gear news, reviews, deals, features and more, direct to your inbox? Sign up here.
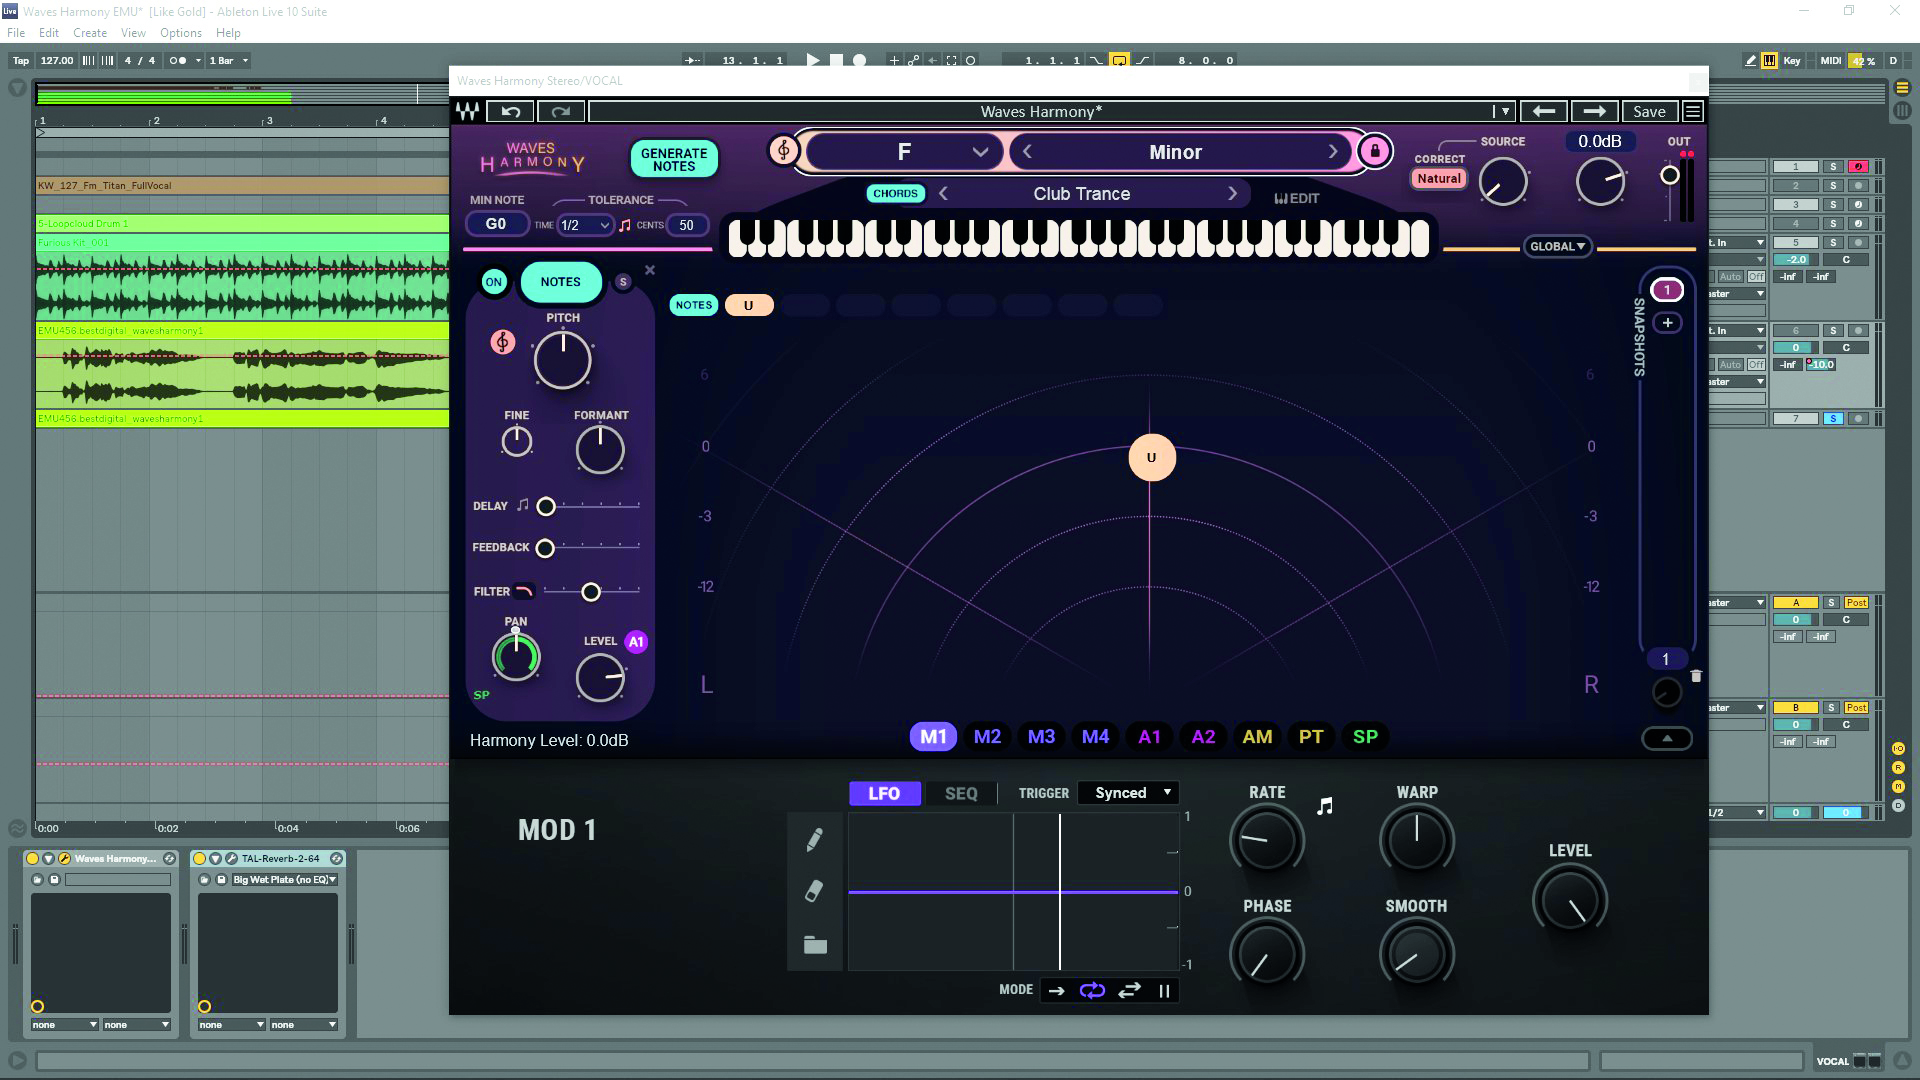
Once Harmony has been added to a solo vocal track, the plugin will automatically process the audio, which is why you’ll hear it pitch correcting. You can select the Key and Scale, and choose from three pitch correction modes: Natural, Hard and Notes.
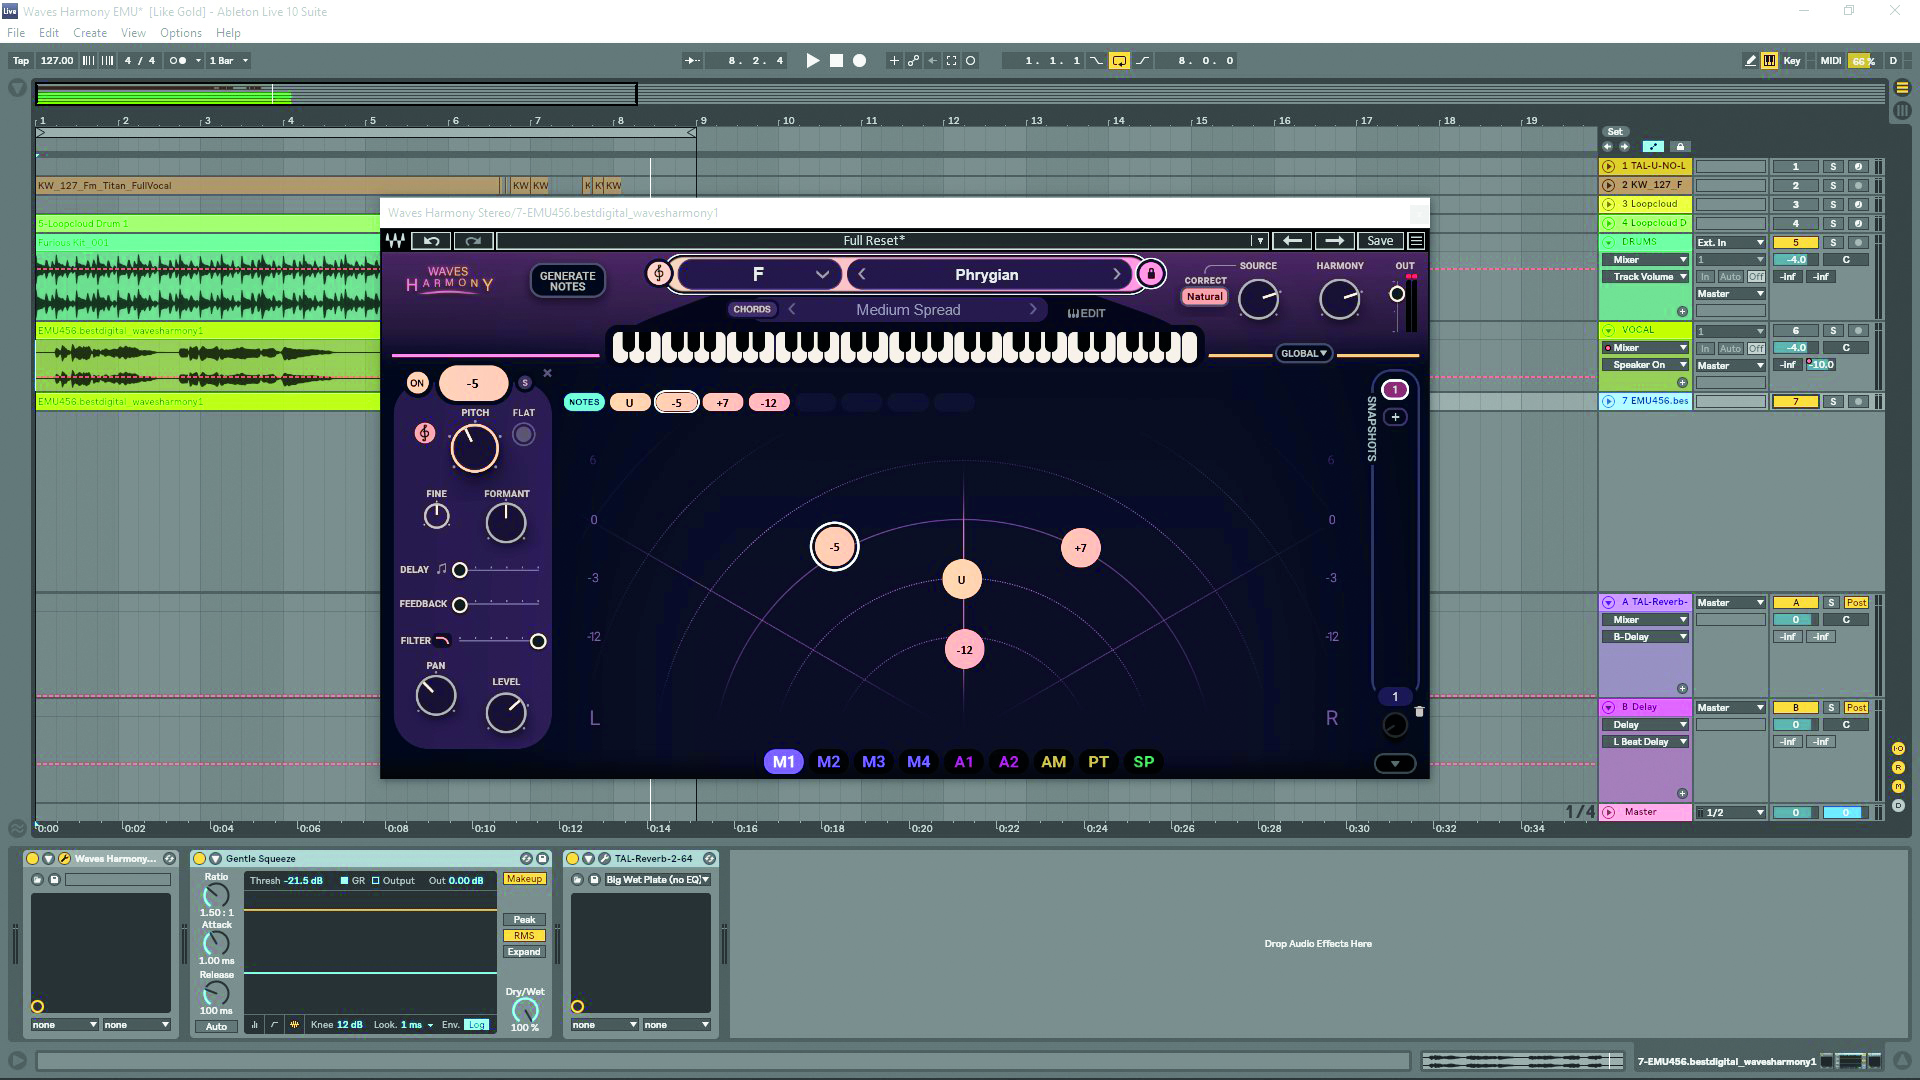
We don’t want to just use Harmony as a tuning tool – harmonies are what we’re after, and there are three ways of getting them. You can auto generate notes, play them in using your MIDI keyboard, or click anywhere on the GUI to add a harmony.
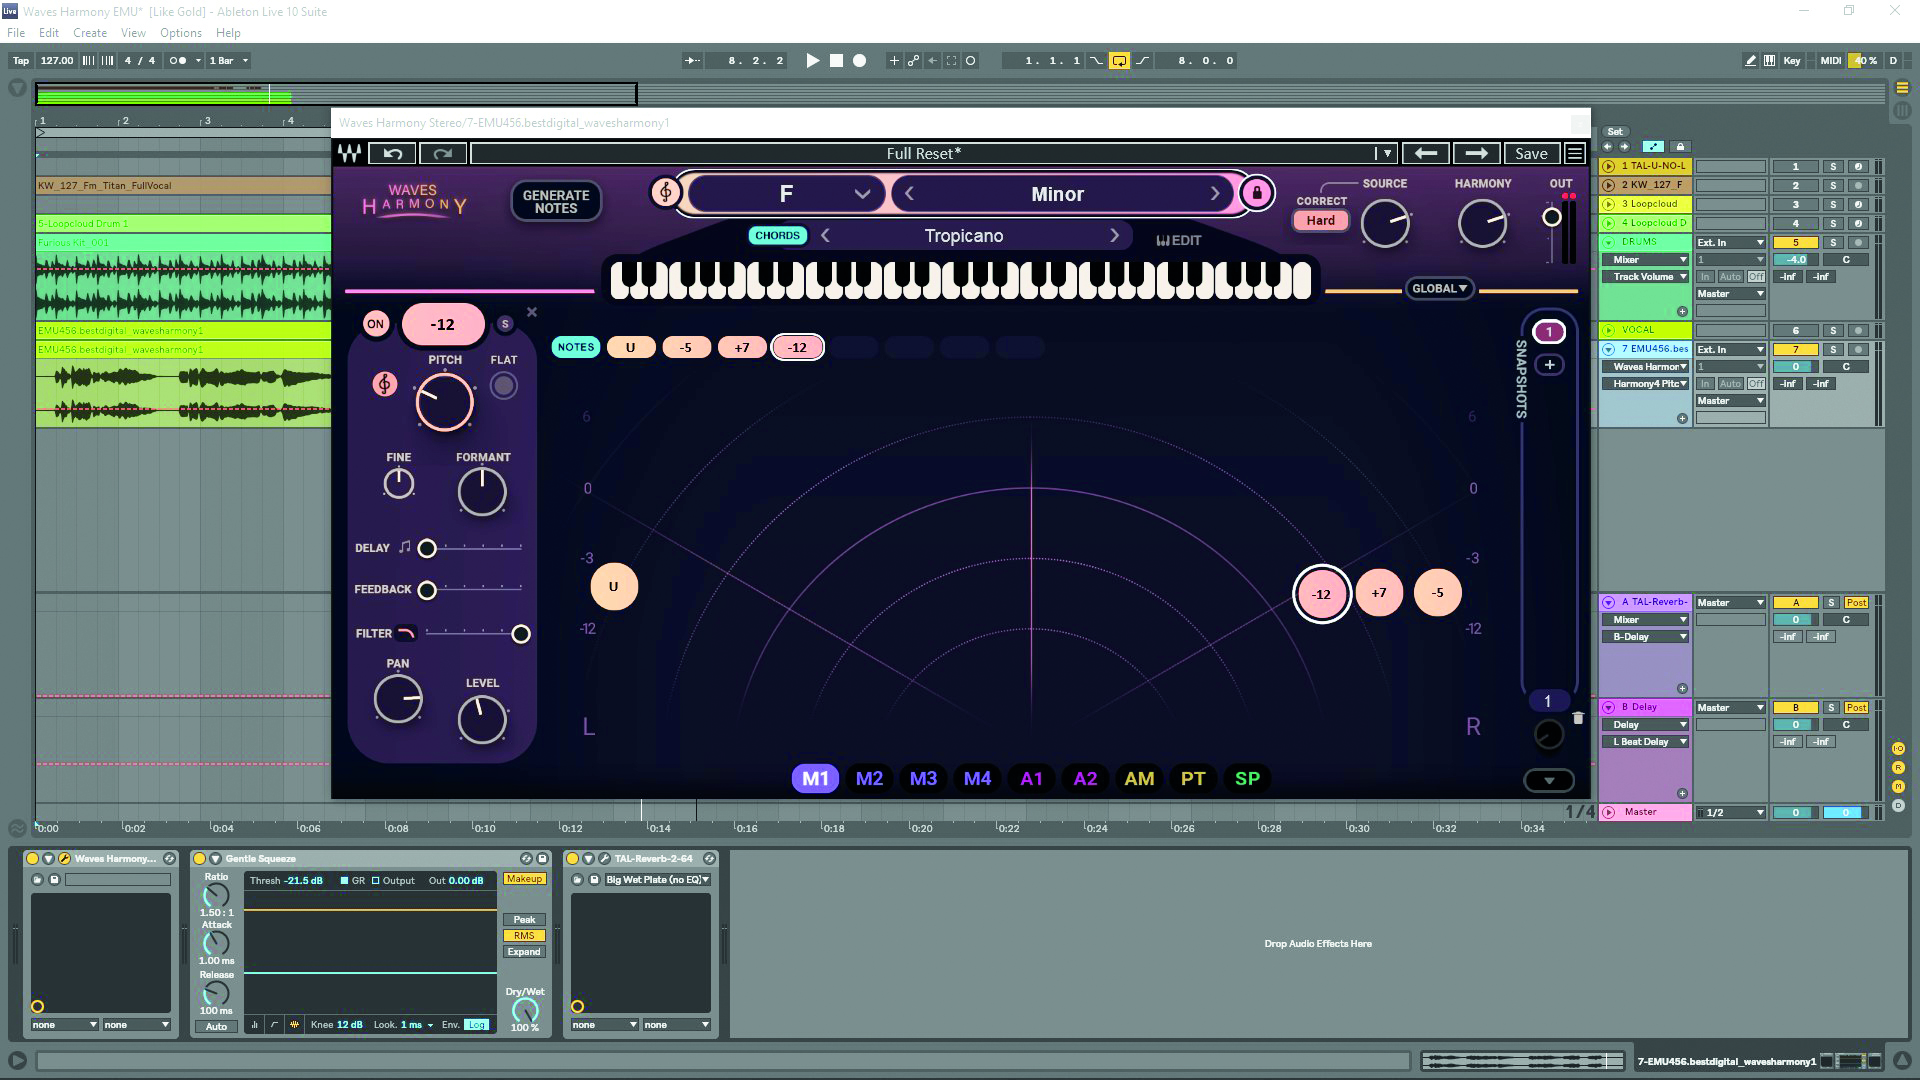
Drag notes around to position them in the stereo field and affect their level. With a note selected, you can transpose it across 48 semitones using the Pitch knob. Flat drops the pitch to a given note, while the treble clef button corrects it to your scale.
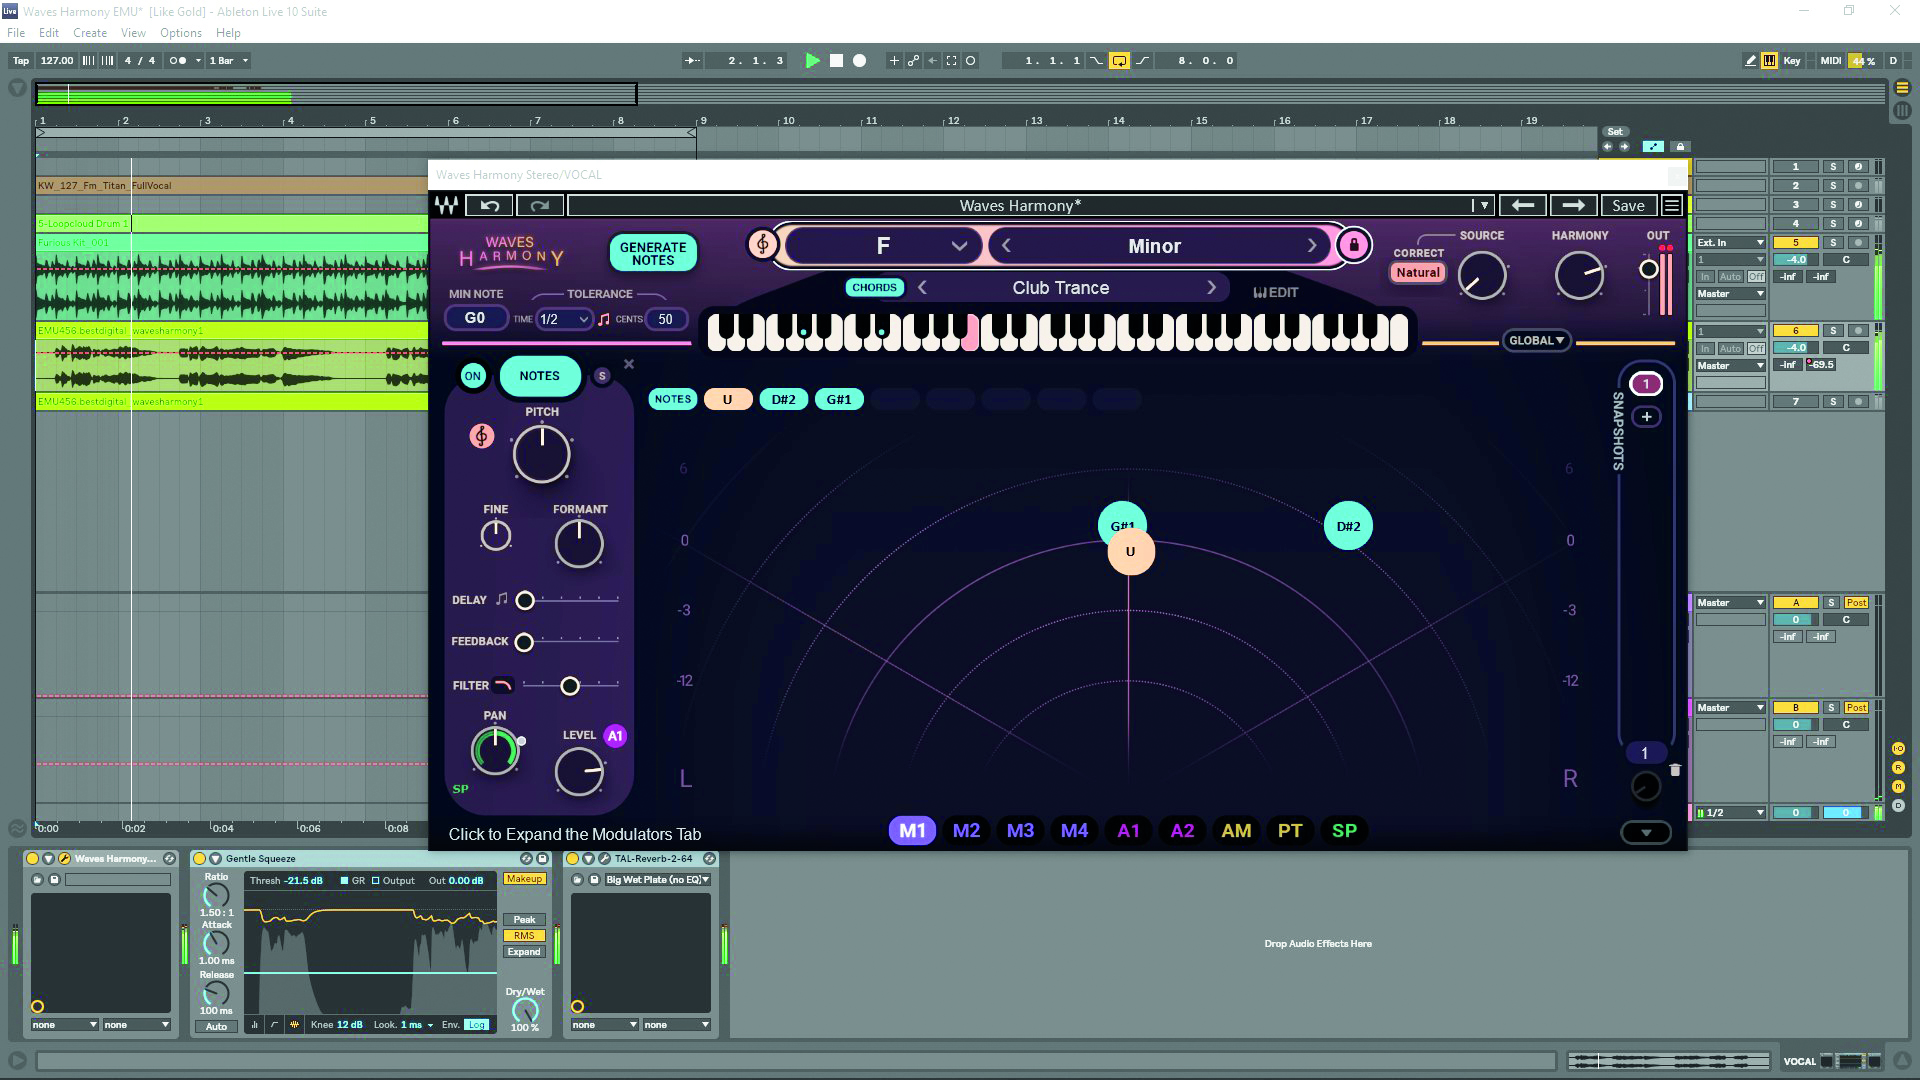
If your harmonies are too bright, roll off some of the top end with the Filter, which you can set to low-, high- or band-pass. The Delay slider will offset the harmony against the solo vocal in milliseconds, and is further controlled with Feedback.
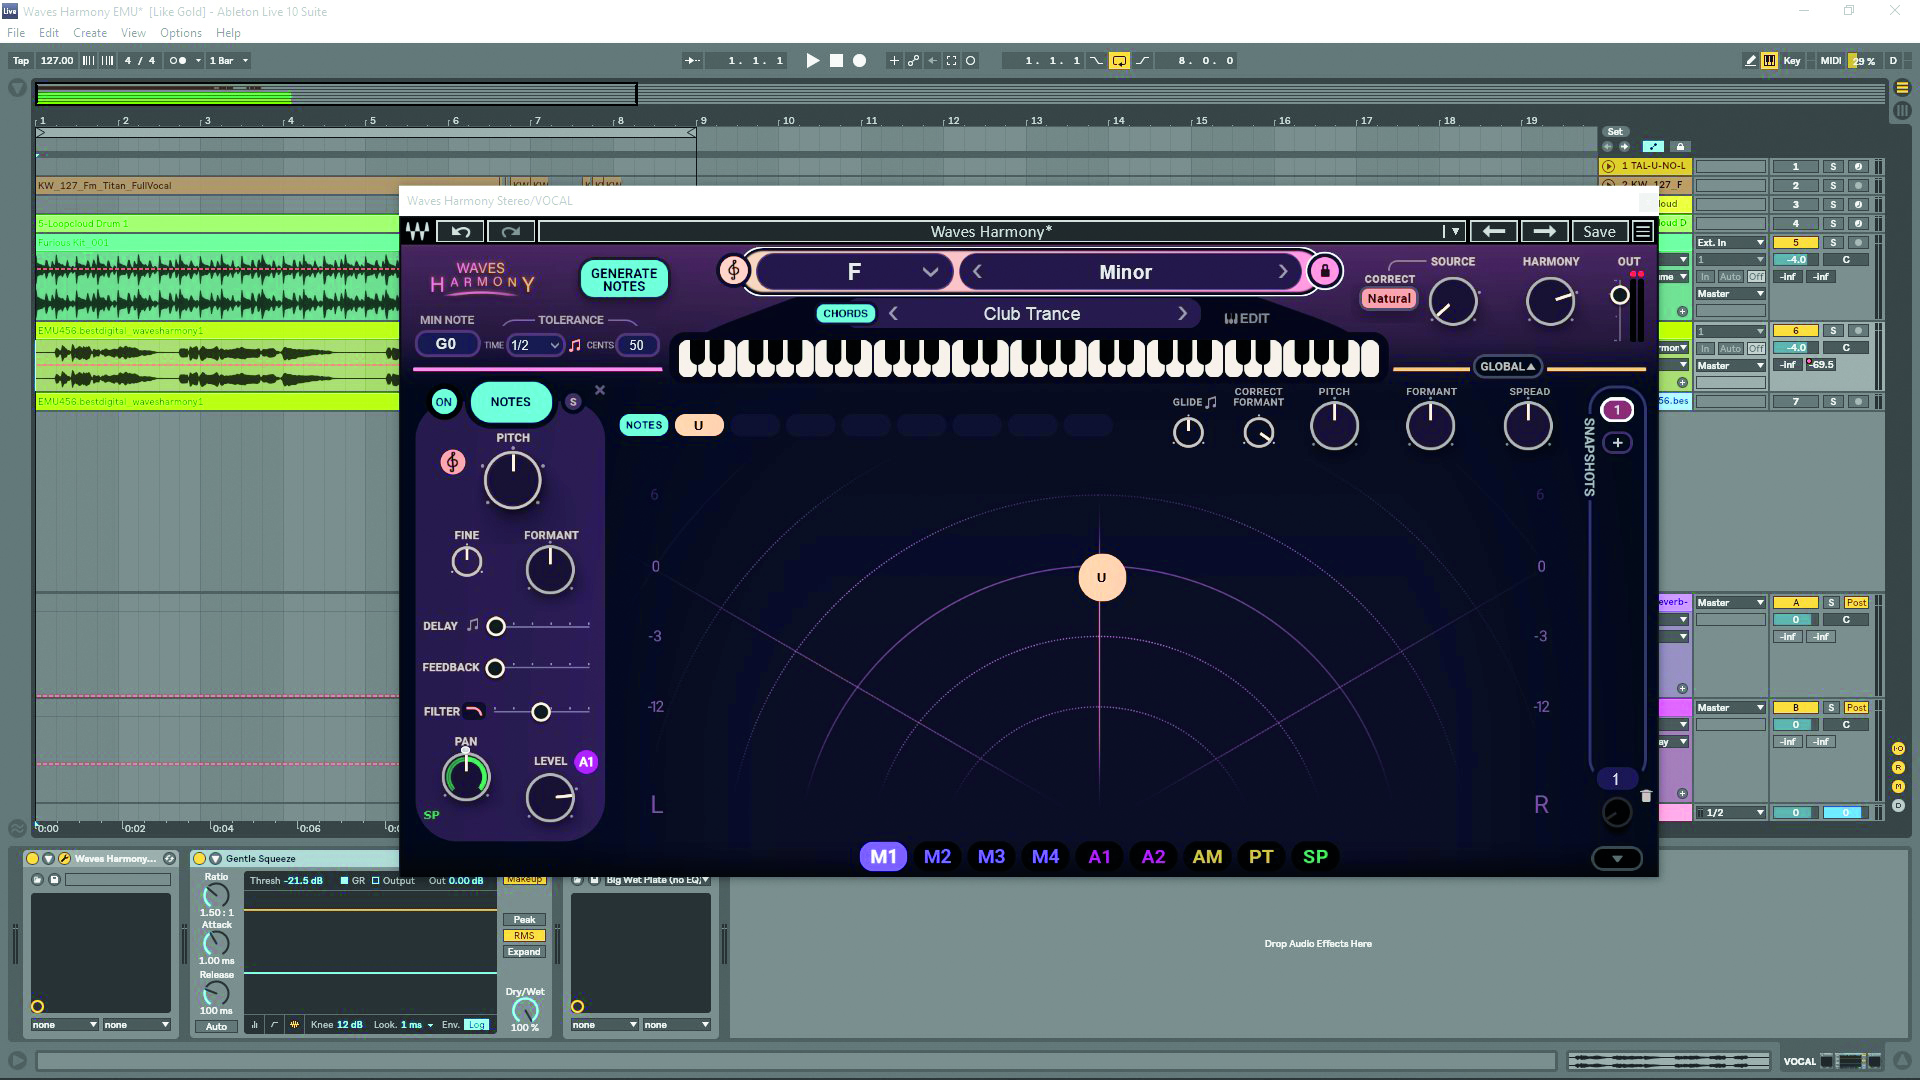
The Global button offers an extra set of controls to affect all the harmonies. There’s pitch and formant offset, Glide and stereo image spread. You can also affect the balance of the source sound and harmonies if you want more of one.
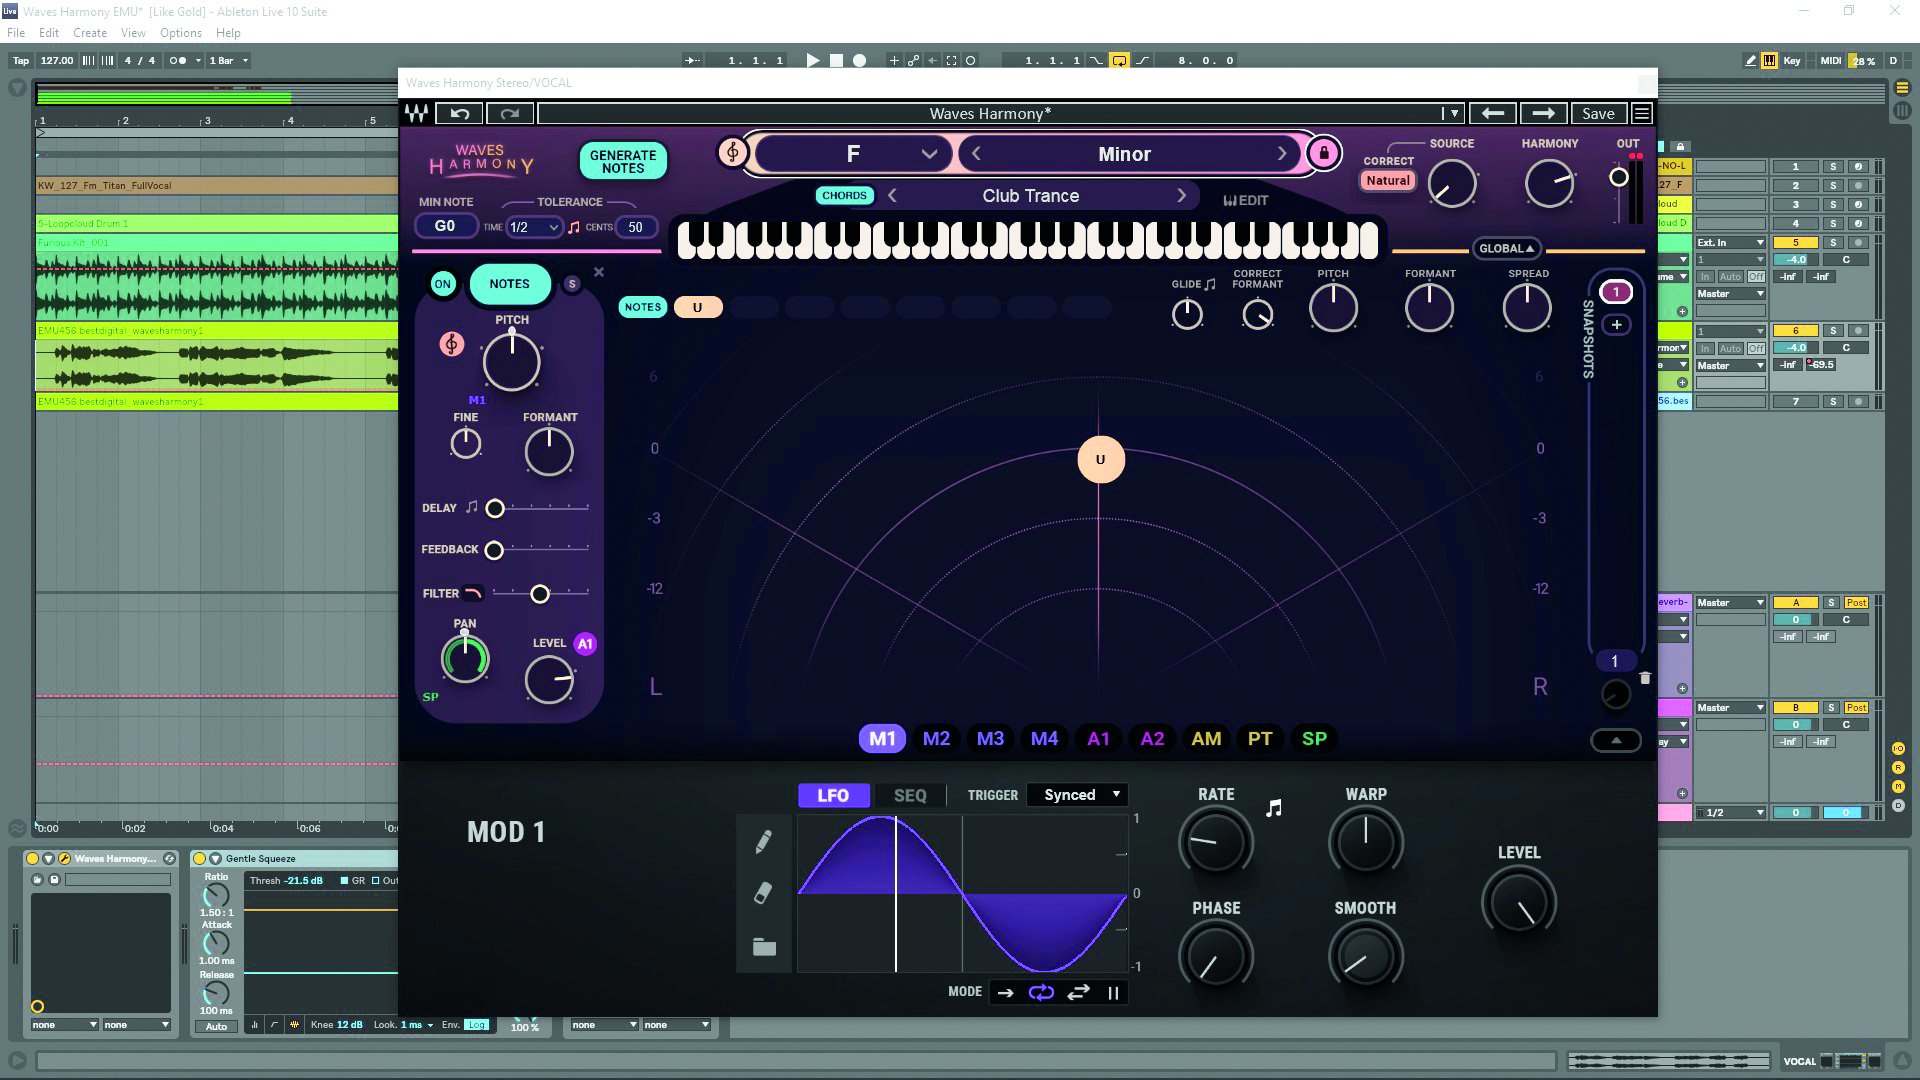
For complex arrangements, you can capture snapshots of different harmony setups and automate them as you move through a song. Modulation options are available in the form of an LFO and a Sequencer, assignable by drag and drop.
2. Lese Strum
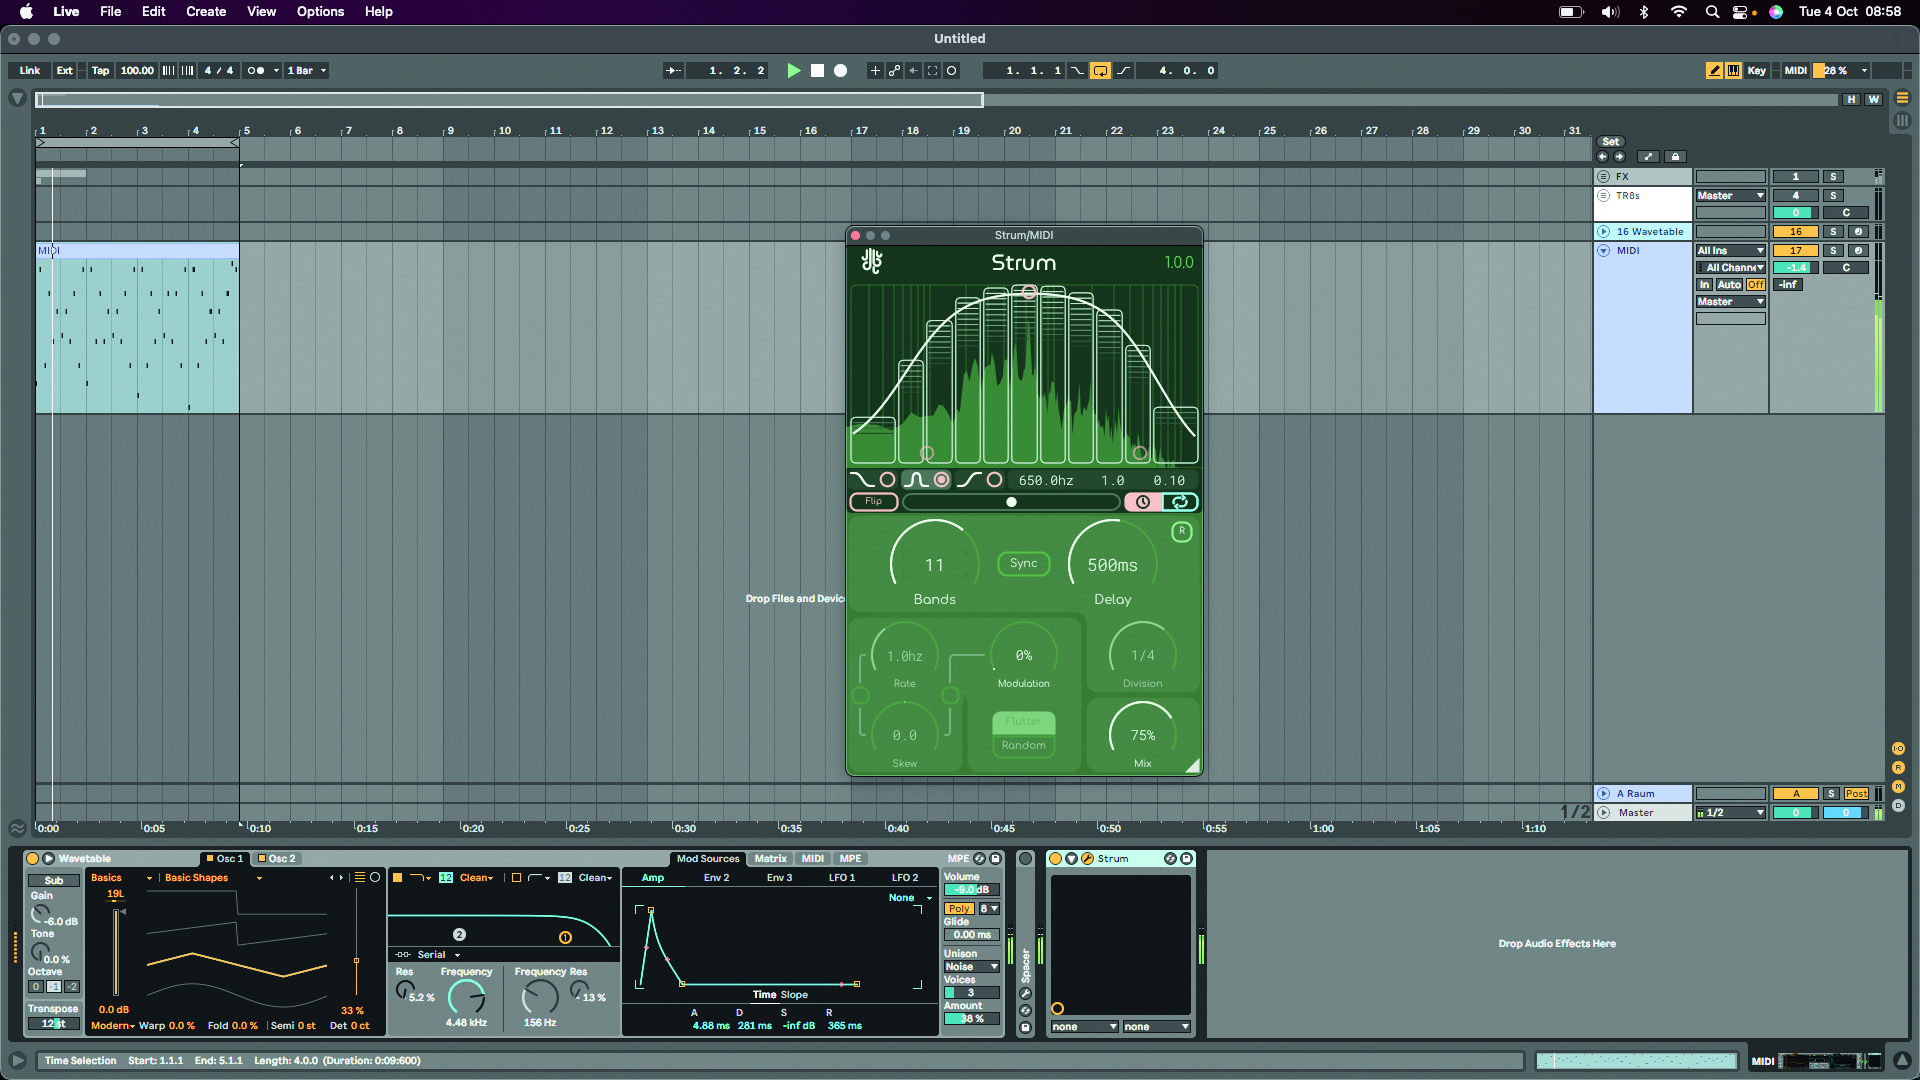
Strum is a neat little multiband delay which grants you deep control over up to 15 bands of your audio signal. You can set the number of bands using the Bands dial; higher values will sound smoother but be more CPU intensive.
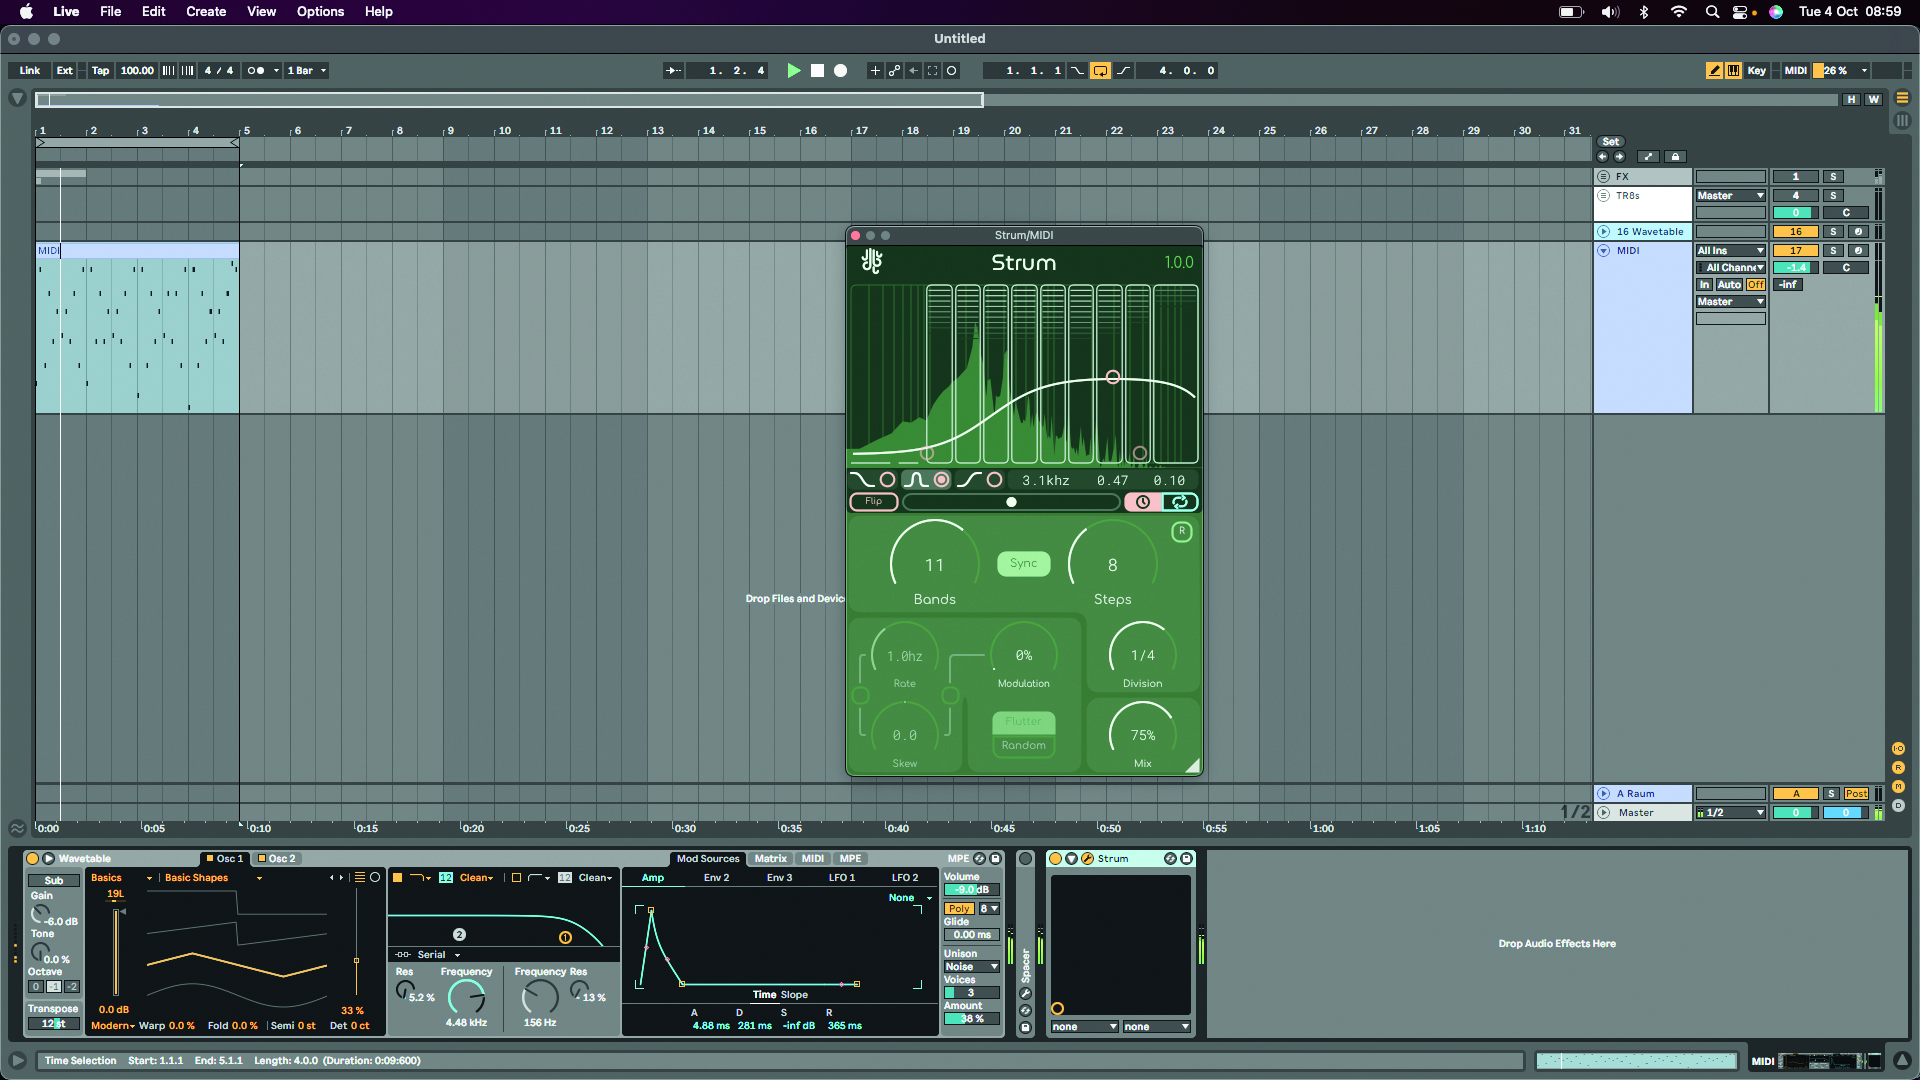
Adjust the delay time according to frequency by dragging the red node, and set the max time using the delay dial. In Free mode delay time is measured in milliseconds. In sync mode, the dial sets the maximum number of delay repeats.
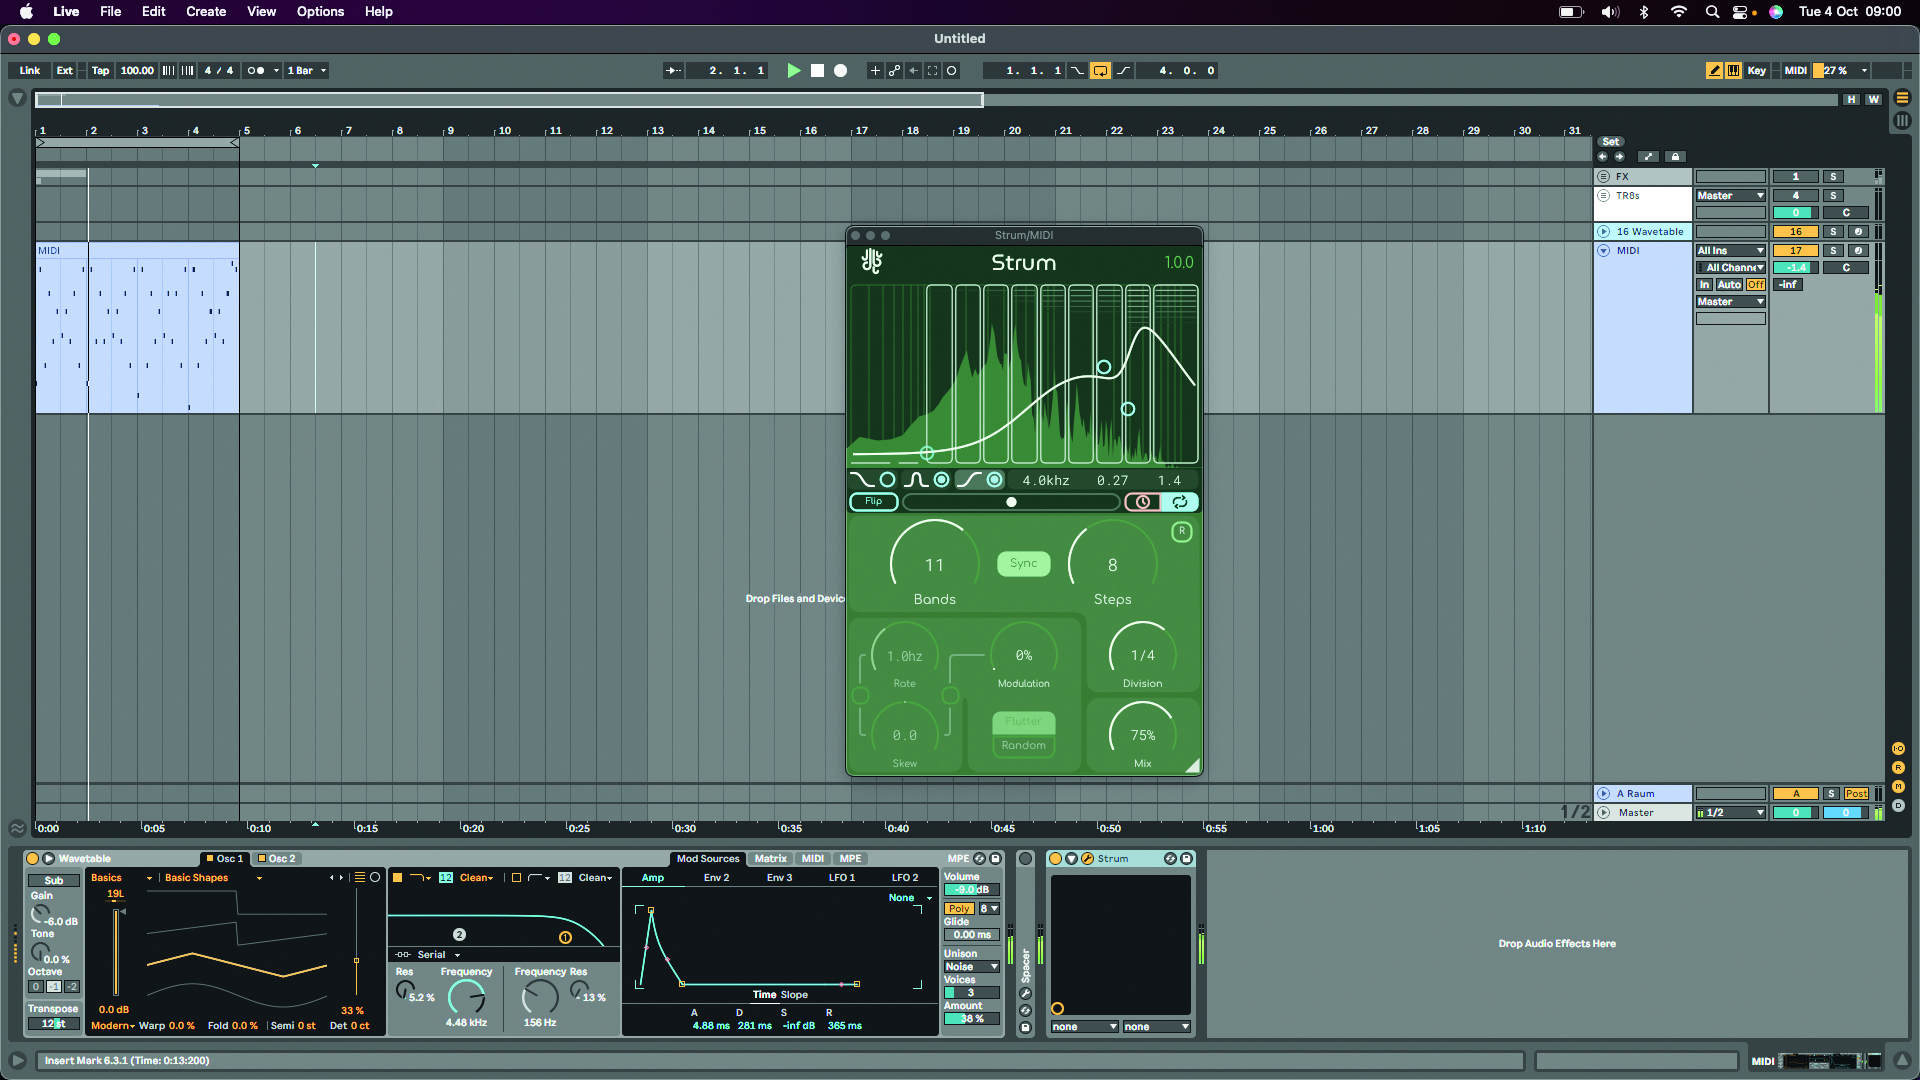
Click the blue feedback button to adjust your signal’s feedback level according to its frequency using the blue node. You can toggle low- and high-shelf factor bands and adjust the frequency, amplitude and bandwidth with the parameters to the right.
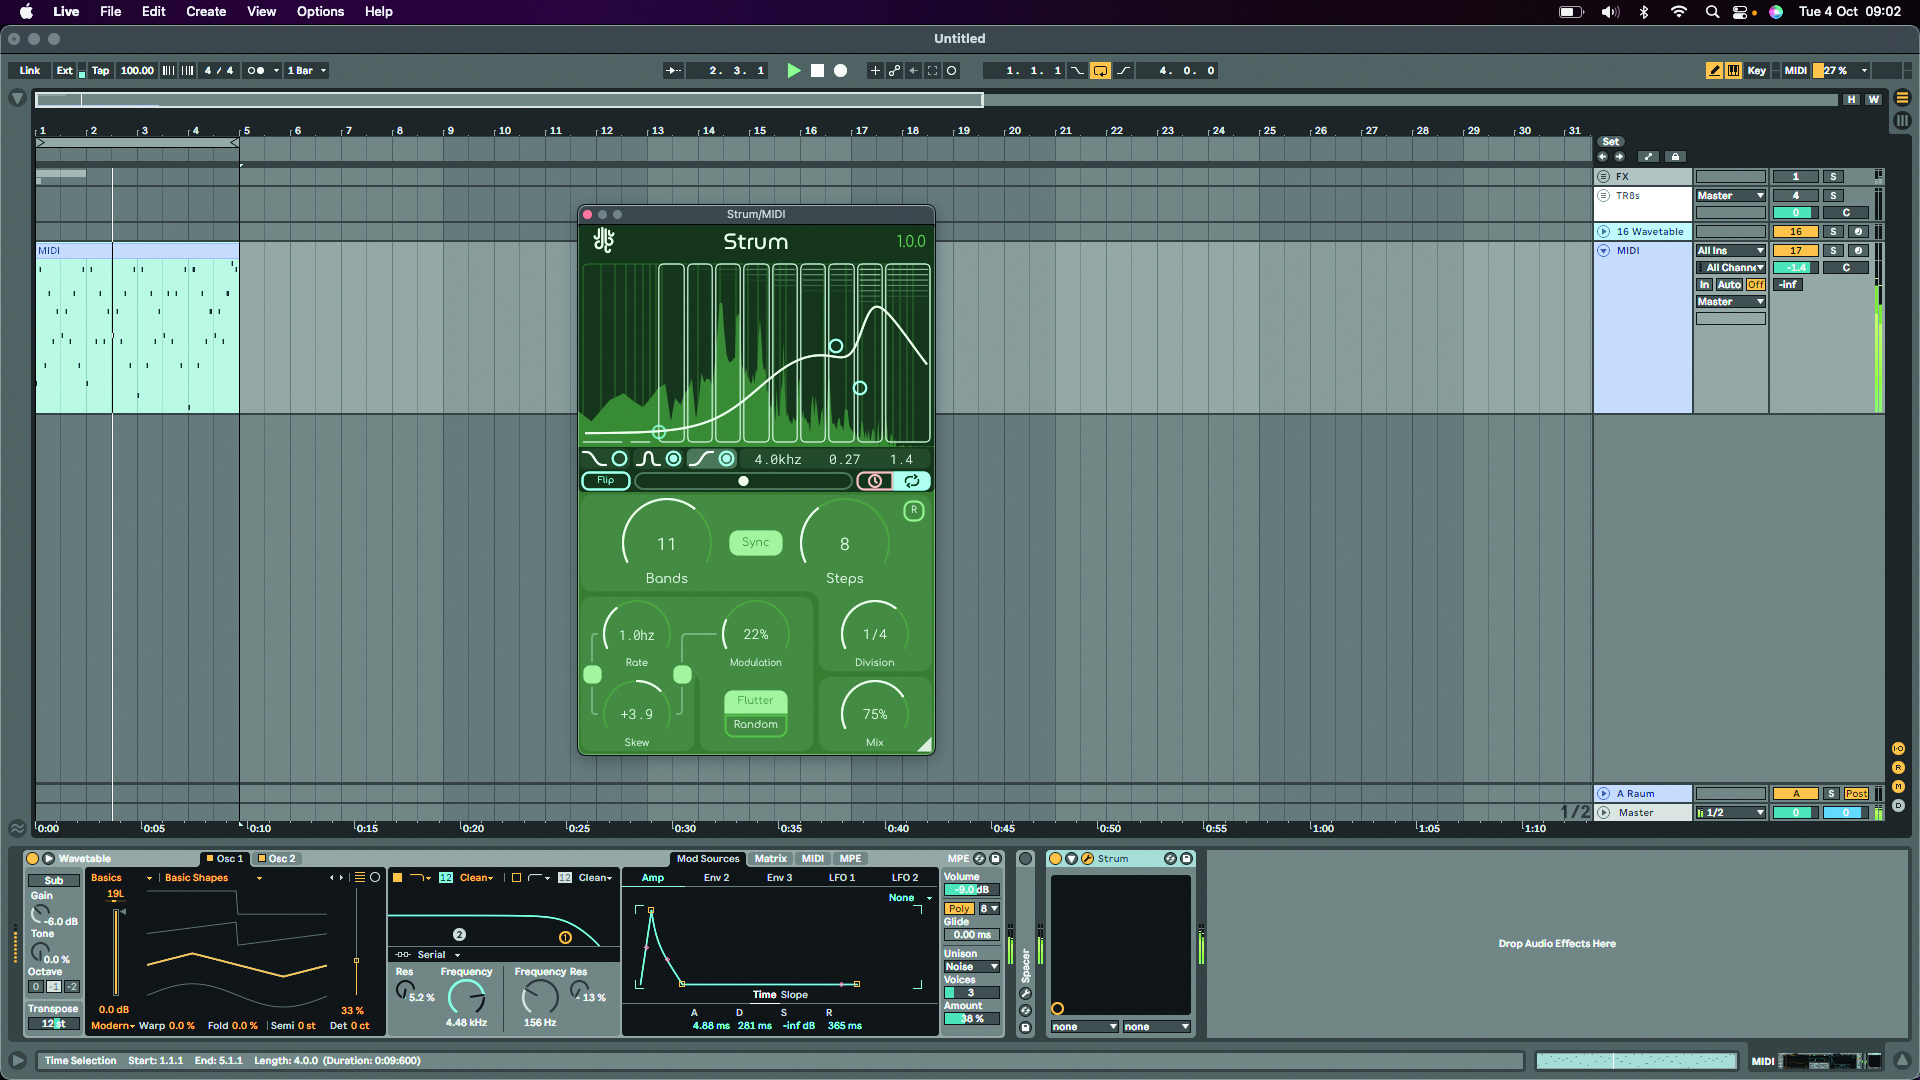
Add modulation and adjust speed with the Modulation/Rate dials. Skew adds or subtracts bias from the other modulation parameters. The modulation’s flutter mode shape resembles a sine wave, while Random mode adds jitter.
3. Sonible smart:comp 2
The compressor is a strange tool to consider. On the one hand, its remit – grappling automatically with audio levels – is a pretty simple one. But once you consider how much potential this process has for imbuing sounds with personality, power and character, you start to realise there’s a certain magic to compression. This magic is actually driving a lot of how we make music.
Innovations in compression in recent years have included more tailored sidechain functionality: Pulsar 1178, for example, with its full sidechain EQ and even delay. And then attack and release timing have started to crop up (as in smart:comp 2). Variable responses à la DDMF’s Comprezzore have also been developed, and the subject of spectral compression looms large here as well.
We certainly don’t seem stuck for new fronts to explore in the compression landscape. One tool we've particularly enjoyed getting to grips with this year has been Sonible's AI-powered smart:comp 2.
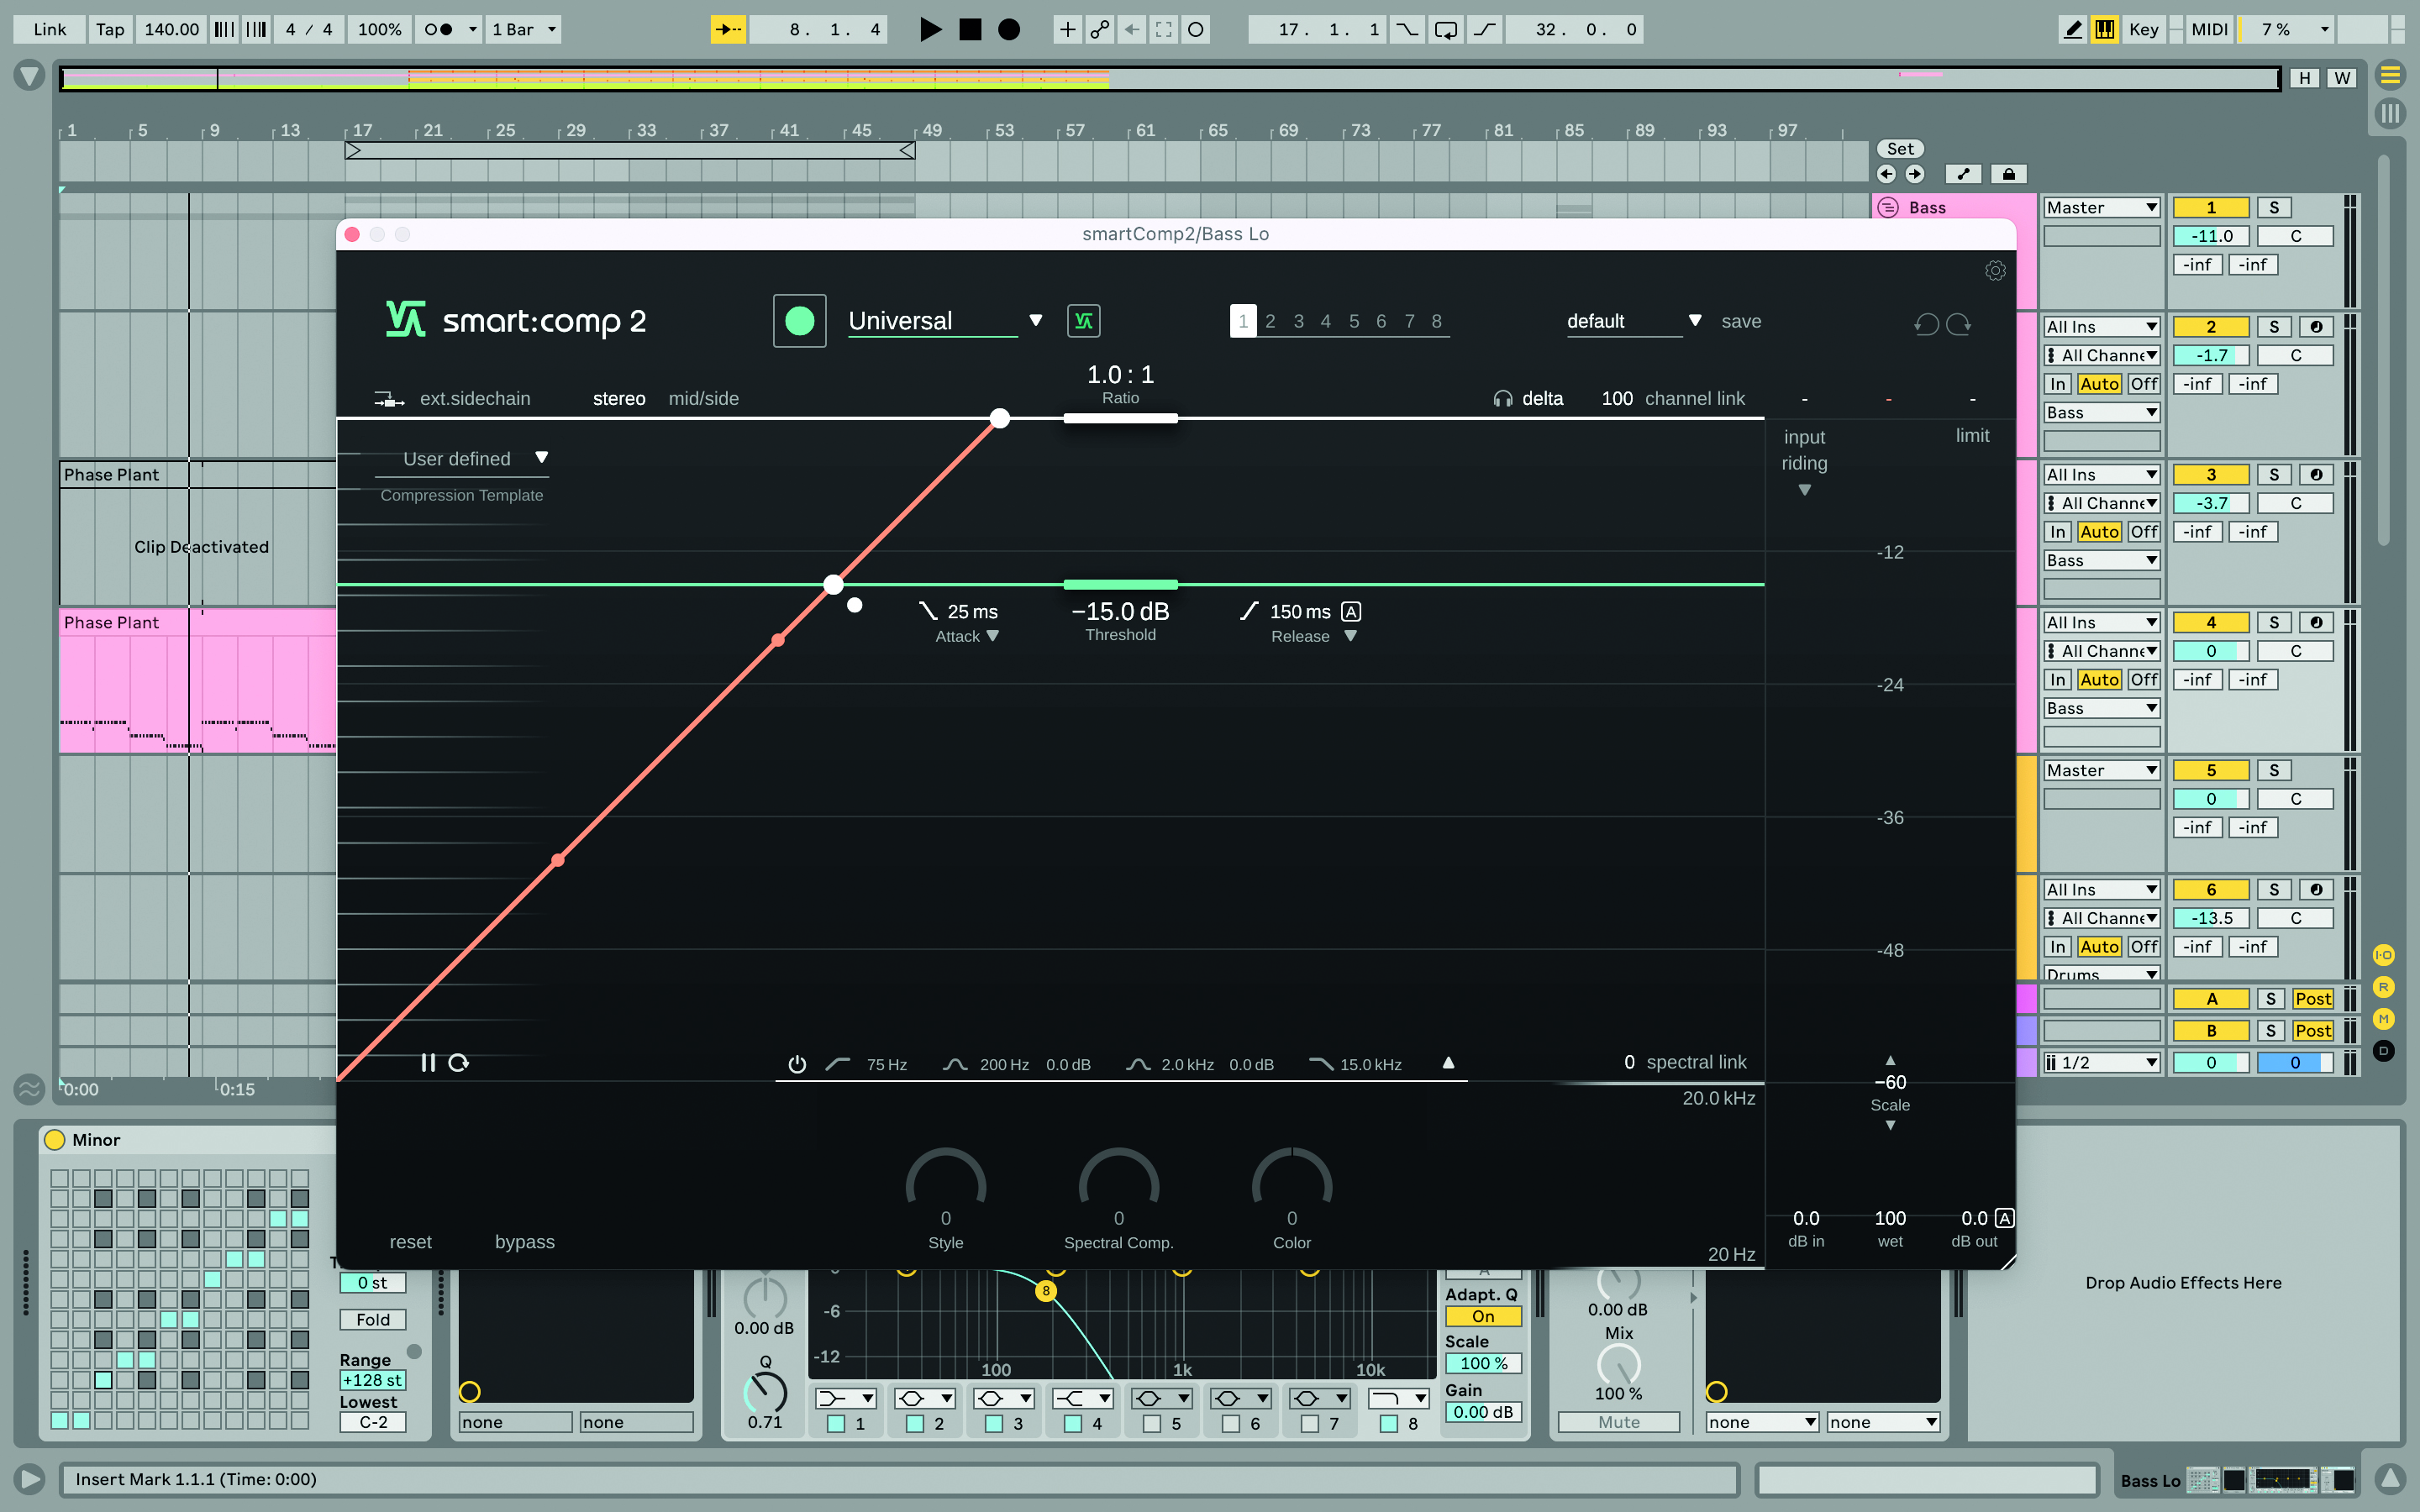
Sonible’s smart:comp 2 has been praised for its intuitive design and ultra-clean 2000-band compression. However, as with most Sonible products, the most exciting feature is the AI that can give a good approximation of compression in seconds.
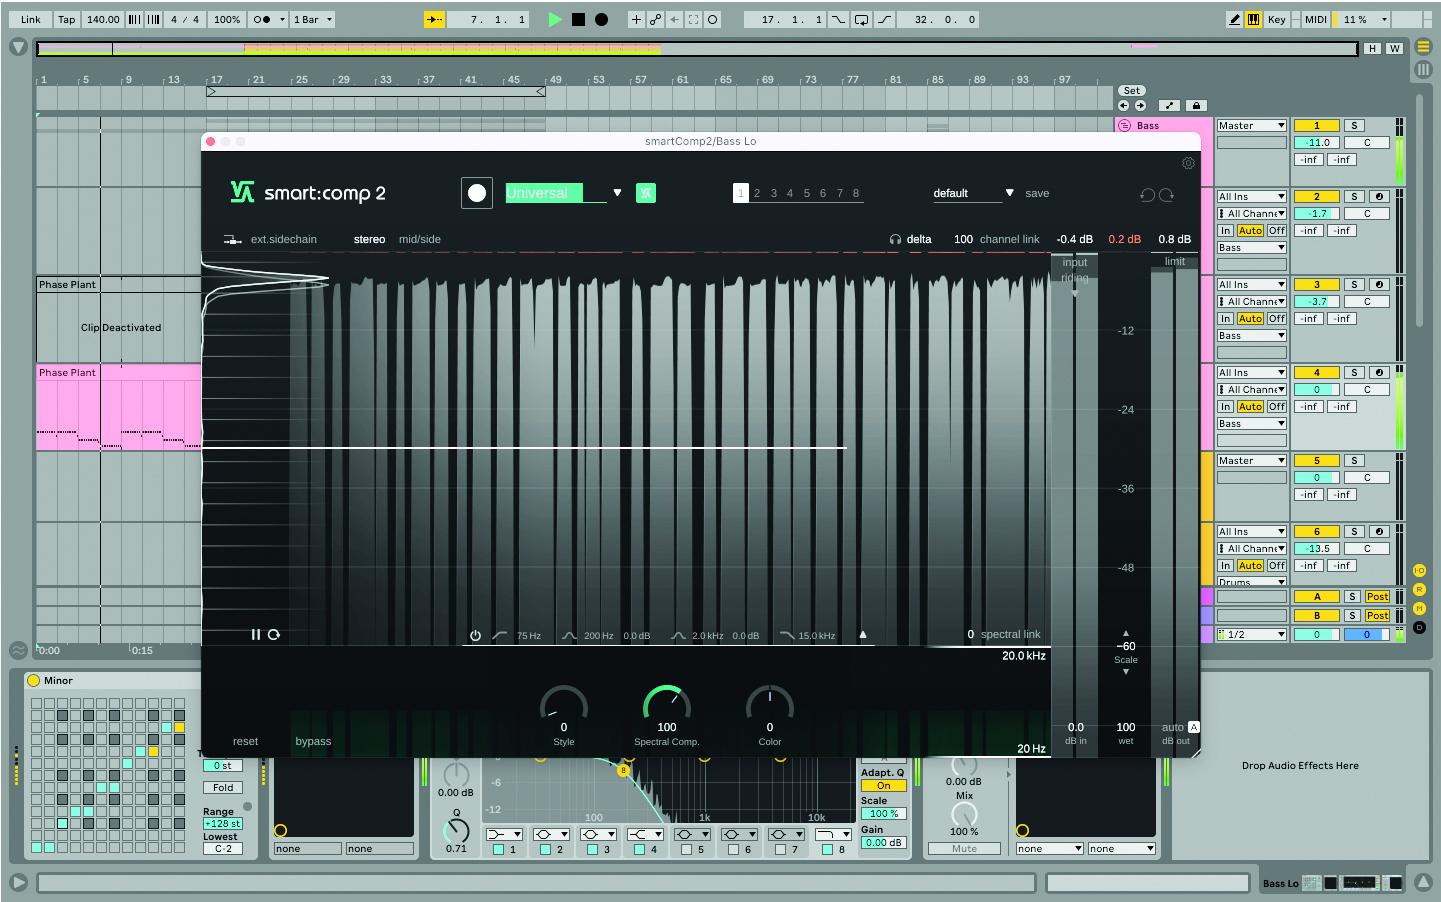
By clicking record at the top and playing your track, smart:comp 2 ‘listens’ to your track. After a few seconds the plugin provides what it deems the best universal compression settings. It aims for ultra clean compression, with not too much character.
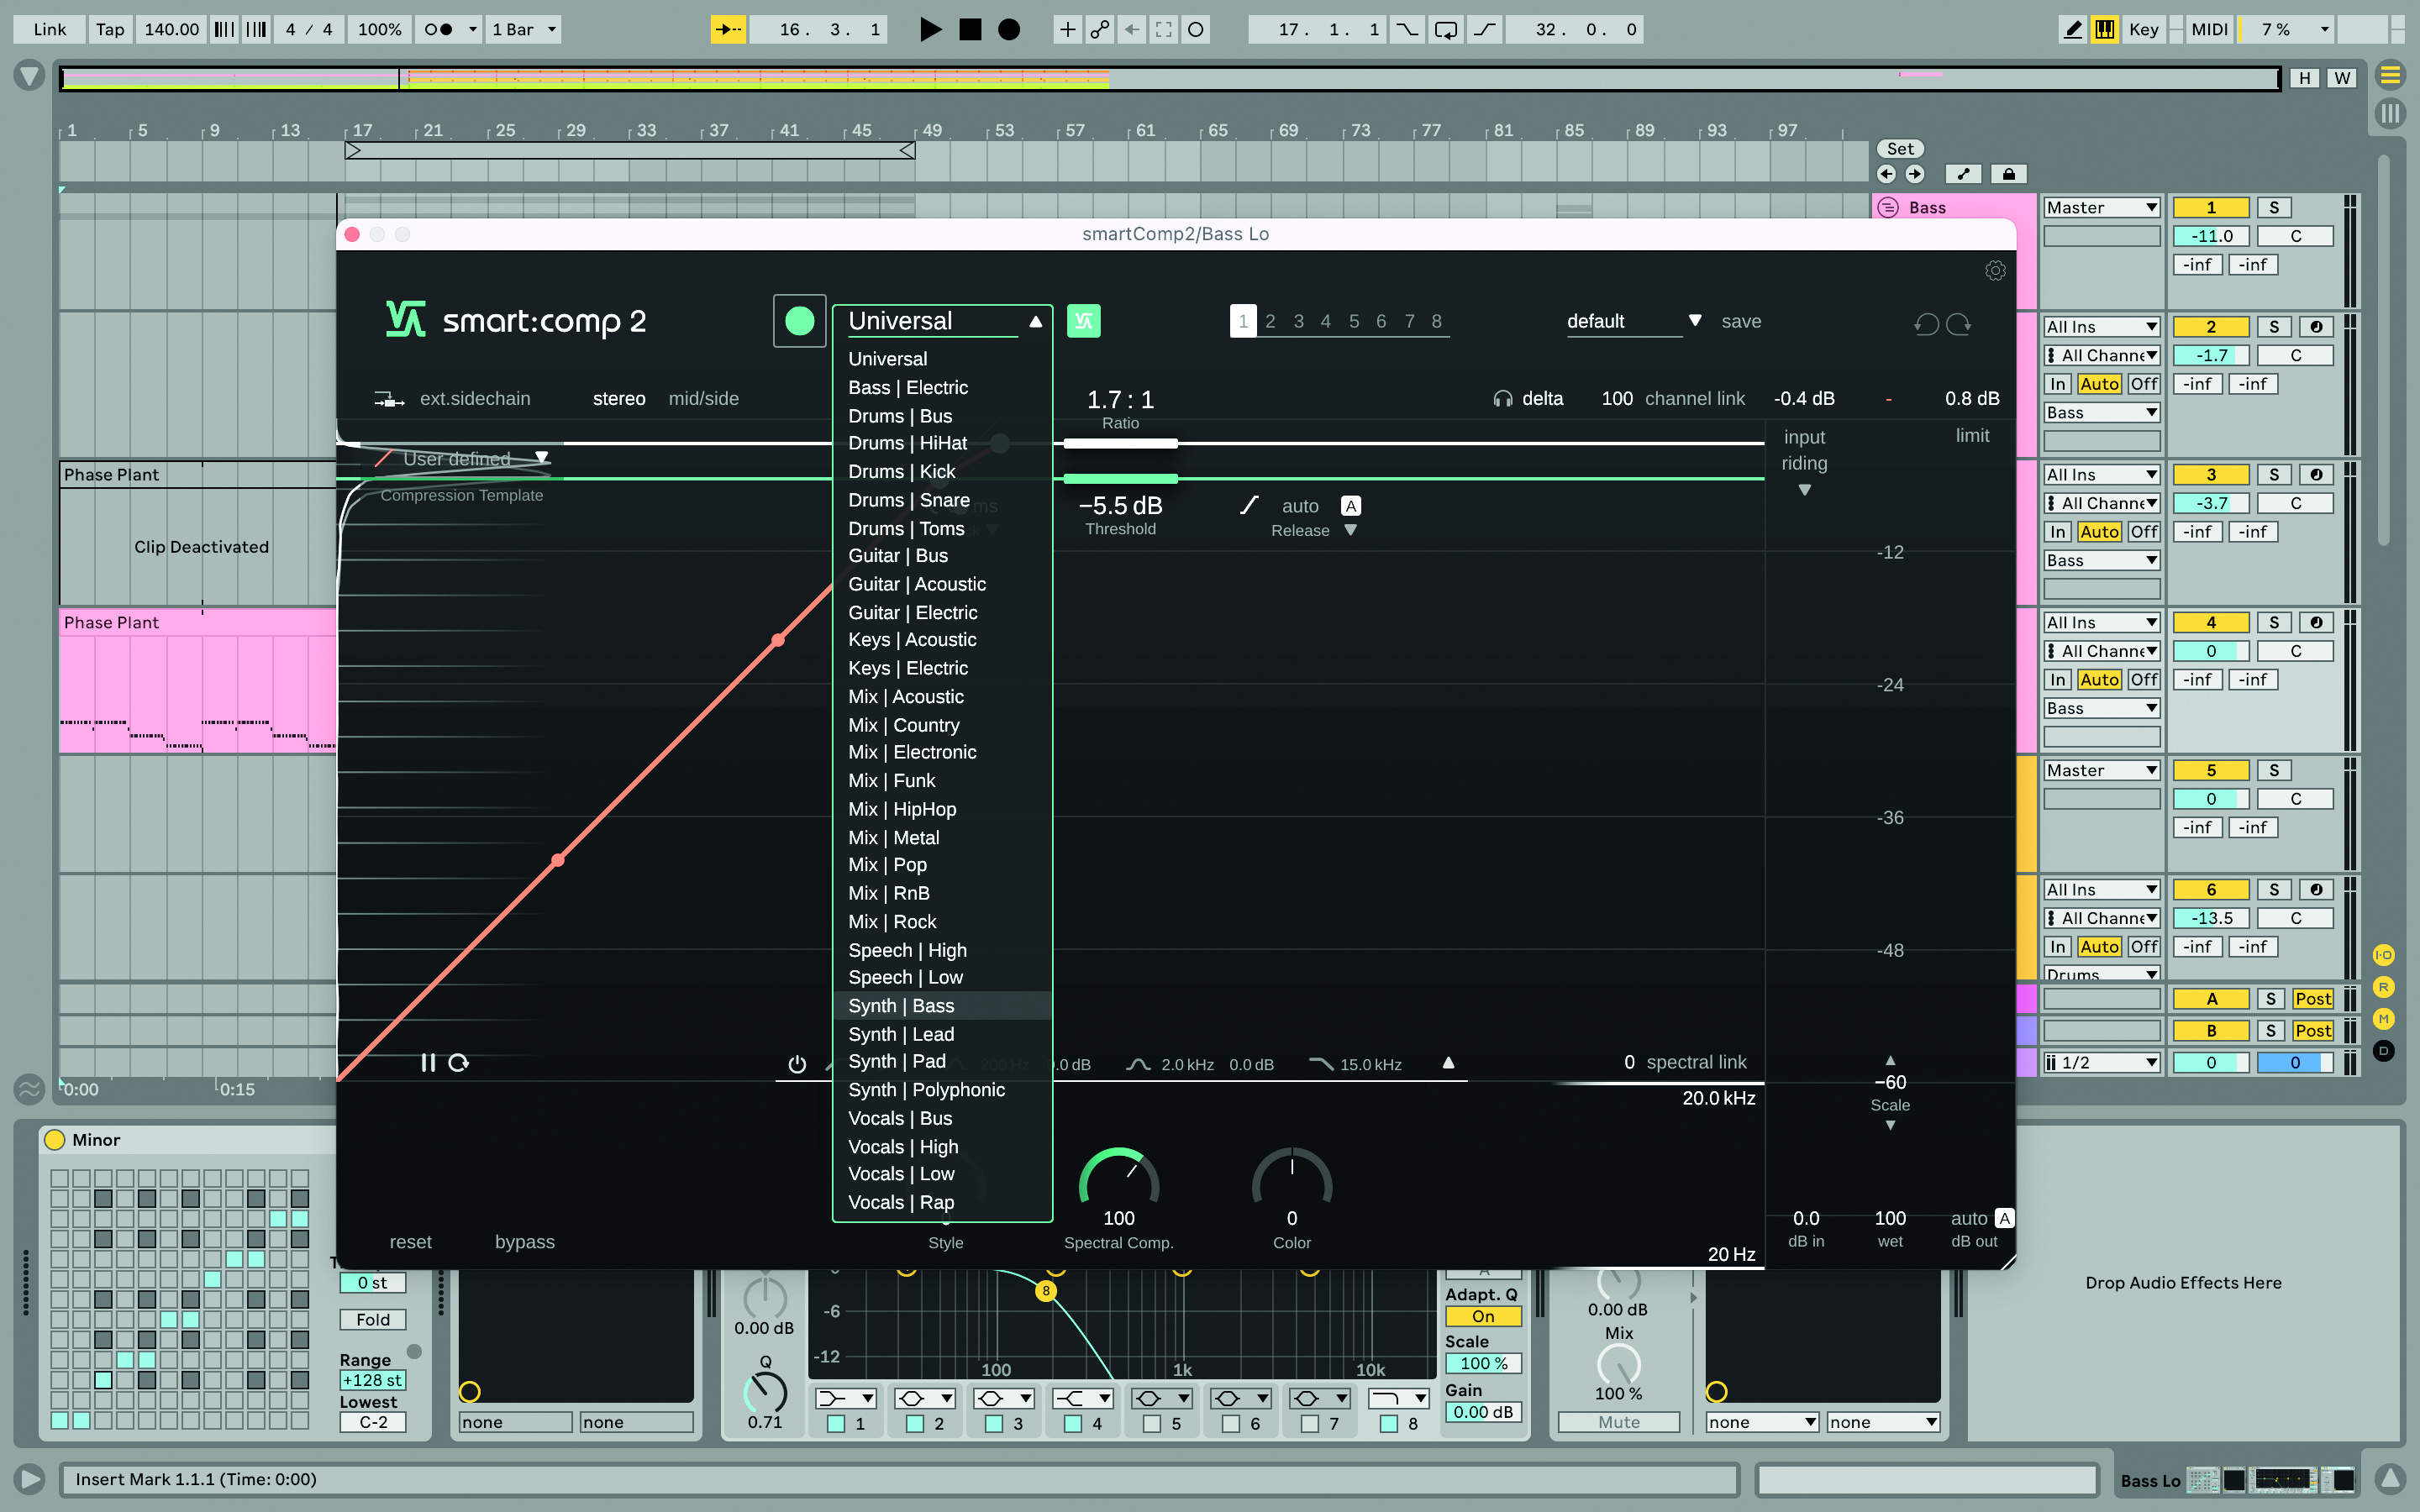
Finally, select a compression model. Open the dropdown next to record for 31 compress models in categories such as Drums, Guitar and Keys. smart:comp 2 doesn’t need to listen to your track again so you can audition these seamlessly.
4. GS DSP MagicBlur
As technology’s power grows, so does its ability to process audio in new and exciting ways. Spectral processing is one of many relatively modern audio processing techniques that has been made possible by recent leaps and progress in computing power.
The FFT-based technology can take many shapes, from EQs and audio restoration to reverbs and delays. Ultimately, it works by breaking down audio into tiny frequency bands which can then be individually targeted and treated. Although the process has been around for a while, it’s only recently that consumer technology has been able to work with audio on a spectral level due to the CPU-heavy nature of the task.
Now, though, there are a growing number of software developers with practical audio applications for the technology. One such company is Gustav Scholda Digital Signal Processing. The Austria-based company specialises in spectral processing, with a catalogue of five plugins that harness the power of this audio treatment approach. The range of products and their various purposes go some way to demonstrating the versatility of spectral processing, from clinical utilities to extreme creative sound design plugins.
GS DSP’s capable spectral processing engine promises to offer innovative and practical approaches to carrying out common music production tasks including EQ, delay and pitch and frequency shifting.
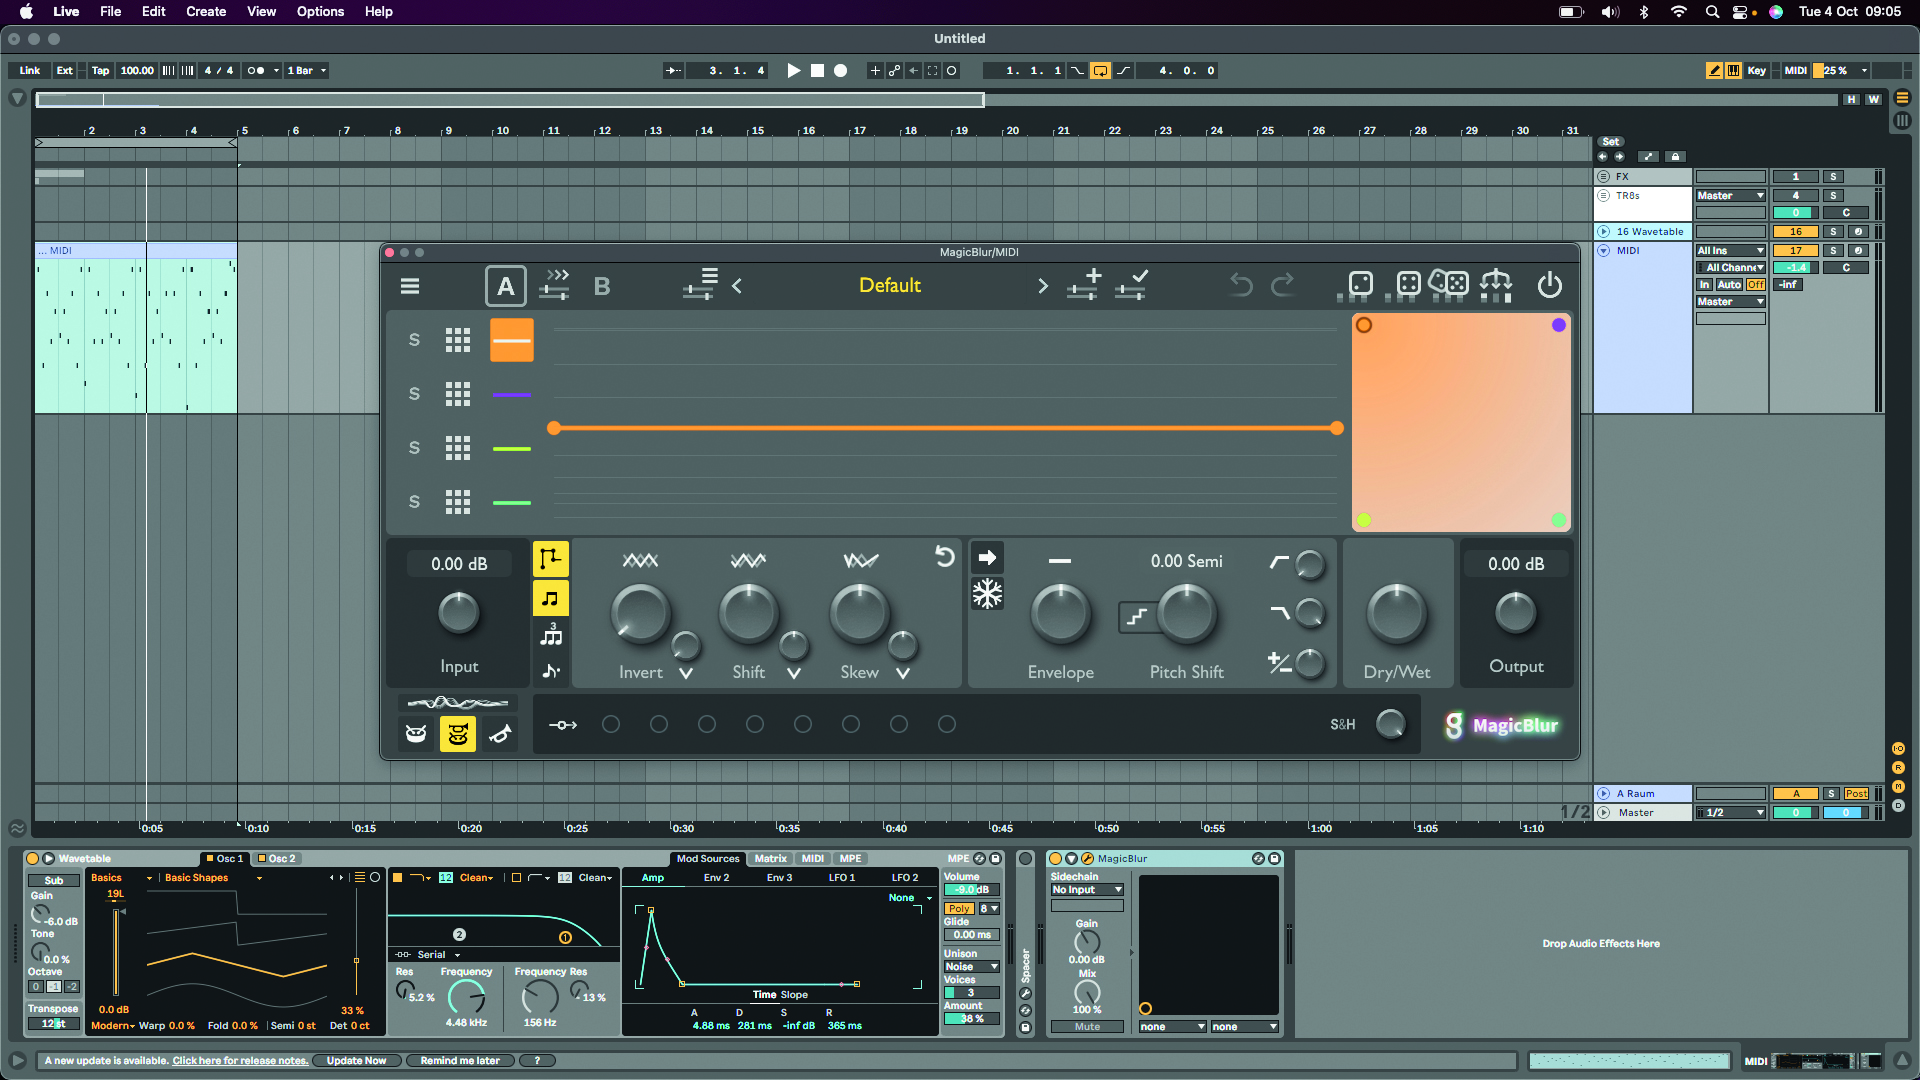
MagicBlur is a spectral blur and freeze effect, capable of creating an array of tones. The curve editor displays blur time as a function of frequency; the X axis represents frequency and the Y axis time. Select a curve by clicking on a horizontal line.
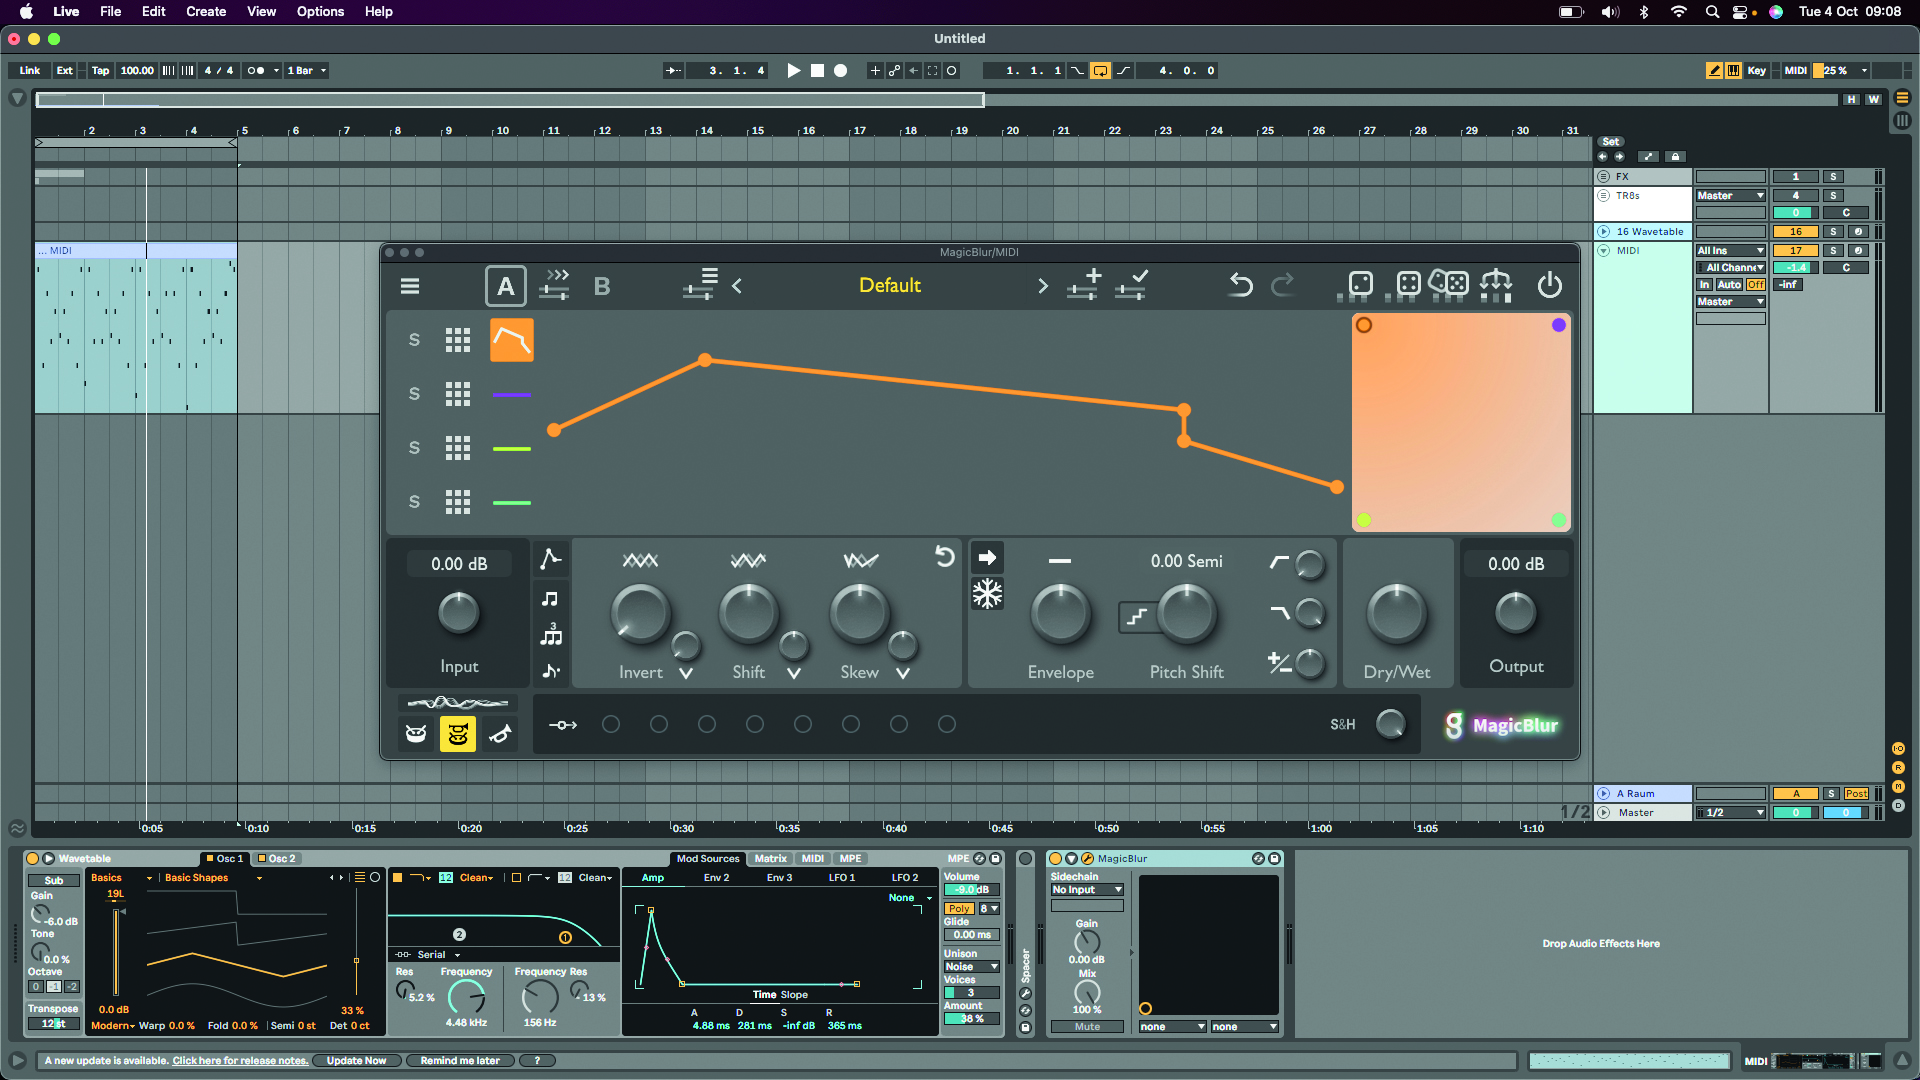
Drag the nodes to move the curve, or double-click to create/delete nodes. Toggle between stepped curves and free curves by clicking on the top icon to the right of the input dial. For finer frequency adjustment, click the button below that.
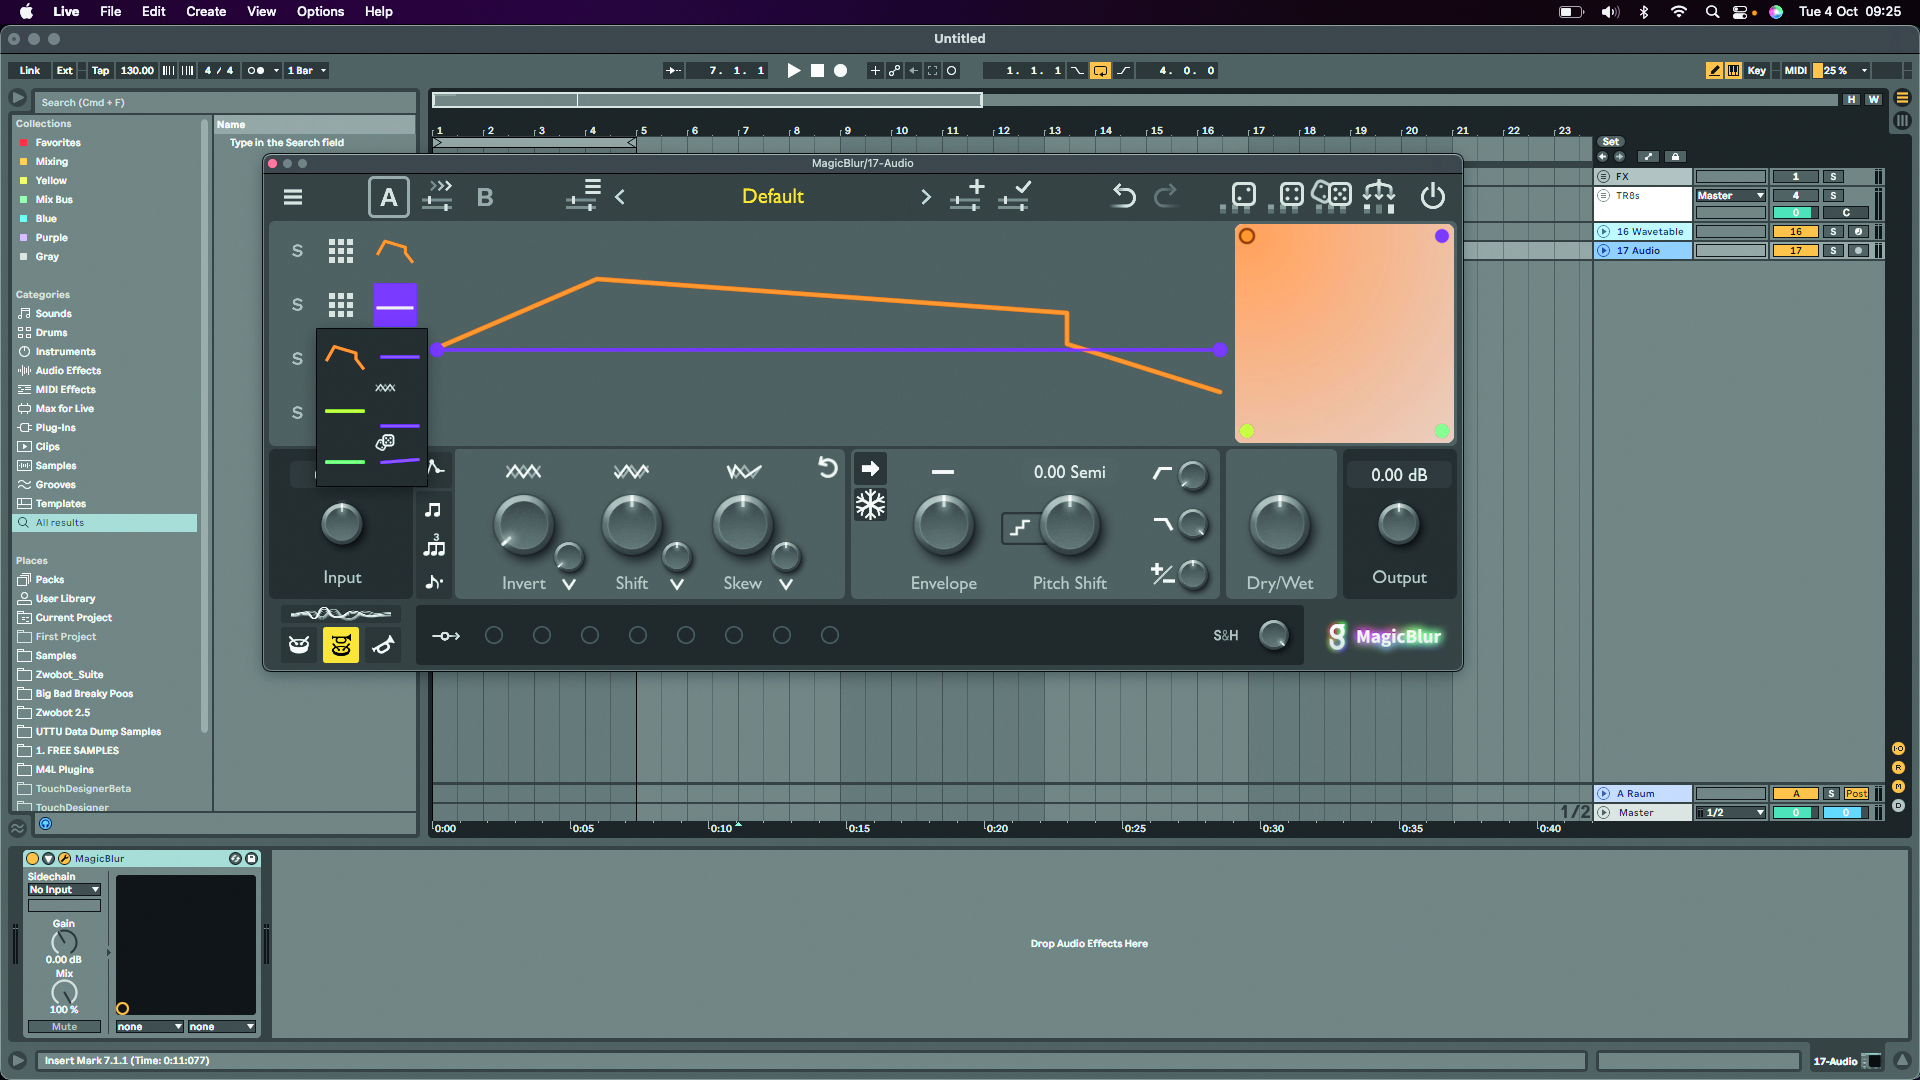
There are four selectable curves which you can alter independently, or select a curve preset by clicking on the grid icon. Once you have created your curves, you can morph between them using the XY controller to create seamless shifting in the effect.
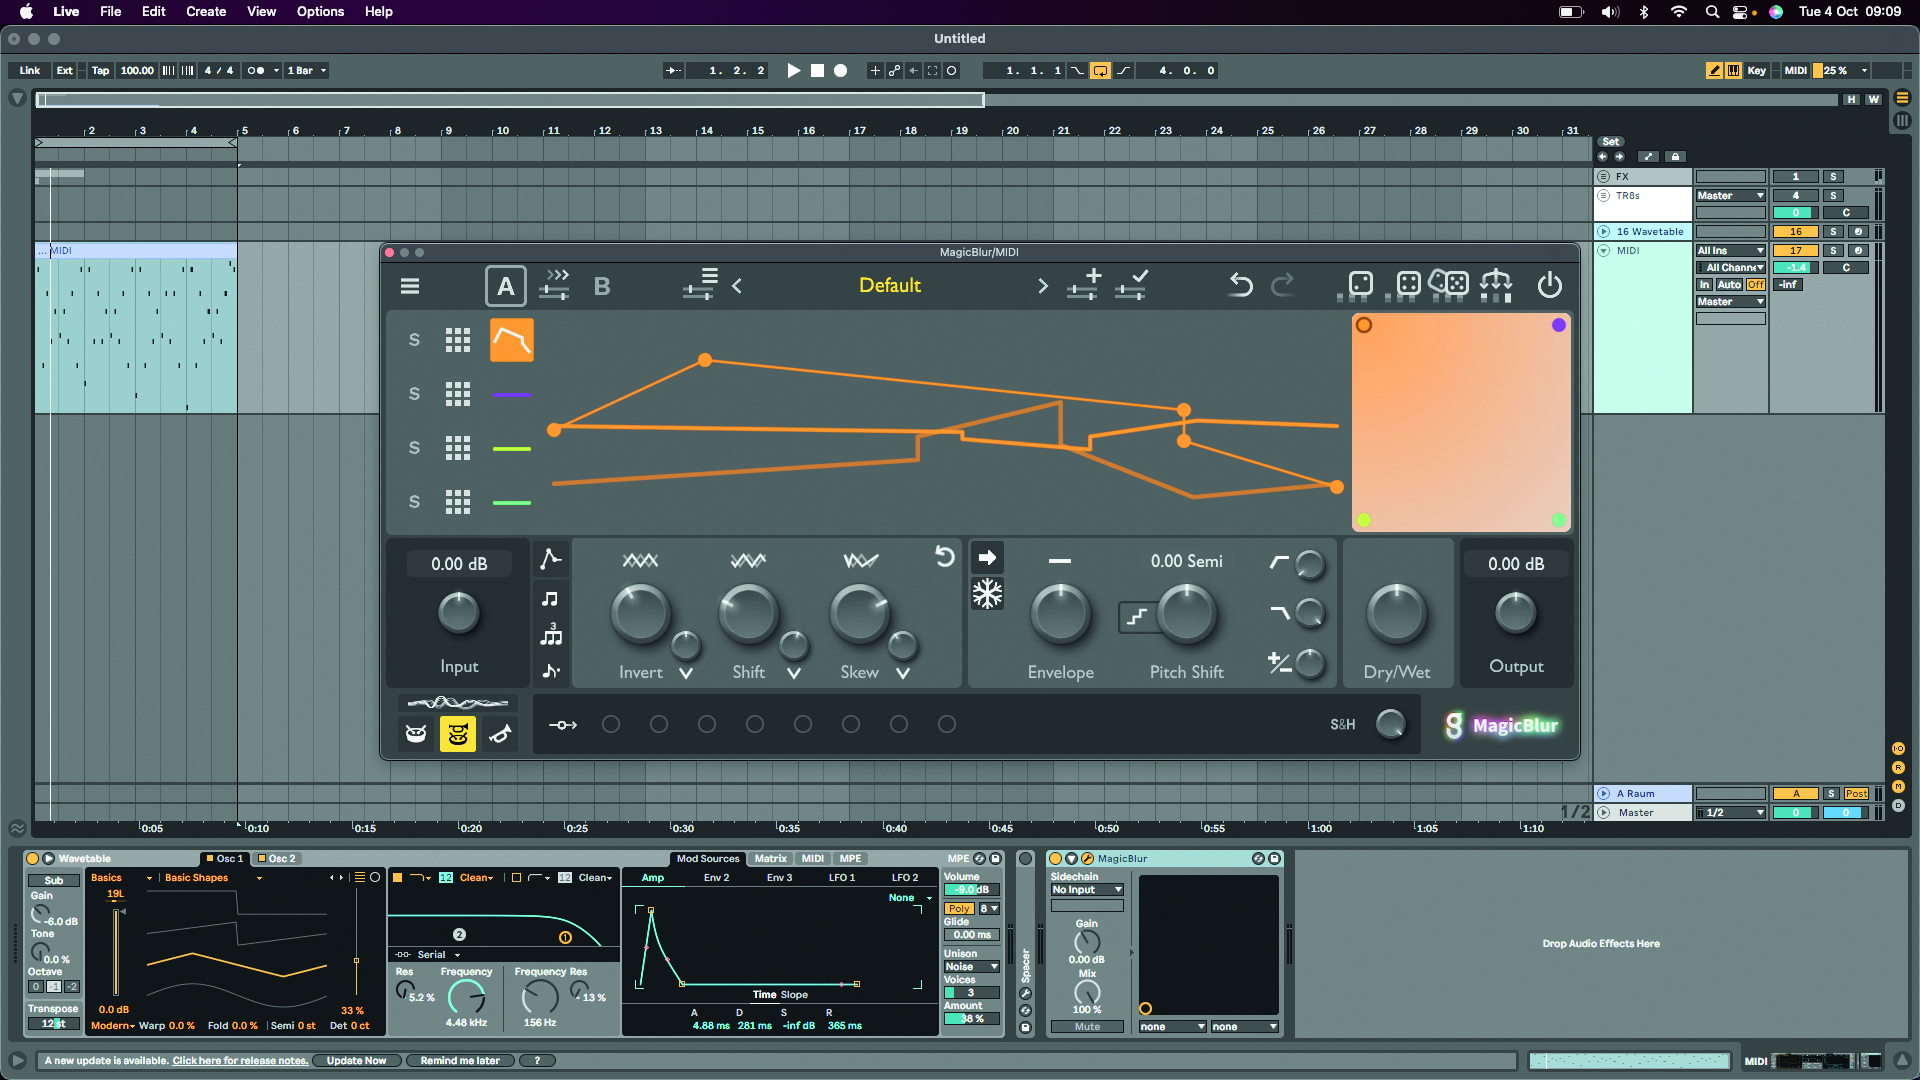
MagicBlur’s Invert, Shift and Skew dials let you manipulate the frequency and time your curve is affecting. You can set an offset between the left and right channels using the V dials below each of these controls, which creates a stereo spread effect.
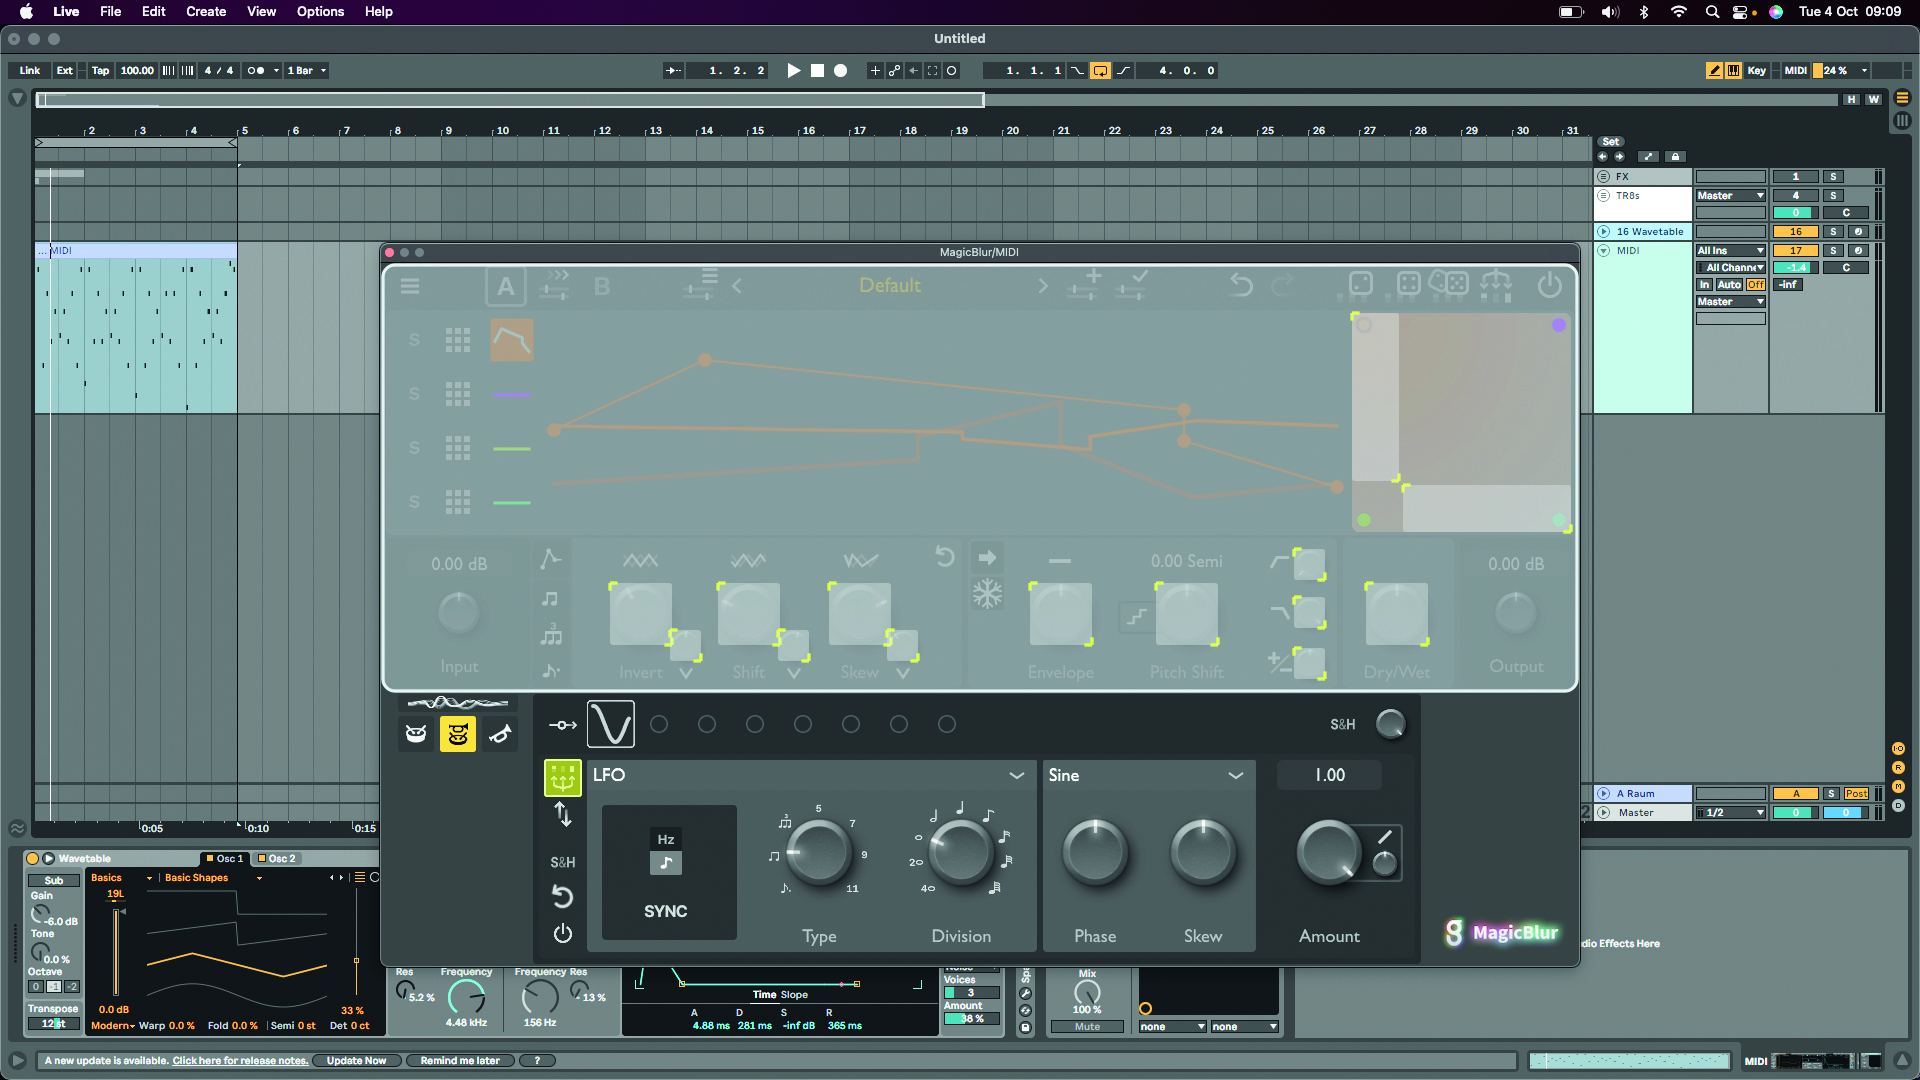
Add modulation by clicking on a grey circle below the Invert dial, then click on the triple arrow icon to select a destination. Modulatable settings are greyed out with yellow markers; simply click on a setting to assign the modulation to it.
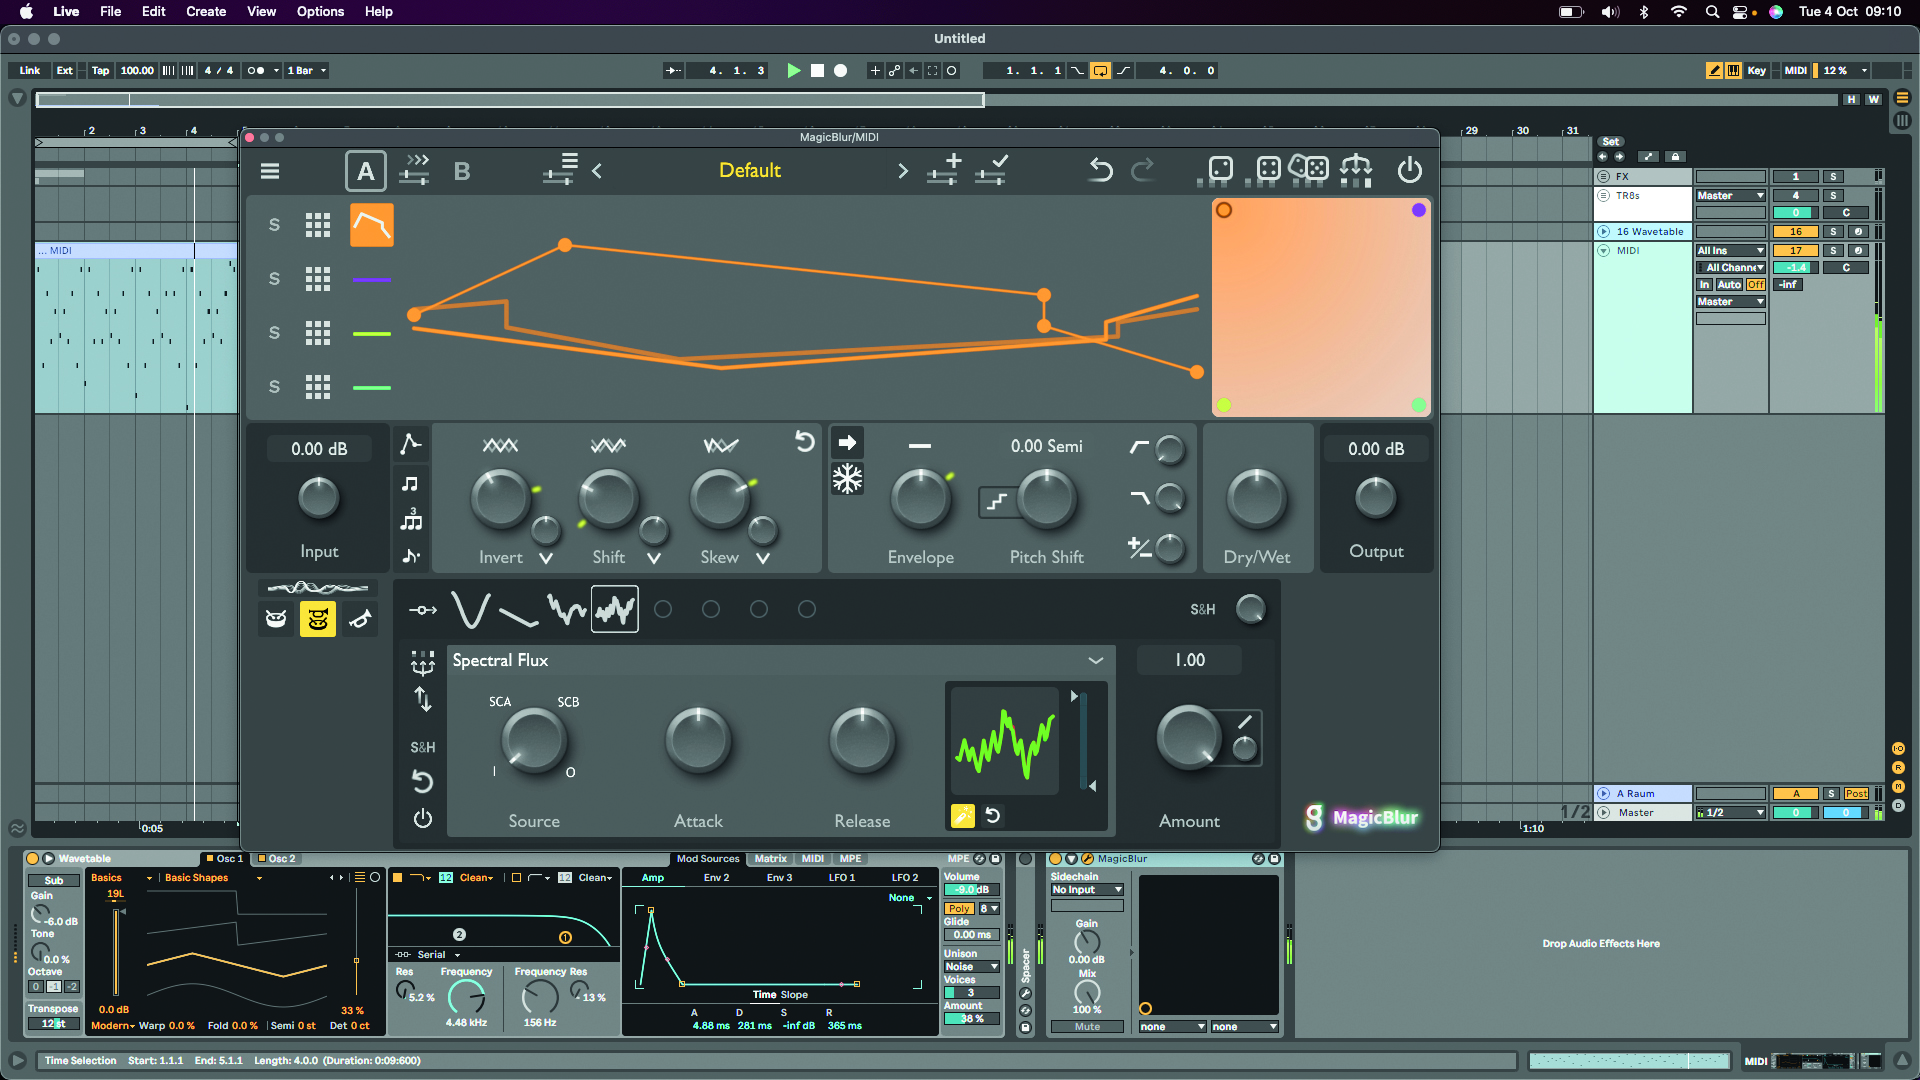
There are 12 modulation sources, including custom LFOs, pitch followers and a camera input. Click on the dropdown to the right of LFO to select one. You can mix and match up to eight different types for unpredictable evolving effects.
5. Three-Body Tech Kirchhoff EQ
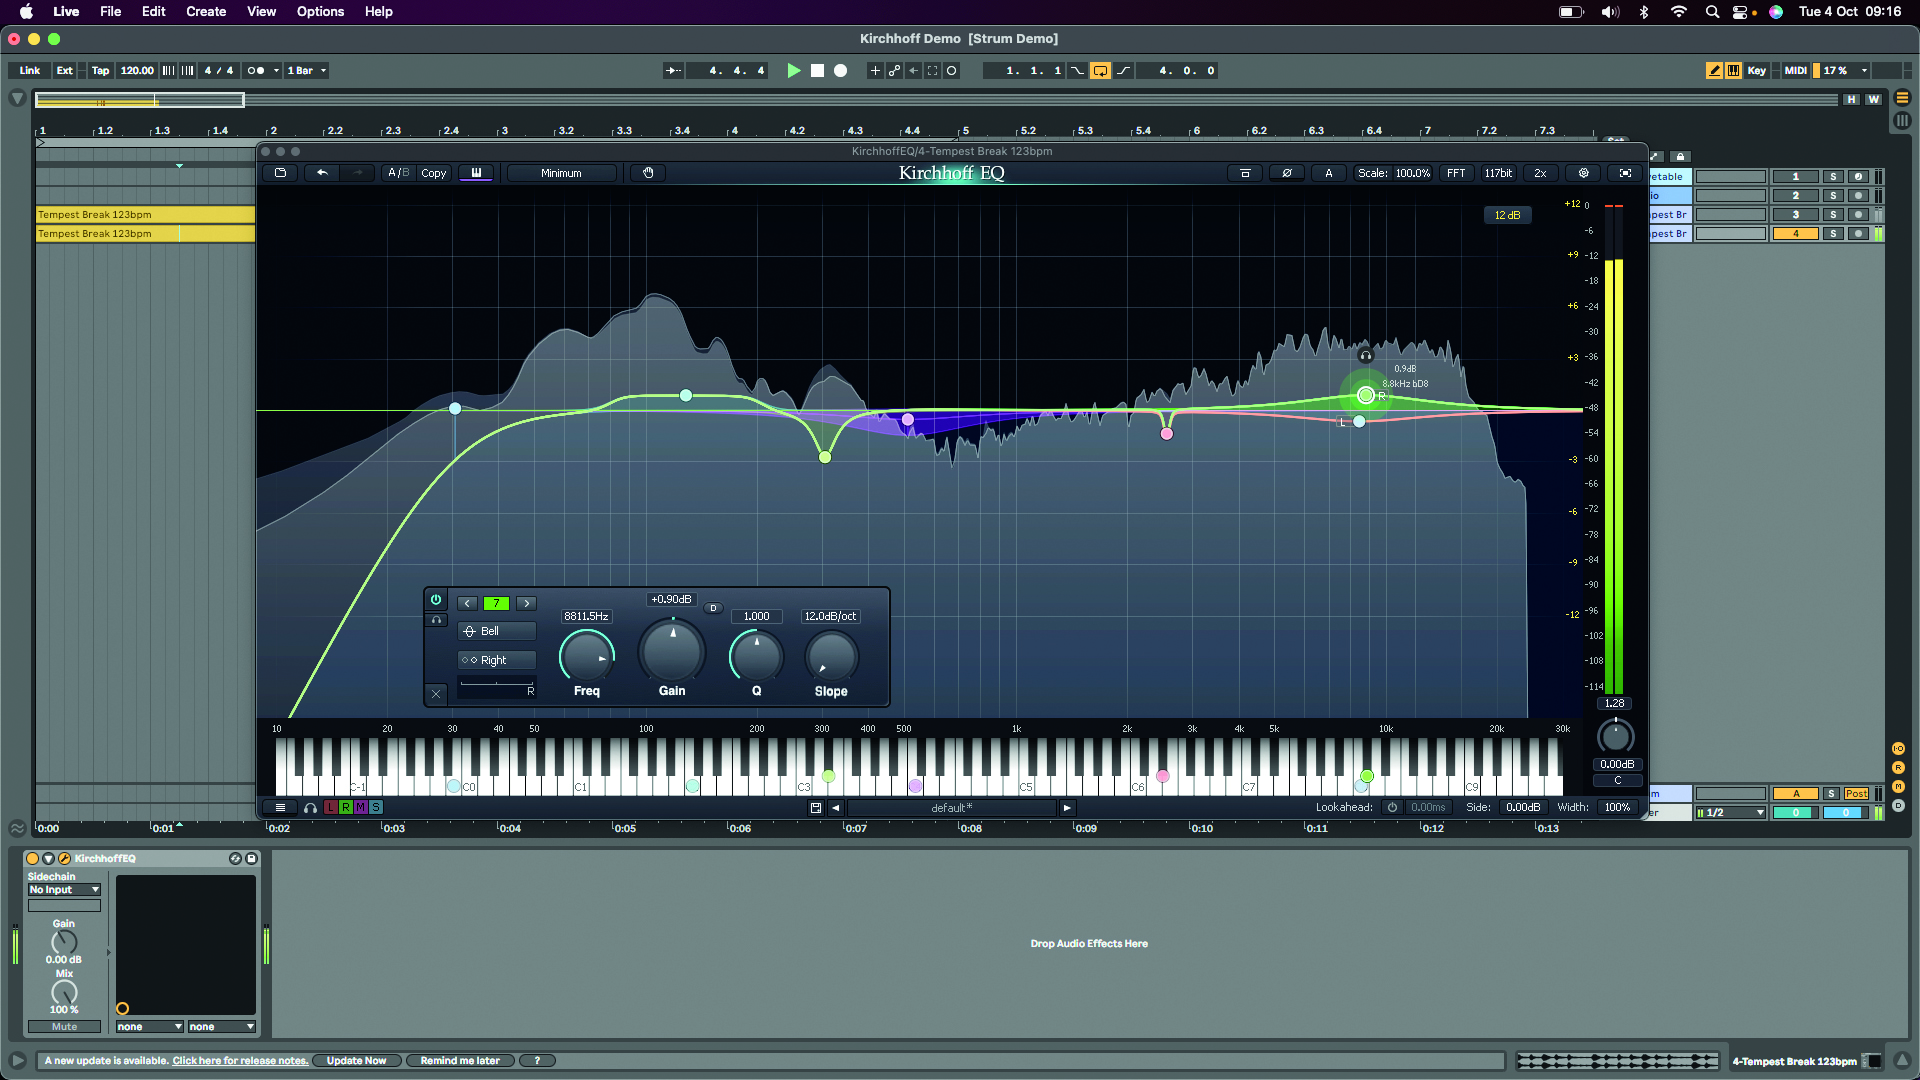
Three-Body Tech’s Kirchhoff EQ is a 32-band parametric EQ, with nine vintage models, dynamic processing and a feature list that puts many more established EQ plugins to shame. At first glance, it resembles other EQs you may have used, but the power of this plugin is tucked away under the hood.
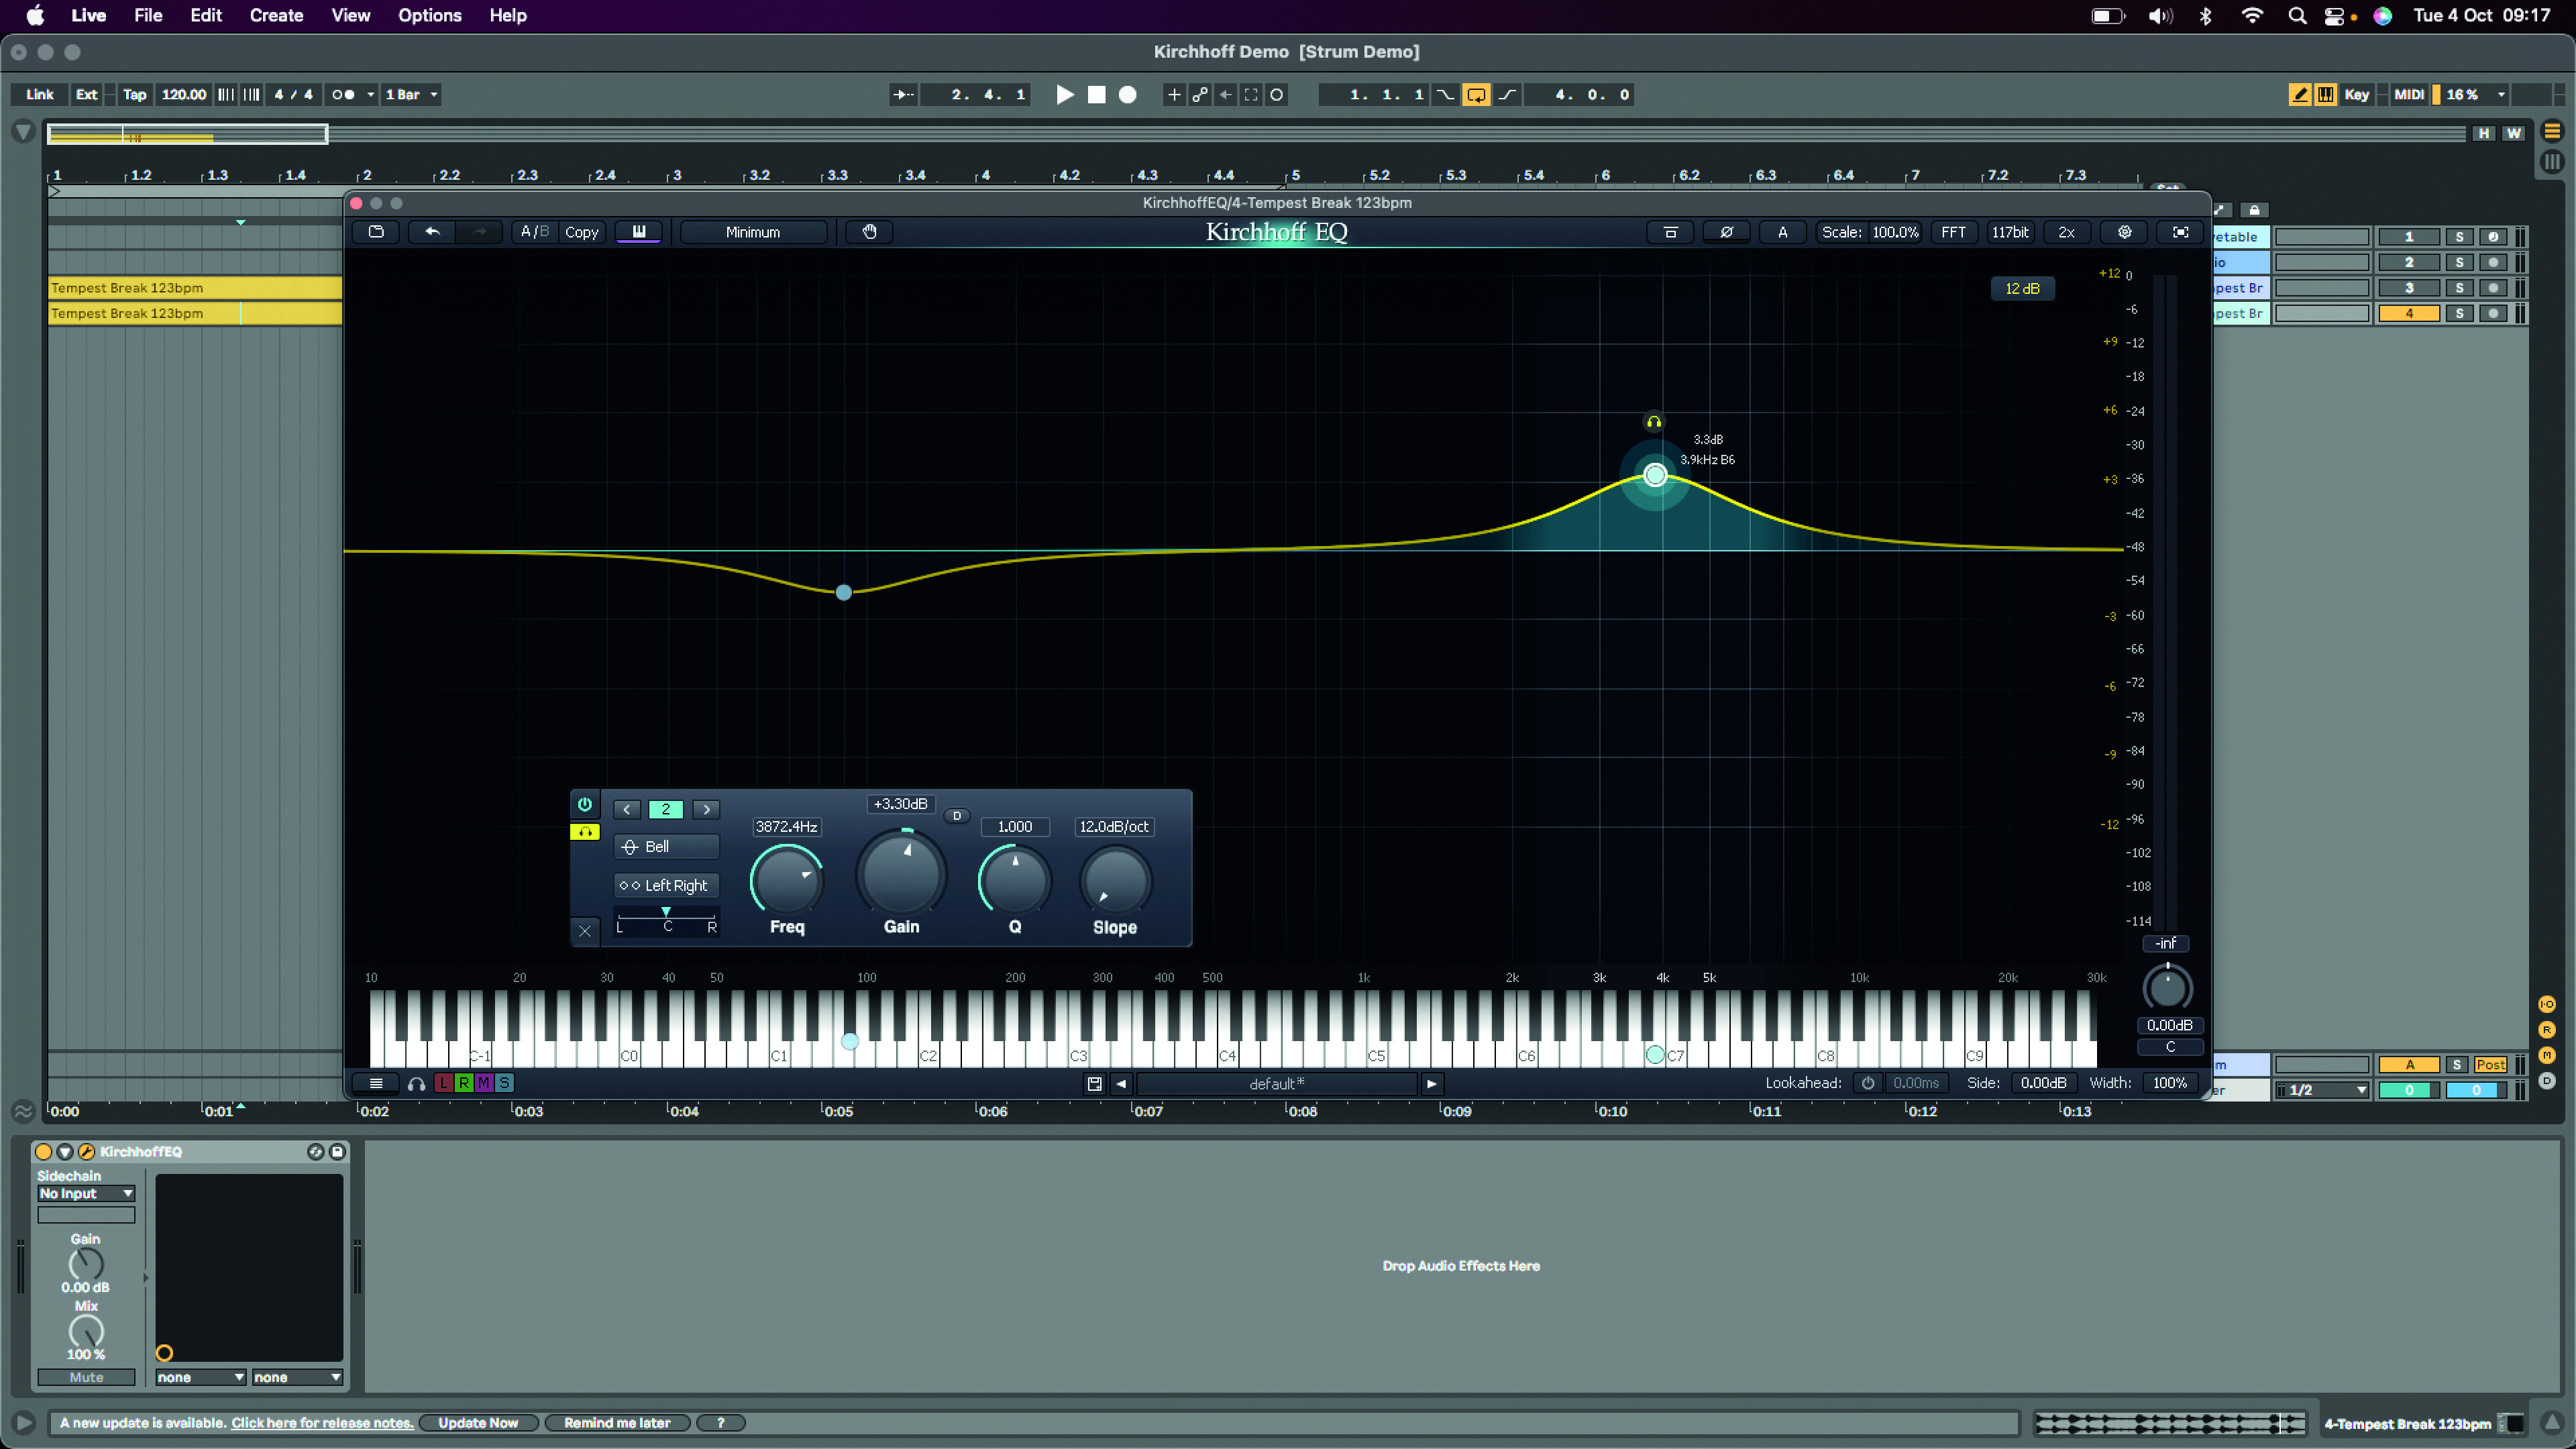
Double-click anywhere on the spectrum window to create a new band, which you can then drag to adjust its frequency and gain. Hold Command/CMD and drag to adjust a band’s Q value, or hold Shift to make finer adjustments. Hold the headphone icon to solo an individual band.
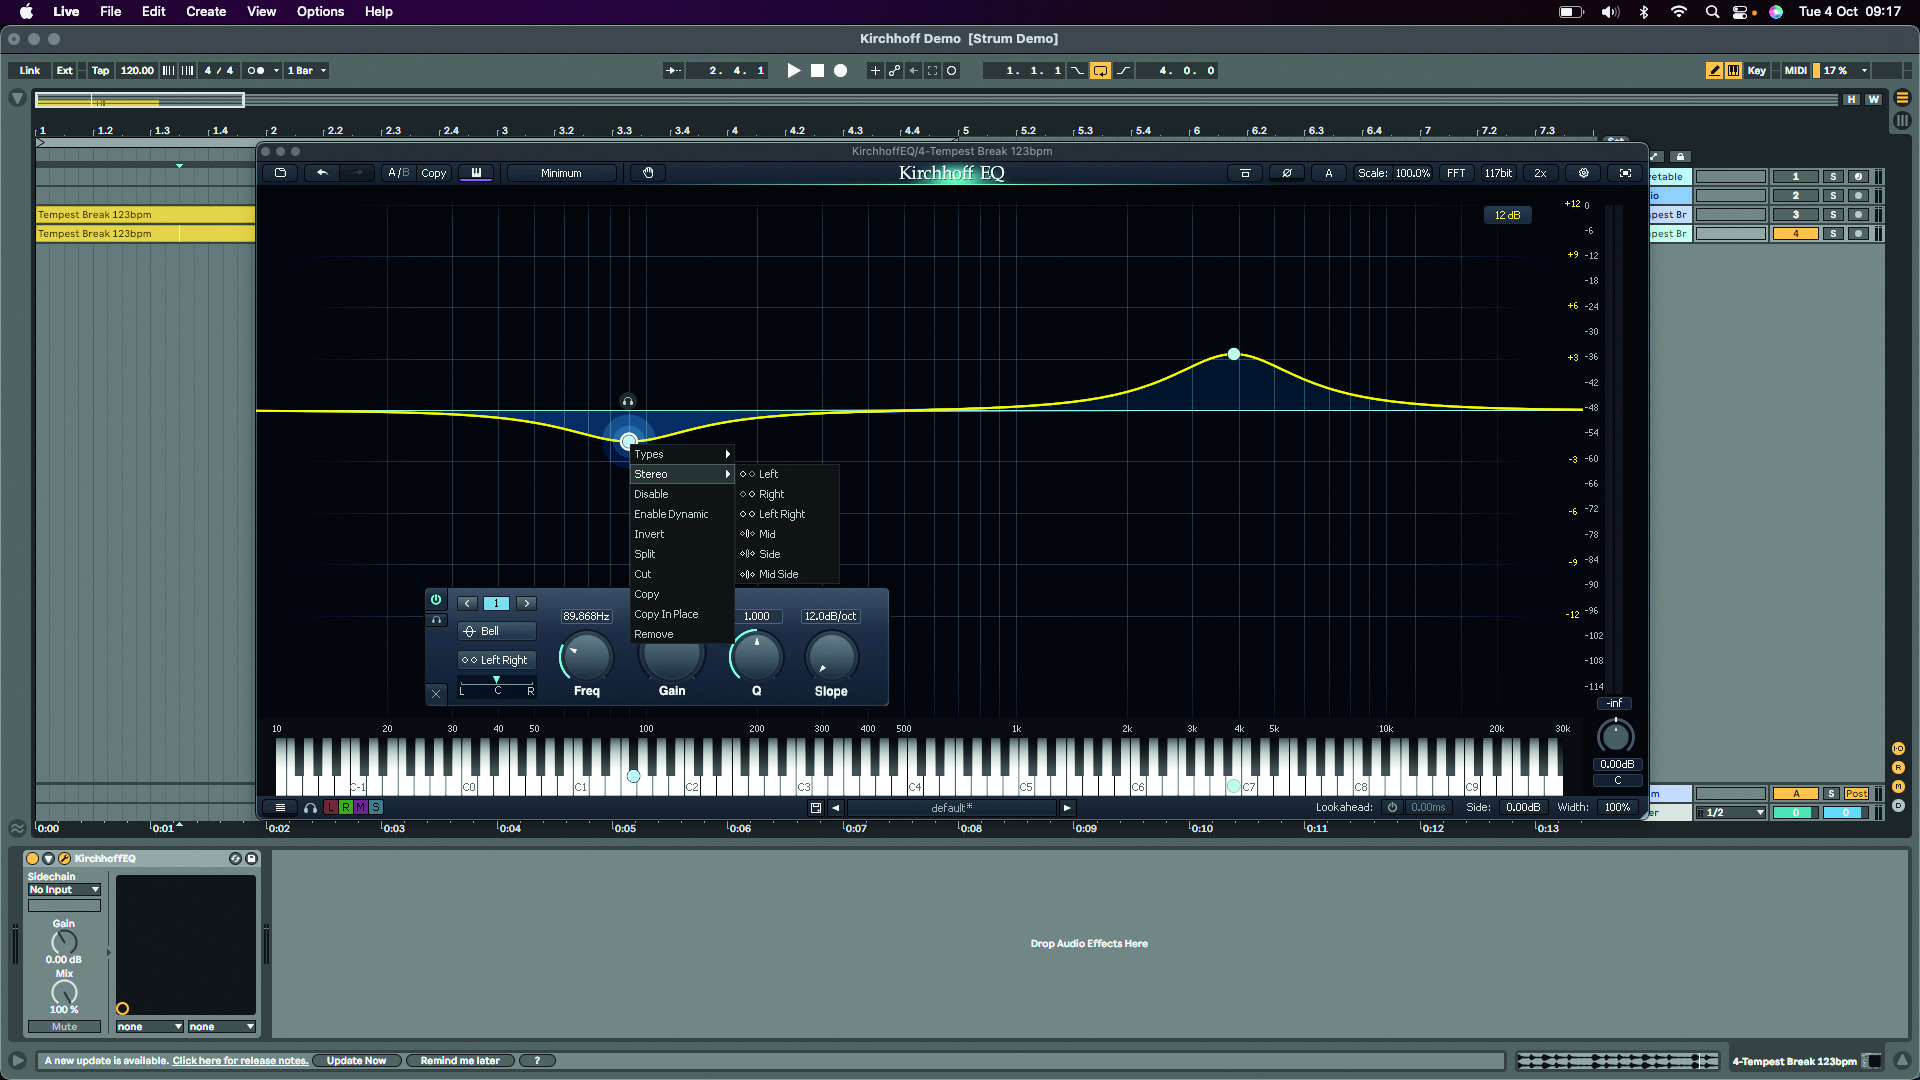
Select a band to view its control panel. Here, you can change more advanced parameters, such as panning, stereo type, filter type and continuously variable slope. Alternatively, you can right-click on a band’s node to access these settings, plus much more.
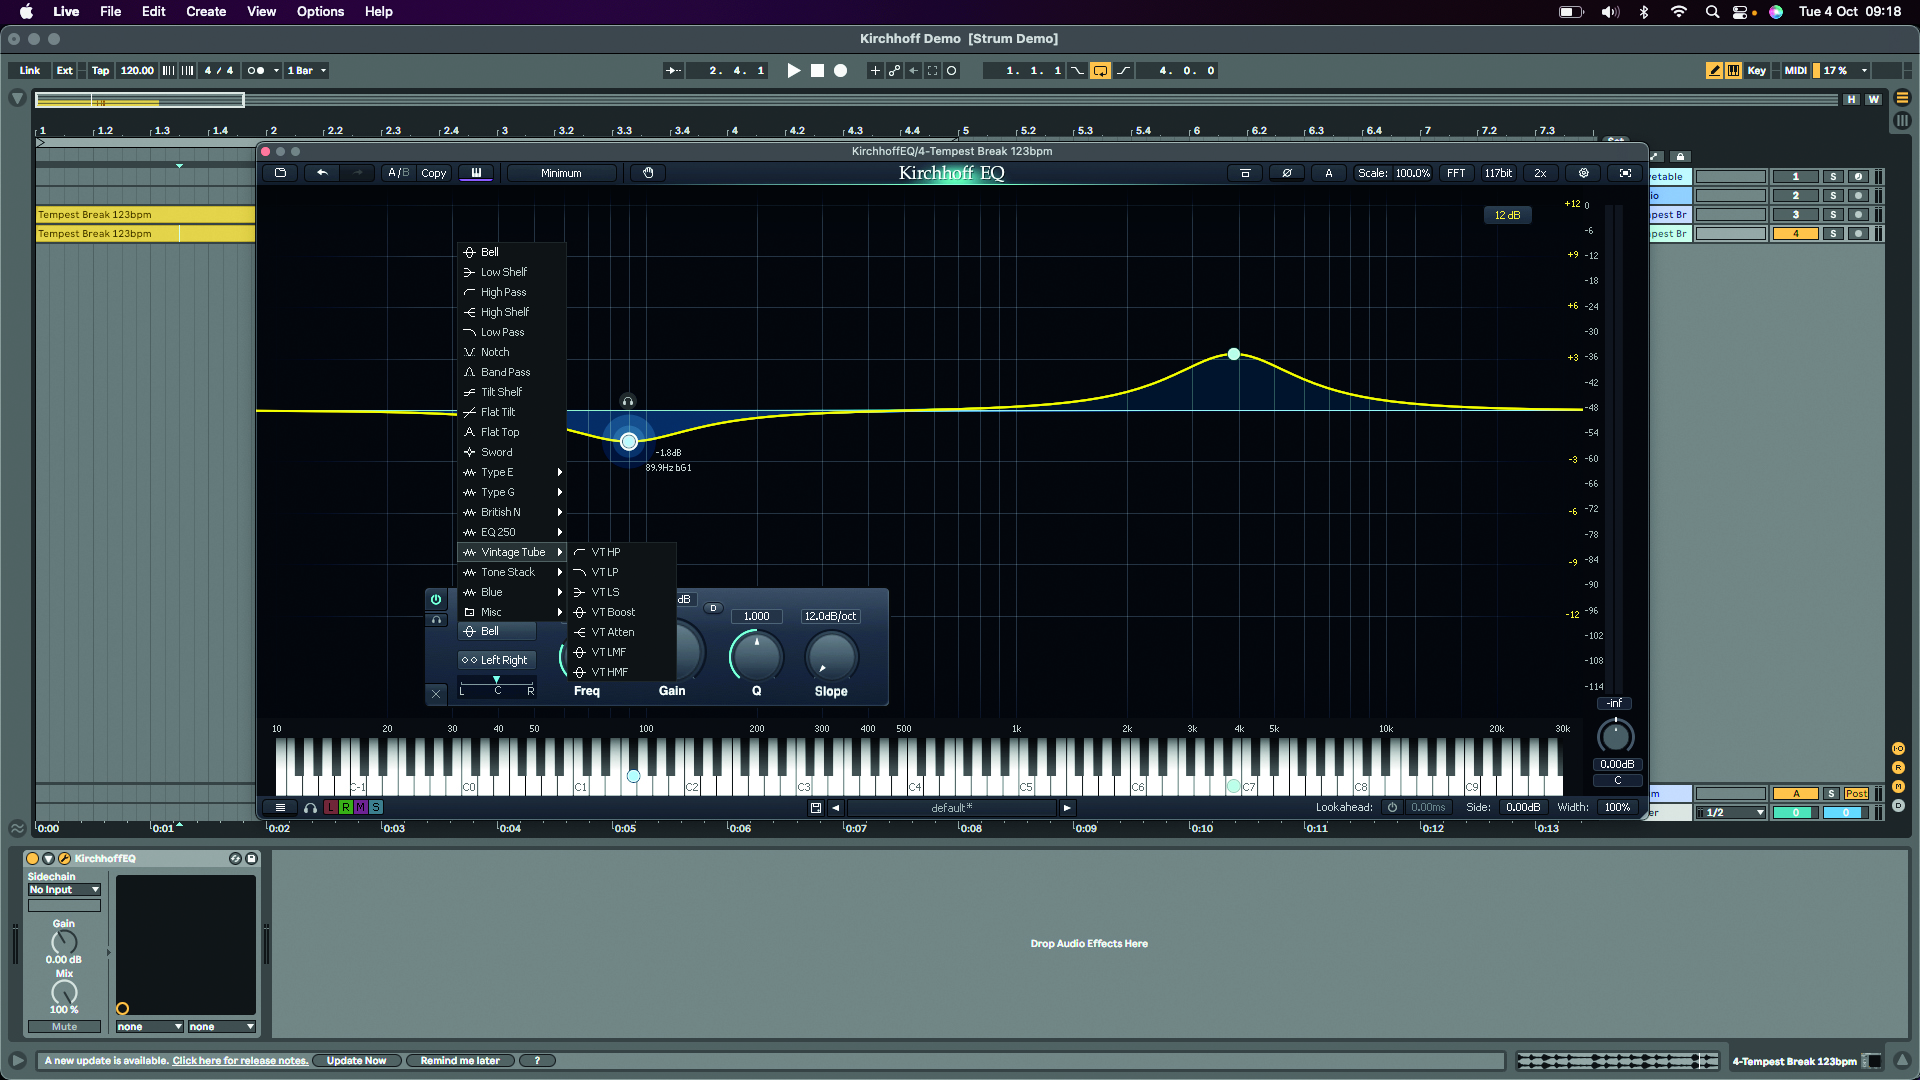
Kirchhoff has 15 distinct filter types, including nine vintage models that emulate some of the most desirable classic EQs including Neve, SSL and Pultec. There are high and low passes, shelf and bell shapes, plus sword and brick wall cuts for precisely carving out very specific frequencies.
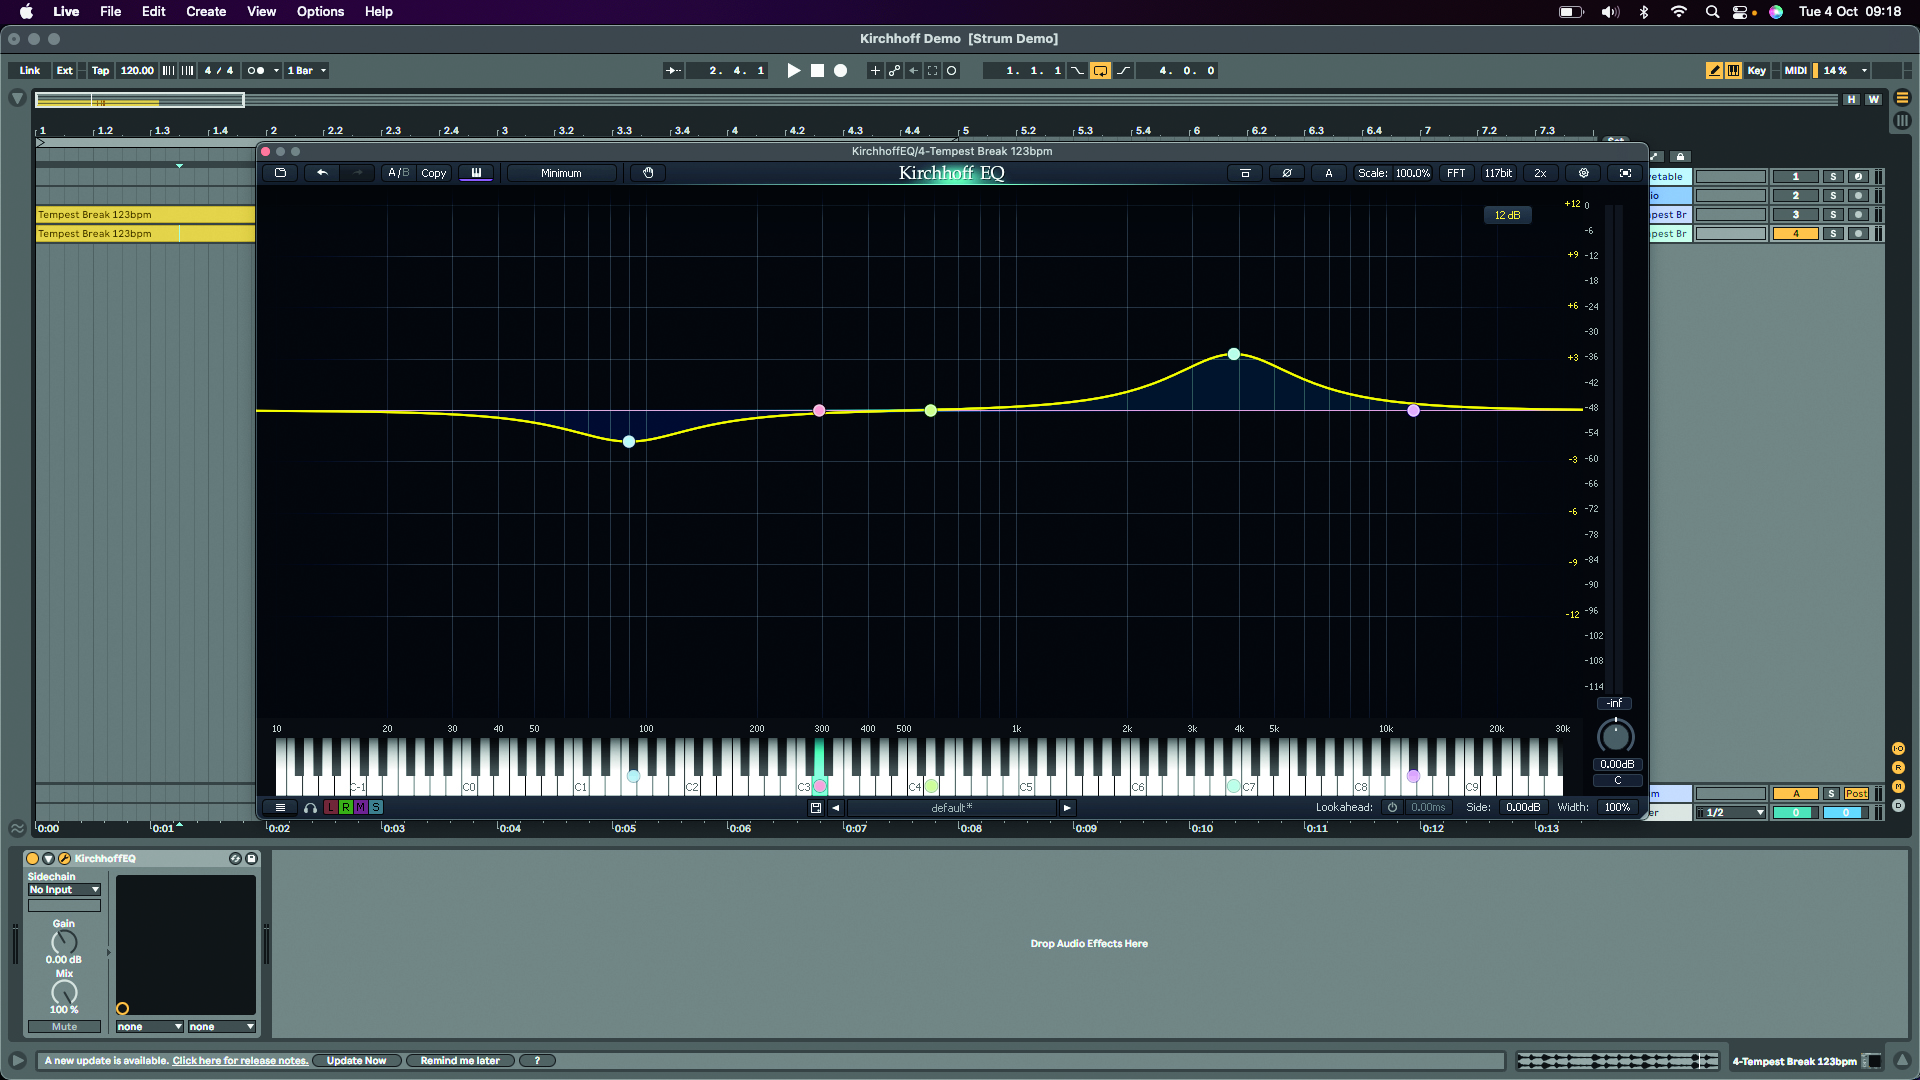
You can view the keyboard by clicking on the keyboard icon at the top left of the GUI. All bands will be displayed on the keyboard in the relevant colour, and you can add new bands by double-clicking on the respective note.
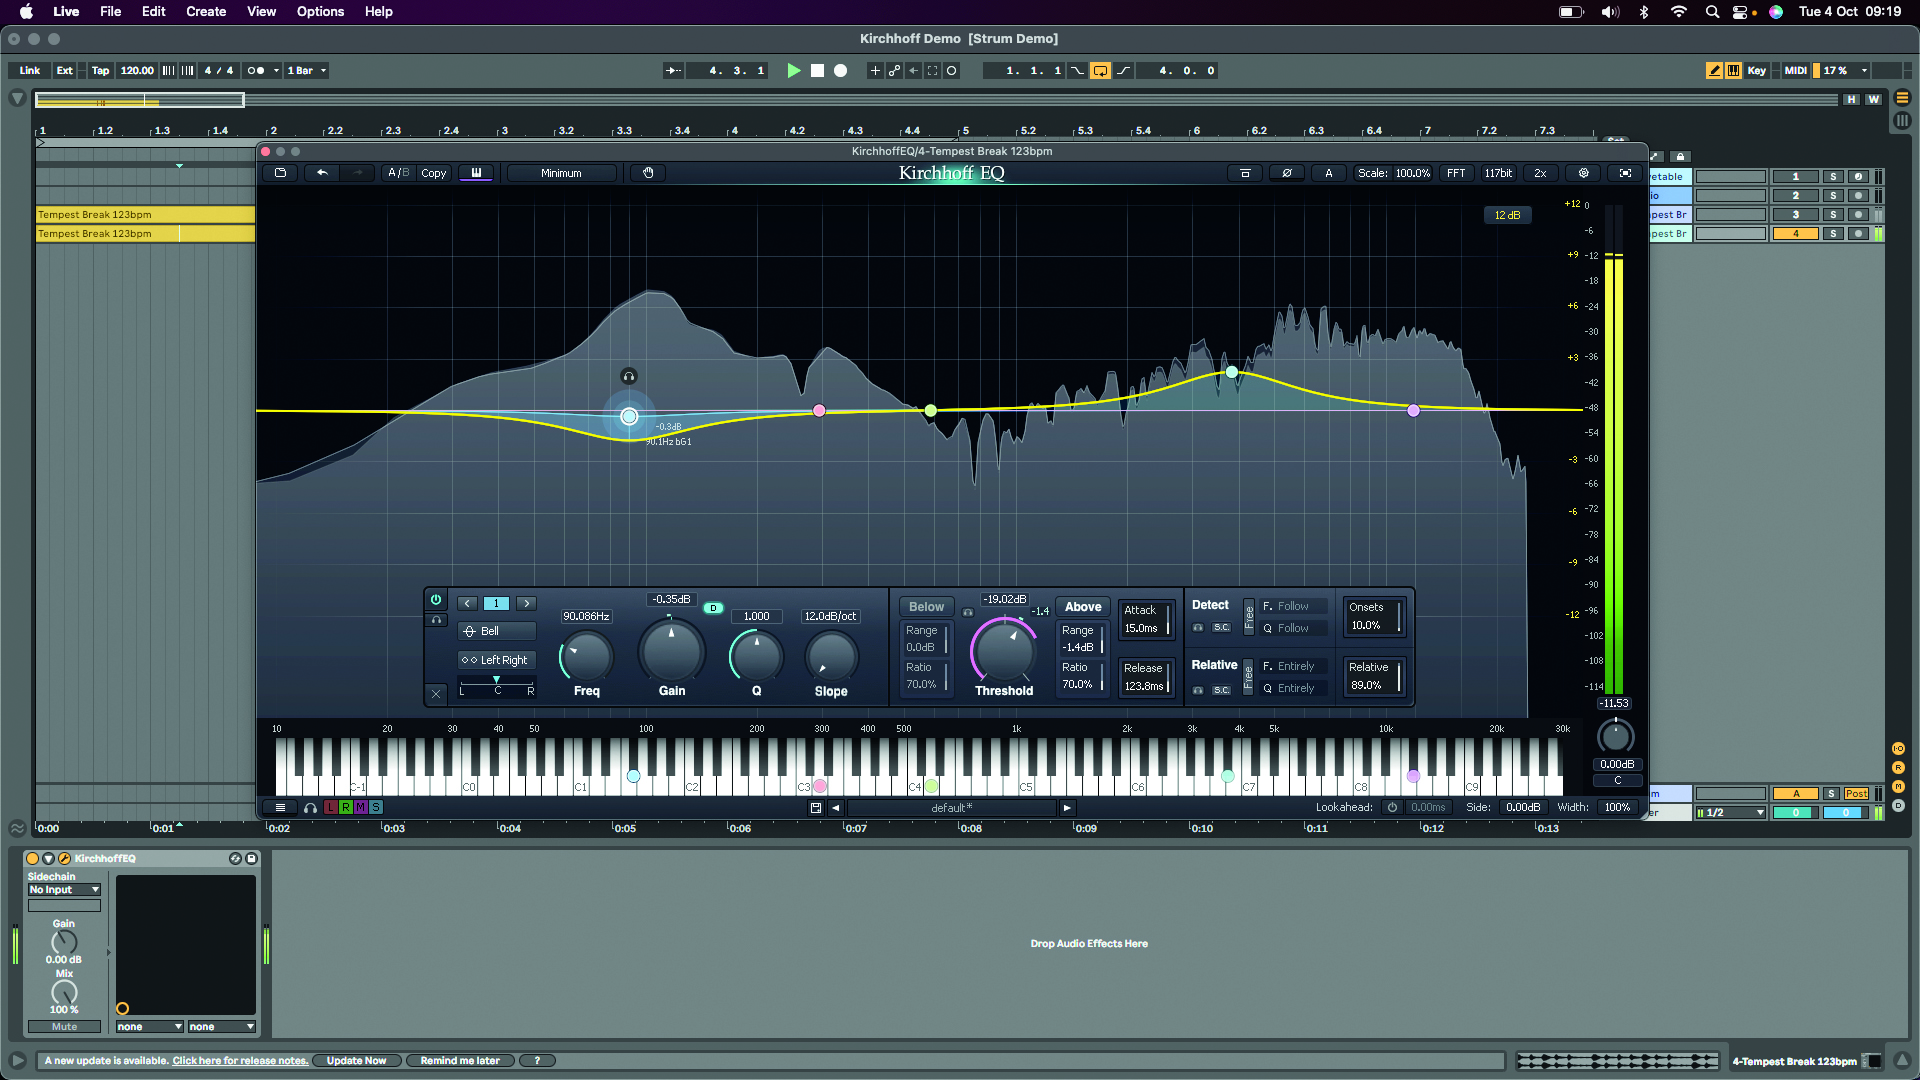
To access Kirchhoff’s dynamic functionality, click on the D icon in a selected band’s control panel. The Below and Above parameters dictate how the EQ responds to signals quieter and louder than the threshold. You can turn off the Below or Above action by clicking on the relevant title box.
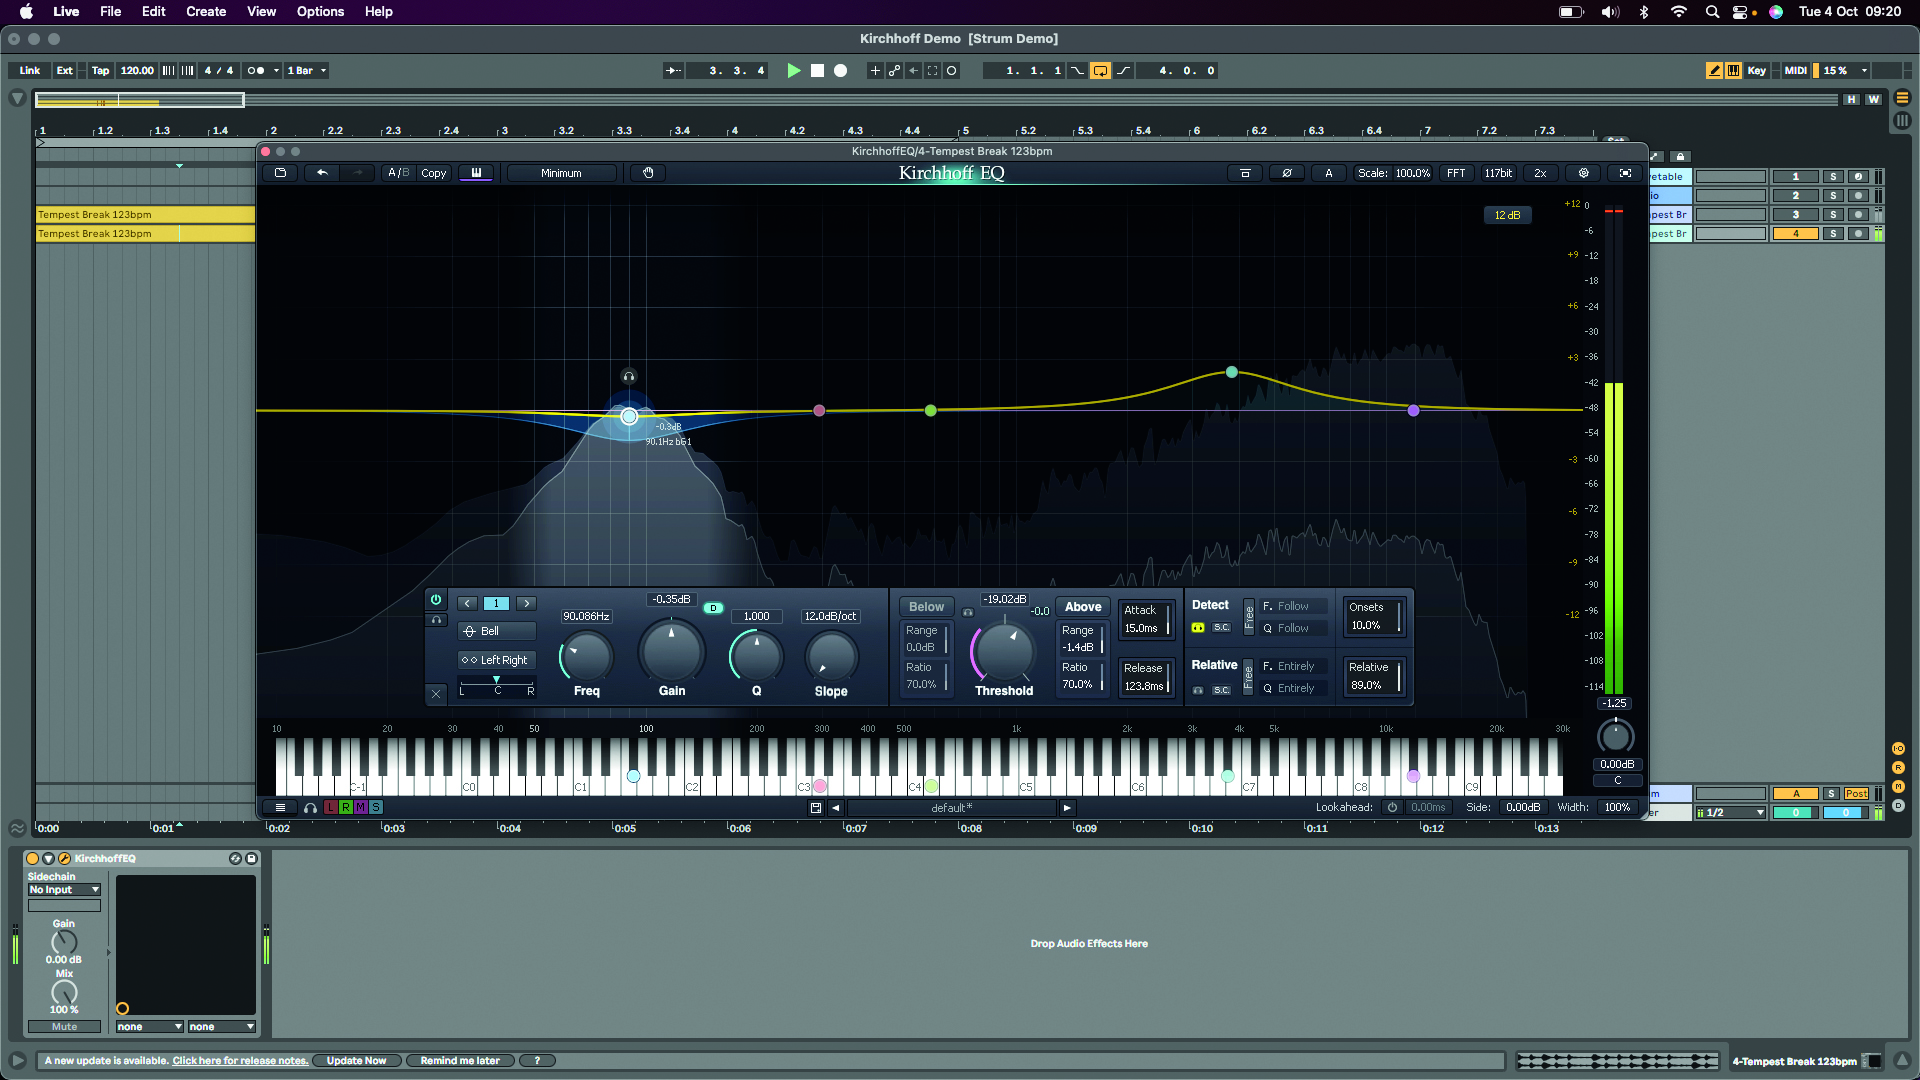
In Detect mode, the dynamics will be controlled according to the signal within that specific band. In Relative mode, dynamics are controlled by the entire audio signal, allowing for a more cohesive and balanced overall signal. You can solo each of these envelope detection modes to listen to what each is doing.
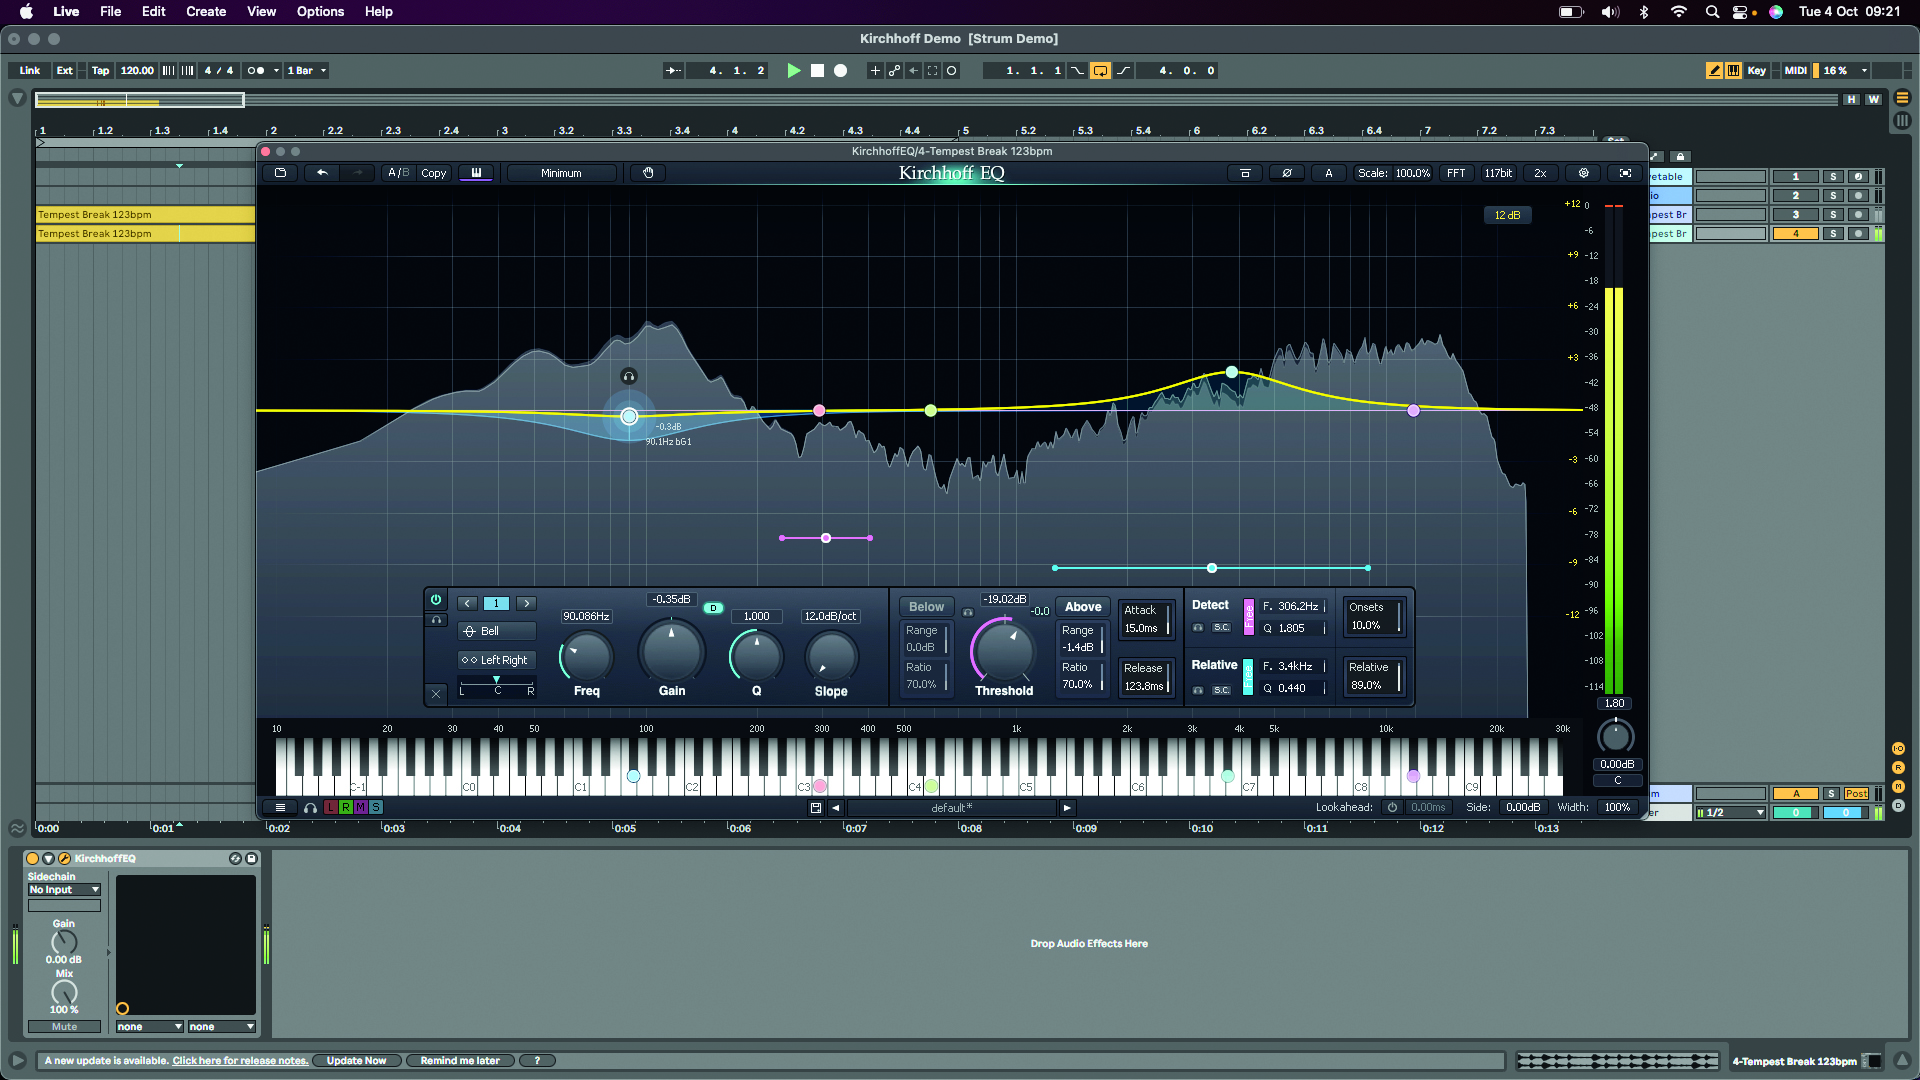
Using Kirchhoff’s Free dynamics mode, you can manually configure a band’s dynamic processor to respond to any frequency across the spectrum. Switch on Free in Detect or Relative mode, then drag the central node of the corresponding horizontal sliders. Drag the outside nodes to adjust bandwidth.
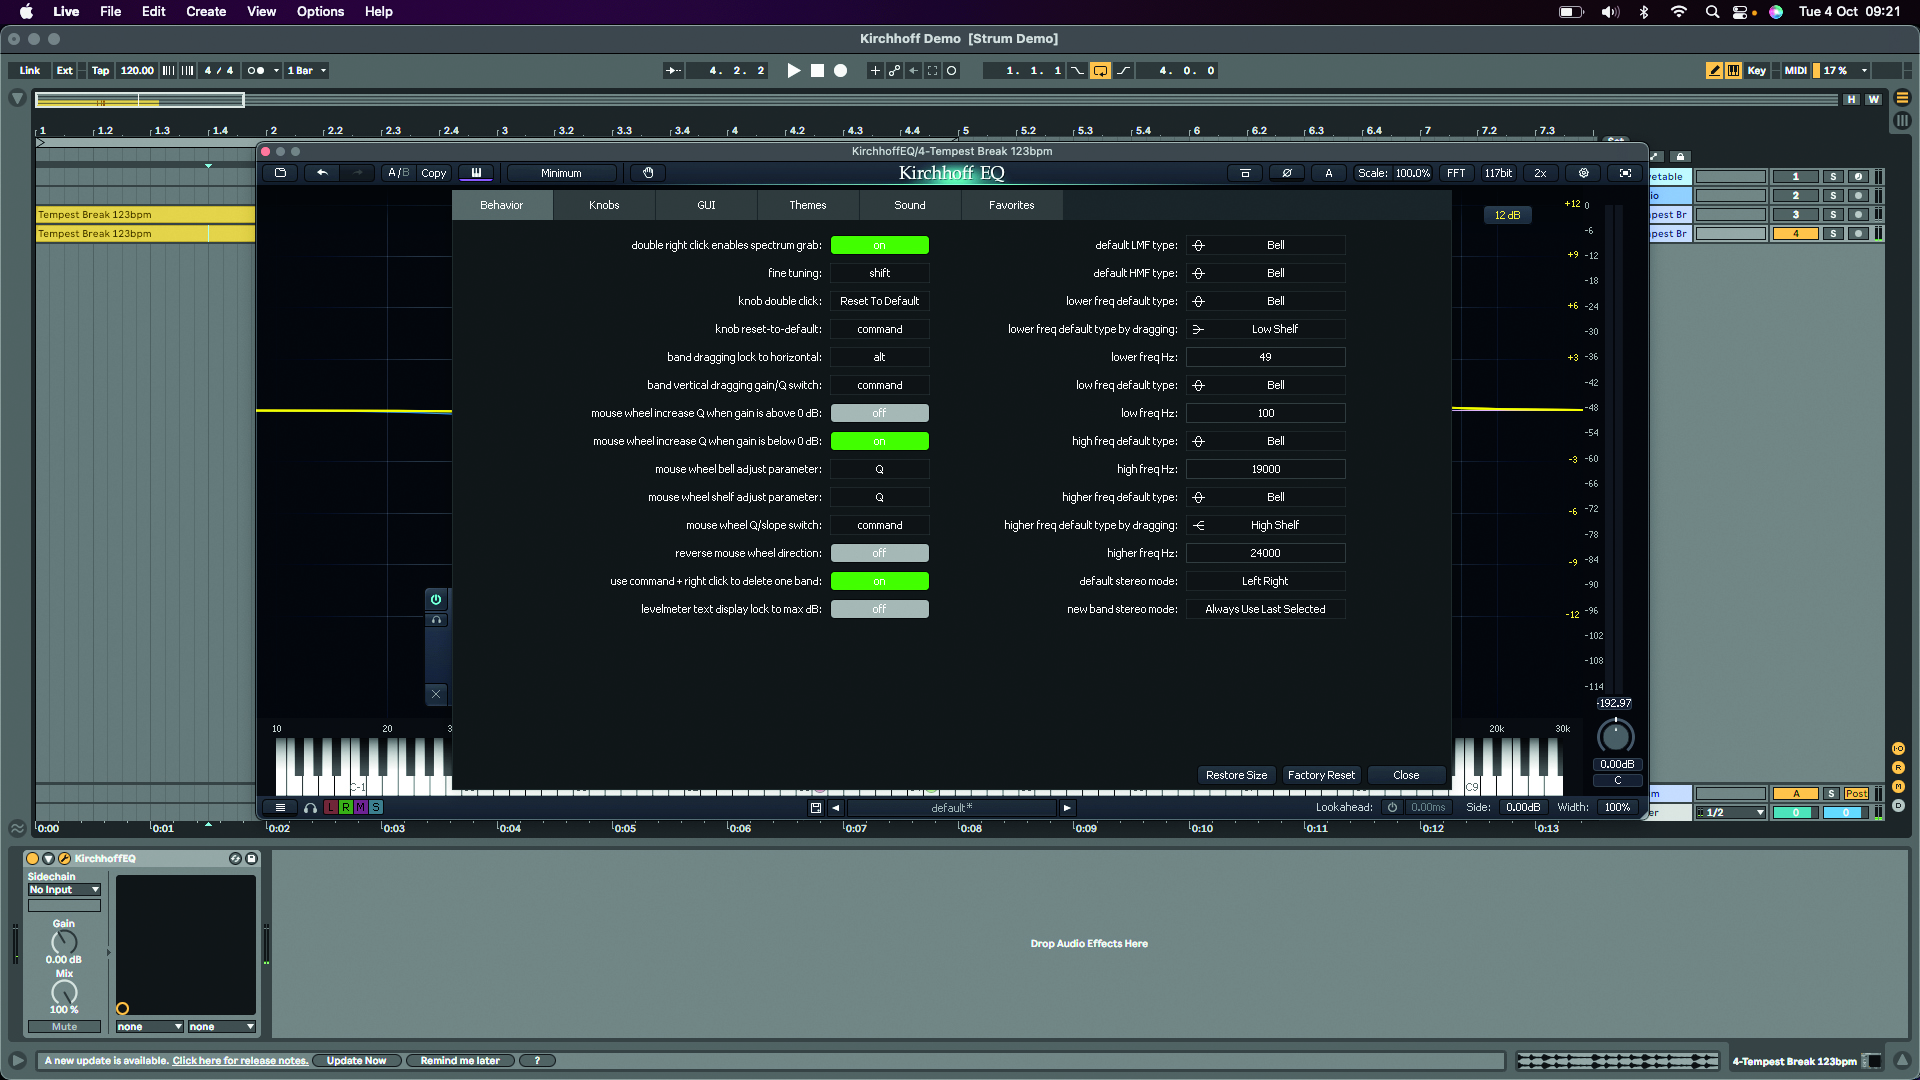
Kirchhoff is an extremely comprehensive EQ with a huge arsenal of features. To make its usability as streamlined as possible, you’ll find a wide range of customisation options in the settings menu. You can set default filter behaviours, adjustment speeds, filter colours and favourite filters.
6. Physical Audio Preparation
So, what new directions will synthesis take in 2023? We can’t tell you exactly, but we’re itching to find out.
On the one hand, synthesis has forefronts in many areas of digital technology, but from another perspective, things can look a little unchanging. Even today’s most interesting and innovative synths operate under a basic guiding principle: take a source sound (or multiple), and then process that in a variety of ways.
Really, the innovation in synths must come from one of these two areas: either in development of a better or never heard before sound generation, or in more interesting, unique or exploratory ways of sculpting or enhancing that signal.
Synths like Newfangled Audio’s Generate or Physical Audio Preparation take their inspiration from real-world phenomena abstracted into a usable, programmable and, ultimately, lovable instrument.
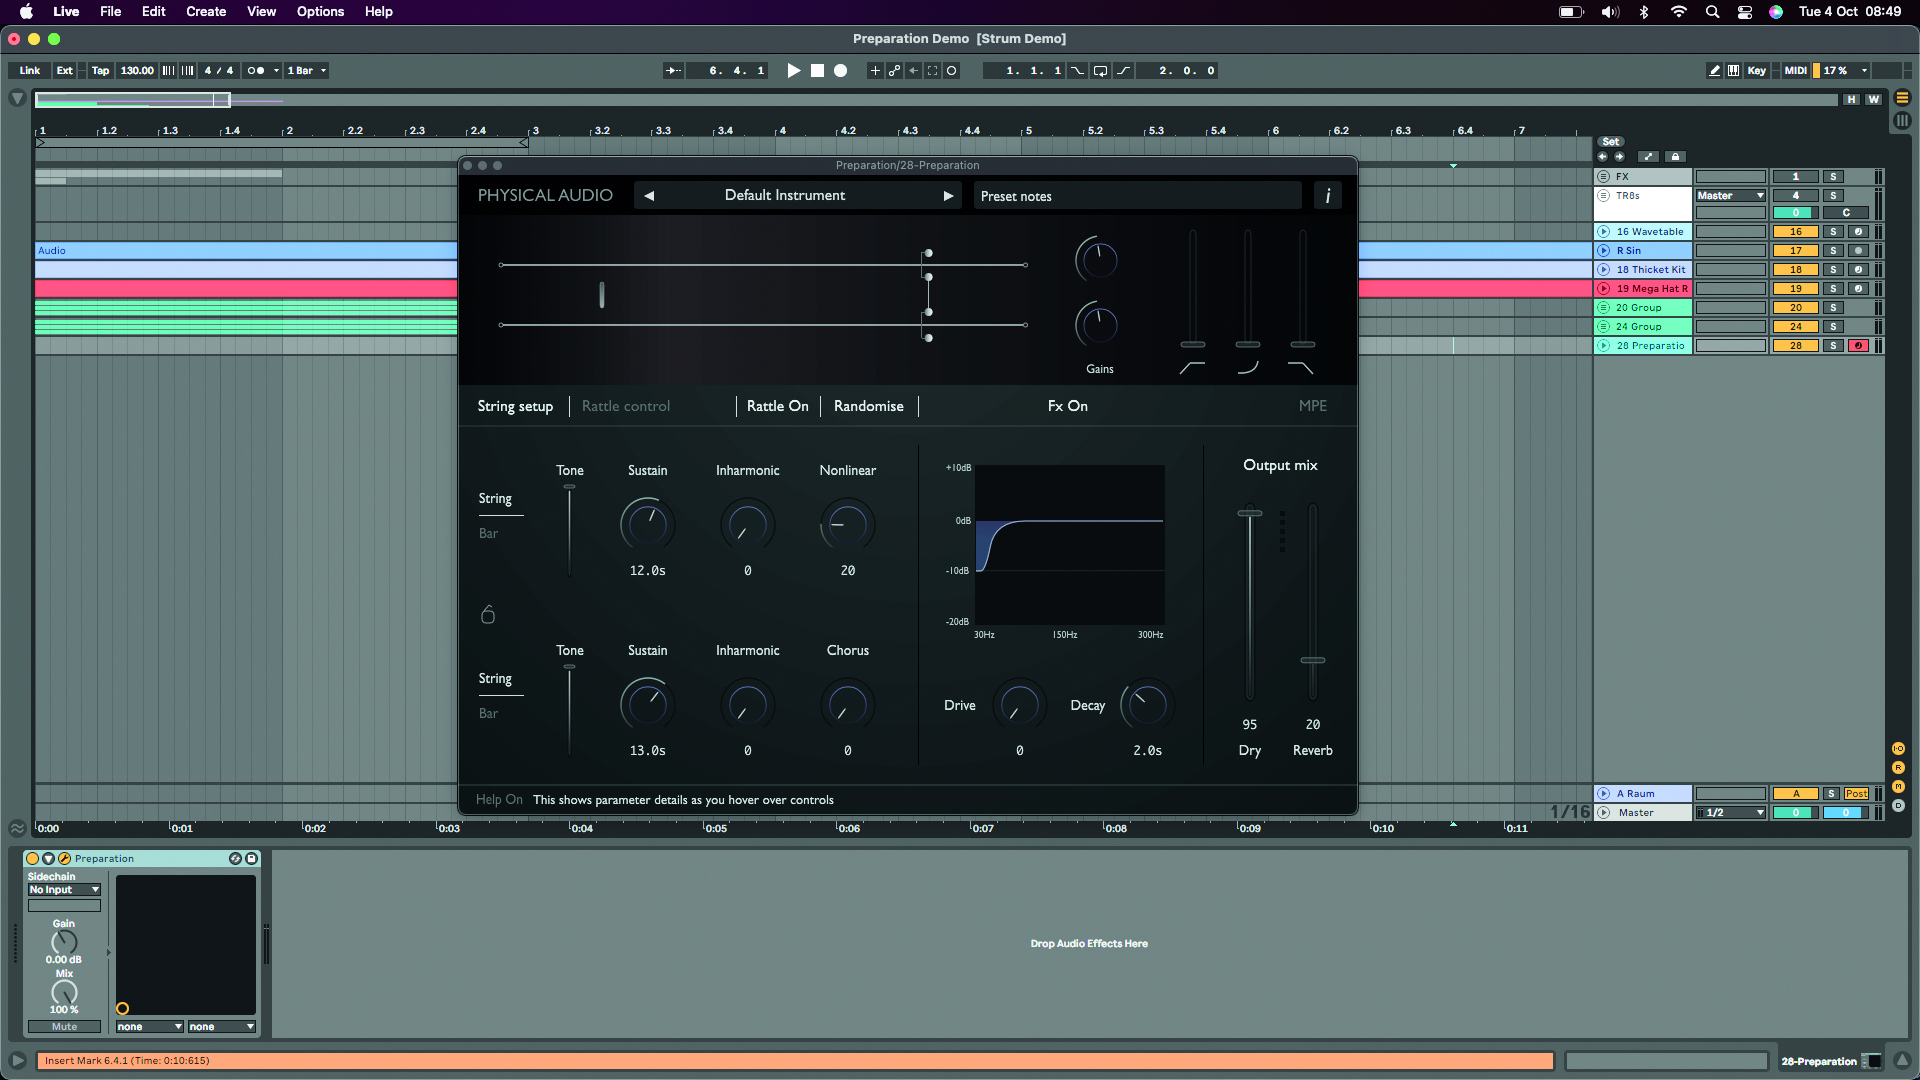
Physical Audio’s Preparation is a physical modelling synth that uses mathematical modelling to emulate the sound of two core sources, strings and rattle. It shows a visualisation of the modelling at the top of the GUI, displaying the two strings or bars and the rattle.
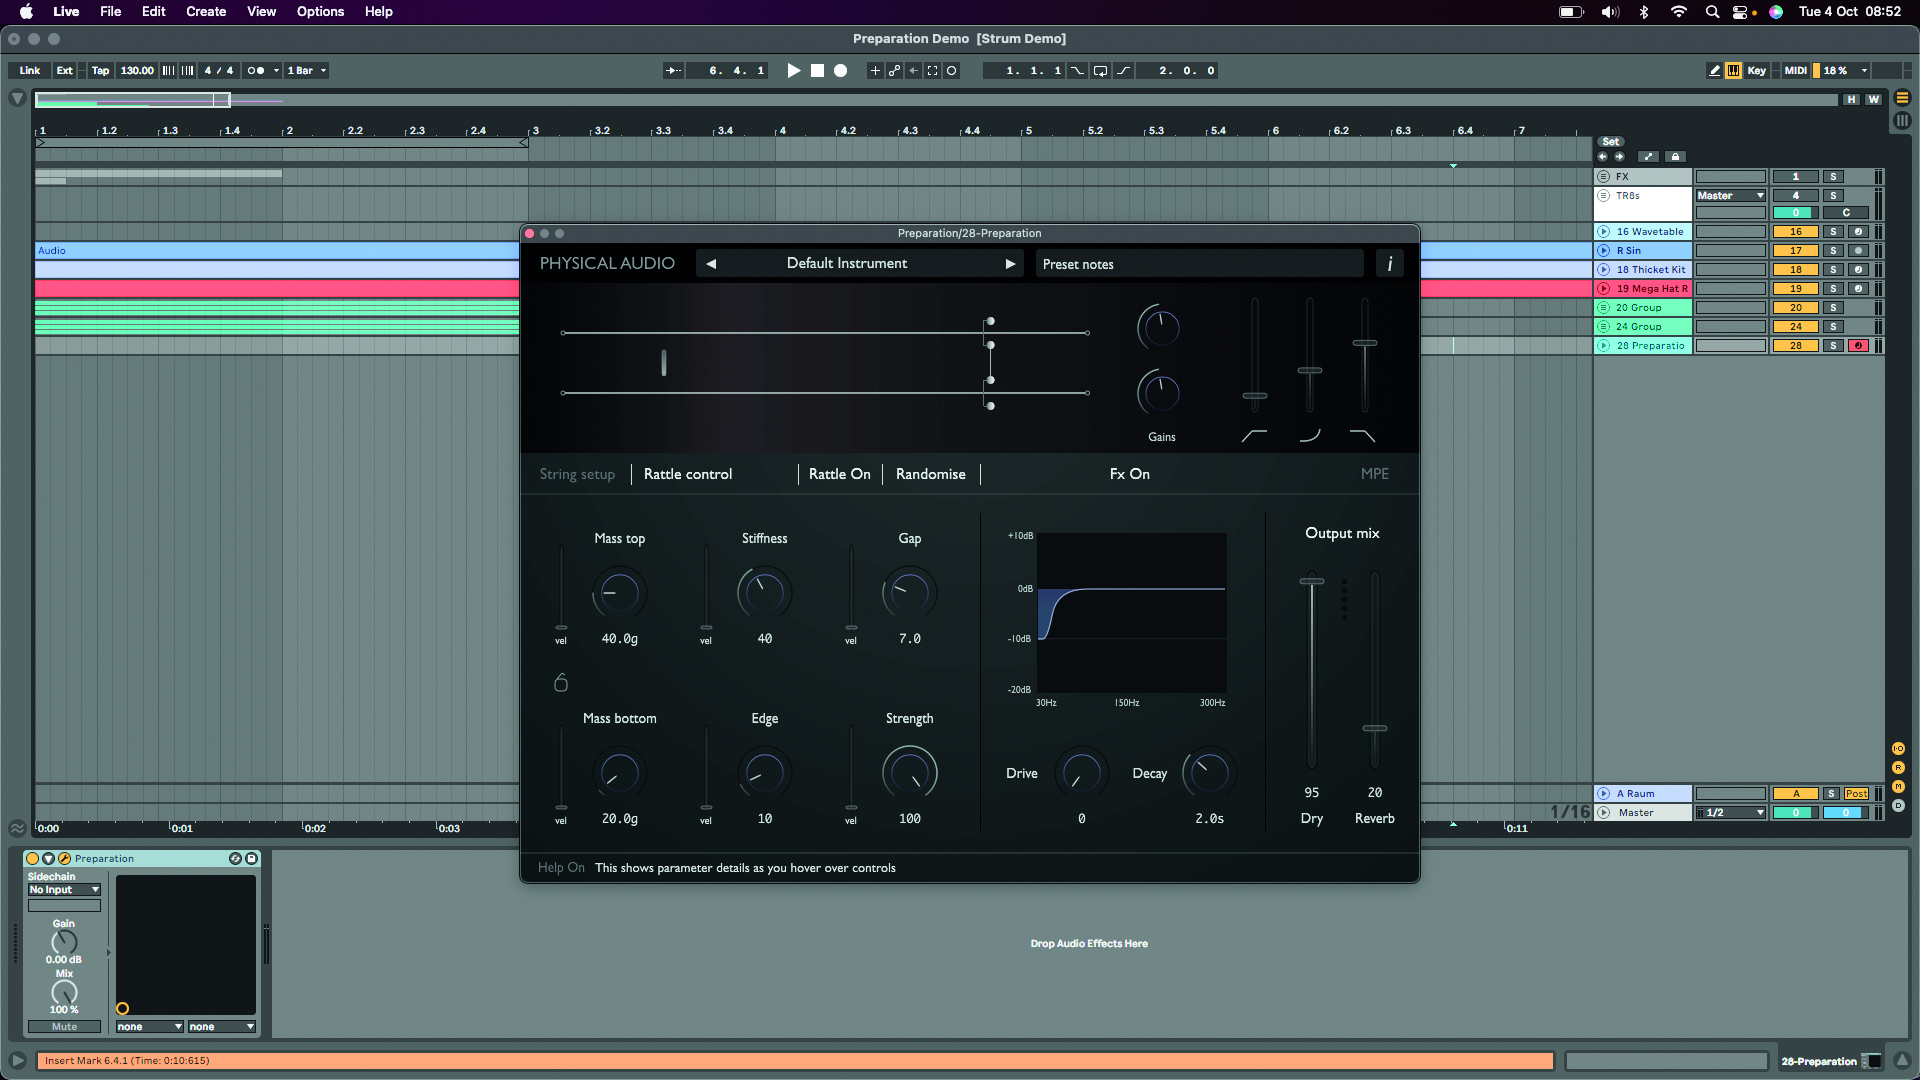
There are attack/release controls to the right plus a tailboost control which increases gain over several seconds. Below you can select the string setup or rattle control. The string setup gives you independent controls of the top and bottom strings.
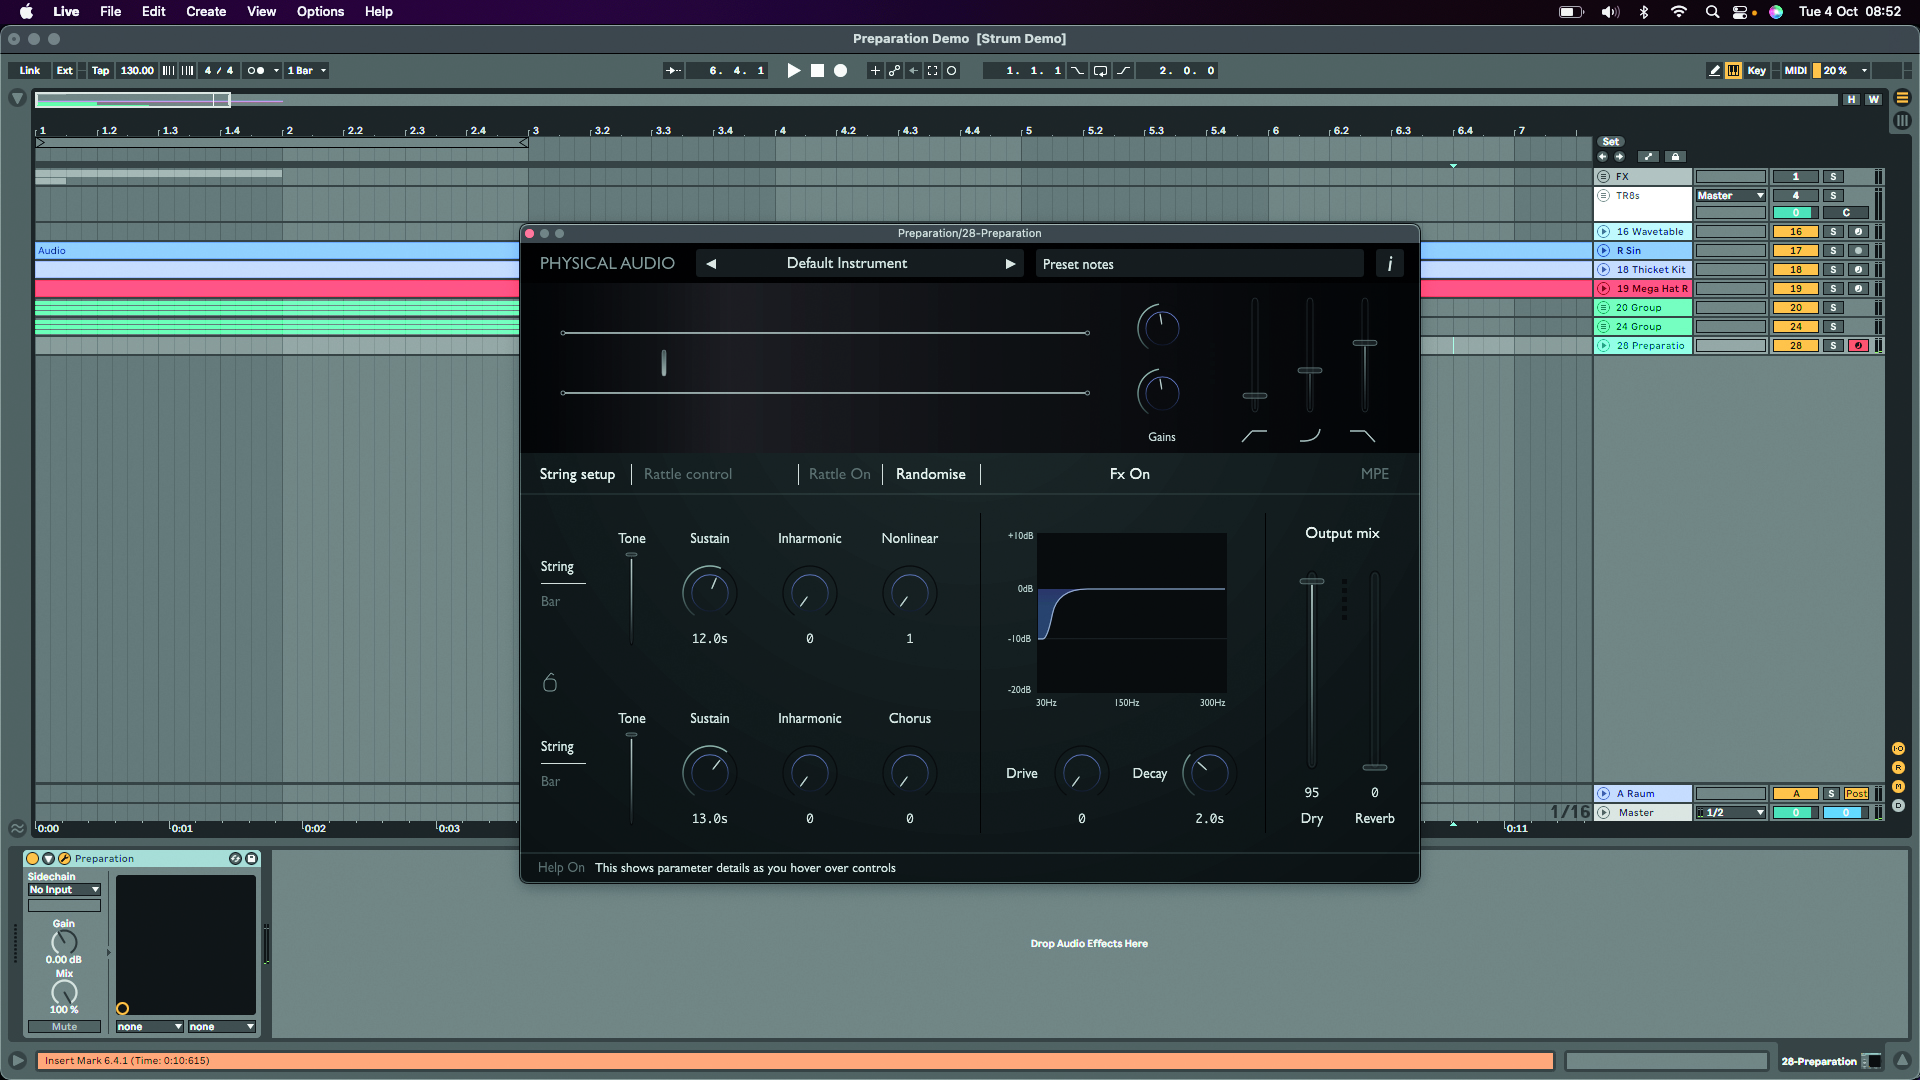
In string mode, with rattle off and inharmonics and nonlinearity turned down, the output is a traditional string sound. Tweak parameters to create more complex, resonant tones. Settings are note-on and take effect at the next note-on event.
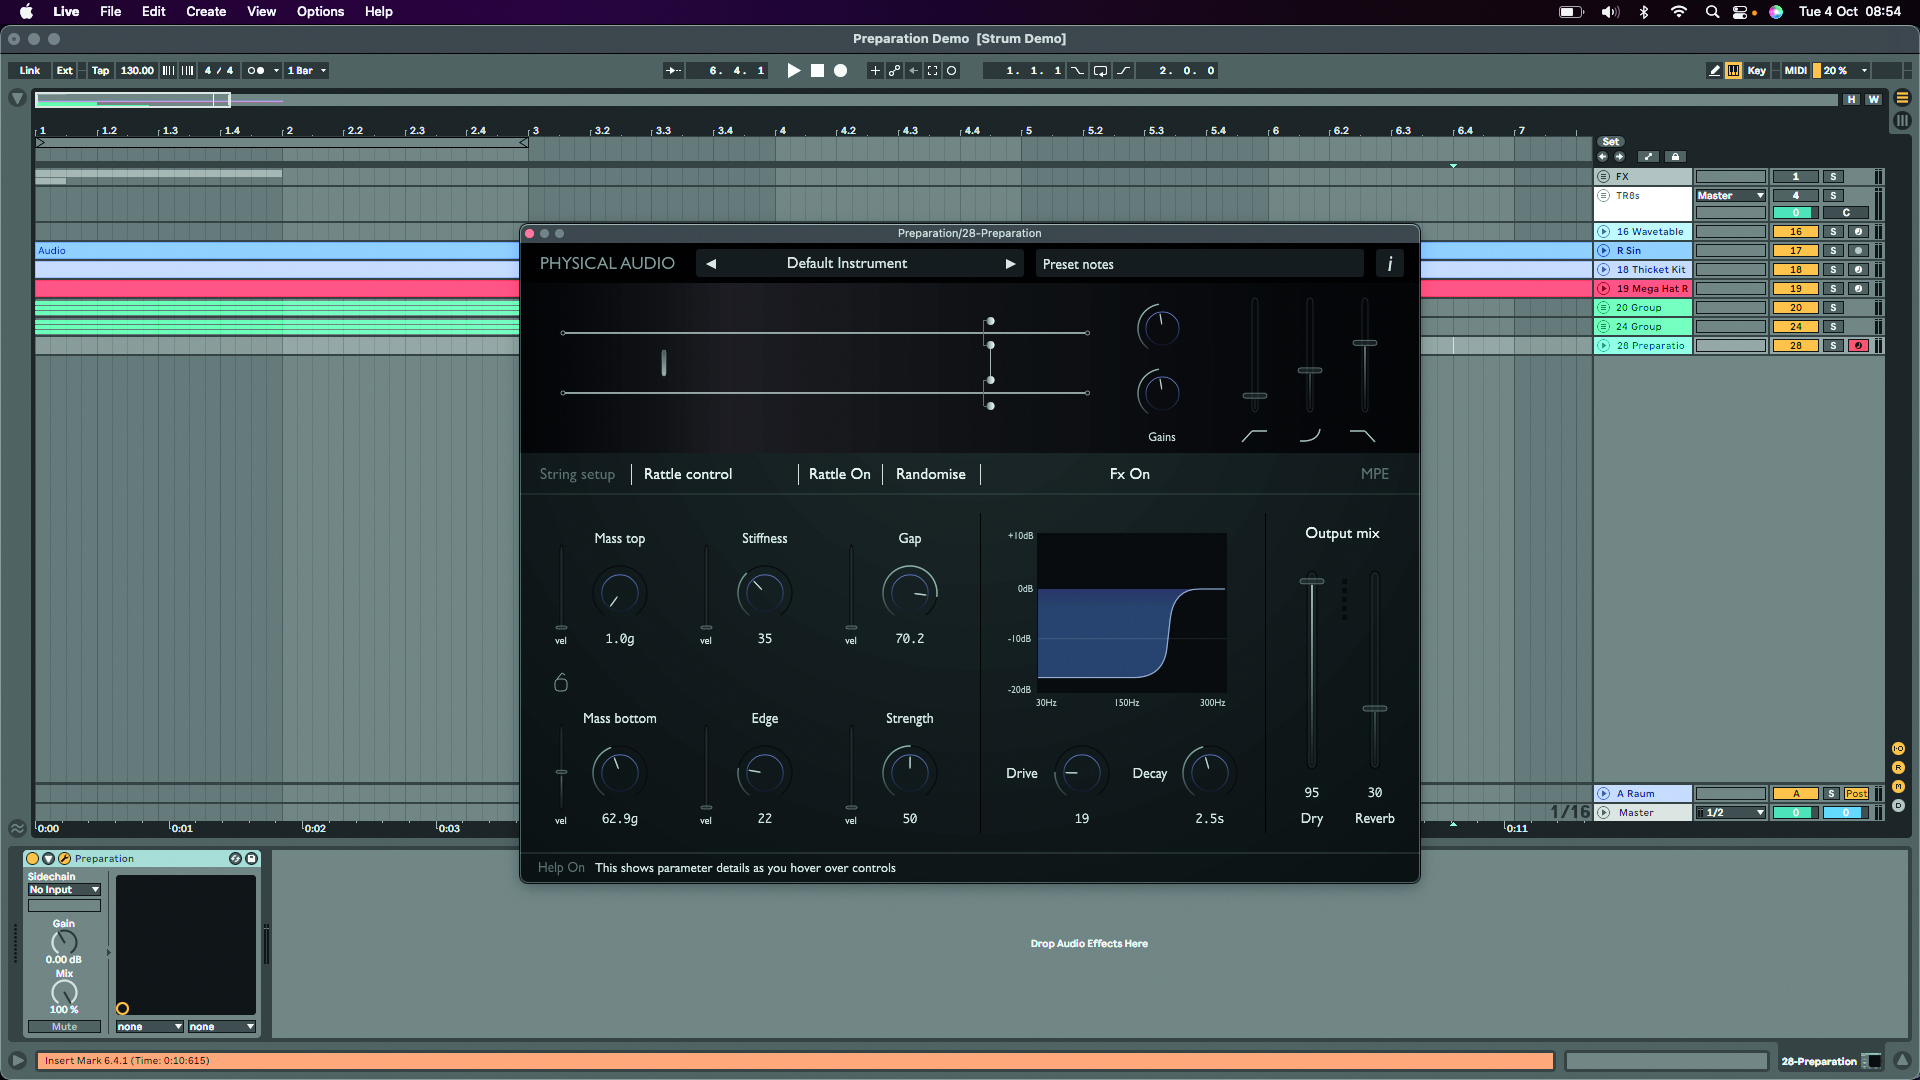
Switch the rattle on and in the rattle control page adjust the top and bottom rattle properties for more advanced sound design. Assign velocity modulation using the slider to the left of each parameter. EQ, drive and reverb let you finalise your signal.


Future Music is the number one magazine for today's producers. Packed with technique and technology we'll help you make great new music. All-access artist interviews, in-depth gear reviews, essential production tutorials and much more. Every marvellous monthly edition features reliable reviews of the latest and greatest hardware and software technology and techniques, unparalleled advice, in-depth interviews, sensational free samples and so much more to improve the experience and outcome of your music-making.
“The included sample content is not only unique but sonically amazing, as it always was”: Spitfire Audio BBC Radiophonic Workshop review
“We were able to fire up a bass sound that was indistinguishable from the flavour of New Order’s Blue Monday in seconds”: EastWest Sounds Iconic review


