
If you’re looking to get started recording music but you haven’t got the funds of major label proportions, adding one of the best budget audio interfaces to your arsenal can get you some surprisingly good results. Having tested over 17 audio interfaces in the past 12 months, as well as personally testing every single interface in this guide, I can attest that even a cheap audio interface can get you some amazing results with the right input.
You might think a cheap interface means you’ll have to skimp on sound quality, but that’s just not the case. Realistically when it comes to spending more money on an interface at the home level, you’ll just be getting better features and more connections rather than any massive improvement in sound. My motto, and it’s the same for many professional mixers and engineers, is that you get what you put in when it comes to sound quality.
As well as reviewing many of the models in this guide, I’ve also subjected each product to in-depth latency testing to see how well they handle low-latency monitoring, a crucial metric for the performance of any audio interface. If you want to delve further into this and try it for yourself, head to the latency testing section of this guide.
In my opinion, the best budget audio interface right now is the Audient iD4 MkII. Admittedly, it’s not the cheapest out there, but if you want sound quality, feature set, and ease of use, there’s no doubting its place at the top of this guide. If that is too pricey for you, go have a look at the Behringer U-Phoria UMC22, which can be found for well below the $100 mark.
If you’re here for your first audio interface, I’ve put together a comprehensive FAQ section that will answer any burning questions you might have, as well as a glossary of key terms that explains all the lingo used in this guide and the wider audio world. I’ve also put together a how to choose section which takes you through the process of picking out a cheap interface.
My top picks

Combining awesome quality preamps with ease of use and excellent value for money, it’s not the cheapest on this list, but it’ll be the perfect affordable interface for the majority of music makers.

For the absolute tightest of shoestring budgets, the Behringer U-Phoria UMC22 will have you up and recording for well below the $/£100 mark. It’s the cheapest decent-quality audio interface, perfect for a budget recording.

If you’re mainly recording vocals, the quality of the Universal Audio Volt 1 preamps will ensure you get a great sound. I love the tube preamp emulation for warming up incoming vocal signals.

If you want to stream content on a budget, the Presonus Studio 24c is an excellent affordable audio interface. Featuring a very powerful control software and MIDI capabilities, it delivers a lot of bang for buck.

If you're looking to start a podcast on a budget, the Focusrite Scarlett Solo will be a great match. In my opinion one of the easiest interfaces to use, it packs robust software and great quality preamps in a low-budget package.

If you need an audio interface you can easily chuck in a backpack, I'd go for the Arturia Minifuse 1. With robust build quality, excellent quality sound, and a great software bundle, it's the best choice for music-making on the move.

If you're looking for a good quality, all-in-one recording solution for absolute beginners, the M-Audio M-Track Duo HD Producer Pack is a very capable one. It features an audio interface, condenser microphone, and studio headphones for a very reasonable price.
Best overall

🎛️ If you want a great all-rounder that doesn’t cost the Earth, the Audient iD4 MKII delivers superb quality preamps and ease of use. It’s got loads of useful functionality which means it will suit the vast majority of musicians looking to record on a budget.
✅ Buy if you want an easy-to-use audio interface: Packed with features but easy to get up and running, the iD4 MkII is a perfect beginner audio interface thanks to its excellent quality and low cost.
❌ Avoid if you want to use MIDI: It doesn't have MIDI however, so if you're looking at integrating external hardware with your interface, you'll want to look elsewhere.
Overview: Combining superb audio fidelity, simplicity, and rigid build quality, the Audient iD4 MKII is my top pick as the best budget USB interface you can buy right now. With its extra headphone output and clever scroll wheel it’s eminently usable, yet is available for around the $/£200 mark, which is simply superb value for money.
Features: When it comes to manipulating your audio interface physically some do it much better than others, and the iD4 MKII is incredibly easy to handle thanks to that smart scroll wheel. It can set your output levels and control various DAW parameters. My favourite use is that with a quick push down you can dim your studio monitors and studio headphones, great for when you’re collaborating with others on a track.
There’s also a multitude of buttons and knobs on its grey fascia that set the input and monitoring levels, shift the left and right balance of input monitoring, and balance your DAW signal with your dry signal going in. It’s a very complete feature set at a very low price, sure to suit the vast majority of music-makers.
Software: The iD4 MKII has a rugged Windows driver which makes it a breeze to install and use whether you’re using PC or Mac where no drivers are required. It’s also got a generous plugin selection available with Cubase LE3, Sonarworks, Strymon BigSky reverb plugin, Two Notes Torpedo Wall of Sound Speaker Emulator, and 3 free online courses from Produce Like A Pro. It adds further value for money and makes it great for beginners who might not have their own software yet.
Performance: With a microphone preamp capable of delivering 58dB of gain, you’ve got plenty of performance for using quieter dynamic microphones, as well as phantom power for condenser mics. I use Audient preamps when recording in a professional studio at an analogue desk, and the iD4 MKII delivers a similarly transparent sound that works brilliantly on a selection of sound sources.
I play a lot of guitar and really loved the JFET input it has, which delivers a more lifelike experience when used in conjunction with a guitar plugin. It doesn’t sound bad if you hit it too hard and also delivers plenty of heft for DI bass guitars, making it a great all-rounder no matter what instrument you play. For those on a budget, it doesn’t come much better than the Audient iD4 MKII.

“How does it sound? Well, the mic pre is very transparent and you’ve got 58dB of clean quiet gain. But it’s the instrument input that’s the star. The JFET design is quiet and punchy with plenty of headroom and if you do happen to clip the input, the distortion is natural and pleasing.”
Read more: Audient iD4 MKII review
Test | Results | Score |
|---|---|---|
Connectivity | USB 3.0 only, no MIDI | ★★★★☆ |
Features | JFET input, works with iPhone/iPad | ★★★★★ |
Software | Excellent software bundle | ★★★★★ |
Usability | Brilliant performance | ★★★★★ |
Overall | An excellent all-rounder | ★★★★½ |
Most affordable
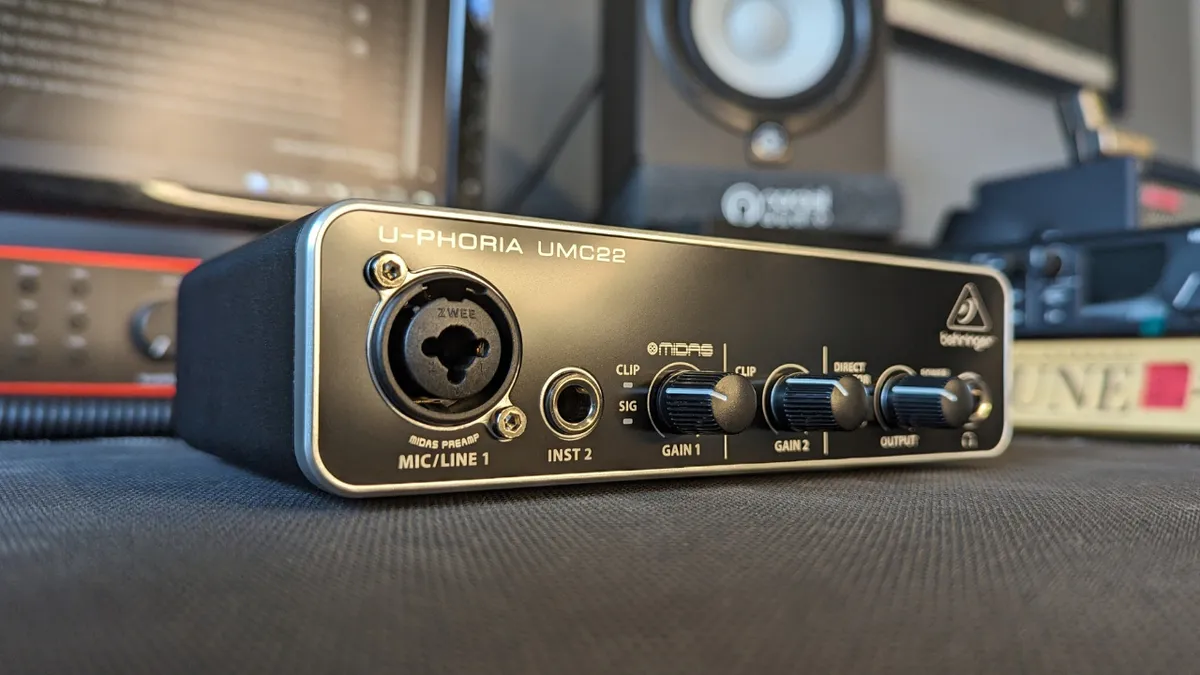
🎛️ For those who have the smallest of budgets, the Behringer U-Phoria UMC22 offers excellent performance versus price. It’s not the most feature-laden interface in this list, but if you just need basic recording without any extravagant costs, it absolutely delivers.
✅ Buy if you want the lowest cost interface: The UMC22 is probably the cheapest but good quality audio interface we've ever come across, coming in well below the $100/£100 mark.
❌ Avoid if you prefer a dedicated driver: There's no driver for Windows for the UMC22, so you'll need to use ASIO4ALL to use it on a PC.
Overview: There are a lot of dirt-cheap, derivative interfaces on Amazon that offer less than stellar performance. Despite being priced in a similarly low fashion, the Behringer U-Phoria UMC22 is actually a pretty fine audio interface if you need to start recording on a shoestring budget. Before I reviewed it I was very skeptical considering the price, but it exceeded my expectations completely.
Features: As you might expect with such a low price point, features aren’t exactly in abundance here. It still has all the facilities to do the job however, giving you a single XLR input, 1/4-inch Hi-Z input, headphone out, and outputs for a pair of studio monitors. You don’t get much beyond this though, so no fancy software app or extra controls for dimming your monitors.
Software: Presumably to keep costs down, Behringer doesn’t offer a dedicated driver for Windows, meaning you’ll need to use a third-party ASIO driver to get it up and running. I recommend using ASIO4ALL, which in my tests worked perfectly with the UMC22. On Mac it’s a lot simpler as it simply works in a plug-and-play fashion, so you don’t need to do too much messing around.
There’s no additional software either, so you’ll have to rely on free plugins for your DAW, EQs, and compressors if you don’t already have some. Luckily there are plenty of free options out there if you want to stick to that budget, or you could look at a plugin subscription to help you find out what you really like.
Performance: Actually using the UMC22 is very simple, and in my tests it performed admirably at a variety of tasks. The MIDAS preamps aren’t as quiet as some of the others on this list, but unless you’re recording the quiet tinkling of a grand piano playing pianissimo, you’re unlikely to run into any issues here. I tested it with both dynamic and condenser microphones on guitars, drums, and vocals where it did a great job of capturing the audio.
The headphone output offered plenty of gain to drive my 250-ohm headphones which typically need a lot of power, although it doesn’t have separate headphone and monitor volumes, which means if you turn your headphones up your monitors come up which can be a little annoying. It’s not perfect by any means, but at less than $/£100, there isn’t another audio interface that can compete in terms of price point.

“For the money, it’s really quite hard to knock the Behringer UMC22. It’s more than capable of handling home recording duties and producing good-quality audio from a variety of sources. It has its downsides of course, particularly on Windows machines thanks to the lack of a dedicated driver, but ultimately it’s nothing that stops you from doing the job of recording at home.”
Read more: Behringer U-Phoria UMC22
Test | Results | Score |
|---|---|---|
Connectivity | Everything you need | ★★★★☆ |
Features | Barebones but does the job | ★★★★☆ |
Software | Needs 3rd party drivers | ★★★☆☆ |
Usability | Works really well | ★★★★☆ |
Overall | The best choice on a tight budget | ★★★★☆ |
Best for vocals

🎛️ If you’re looking to record vocals for the most part, the great sound of a Universal Audio preamp will be the perfect partner in crime. It’s compact yet packs a powerful tube preamp emulation and comes with an excellent software bundle.
✅ Buy if you want to record vocals: With its fantastic quality preamp and excellent tube preamp emulation, the Volt 1 is a great choice for singing and spoken word.
❌ Avoid if you need more inputs: The Volt 1 only has a single input so if you're looking to multi-mic or record different sources at the same time you'll need to look elsewhere.
Overview: One of the entry-level interfaces from UA’s typically more pro-level lineup, the Universal Audio Volt 1 is a compact but ruggedly built audio interface that’ll do just as well in a permanent setup as it will being chucked in a backpack and taken on the road. With UA’s ultra-high-quality preamps, I think it’s a perfect match for those who spend a lot of time recording vocals.
Features: On the front panel there’s only a single combi XLR input, so you won’t be multi-miking anything with this but for a single vocal or any other instrument it’ll do a fantastic job. A button allows you to switch between mic and instrument inputs while you can also add tube preamp emulation to your incoming signals which is great for livening up a dull DI bass guitar or adding some extra edge to a vocal mic.
Dedicated monitoring and headphone knobs make balancing your outputs nice and simple. I really enjoyed the feel of the knobs too, with a nice stiffness to them that makes small adjustments nice and easy. You also get a small two-tier LED light that lets you know how hot your signal is. You’ll probably want to rely on software for checking your meters as it doesn’t offer much resolution, but it’s nice to have in a pinch.
Software: UA plugins are highly regarded in the recording community, and with the Volt 1 you get an excellent software selection. You get a selection of compression, delay, and saturation plugins from UA themselves as well as DAW in Ableton Live Lite, and plenty of virtual instruments including synths, strings, drums, and various other percussion. It’s a fantastic offering for beginners, and no doubt those with more experience will find a few plugins here that get added to their collections permanently.
Performance: Using the Volt 1 is an absolute breeze, particularly if you’re part of the Mac ecosystem where you don’t even need to install any additional software to get it running. I tested with recording (my very bad) vocals, electric guitars, bass guitars, and a hardware synthesizer too. I really love the sound of UA preamps and while they’re not quite as good as those on my usual Apollo, they’re not that far off at all.
The Vintage button emulates the sound of UA’s famous 610 tube preamp, adding some nice saturation and a touch of high-end to any signal you add it to. The headphone out offers plenty of gain, and it didn’t hesitate to drive my 250-ohm cans with plenty of output for checking out the low end. Overall I found it nice and easy to use, and at this price point it’s stellar value for money, too.
“In my opinion, it’s perfect for the solo or beginner recording musician looking for a quality audio interface on a budget. The small size makes it great for recording on the go, but the single input will be limiting if you’re looking to do anything other than basic recordings. If you’re happy to mainly work with a single instrument or purely in the box, we can think of few better options than the Volt 1.”
Read more: Universal Audio Volt 1 review
Test | Results | Score |
|---|---|---|
Connectivity | Only one input | ★★★★☆ |
Features | Useful controls, tube preamp emulation | ★★★★☆ |
Software | Great variety of plugins | ★★★★★ |
Usability | Really easy to use, great sound | ★★★★★ |
Overall | Perfect for vocalists | ★★★★½ |
Best for streaming

🎛️ For those who aren’t necessarily making music, the PreSonus Studio 24c has plenty of streaming-friendly features that make it a must-have for content creators. Loopback functionality alongside the powerful Universal Control software makes it great for arranging multiple audio sources.
✅ Buy if you want to stream content: Whether it's music or anything else, the Studio 24c has loads of great features like loopback that make streaming super easy.
❌ Avoid if you've got big hands: The small controls are quite close together on the front panel, so not one for those with big hands or a dislike of fiddly controls.
Overview: Although the PreSonus Studio 24c is more than capable of being an interface for music-makers - and able to handle a huge variety of tasks - I think it offers excellent functionality for those who are into streaming. Whether it’s gaming, video, or any other kind of content streaming, you’ll find this interface offers plenty of functionality for mixing and matching a variety of audio sources.
Features: On the front panel you get two combi XLR inputs for connecting microphones or any other instrument. At the centre is an input and output metering system that gives you visual cues of your signal strength, handy for ensuring you’ve got a strong signal going in and coming out. There’s also a good selection of physical knobs for controlling input gain, output signals, and the balance between direct signal and that coming out of your DAW or streaming software.
Software: For me, the powerful Universal Control software is the star of the show here, offering an excellent array of options for routing audio whether it’s physical or digital. If you’re using streaming software you’ll be able to quickly and easily bring together multiple sources from your content itself, voice-over, voice chat, and even background music, ensuring you put on a great show.
You also get a 6-month stackable membership to Studio One Pro+, which gives you full access to the latest version of Studio One Pro plus all the extra features on offer, which is a huge array of instruments, plugins, loops, and plenty of other music-making friendly features.
Performance: I found the 24c’s preamps to be of excellent quality, providing plenty of clean headroom when recording speech, another tick in the box that means it will excel for streaming. It also performed admirably when recording direct guitars, bass, and hardware synthesizers, so if you need to record music alongside your streaming endeavours it’s a great shout.
It also has MIDI, so if you’re using sequencers or samplers you’ll be able to quickly and powerfully integrate them with the 24c. To be honest, I’m not a fan of having the headphone output on the back, but this might suit your particular needs. All-in-all, thanks to the excellent feature set this is a very adaptable cheap audio interface that just so happens to be brilliant for streamers.

“Overall, it’s a well-designed, sturdily-built interface with a lot to like about it. With the addition of Loopback, MIDI connectivity and other small quality-of-life features, the PreSonus Studio 24c elevates itself above the competition and manages to do so at a very sensible price point.”
Read more: PreSonus Studio 24c review
Test | Results | Score |
|---|---|---|
Connectivity | Loads of options | ★★★★☆ |
Features | Packs a lot into a small interface | ★★★★☆ |
Software | Powerful control app | ★★★★★ |
Usability | Really easy to use, great sound | ★★★★☆ |
Overall | A great option for streaming | ★★★★☆ |
Best for podcasting

🎛️ If you’re looking to get started podcasting or need something cheap to accompany you on the road, the huge feature set of the Focusrite Scarlett 4th Gen Solo makes it an excellent option for capturing the spoken word, no matter what your chosen subject.
✅ Buy if you want an interface for a podcast: With a clear preamp that delivers plenty of gain and powerful accompanying software, I love the Scarlett Solo for podcast tasks.
❌ Avoid if your budget is really tight: This is one of the pricier audio interfaces on this list, and others are cheaper with similar functionality if budget is your main concern.
Overview: I’ve picked the Focusrite Scarlett 4th Gen Solo for podcasting for this guide, but its slightly bigger cousin the Focusrite Scarlett 2i2 is currently sitting at the top of our best audio interfaces guide thanks to its excellent feature set. One of the most feature-laden interfaces on the market at this price point, Focusrite’s 4th Gen offering can truly suit nearly any purpose.
Features: The Solo features a single instrument input on the front, but on the rear is your connection for your microphones. Some may prefer that the mic input was on the front but in my tests, I didn’t find it got in the way particularly. Back to the front panel, the Solo features a trio of buttons for selecting instrument or mic inputs, adding phantom power for your condenser mics, and an Air button which adds extra saturation and high end to your source.
The build quality of it is excellent, with a very durable feeling chassis and a great feel to all the knobs and buttons. There’s no MIDI here so if you need that look elsewhere, and on the back it’s overall a very simple affair with just two 1/4-inch outputs for hooking up your studio monitors.
Software: Focusrite’s Control App is one of the best that I’ve tested, offering a clear and concise view of all your inputs and outputs, as well as allowing you to monitor your levels. It’s here that it could be potentially interesting for podcasters too, as it features a loopback function that lets you bring in different audio sources which can really help up your production game and assist with remote guests.
You also get an excellent music-making bundle with the Focusrite Hitmaker Expansion. It includes a huge array of software including plenty of software synthesizers, a modeled Marshall guitar amp, drum and piano VSTs, as well as a good selection mixing plugins like EQs and compressors. You can also take your pick of your favourite DAW with offerings from Ableton, Pro Tools, and FL Studio.
Performance: Using the 4th Gen Focusrite interfaces is really easy thanks to the robust software and great driver support. It works seamlessly on both Windows and Mac, and with all the important controls on the front, you won’t have too much trouble getting to grips with it. It also has some of the best low-latency performance I’ve experienced for an interface at this level, which you can see more in the testing section of this guide.
With a Neutrik connector and excellent quality preamps, it will deliver brilliant audio fidelity whether you’re recording a podcast or putting together your next EP. Couple in rugged build quality and an excellent software offering and you’ve got a truly great interface for relatively little money.
“The 4th gen Scarletts include technical improvements across all interfaces with 120dB dynamic range RedNet A/D converters, a new improved headphone amp, better implementation of knob halo indicators with output metering for the 2i2 and 4i4, and a reworked Air mode.”
Read more: Focusrite Scarlett Solo 4th Gen review
Test | Results | Score |
|---|---|---|
Connectivity | Limited options, no MIDI | ★★★★☆ |
Features | Everything you need | ★★★★☆ |
Software | Very complete software | ★★★★★ |
Usability | Really easy to use | ★★★★★ |
Overall | A great choice for spoken word | ★★★★½ |
Best compact

🎛️ If you’re looking for a ruggedly built interface that’s small enough to fit into a backpack alongside all your other gear, you should go for the Arturia MiniFuse 1. It’s one of the smallest interfaces I’ve ever tested, but still does a great job of capturing audio.
✅ Buy if you want to make music on the go: With its teeny tiny size and excellent build quality, this is a great interface to chuck in a backpack and take on the road.
❌ Avoid if you need more inputs: This interface has a single input, so it's not great for multiple sound sources or utilizing multiple microphones.
Overview: Typically known for crafting some of the most legendary synth plugins and MIDI keyboards, Arturia’s first foray into audio interfaces ticks two boxes by being both low-budget and uber-compact. If you’re after something you can chuck into your bag it’s got the build quality to match too.
Features: Like a lot of the interfaces in this guide, the MiniFuse 1 features a single combi-XLR input that can handle mics and instrument inputs. A single gain knob gives you control over your input signal, and you have a dedicated headphone output with its own volume knob alongside the main monitor knob for controlling the volume of your studio monitors.
It’s one of the most nicely put-together audio interfaces I’ve tested too, despite the low price point. Every knob and button feels nice and robust, and the matt white finish of the model I tested (it’s also available in black) feels decidedly more premium than you might expect. Just to make itself even more useful, it also has a USB hub port for connecting hard drives and MIDI controllers without taking up a valuable slot on your laptop.
Software: Installing the MiniFuse 1 on Mac is a nice and easy process as you’d expect, although I did have trouble finding the correct driver page for Windows during my testing. Once that was out of the way though I had no issues with the driver software, and found the MiniFuse Control Center to be a nice way of controlling the hardware without having to press any actual buttons.
You get a generous complement of software from Arturia when you install too, including Ableton Live Lite, Analog Lab Intro which features loads of classic synths, Native Instruments Guitar Rig LE for modeled guitar tones, Arturia FX for creative uses, and a 3-month subscription to Antares Autotune Unlimited. It’s very complete, and great for beginners that don’t already have a suite of software built up.
Performance: I tested the MiniFuse 1 both in my home studio and at the rehearsal room for some on-the-go recording tasks. It performed admirably at both, and especially on the go, that additional USB hub slot was really useful. It’s so small too that you can easily fit into any setup, no matter how limited your desk space.
In terms of recording quality, I’d have no qualms about using it for a huge variety of tasks. I tried recording acoustic guitars with a condenser, electric guitar straight into the input, and micing an electric guitar amp, all of which delivered some brilliant results. There’s plenty of gain available on the inputs for a wide variety of sources, and will suit beginners, the budget conscious, and more experienced producers looking to create a portable recording rig.
“If you’re after a compact and affordable audio interface, the Arturia MiniFuse 1 is a brilliant option. The extra USB-A port lets you power an additional MIDI controller - or just charge your phone if you need to - offering some welcome added versatility. Despite the teeny tiny size it’s packing loads of useful features that will suit beginners or those looking for a travel rig.”
Read more: Arturia Minifuse 1 review
Test | Results | Score |
|---|---|---|
Connectivity | Single input, useful USB hub | ★★★★☆ |
Features | Gives you everything you need | ★★★★☆ |
Software | All-encompassing software bundle | ★★★★★ |
Usability | Fantastic value for money | ★★★★★ |
Overall | A compact powerhouse | ★★★★½ |
Best all-in-one

🎛️ For the producer who's just getting started and doesn't have any gear at all, this is a great all-in-one solution with pretty much everything they'll need to get recording. With a great quality interface, condenser microphone, and headphones, you'll just need a mic stand and for a full recording rig.
✅ Buy if you're a complete beginner: Including everything you need to get started, this all-in-one solution is perfect for absolute beginners.
❌ Avoid if you already have gear: If you've been producing for some time and already have mics and headphones, this won't be for you.
Overview: With an M-Audio M-Track Duo interface, condenser microphone, and a pair of studio headphones, this Producer Pack is the perfect option for absolute beginners who want to get up and recording with an all-in-one solution. Just add a computer and mic stand and you'll be crafting your first mixes in no time.
Features: The interface is a 2-in, 2-out, with combi jack/XLR inputs on the front of the unit, and two TRS outputs on the back for sending signals out or adding in a pair of studio monitors when you decide to take the plunge. Each input has a dedicated line/mic switch and input gain knobs, with a handy LED meter to tell you if you're overcooking the signal on the way in.
The condenser microphone is a simple affair without any additional switches for pad or low cut, but it's very robustly built. It's a similar story with the headphones too, which feel very similar to the iconic Sony MDR-7506 in terms of build. They're on ear, so they do a great job of rejecting external noise and bleed while you're recording.
Software: There's a decent software bundle that comes with the Producer Pack that's worth over $1,000 when bought separately, so even if you don't anything already you'll be able to record straight out of the box. It includes Ableton Live Lite as a DAW, and a 6-month subscription to Reason+ that you can experiment with to see if you like the workflow.
Alongside this you get a bunch of instruments from AIR, BFD, and Headrush that includes synths, drums, pianos, guitars, and plenty more. There are some effects like chorus and filters, and alongside that you get a 2-month Splice subscription to access a huge range of samples.
Performance: In my review, the M-Audio M-Track 2 performed admirably for a beginner audio interface. I used it to record guitars, both in the box via software and using the included microphone in front of my small body acoustic. The sounds I got were more than usable, with the direct sound not really that much different from my much more expensive UA Apollo interface.
The mic captured plenty of the sparkle of my acoustic guitar really nicely, with plenty of body when I pointed it closer to my picking hand. It was more than serviceable to fit into a busier mix, and it was a similar story when I tried it on vocals. If you are going to use it on vocals though, I'd recommend you buy a shock mount and pop filter to go with it, as these don't come in the box.
"I’m a firm believer that you get what you put in with any recording device or mic, and with the M-Audio Producer Pack, if you record well-thought-out, tight takes, then you can absolutely get yourself a great quality recording."
Read more: M-Audio M-Track Duo Producer Pack review
Spec comparison
If you're struggling to decide between any of the interfaces on this guide, our spec comparison table lays all the key specs out in one place to help you make a decision.
Model | Resolution | Inputs | Outputs | MIDI | Connector | Latency at 16 samples |
|---|---|---|---|---|---|---|
Audient iD4 MkII | 24-bit/96kHz | 2 | 2 | No | USB 3.0 | 6.213 |
Behringer U-Phoria UMC22 | 24-bit/48kHz | 2 | 2 | No | USB 2.0 | 10.363 |
Universal Audio Volt 1 | 24-bit/192kHz | 1 | 2 | No | USB 2.0 | 8.594 |
Presonus Studio 24c | 24-bit/192kHz | 2 | 2 | Yes | USB 2.0 | 5.442 |
Focusrite Scarlett Solo | 24-bit/192kHz | 1 | 2 | No | USB 2.0 | 5.782 |
Arturia Minifuse 1 | 24-bit/192kHz | 1 | 2 | No | USB 2.0 | 6.893 |
M-Audio M-Track 2 | 24-bit/192kHz | 2 | 2 | No | USB 2.0 | 5.872 |
Also tested
The above interfaces are the ones we recommend you spend your money on, particularly if your budget is tight. That said, we've reviewed countless interfaces over the years so if you didn't find your match, here are some more options for you to look at.


How to choose

If you’re looking to buy an audio interface at the budget end of the spectrum you’re going to have less choice, but that doesn’t mean you can’t get exactly what you need. I’ve been using, buying, and testing audio interfaces for a long time now, so here are my top tips for ensuring you get the right unit for your use case.
1. Consider your needs
MusicRadar's got your back Our team of expert musicians and producers spends hours testing products to help you choose the best music-making gear for you. Find out more about how we test.
The first and arguably most important step is to look at what you’re using your interface for. Are you recording guitars direct? Vocals with a condenser mic? Are you wanting to stream content or create a podcast?
While all the interfaces on this list will do the primary task of capturing audio, some have differing features that can make them better suited to certain tasks. I’ve arranged the audio interfaces in this guide by use case for precisely this reason, but your own needs might be more nuanced, so just keep those in mind when you’re doing your research. Which leads us to…
2. Do your research
Before buying, it’s imperative that you research what’s available to you within your price bracket. There could be an option out there you haven’t already considered that’s the perfect match, and it’ll just help you generally to know what’s available and at what price. A good tip is to check out a retailer's site for the audio interface category and filter by price to see what your options are.
3. Read reviews
Once you’ve got an idea of which interfaces meet your criteria, it’s time to get in-depth. Reading reviews is a great way to get a deeper level of understanding about your chosen interfaces, and these can unlock useful pieces of knowledge that might help determine if it’s right for you.
Be careful of user reviews though. Often people feel obliged to justify what they’ve bought so they can give something a glowing review, similarly, they can point out issues that may just be user error, so always take these with a pinch of salt. If users are saying a lot of the same thing then it’s likely to be true.
On the other hand, if you can find reviews from well-known publishers, you’ll tend to find these are less biased. Publishers review a lot of gear, which gives them a great overview of the product genre as a whole.
4. Draw up your shortlist
If you’re still struggling, you can try drawing up a pros and cons list of each interface and seeing which does the most of what you want. This could be looking at the interfaces on a pure specification level, or just writing down what each can do to see them side by side. If you’re still struggling after this, well it might be time for a coin toss!
5. Make a decision
Hopefully, by now you’ll have a shortlist of a couple of interfaces that meet your needs, which means it’s time to make a decision. Go with your gut here, you now have both the knowledge of your own needs and the knowledge of what the audio interfaces are capable of, so you’re in the best position to pick an interface.
How we test

I’ve tested a lot of audio interfaces for MusicRadar. Our main focus of reviewing as much gear as possible is what informs the choices in our Buying Guides. By reviewing all the available gear on the market we get a great overview of the product category, which allows us to make the best recommendations possible when helping our readers select an audio interface for their needs.
Reviews
Our audio interface reviews all take a similar approach, ensuring we get a complete overview of the product. Each of our reviewers takes a good amount of time with the product ensuring that they get over the honeymoon period and really understand what it’s like to live with. Here’s an outline of the process:
1. Features
I begin our testing by examining the features of the audio interface. This allows me to see where it sits in the product category, who it’s best suited to, and whether it’s worth the price point. This first stage of reviewing also informs the tests I’ll perform later on, as we always aim to simulate its intended use.
2. Build quality
Once I understand the product and where it sits in the category, I’ll do an in-depth physical inspection of it. I’m looking at the overall build quality, how well it’s put together, the feel of the buttons and knobs. I want to know if it’s going to survive being chucked in a backpack or taken to gigs, or whether it’s better suited for the home studio. This process also allows me to check for any features that I might have missed.
3. Installation & software
For the most part, installation on a Mac is a simple process. Windows however can be a very different beast as you’ll be relying on additional driver software for your audio interface. To this end I always check the installation process on both, to ensure that they are smooth to get up and running, and that the performance is there once you’ve got it installed.
I’ll also look at the additional software package that most audio interface manufacturers include. I’m looking for something that adds value to the purchase and gives a good spread of different types of software so someone who’s a complete beginner can get up and running without having to buy anything additional.
4. Usability
The next step of the review process is to actually use the audio interface. Depending on what I’m doing at the time I might record guitars directly in, mic up a guitar amp, use a condenser microphone and a vocalist, or with larger interfaces that have more inputs, record a drummer.
I’m looking to use the interface as any end-user would, so it’ll become part of my home setup, and I’ll use it day to day to record and mix as I would with my own. This lived experience is a crucial part of the review process, and is often where you’ll pick up on any shortcoming the interface might have.
5. Sound
People who are new to audio interfaces might think that there’s a big difference in sound but at this level, my experience tells me that it’s a very even playing field out there. Ultimately, when you’re recording music, it’s the quality of the arrangement, performance, and any post-production that determines how good a piece of audio sounds. So don’t ever think you can’t get good results even if you’re only using a cheap audio interface.
Latency data

For the purposes of this guide, I’ve also conducted in-depth latency testing of each audio interface as a way to gauge the performance of each. Low latency performance is critical to the usability of any audio interface, so it’s a great way to see how they measure up to one another.
To test the interfaces I used the Oblique Audio RTL Utility, which is a freeware program anyone can download. It measures something called the Round Trip Latency of your audio interface, which is the time it takes to process the incoming audio and push it back out to your speakers.
It’s a test anyone can perform so here are the steps you need to take to do it yourself:
- 1. Download and install the software
- 2. Connect your interface to your computer
- 3. Plug a short cable from input one of your interface to output one
- 4. Select the sample rate and bit depth for your test
- 5. Make sure your gain and output knobs are turned up
- 6. Run the utility
- 7. See your results!
When performing these tests I used the same MacBook Air M1 to ensure each interface had parity. Because the spec of your computer and the OS you’re running can have an impact on the results, this was the best way I could ensure that every interface had a fair chance. Each interface was tested at 44.1 KHz and at 6 different buffer sizes to get a good overview of how it responds.
Here you’ll find the full results:

The outcome of the testing is immediately clear at a glance - there isn’t all that much difference between the performance of each. This is great for end-users, as it means no matter what you choose you’re going to get something that performs well. It then becomes more about the feature set rather than how good your chosen interface actually is at capturing audio.
Read more about how we test audio interfaces at MusicRadar.
Key terms
Confused by a word or phrase we've used in this guide? We've compiled this handy glossary to shed light on the key terms you'll hear associated with interfaces.
- AD/DA conversion: The process of converting audio signals into digital ones your computer can understand and back from your computer to your studio headphones or monitors. AD stands for Audio to Digital while DA stands for Digital to Audio.
- Bit depth: Refers to the amount of detail captured. Most audio interfaces record at 24-bit, but you can also find those that record at 32-bit and 32-bit float which offer better quality, but take up more hard drive space.
- Direct monitoring: A feature on most interfaces that allows you to hear the signal going in, separate from any processing from your computer. This also means zero latency in the signal.
- Dynamic range: A specification that defines the difference between the quietest and loudest sounds an audio interface can handle without distortion.
- Gain: Refers to the volume control of your input. This can be adjusted for a quieter or louder signal.
- Instrument/Hi-Z Input: An input designed for plugging in guitars and basses directly into the interface.
- Latency: the time between playing a note on your instrument and hearing it come back through the speakers. You want as low a latency as possible from your interface.
- MIDI: A type of port for connecting MIDI-enabled devices like synthesizers, drum machines, or guitar pedals.
- Phantom Power (+48V): A way of sending power down a cable for condenser microphones, active DI boxes, and inline signal boosters.
- Preamps: Often referred to as ‘mic pres’ these are a way of boosting weak microphone signals at the input to make them more audible.
- Sample Rate: The amount of times a digital signal is captured per second. A higher sample rate means more detail in the recording. Most recordings are done at 44.1 kHz or 48 kHz.
- XLR / TRS / TS Inputs: An XLR is the 3-pin connection for microphones. A TRS cable can be used for stereo devices or studio monitors. A TS cable is a regular instrument cable for mono signals, guitars, basses, etc.
FAQs

What is an audio interface?
To answer this question, we spoke to Jack Cole, the Product Manager at Focusrite:
"An audio interface connects your microphone or instrument to your computer, converting sound into a digital signal for recording in a Digital Audio Workstation (DAW). Conversely, audio interfaces take digital signals from your DAW and convert them into analogue signals to be sent to loudspeakers and headphones for monitoring."
Which audio interface is best for beginners?
In our opinion, the best audio interface for beginners is the Audient iD4 MKII. It’s got a fantastic set of features, is easy to use, and comes with a great software bundle. That said, any of the audio interfaces on this list will work great for a beginner, as there’s no best interface as such, only the one that best suits your needs.
How much should I spend on an audio interface?
It all depends on your budget but if you want something great quality, you’ll be looking around the $/£100-200 mark. More features and inputs typically mean more money, but if you only need a single input then you can bring that down significantly.
Do expensive audio interfaces make a difference?
When you start getting to the more professional end of the scale, yes a more expensive interface will make a difference. We’re talking about the $1k plus sort of range where you’re going to start getting better converters, cleaner preamps, and more pro-level features.At the budget end of the spectrum, the difference between a $100 interface and $200 interface is going to be pretty small, with the difference more likely to be features and connectivity versus actual sound quality.
Do I need a DAW to use an audio interface?
It all depends on your use case. For most recording endeavors you will need a DAW to go along with your audio interface. If you’re recording instruments, doing a podcast, or streaming, you will need some sort of software to take care of that portion. You can use an audio interface as a device purely to convert audio however, say if you wanted to play an amp modeler or standalone amp simulator plugin through studio monitors.
Does it matter what audio interface I get?
Yes, it does matter. Different audio interfaces offer different capabilities, different features, a variety of inputs and outputs, and many other distinctive features. While one audio interface might work great for recording musical instruments, it might not have the features required for podcasting or streaming, so it’s important to do your own research.
Are cheap mic preamps good enough for recording?
Yes they are. With recording, my philosophy is very much you get what you put in. Records from the 60s still sound great even without the amazing tech we enjoy today, and that's largely down to the performance and mic choice. With a great player or singer, a well-tuned instrument, and a decent microphone, you'll be able to craft excellent recordings.
Where you may run into issues is with certain mic types, particularly ribbon mics, which require a lot more gain than a condenser mic. When using these, or certain dynamic mics, you might benefit from using a preamp booster to get them to the right level.
Why trust us
✔️ Over 150 audio interfaces tested
✔️ More than 9,500 reviews on MusicRadar
✔️ 17 years of product testing
Since 2007 MusicRadar has been helping musicians of all kinds, whether they're guitarists, drummers, producers, keyboard players, or DJs. We've been testing music gear for a long time, and our team of highly experienced industry professionals collectively have over a century's worth of knowledge from real-world music-making.
MusicRadar has been the go-to place for musicians looking for the latest news, best gear reviews, and how-tos for 17 years and counting, irrespective of your particular instrument, or favourite music genre.
As well as providing the best online music content, MusicRadar also hosts content from stalwart magazine brands including Future Music, Computer Music, and eMusician. We receive three million visitors per month, making us the preeminent destination for music makers and lovers worldwide.
Meet the experts
Matt has been recording bands since the mid-noughties, cutting his teeth with an M-Audio M-Track 2 and a copy of Cubase on Windows XP. Since then he's used countless audio interfaces to record music for bands across the UK, covering everything from djent to jazz. As a MusicRadar writer, Matt has reviewed 15 audio interfaces in the past year alone, and over 50 different products including guitars, amps, and pedals. Prior to becoming a writer, he spent five years in the music retail industry working for Dawsons Music and Northwest Guitars, providing expert advice to musicians. He’s currently studying Music Production at Spirit Studios in Manchester, UK.

Si takes care of the reviews on MusicRadar and Future Music magazine, although you may have also spotted him on camera conducting gear reviews for the MusicRadar YouTube channel. As well as making sure our writing team has the latest gear for review, he's been regularly testing instruments and accessories for well over 15 years, putting audio interfaces, studio headphones, synthesizers, laptops, and much more through their paces.

Andy is an expert on music production and technology having started out writing for Music Technology magazine in 1992. He has been an editor for Future Music, Keyboard Review, MusicTech, and Computer Music, which he helped launch in 1998. He regularly reviews gear for MusicRadar, ranging from the best audio interfaces and synthesizers to pro studio hardware and software.
Jon is a London-based platinum award-winning mixer, producer, composer, and club remixer with a diverse CV that spans dance, pop, rock, and music for media. He’s also a long-term contributor to MusicRadar's music technology tutorials and reviews. Whether working alone or collaborating he usually handles final mixdowns, so you’ll also find MusicRadar peppered with his handy mixing tips.
Latest updates
05/01/26: A new header image has been added to give the guide a refreshed look. The intro has been heavily edited to give the reader a clearer understanding of what the guide contains and the testing performed in the creation of the guide.
19/11/25: A new product has been added to the guide, with the M-Audio M-Track Duo HD Producer Pack entering as an all-in-one solution. The specs table and latency testing has been updated appropriately, and the FAQs section has been expanded with some more questions.
04/03/25: The guide has been given a top-to-bottom refresh. The product list and labels have been rearranged to make the guide both easier to navigate and more useful to readers. We've performed latency testing on each interface in the guide, added a spec comparison table, a glossary of key terms, and a brand new how to choose section.
Read more:
- Spend less with the best audio interfaces under $200/£200
- Elevate your content with the best audio interfaces for streaming
- Create for less with the best budget laptops for music production
- Best budget studio headphones: performance on a smaller budget
- Make pro sounds on the go with the best laptops for music production
- Our guide to the best budget PCs for music production
