7 ways to work smarter with MIDI in your DAW
Let’s explore the best of today’s DAW functionality when it comes to handling notes and programming
We’ve come a long way in our use of MIDI. When the standard was introduced in the 1980s, getting different instruments made by different manufacturers to communicate with each other was a huge step forward.
Decades later though, with MIDI firmly established and built into every piece of music hardware and software, we’ve transcended the basics, and human ingenuity has brought us to new creative heights.
What is MIDI?
For those needing a refresher, MIDI (Musical Instrument Digital Interface) is the staple digital language we use to communicate musical performance data from controller to instrument. You don’t need to comprehensively understand what MIDI is and how it works in order to use it inside your DAW, but know that without it, making music via a computer would be limiting and isolated.
All digital instruments, including synths and samplers, make use of the MIDI protocol to transmit performance data that we can manipulate with precision. Even when we use a computer-compatible (digital) hardware synth, it uses MIDI. If your synth or MIDI controller is turned off and you press a key, it doesn’t produce sound. It relies on electrical signals to transmit data, unlike traditional keyboard instruments like the piano or organ, which produce sound acoustically.
Your DAW
If you’re familiar with any DAW (Digital Audio Workstation), you’ll have become accustomed to its unique interface, including its MIDI functions. Technically, a DAW on your computer can be much more sophisticated – “high-resolution”, if you will – than the MIDI spec needs it to be.
Often, the communication between parts of a DAW are happening in a higher-res language like MIDI, but are converted back to MIDI to interface with other kit.
In this article, we’re going to be exploring different DAWs and how they each make use of MIDI in intuitive ways
Perhaps, you’re experienced enough to have worked with multiple DAWs. Then, you’ll be aware that each of them has its unique ways of working with audio and signal routing. To a complete beginner, it may seem like all of them are entirely different. But if you know a bit more about what’s going on under the hood, you’ll see that all of the fundamentals are the same. It’s just how they integrate these fundamentals into a fully functioning software that separates them. MIDI is no exception to this.
Get the MusicRadar Newsletter
Want all the hottest music and gear news, reviews, deals, features and more, direct to your inbox? Sign up here.
In this article, we’re going to be exploring different DAWs and how they each make use of MIDI in intuitive ways, giving rise to the unique functions of each. We’re going to be primarily demonstrating features that’ve been added over recent years, to show off the modern capabilities we now have at our disposal.
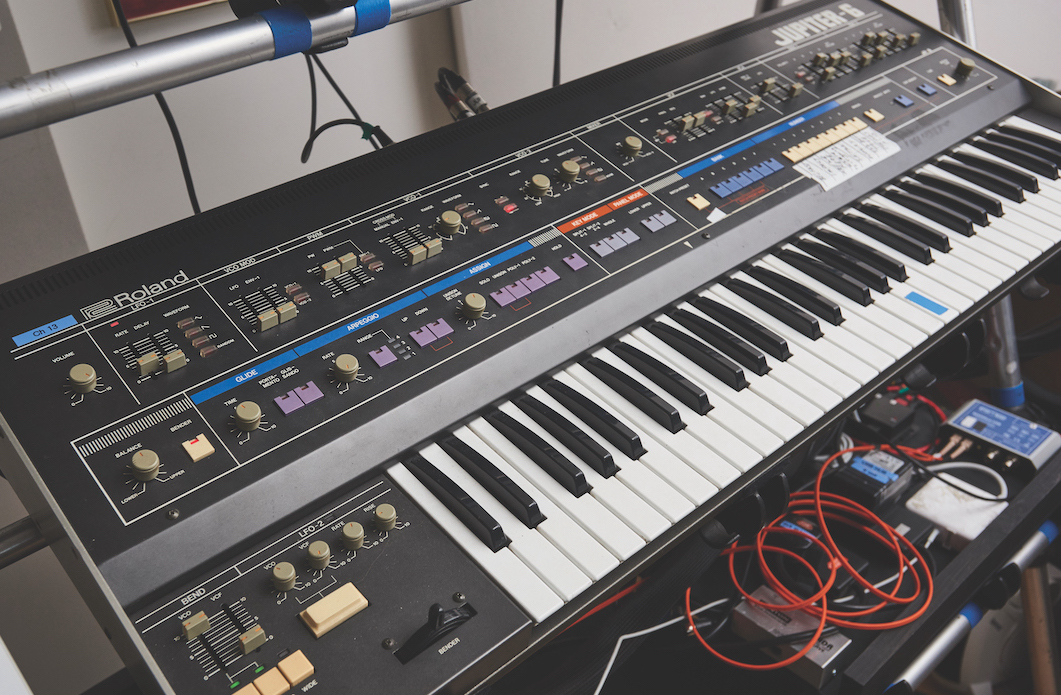
1. Building MIDI devices in Bitwig’s Note Grid
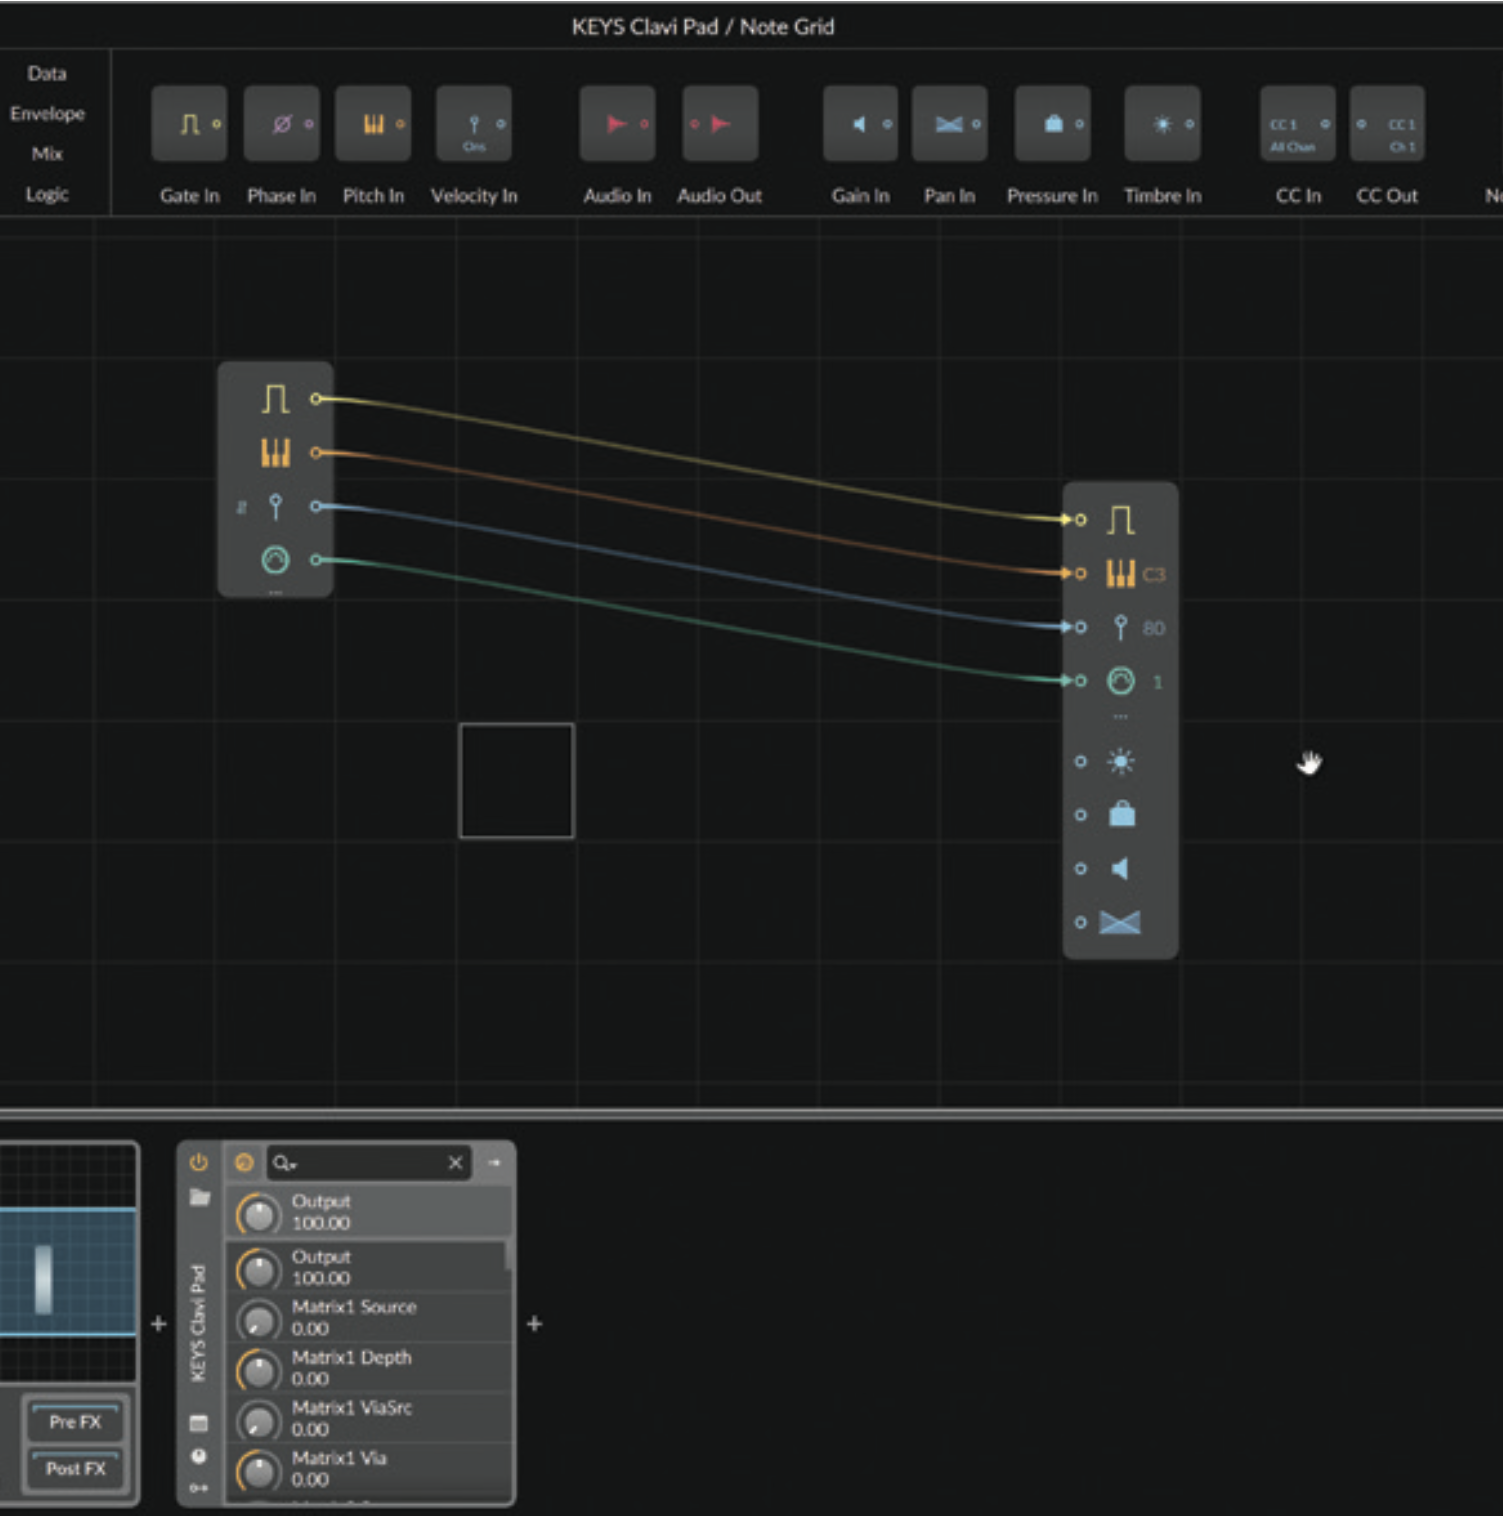
Note Grid is Bitwig Studio’s full-on MIDI processing environment. Like its sibling Grids, Poly Grid and FX Grid, it lets you connect small components to make custom setups, or choose a preset. Here’s a fresh Note Grid for us to play with.
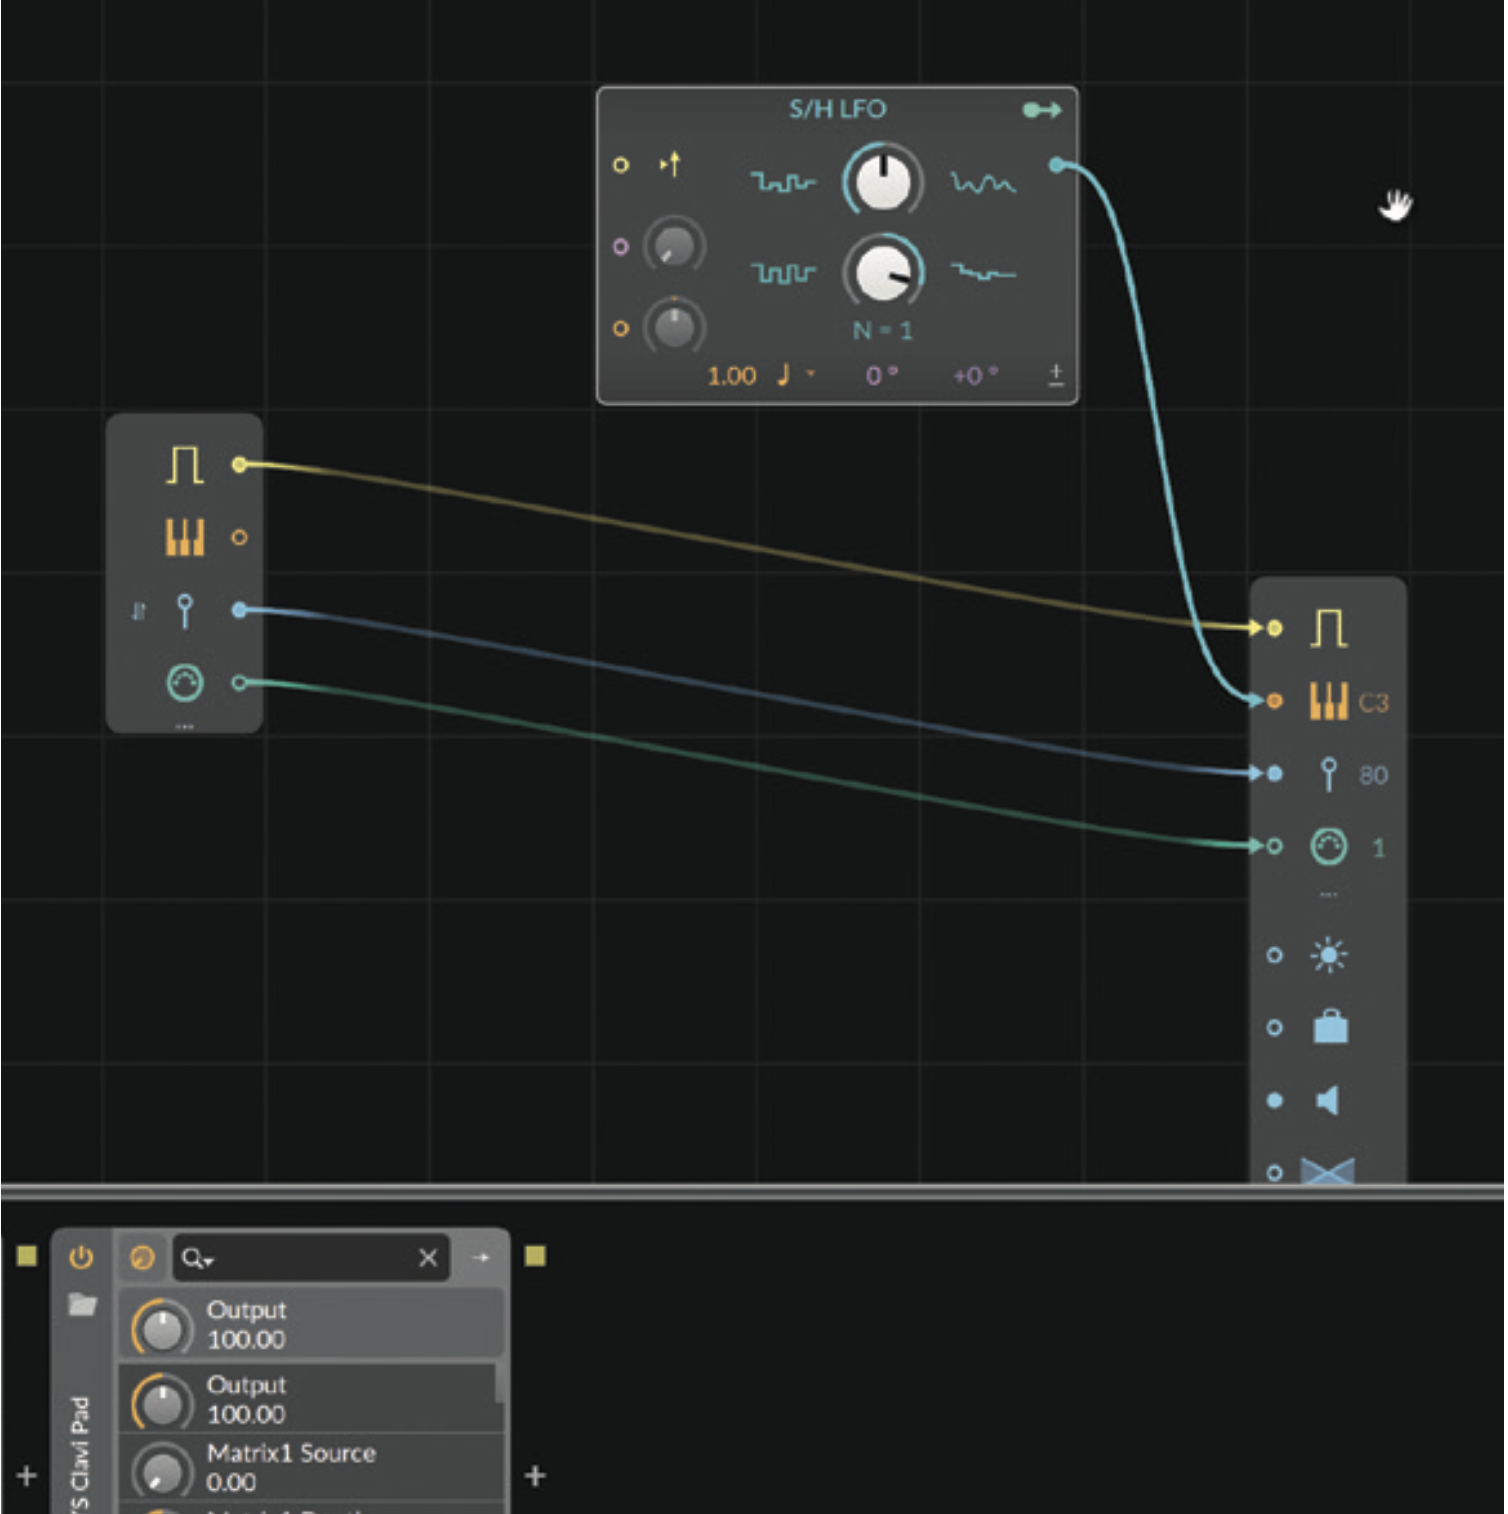
Default connections are mapped input-to-output: Gate, Note number, Velocity and MIDI Channel. We could feed the Note Number output with Sample+Hold LFO, to generate random values, using our original input MIDI as the note-on/off signal.
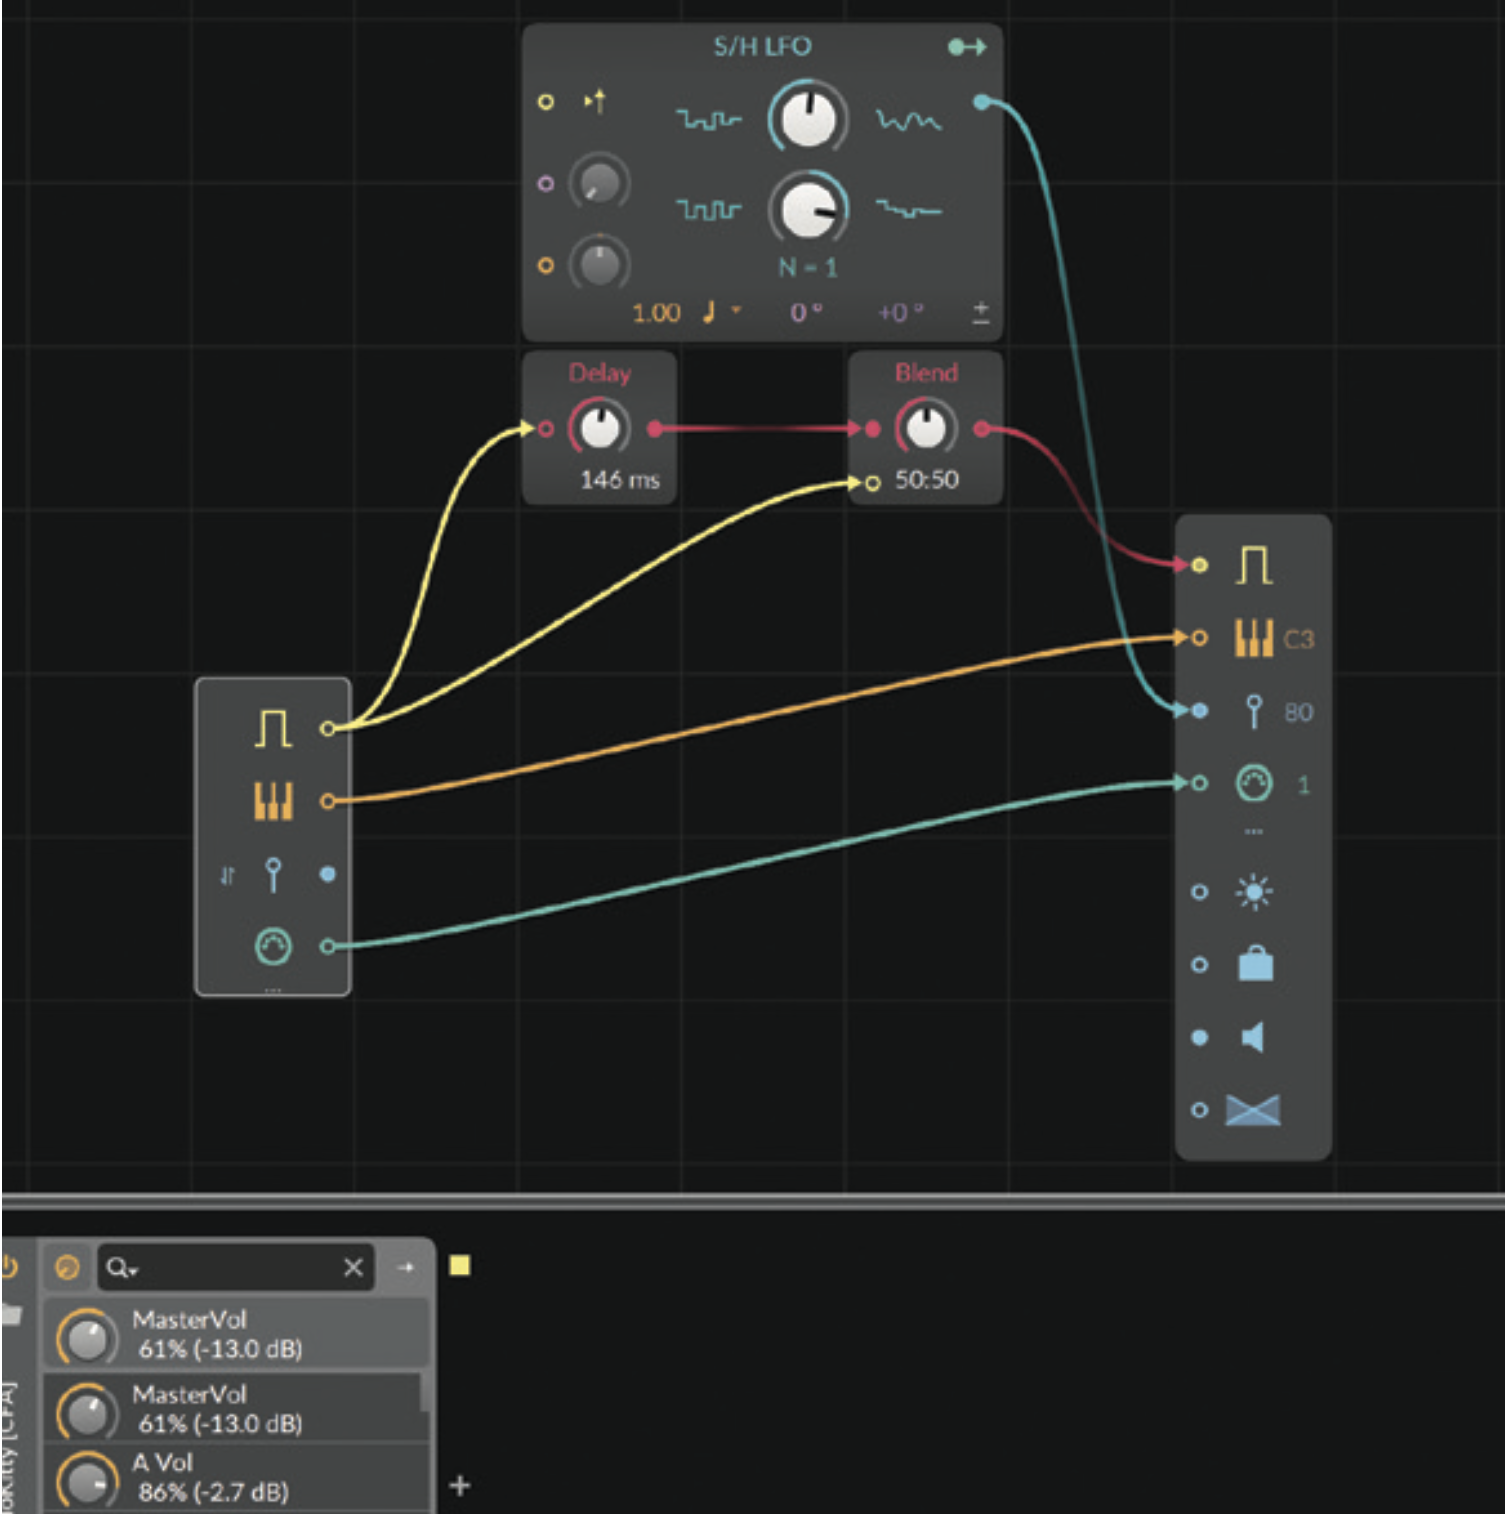
Or connect the S+H module to velocity to humanise notes. We’ve also set up a basic note repeater using a signal split and delay line on the MIDI gate signal. We double each input note but timing must be exact to avoid note-on/off clashes.
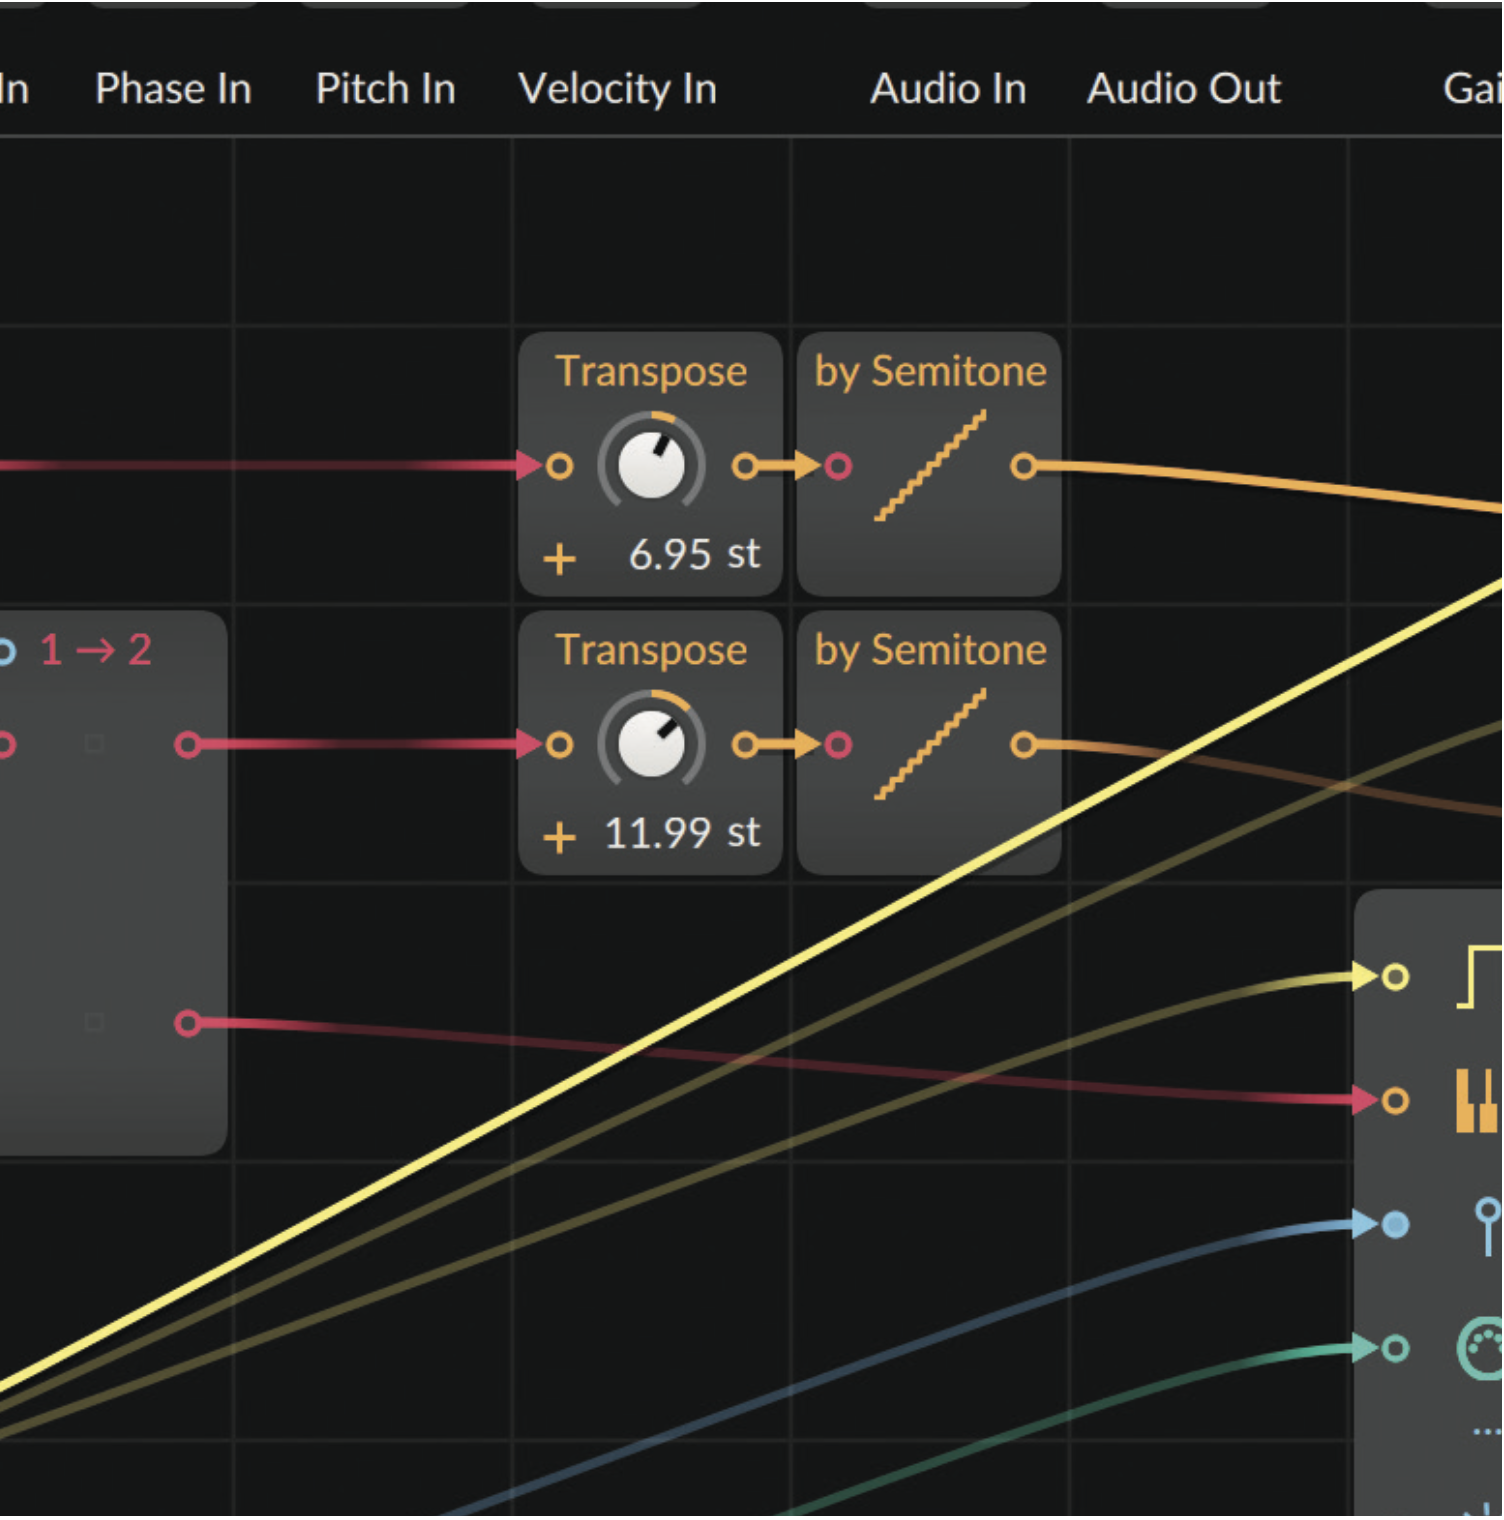
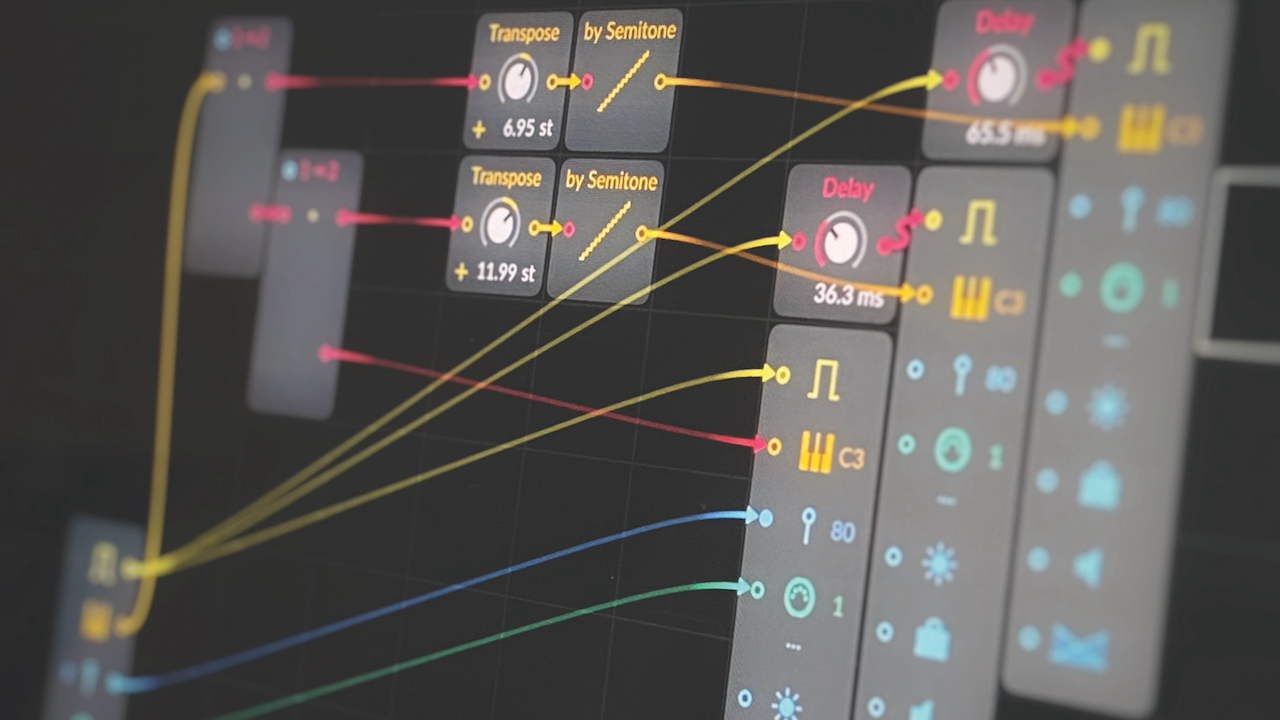
This chord device turns single notes into one-finger chords. We’ve set this up to add +7 semitones and +12 semitones to the input note, as well as outputting the original note itself. This is how to mostly stay in the major/minor key you’re in.
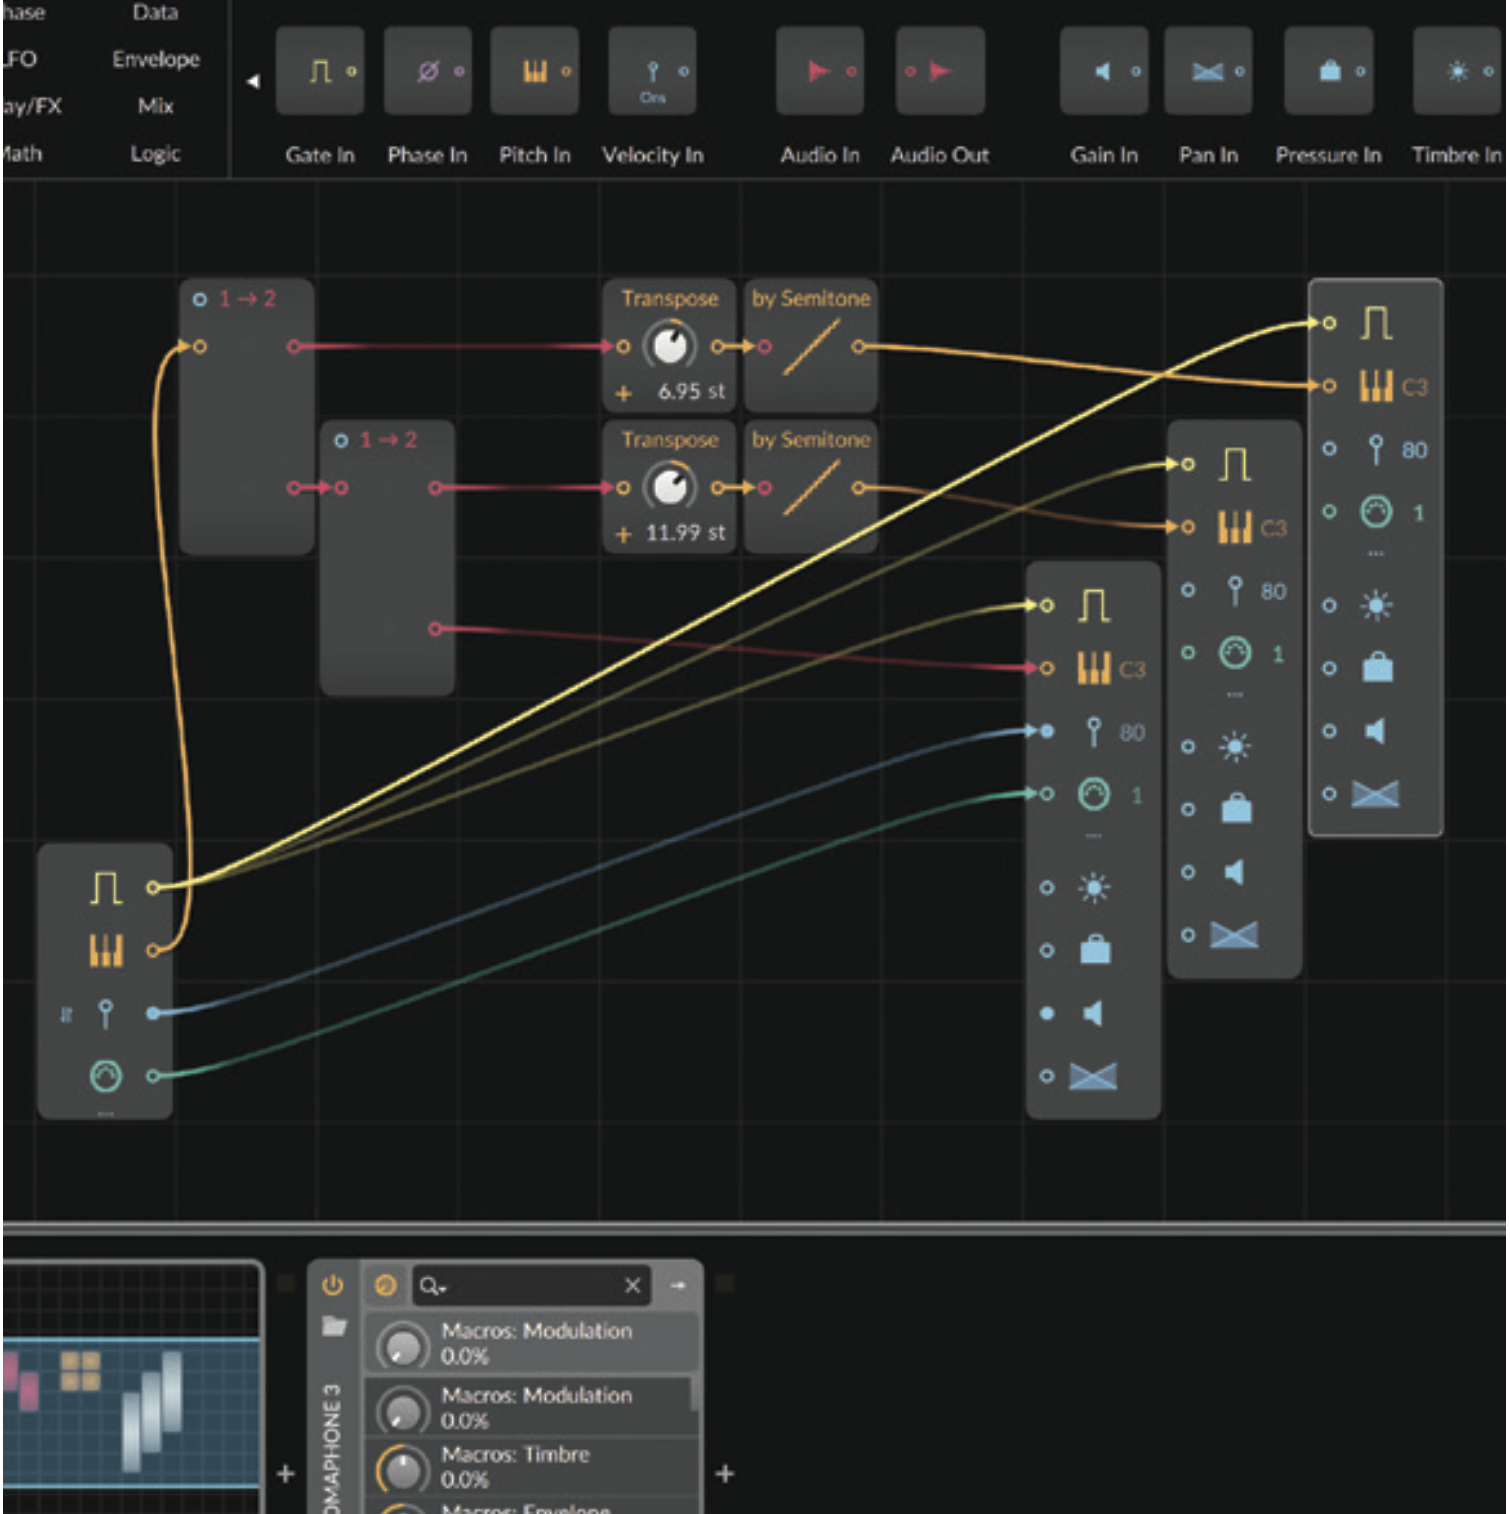
To make it work, we’ve split the Pitch signal into two duplicates, and run each through a Transpose device, into a nearest semitone device. We’ve had to create two new Note Out devices to output three voices instead of one.
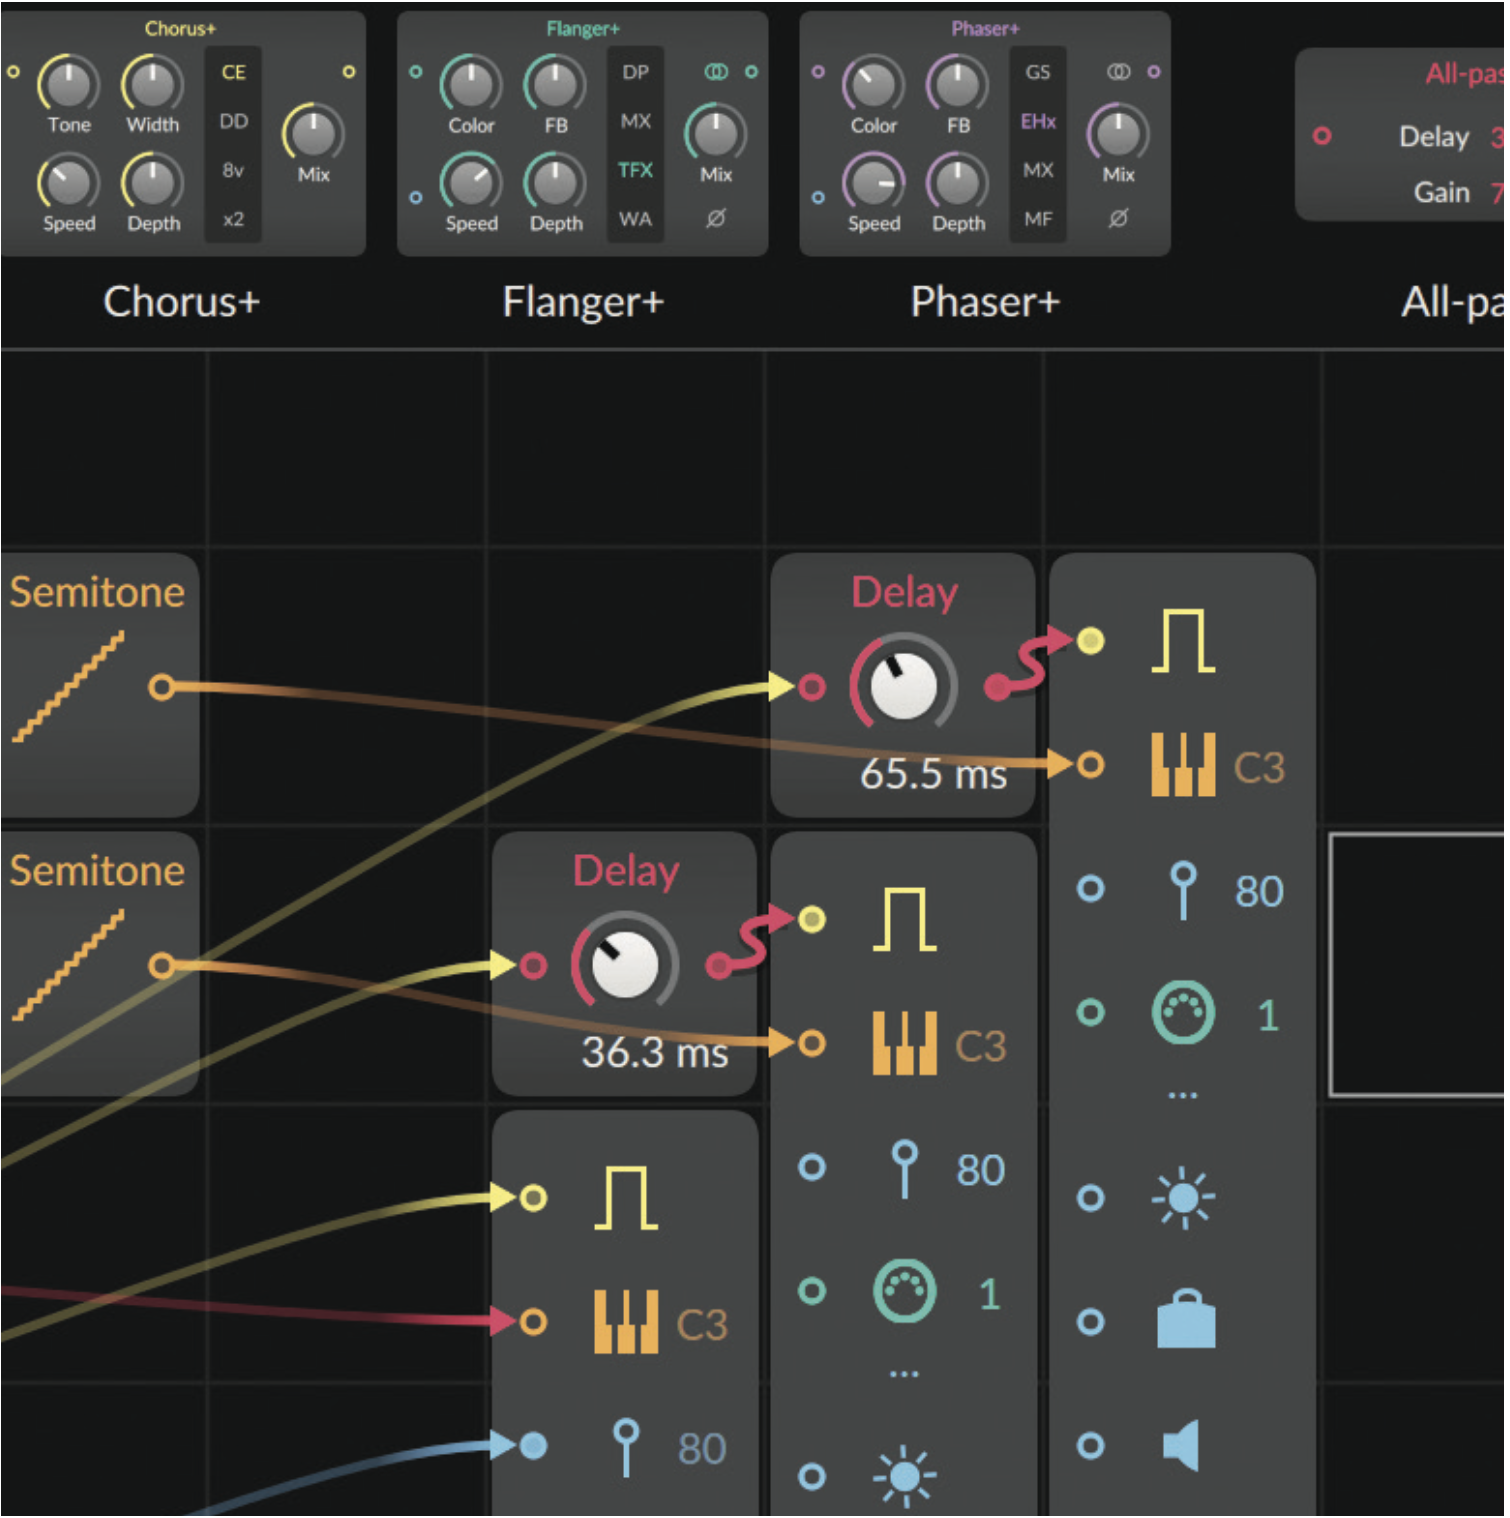
Add Delay devices to the Gate signal for the two new voices, giving a strum effect. We can now vary the strumming time per-note by using a sample+hold LFO or another random signal generator, or link strum timing to velocity or other signals.
2. Using scales in Ableton Live 12
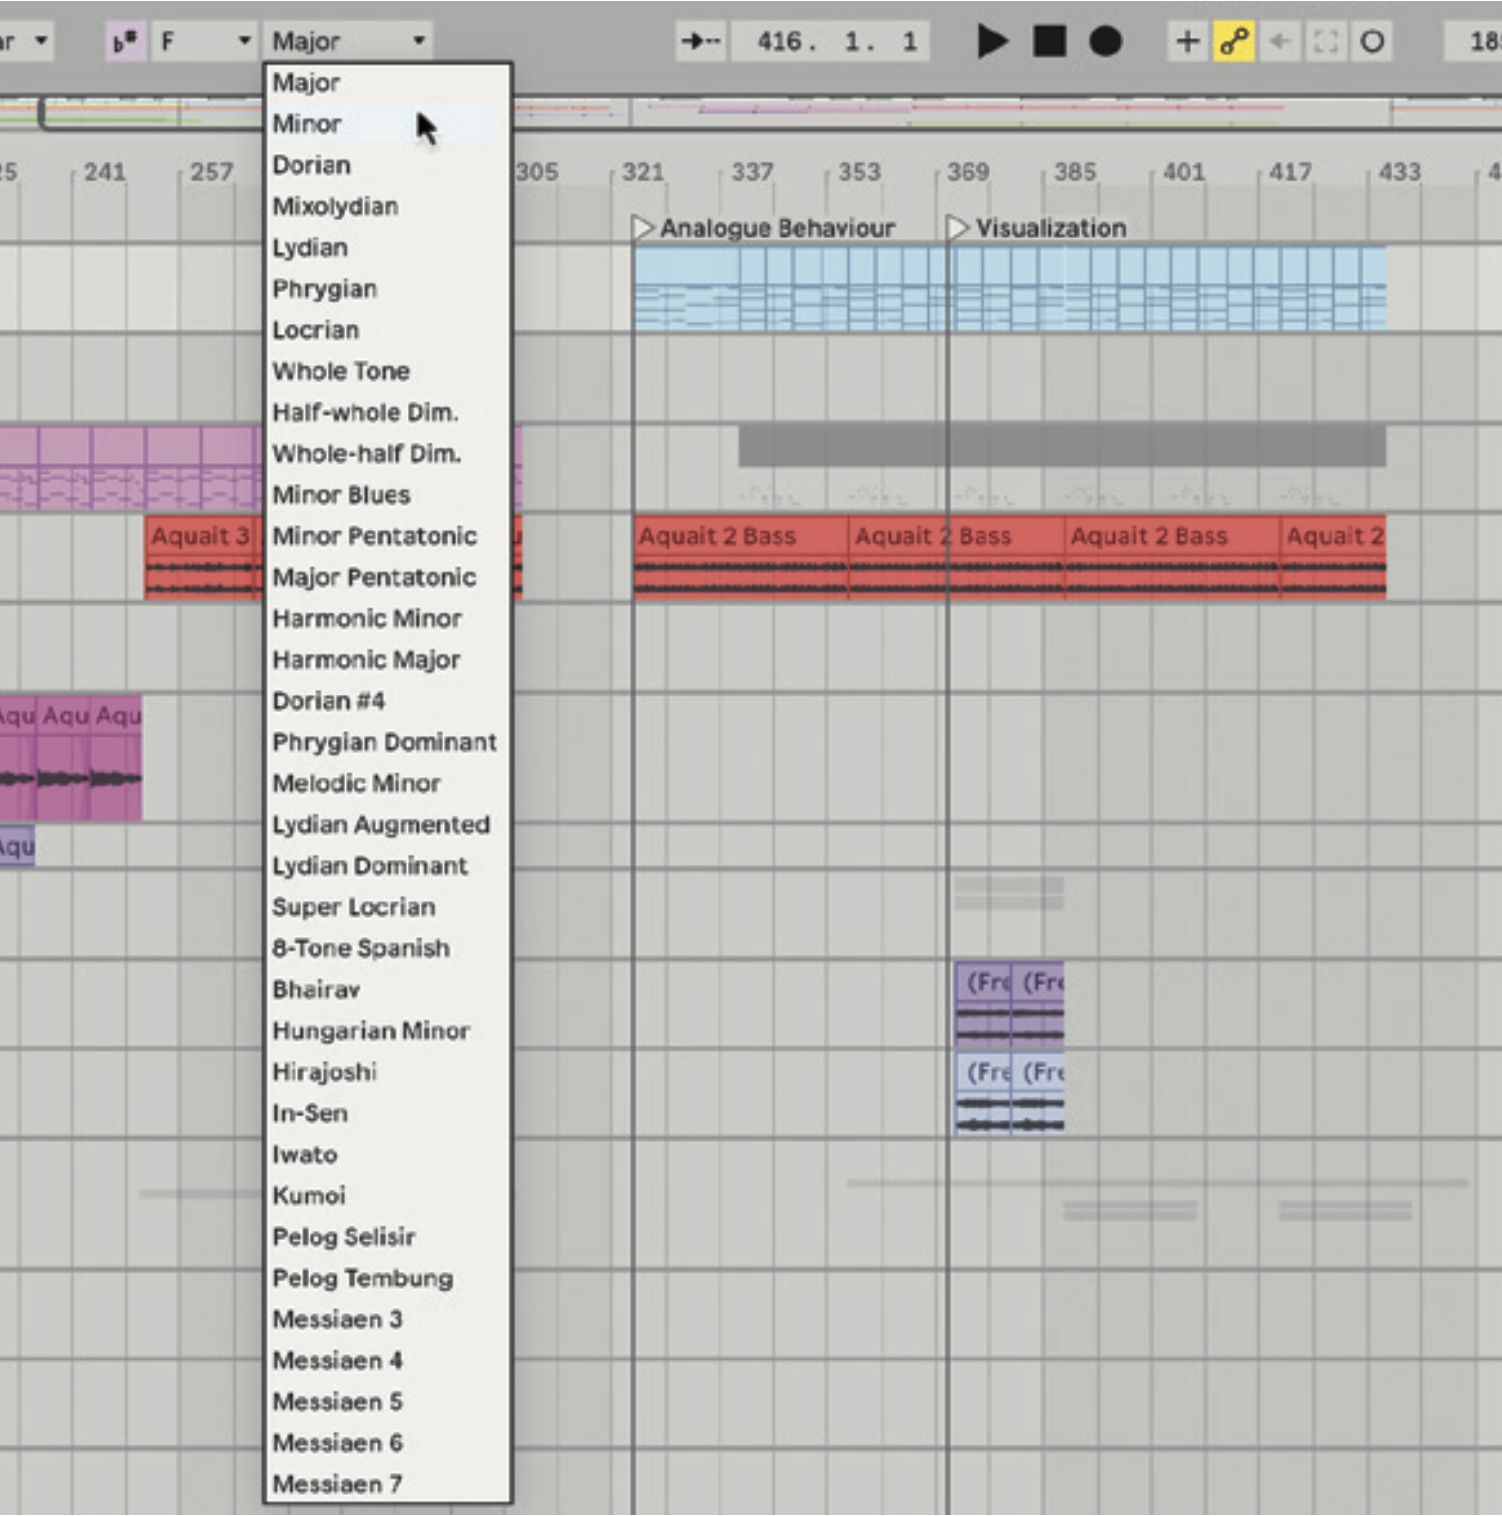
Live now finally lets you specify the key of your project as well as tempo. Choose the key you’re working in, selecting the root note and the scale itself from a list of three you’ll likely use and many that you won’t! Make sure the lilac button is activated.
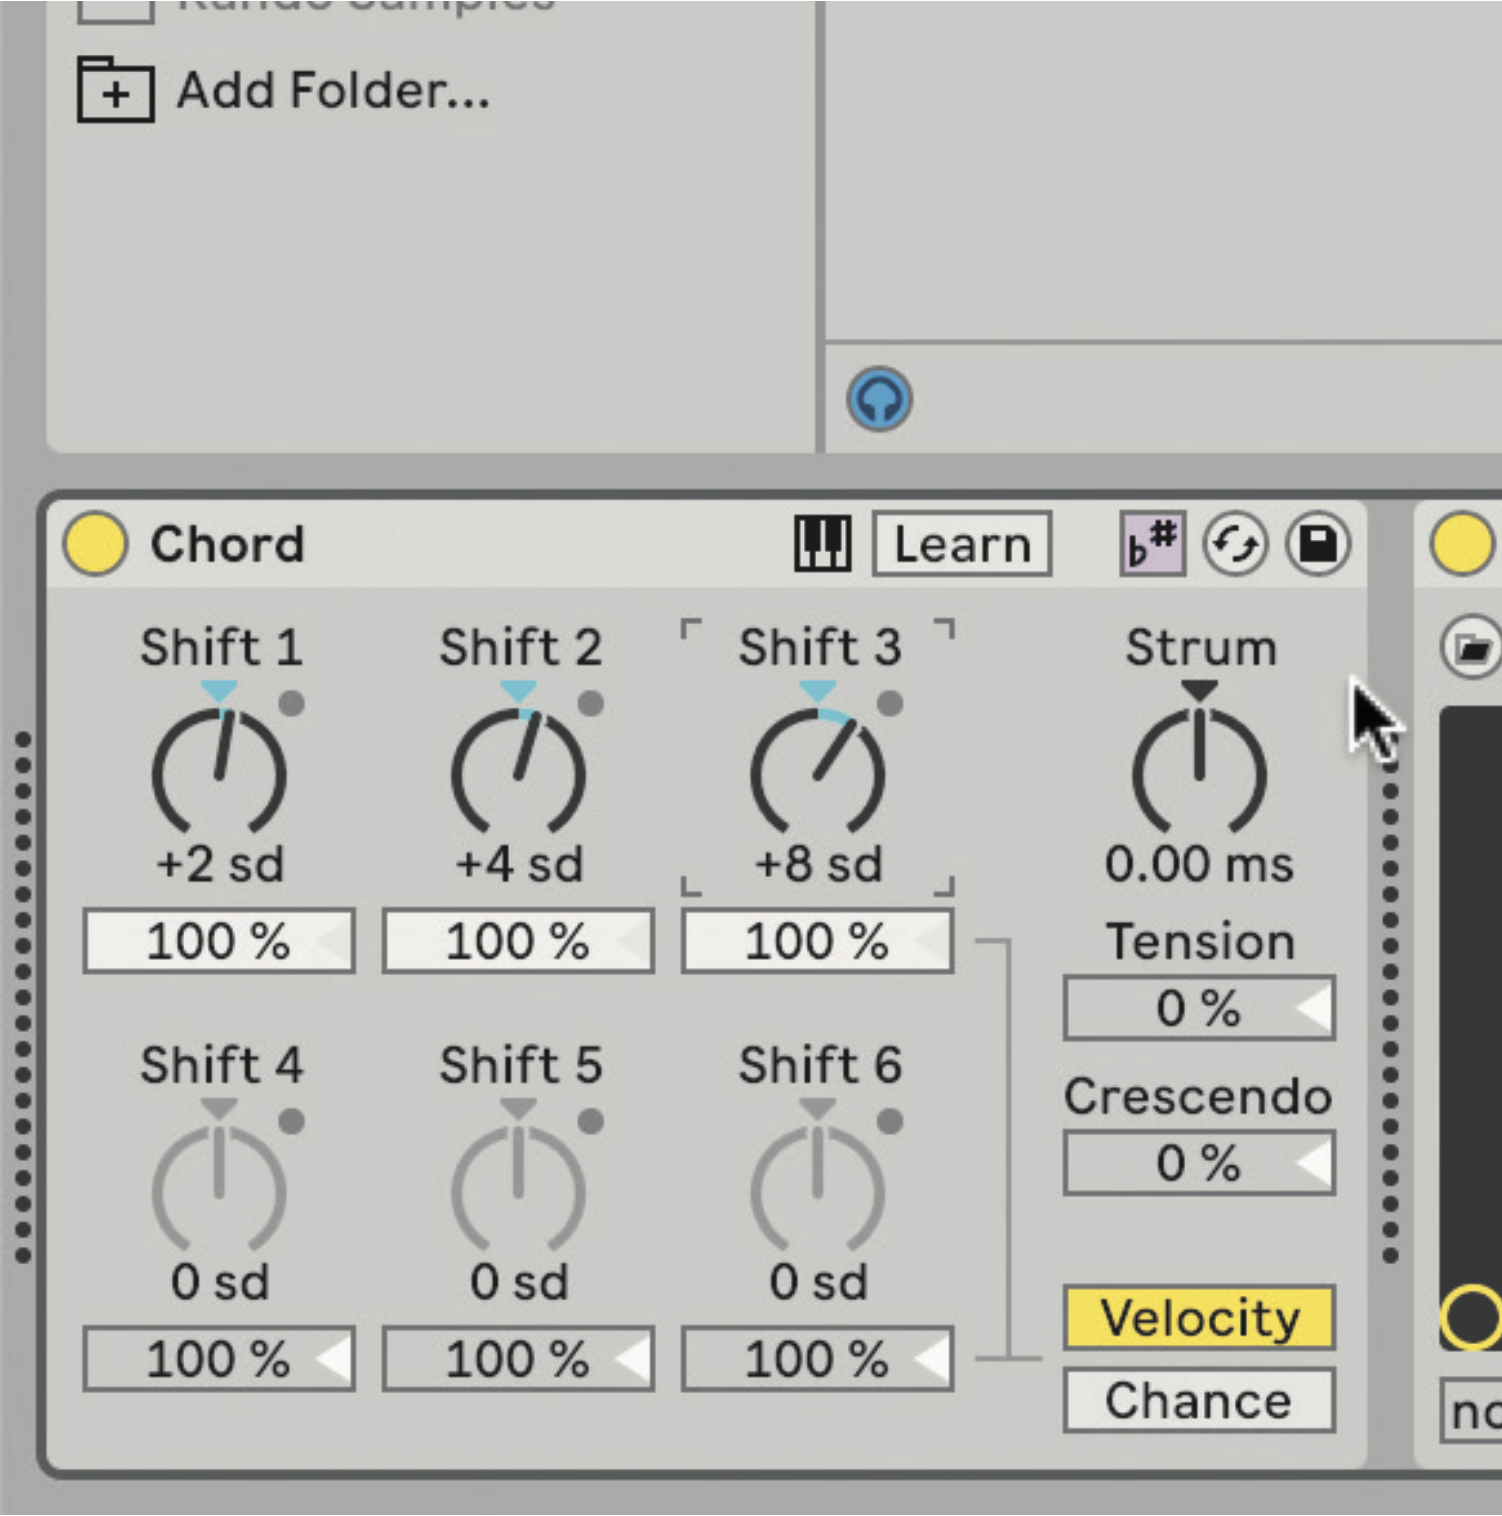
You’ll now see that lilac button on Live’s MIDI Effects. Pressing it on the Chord device changes the semitone markers for the dials to ‘scale degree’. You can now set a chord in relative notes, in scale even without using a Scale device after.
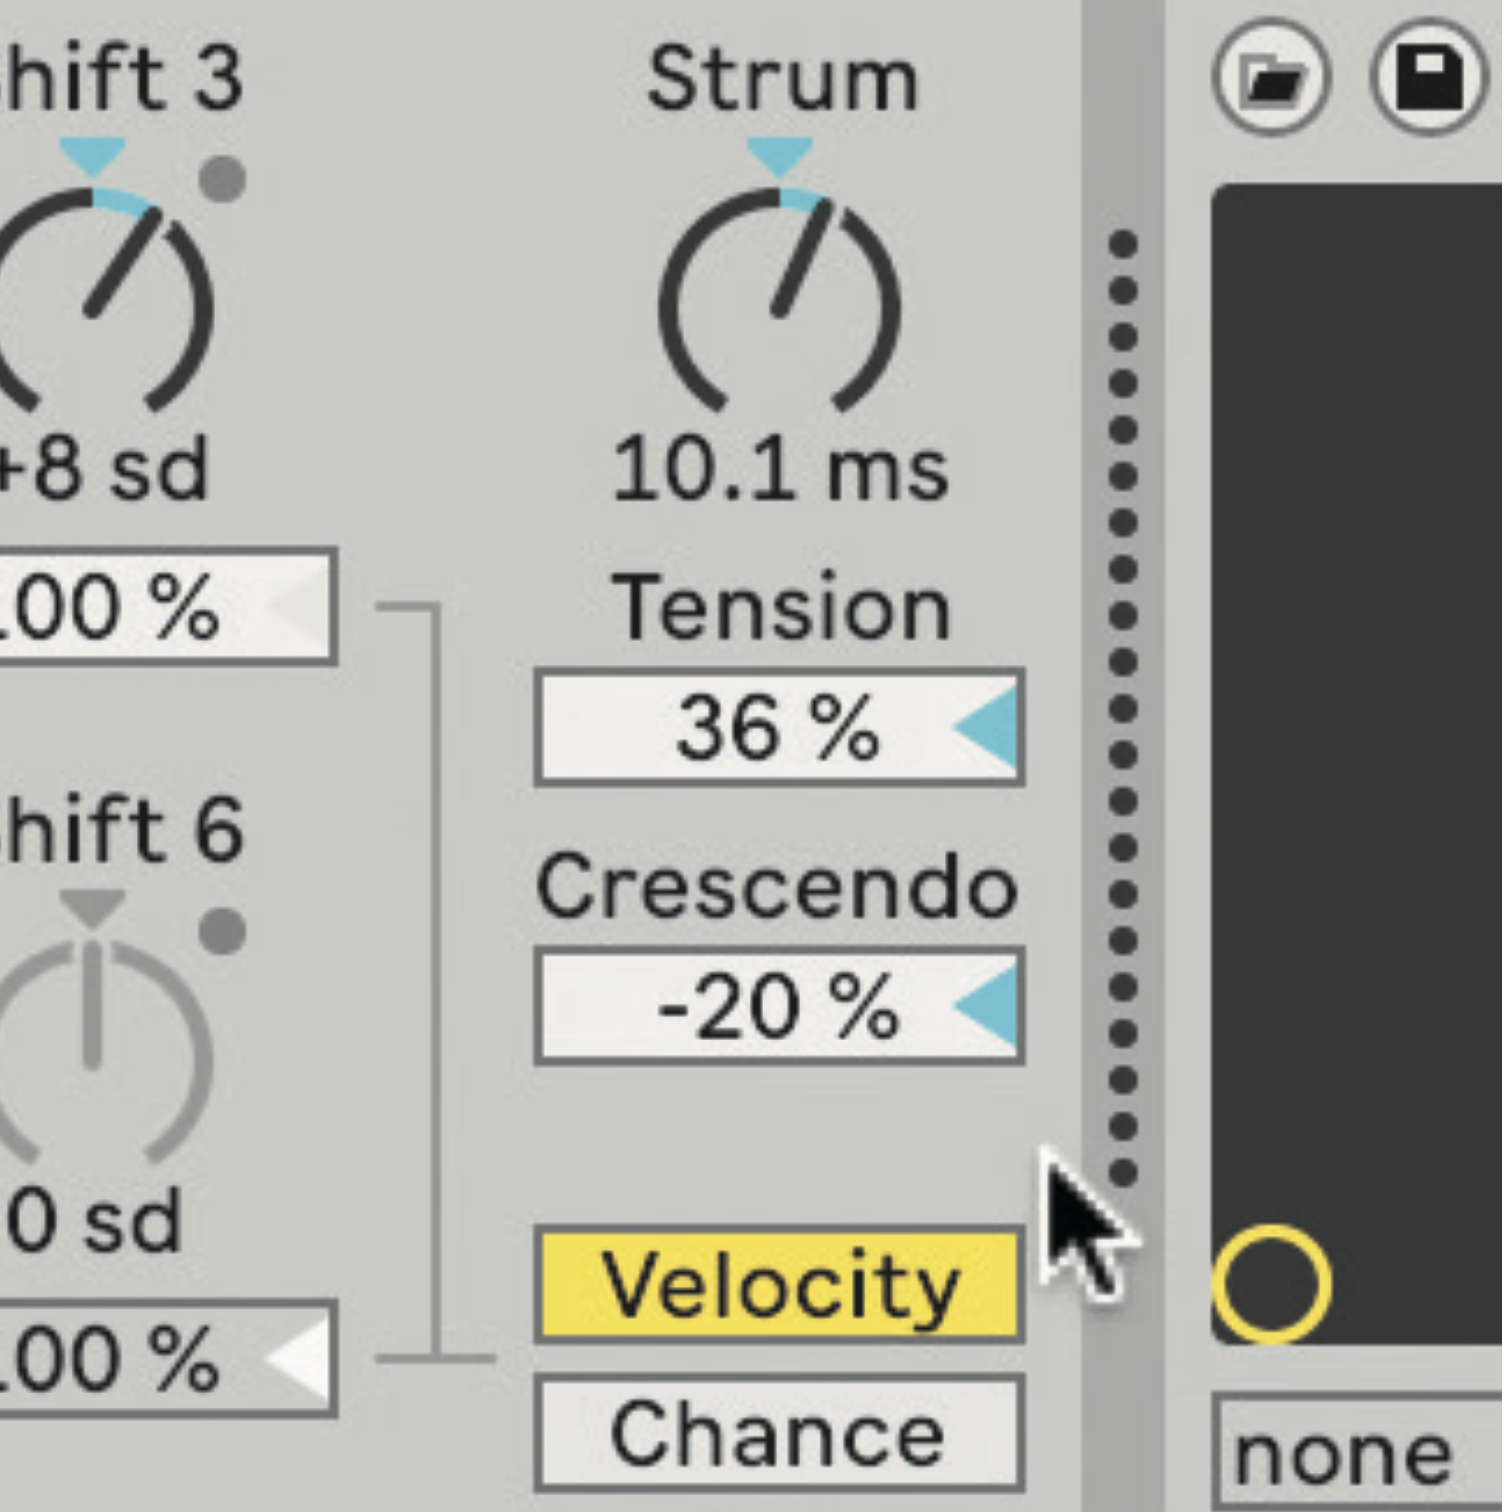
The Chord device also has a Strum function now, and that behaviour can be customised using the Tension and Crescendo parameters to change how the speed and velocity of the notes change during the strum’s duration.
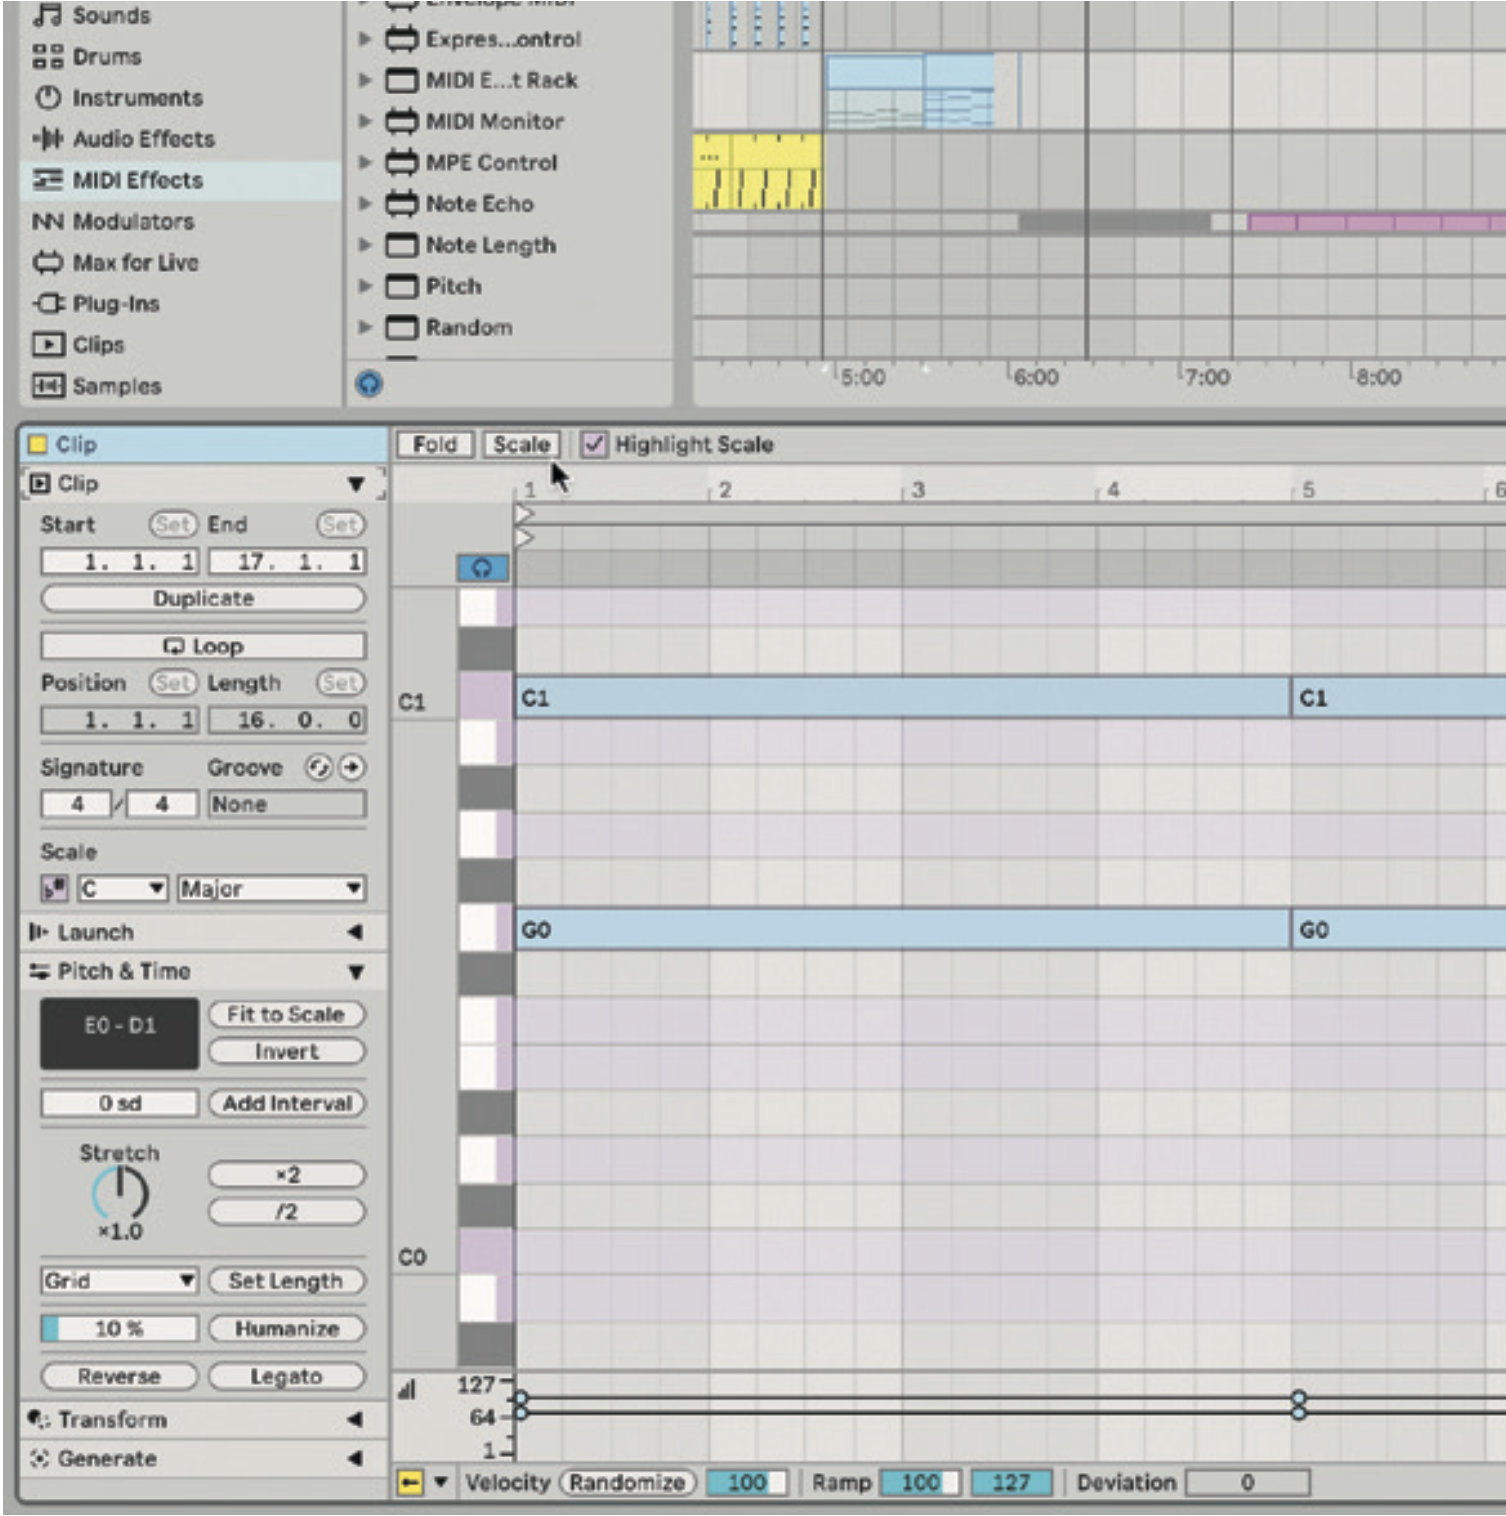
Meanwhile, on the clip inspector, our project’s scale is inherited. Live lets us highlight our scale notes in lilac across the piano roll, and to fold down the piano roll notes to the scale we’re working in.
3. Using tunings in Ableton Live 12
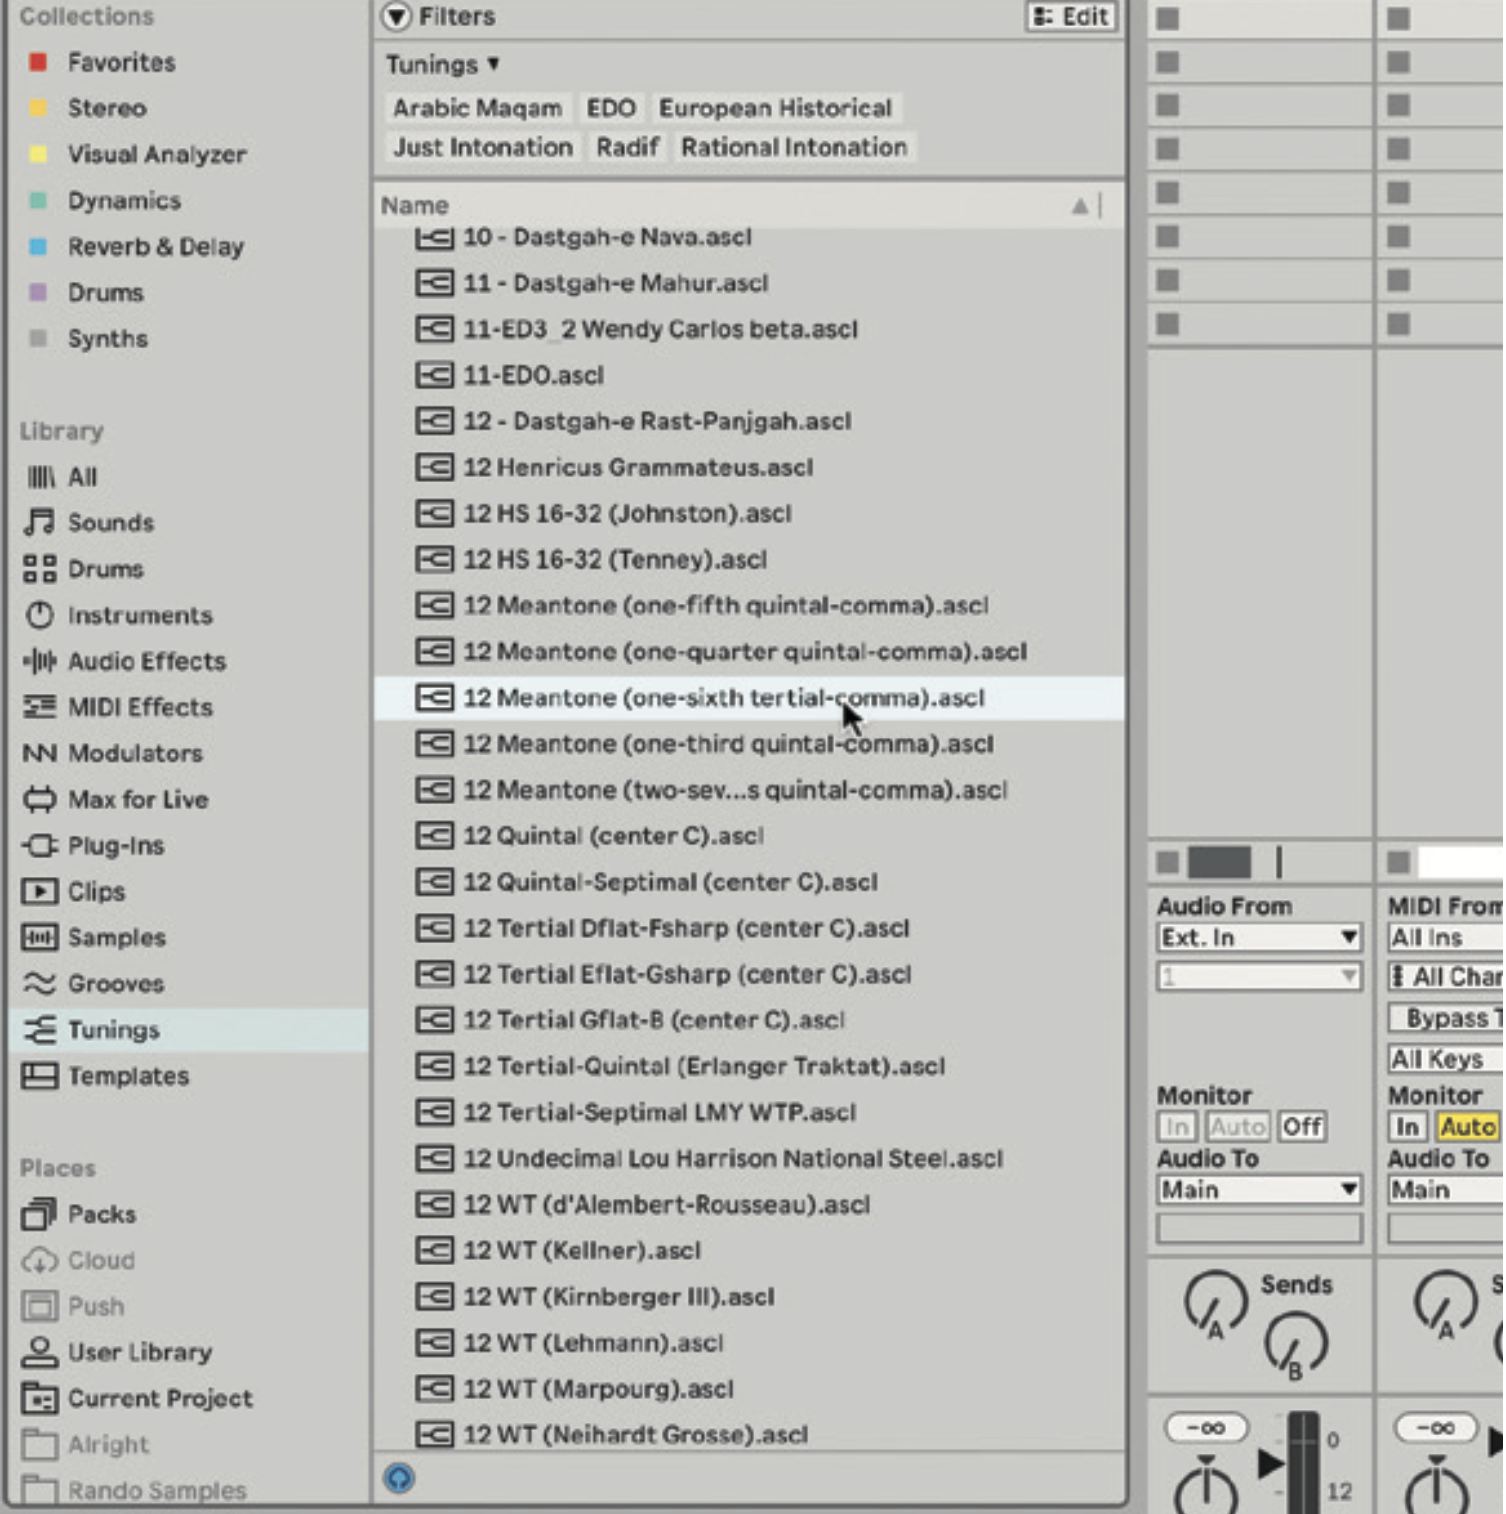
Live now also lets us use tunings – ie, different frequency values for each note. The browser has a Tunings category that gives access to a good list of diverse tunings, which can be used with any MPE synths, including those that come as part of Live.
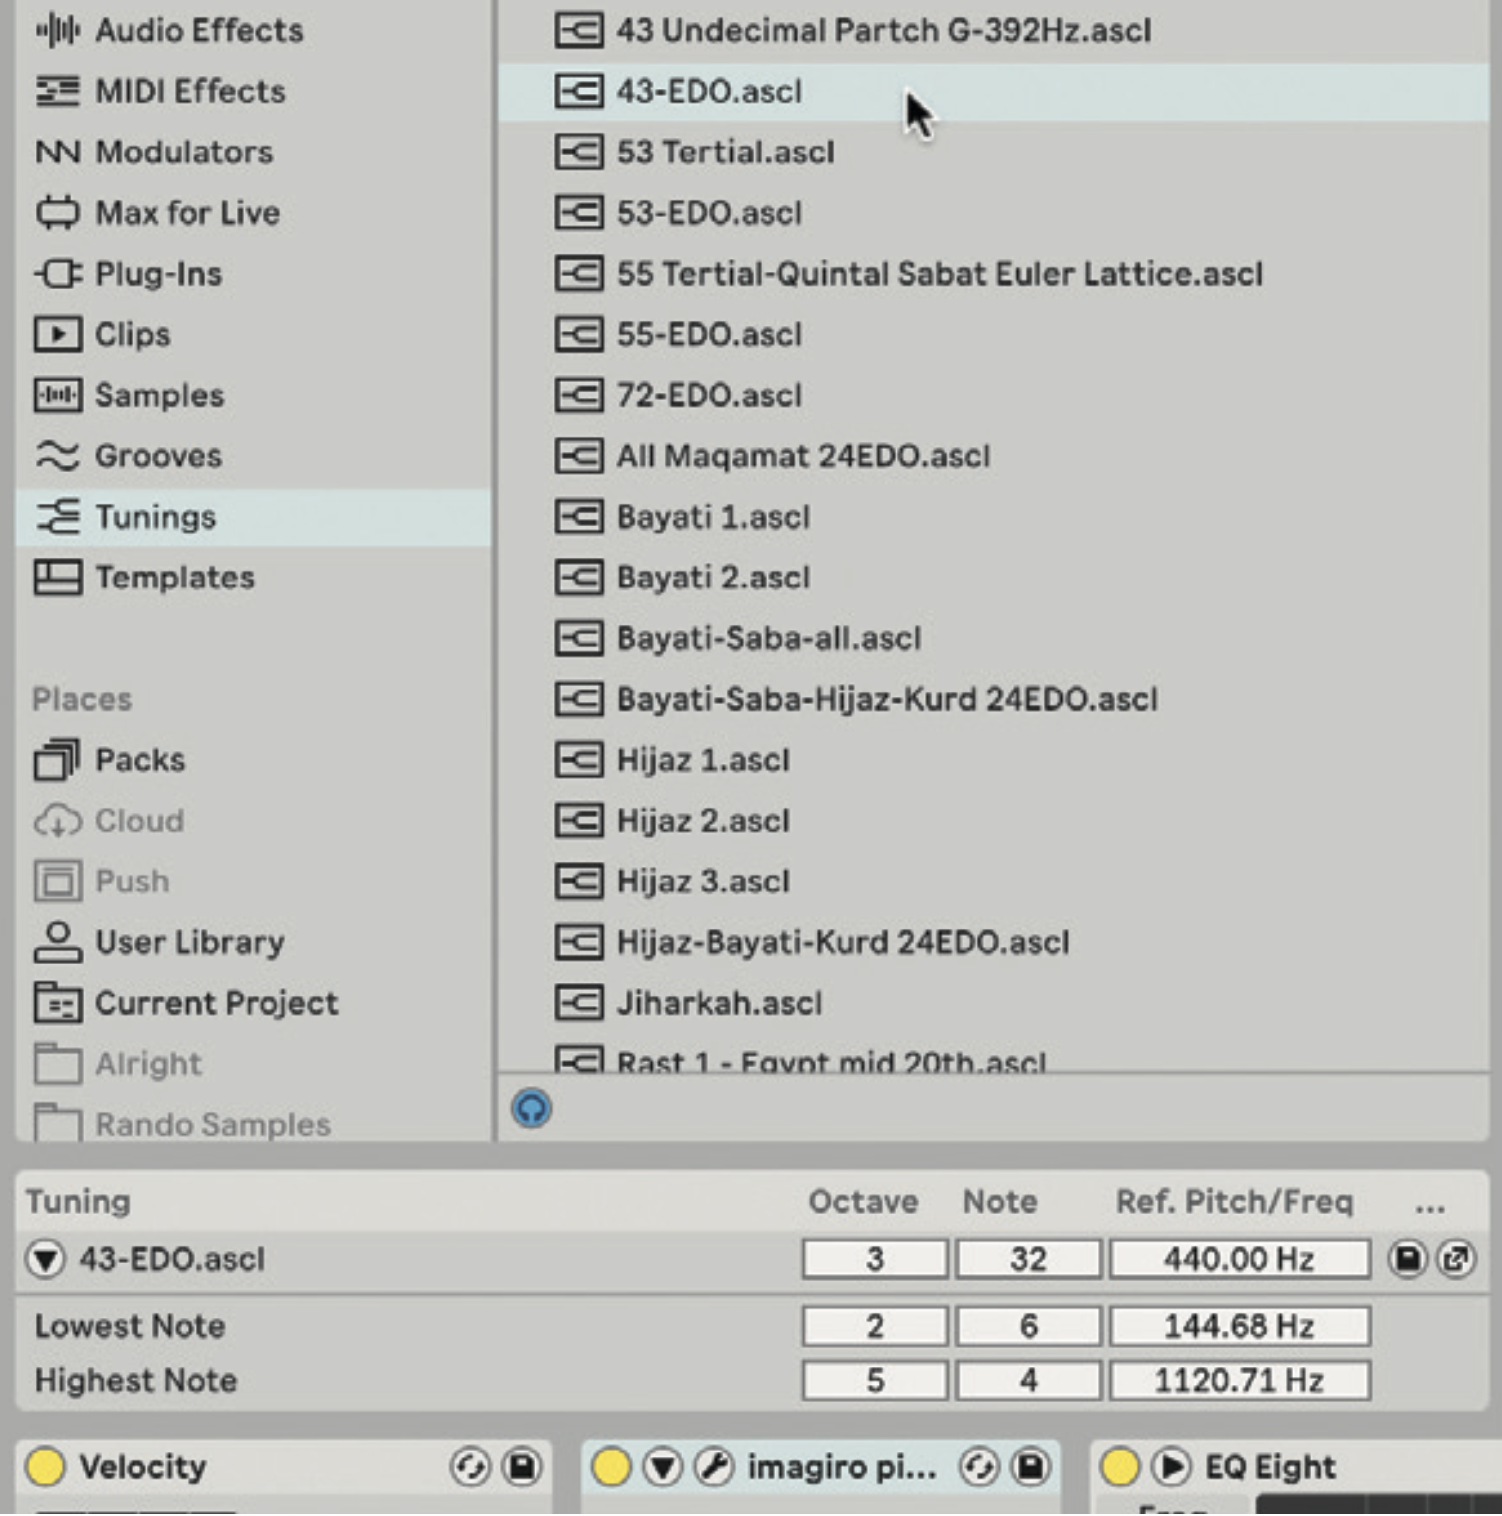
The tunings starting in 12 may be the most familiar, or at least the least unfamiliar. To get really into things, try the tunings that cram more than 12 notes into a single octave, including various EDO options (Equal Divisions of the Octave).
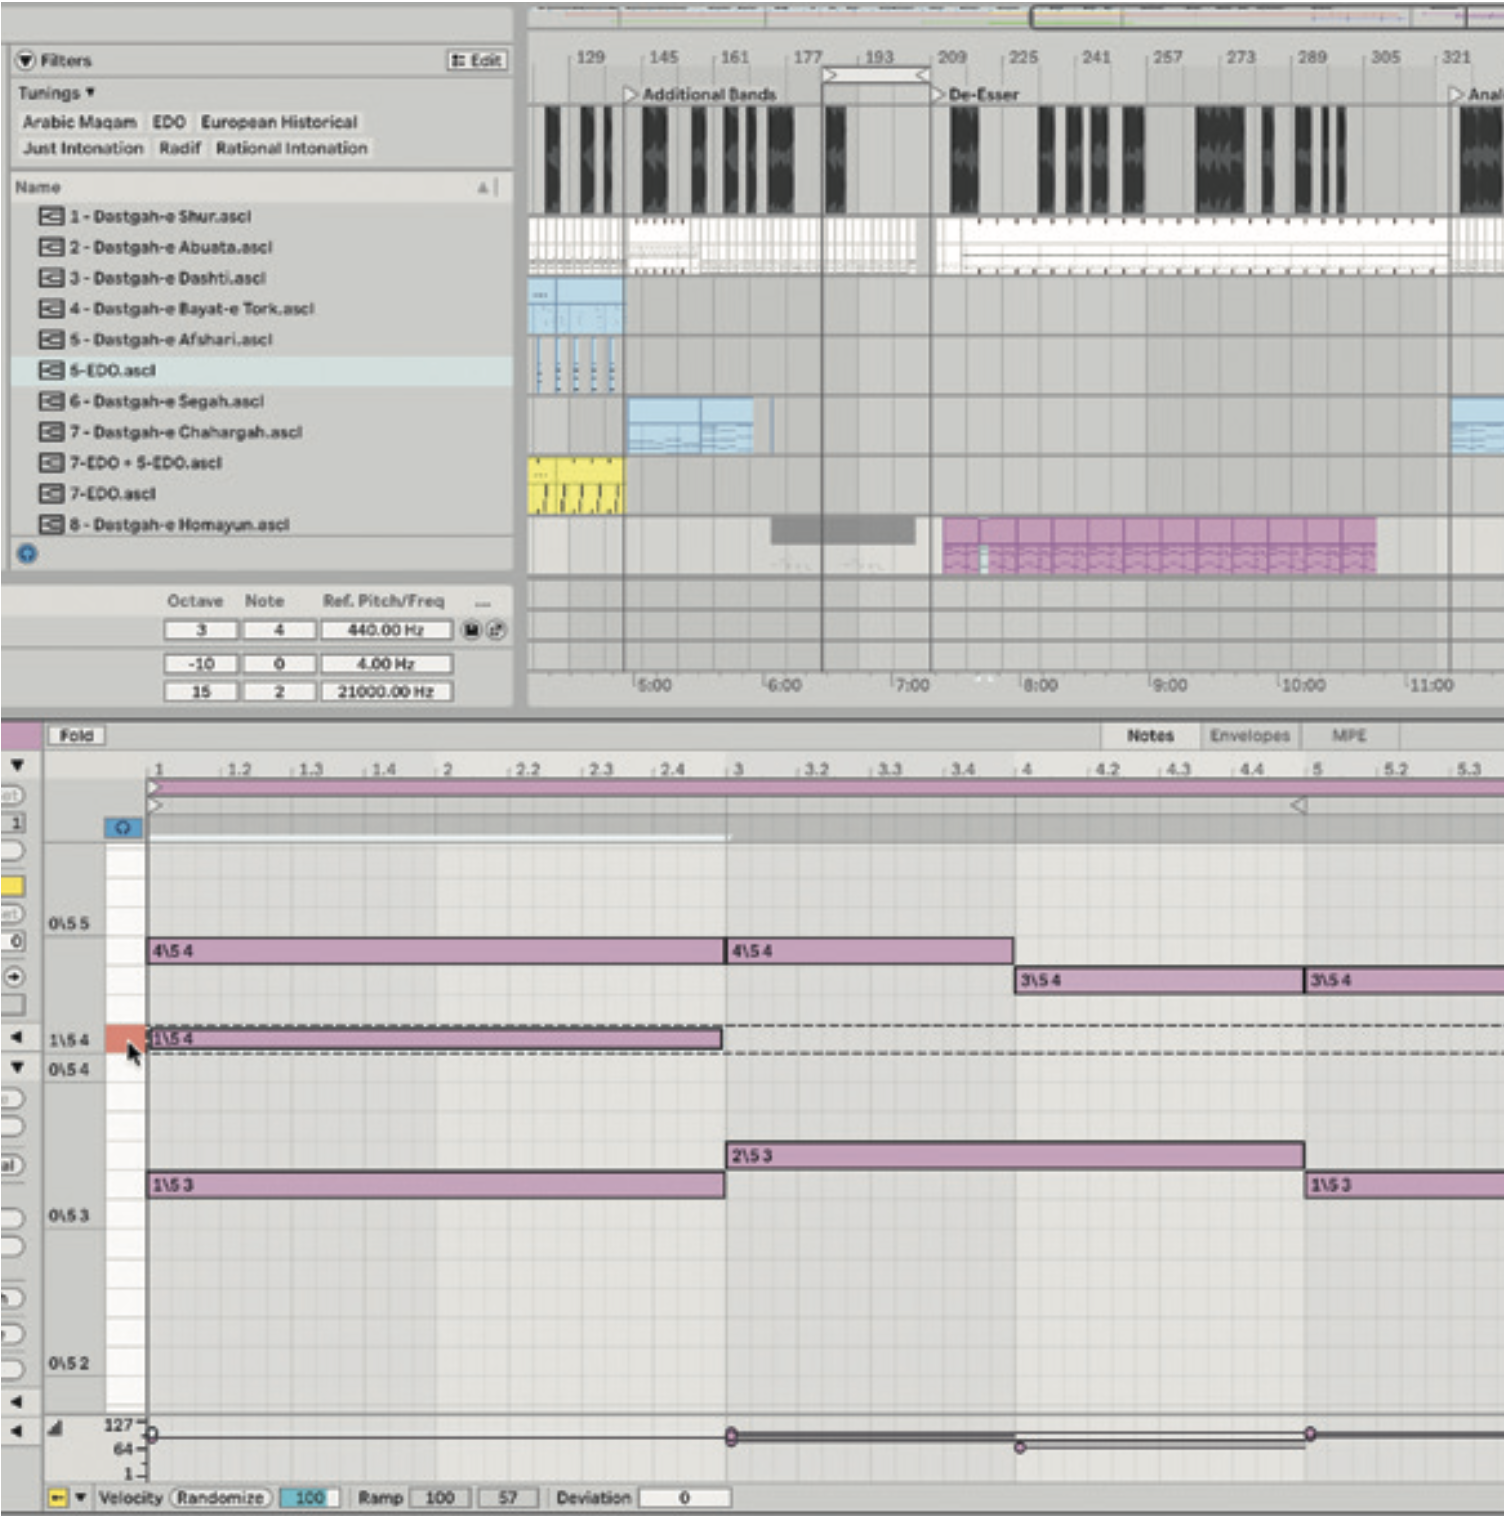
Inversely, with 7-note tunings (and fewer), your piano roll starts to remove notes, as practically anything you play in these will be an acceptable scale. Live can even name the MIDI notes on the sequencer to guide you with the tuning.
What are musical tunings?
Not to be confused with scales, the musical tuning you’re working in will literally define what the frequency of every note is. If that sounds a bit unusual, it’s because almost every piece of Western music is tuned in 12-tone equal temperament. This tuning is one where all 12 notes are equally spaced, and it’s the only one many of us will have ever heard.

How to create microtonal music using Ableton Live's Microtuner
With different tunings, the 12 notes are in sort of the same places, but some are slightly sharper or flatter. This means that different scales in an unequal tuning may sound slightly different, which Western ears won’t be used to. A different tuning may not even call for 12 notes to an octave, with options like 19-tone and 53-note equal temperament being possible too. It’s a rabbit hole that few musicians ever go down, but if it’s one you feel interested in, your first internet searches should be for ‘Xenharmonic’ and ‘Just Intonation’.
4. Logic Pro 11’s new Internal MIDI Routing
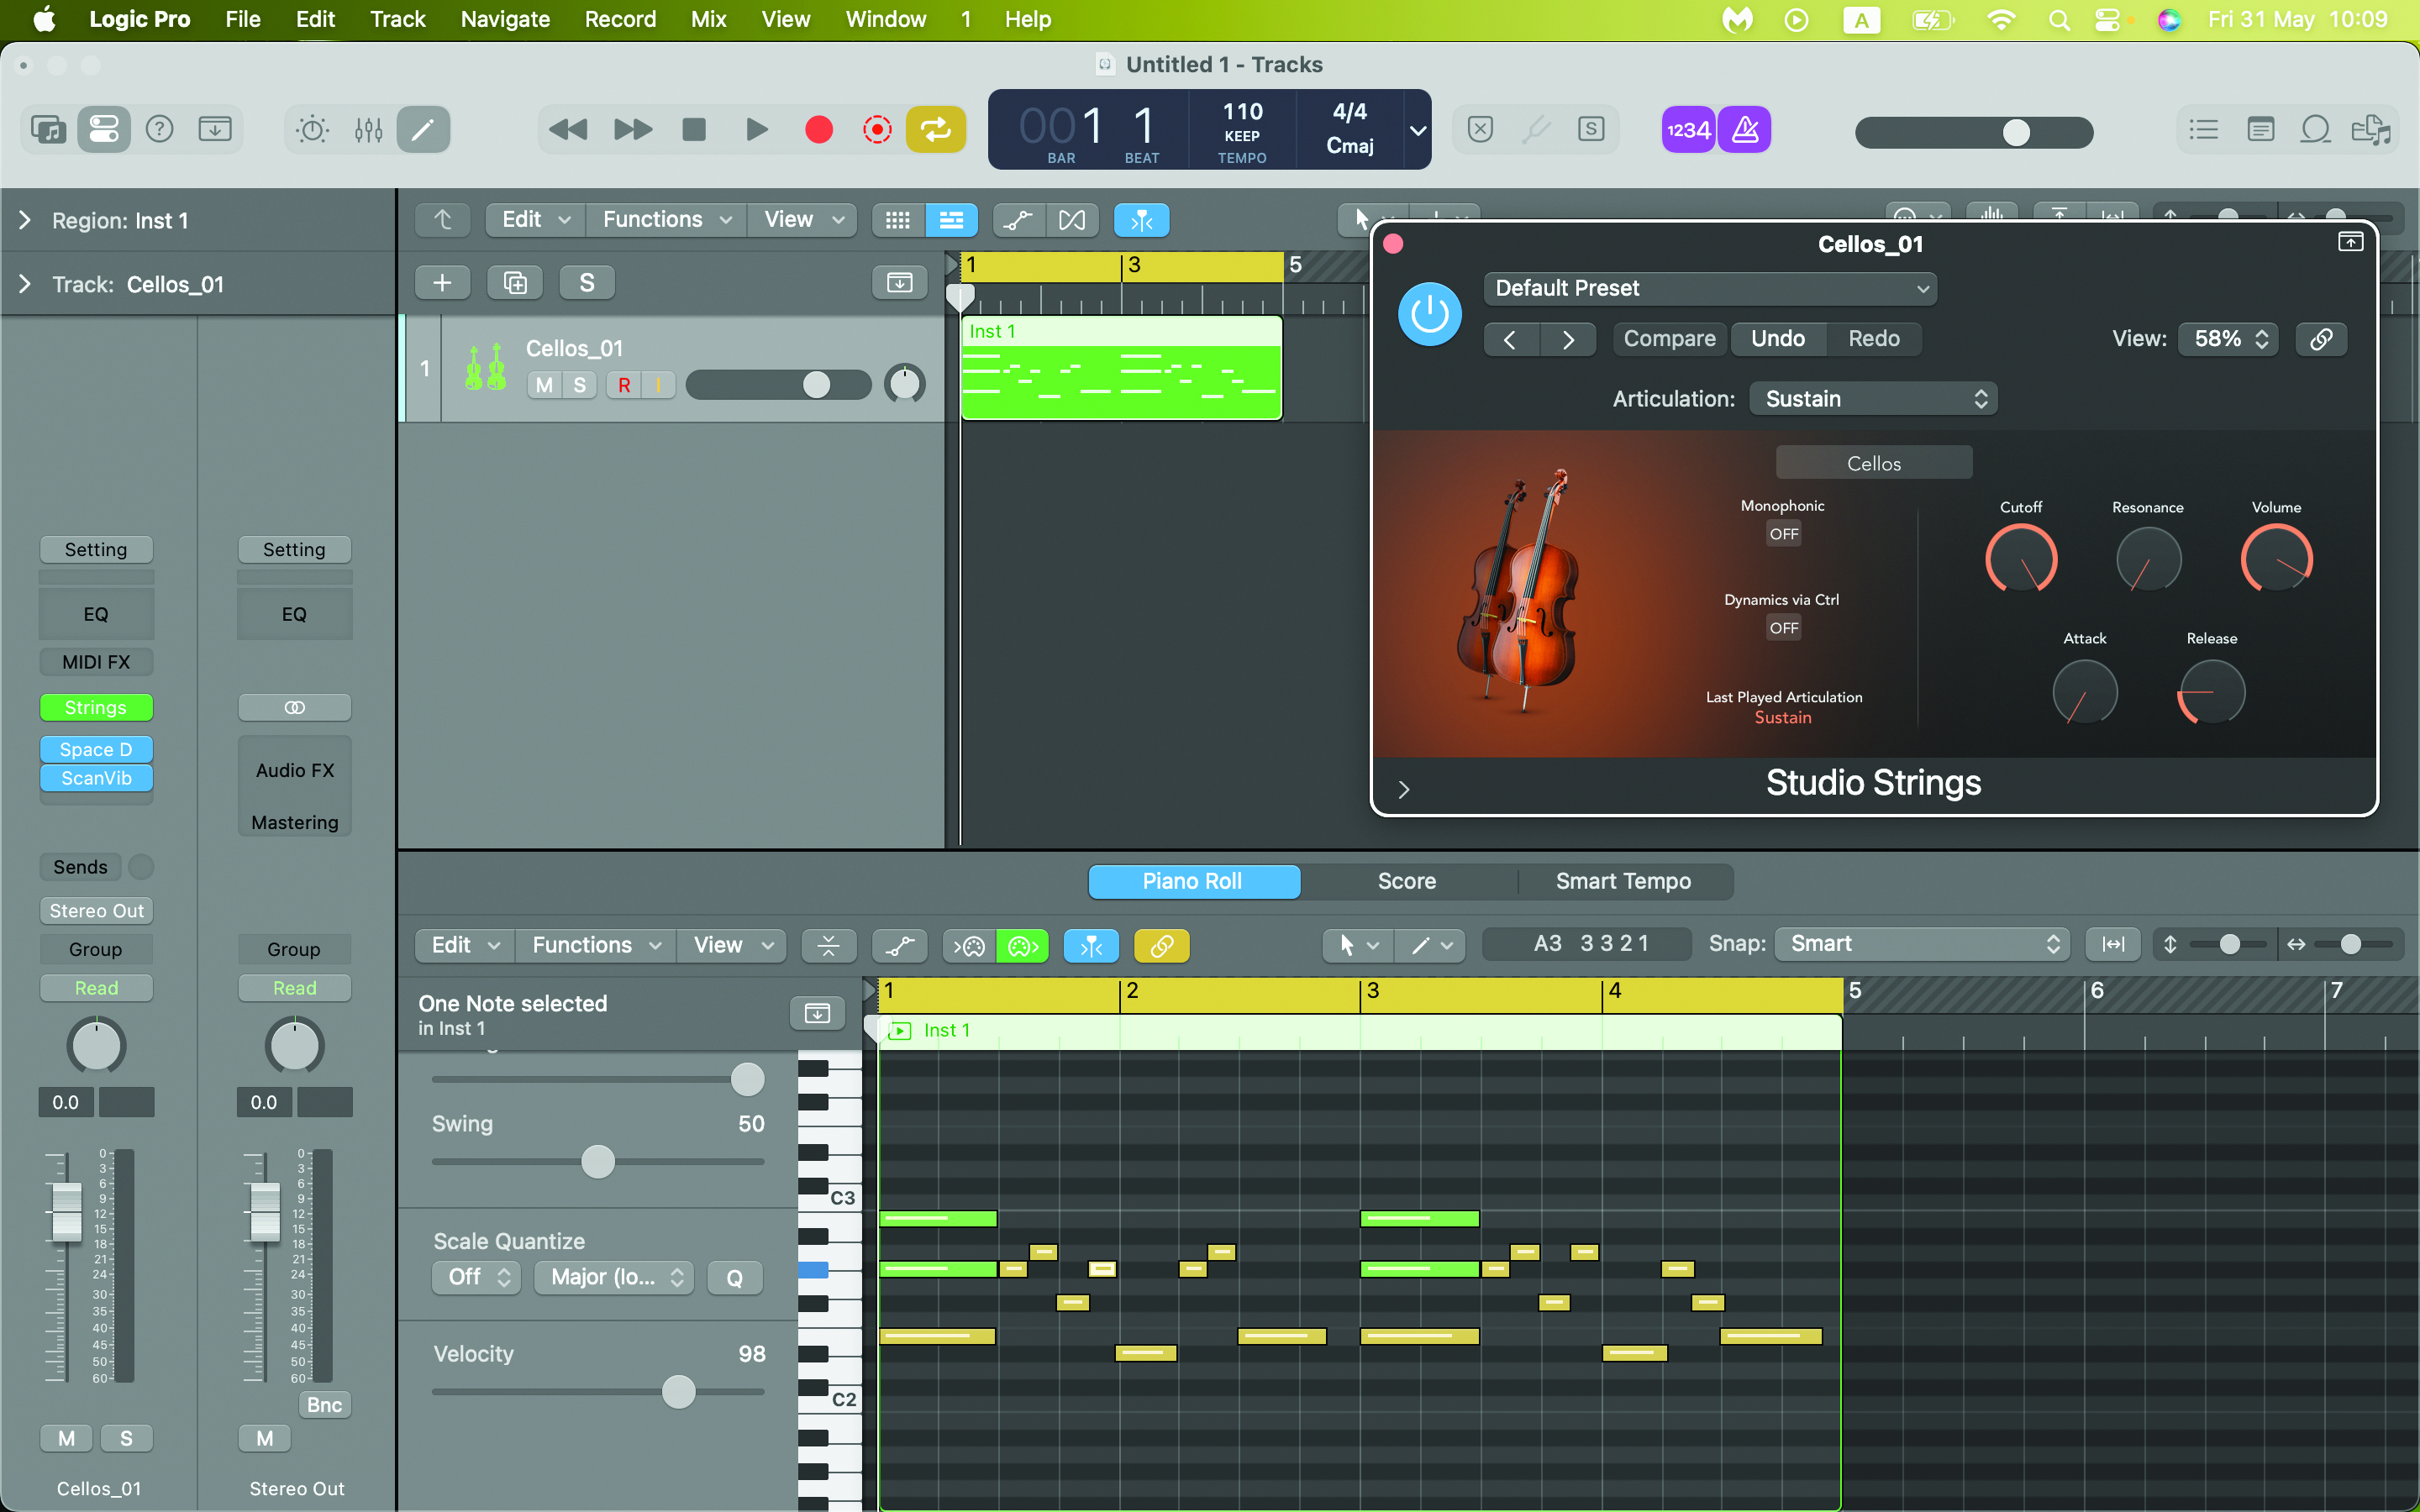
It’s an exciting time to be a Logic User. The Mac-exclusive DAW received a huge update in May 2024, changing it from Logic Pro X to Logic Pro 11. Along with many improvements and added features, Logic has received some fresh MIDI functions.
MIDI Routing gives you the capability to control as many instrument tracks as you like with a single MIDI region. Say you’ve recorded MIDI data to an Instrument Track. You can now open up a separate Instrument Track, load up a fresh software instrument, route the Internal MIDI In to the output of the first track, and it will play the same data. This is great for swiftly creating harmony between tracks.
You can use this to record the pre-existing data to the new track as well, and build from there. In previous versions of Logic, you’d achieve a similar result through a more lengthy process, by creating a track stack. MIDI Routing is a more effective tool for building complementary melodies.
The most interesting thing about this new function is that the new track will also print any MIDI FX data from the first track onto the new track when recording.
MIDI FX are different from VST/AU/AAX effects as they use MIDI information to modulate the sound. Therefore when you print the data onto a new track, all the modulation will be embedded into the new sequence for further customisation.
Logic Pro 11’s MIDI Routing features
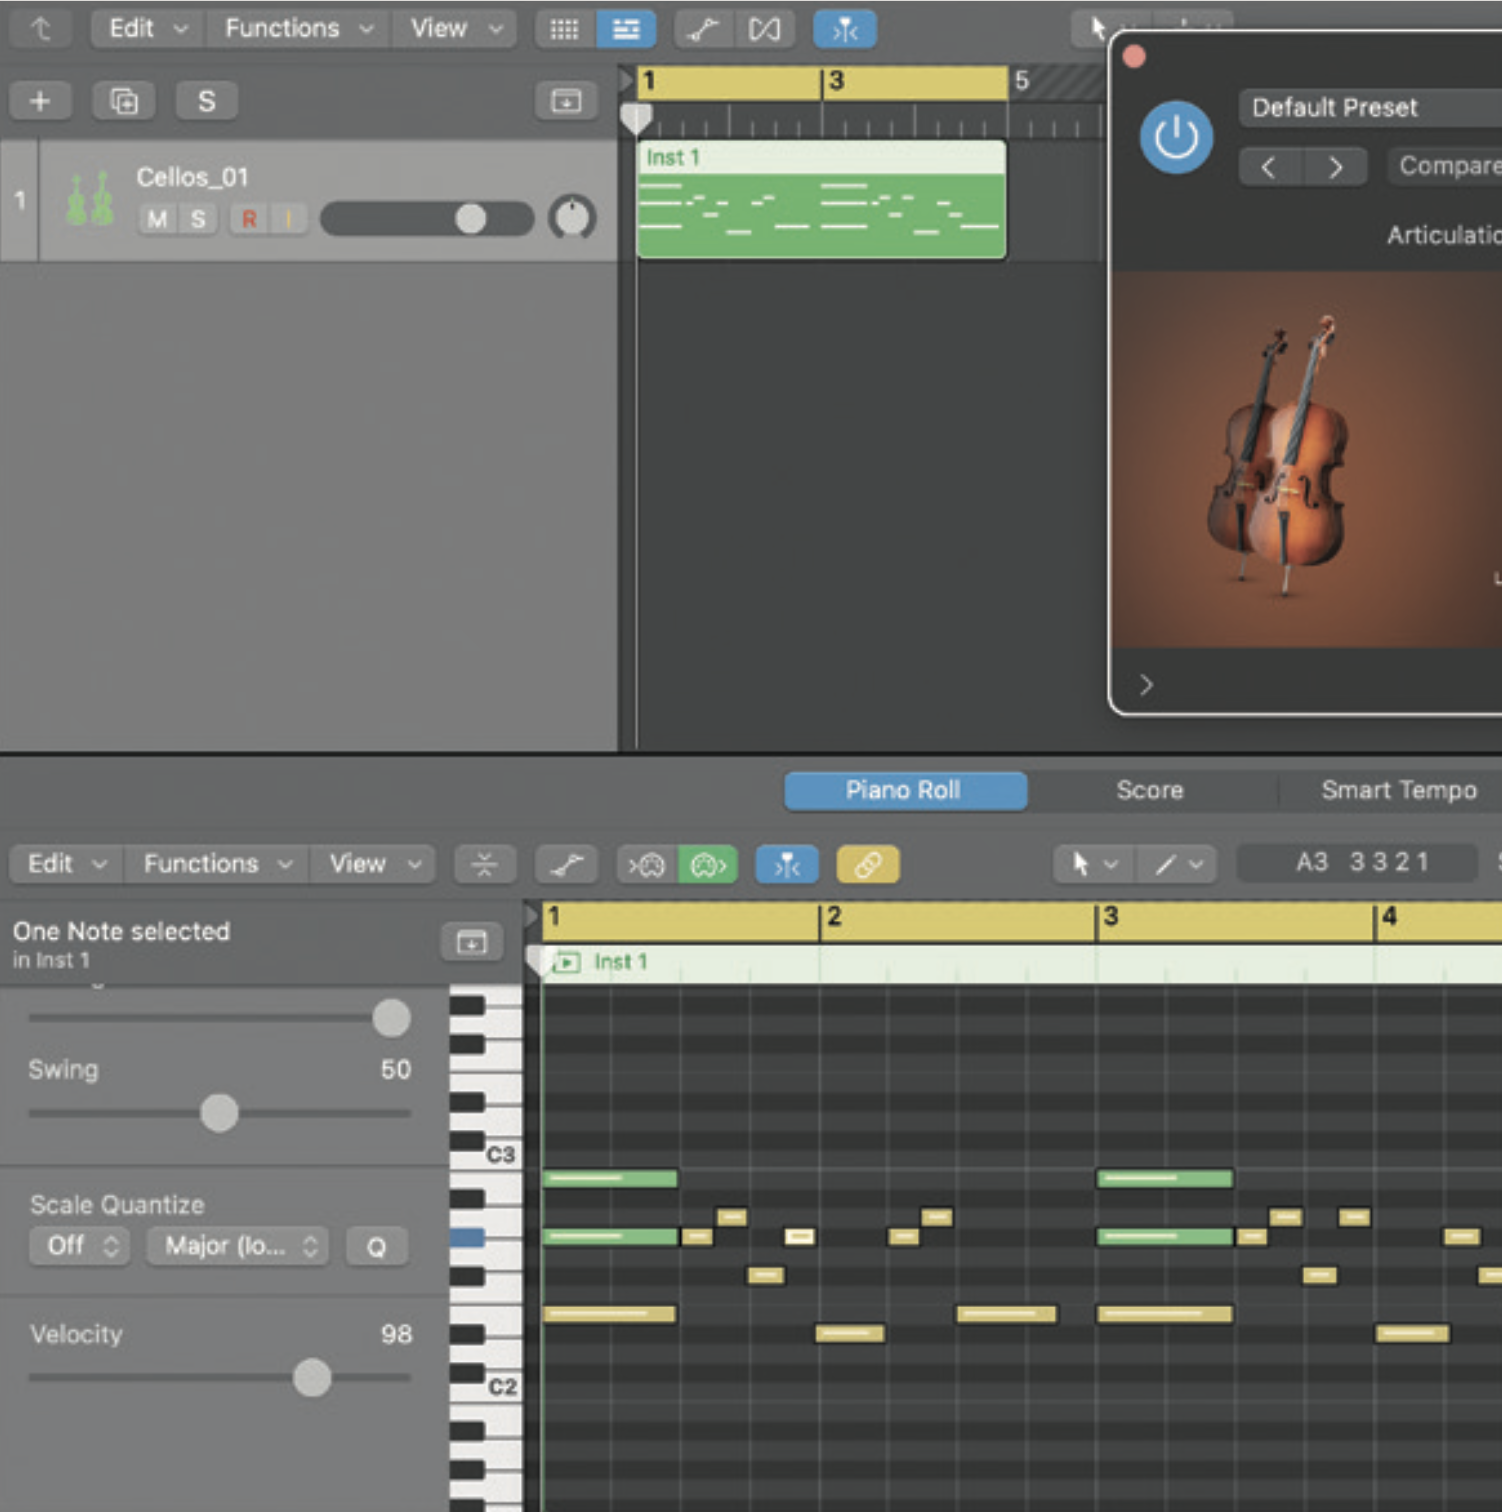
Open a fresh project and load up any software instrument you wish. Then, enter a melody or chord progression onto the piano roll. Remember, we can use this melody/chord progression to build from in the next steps.
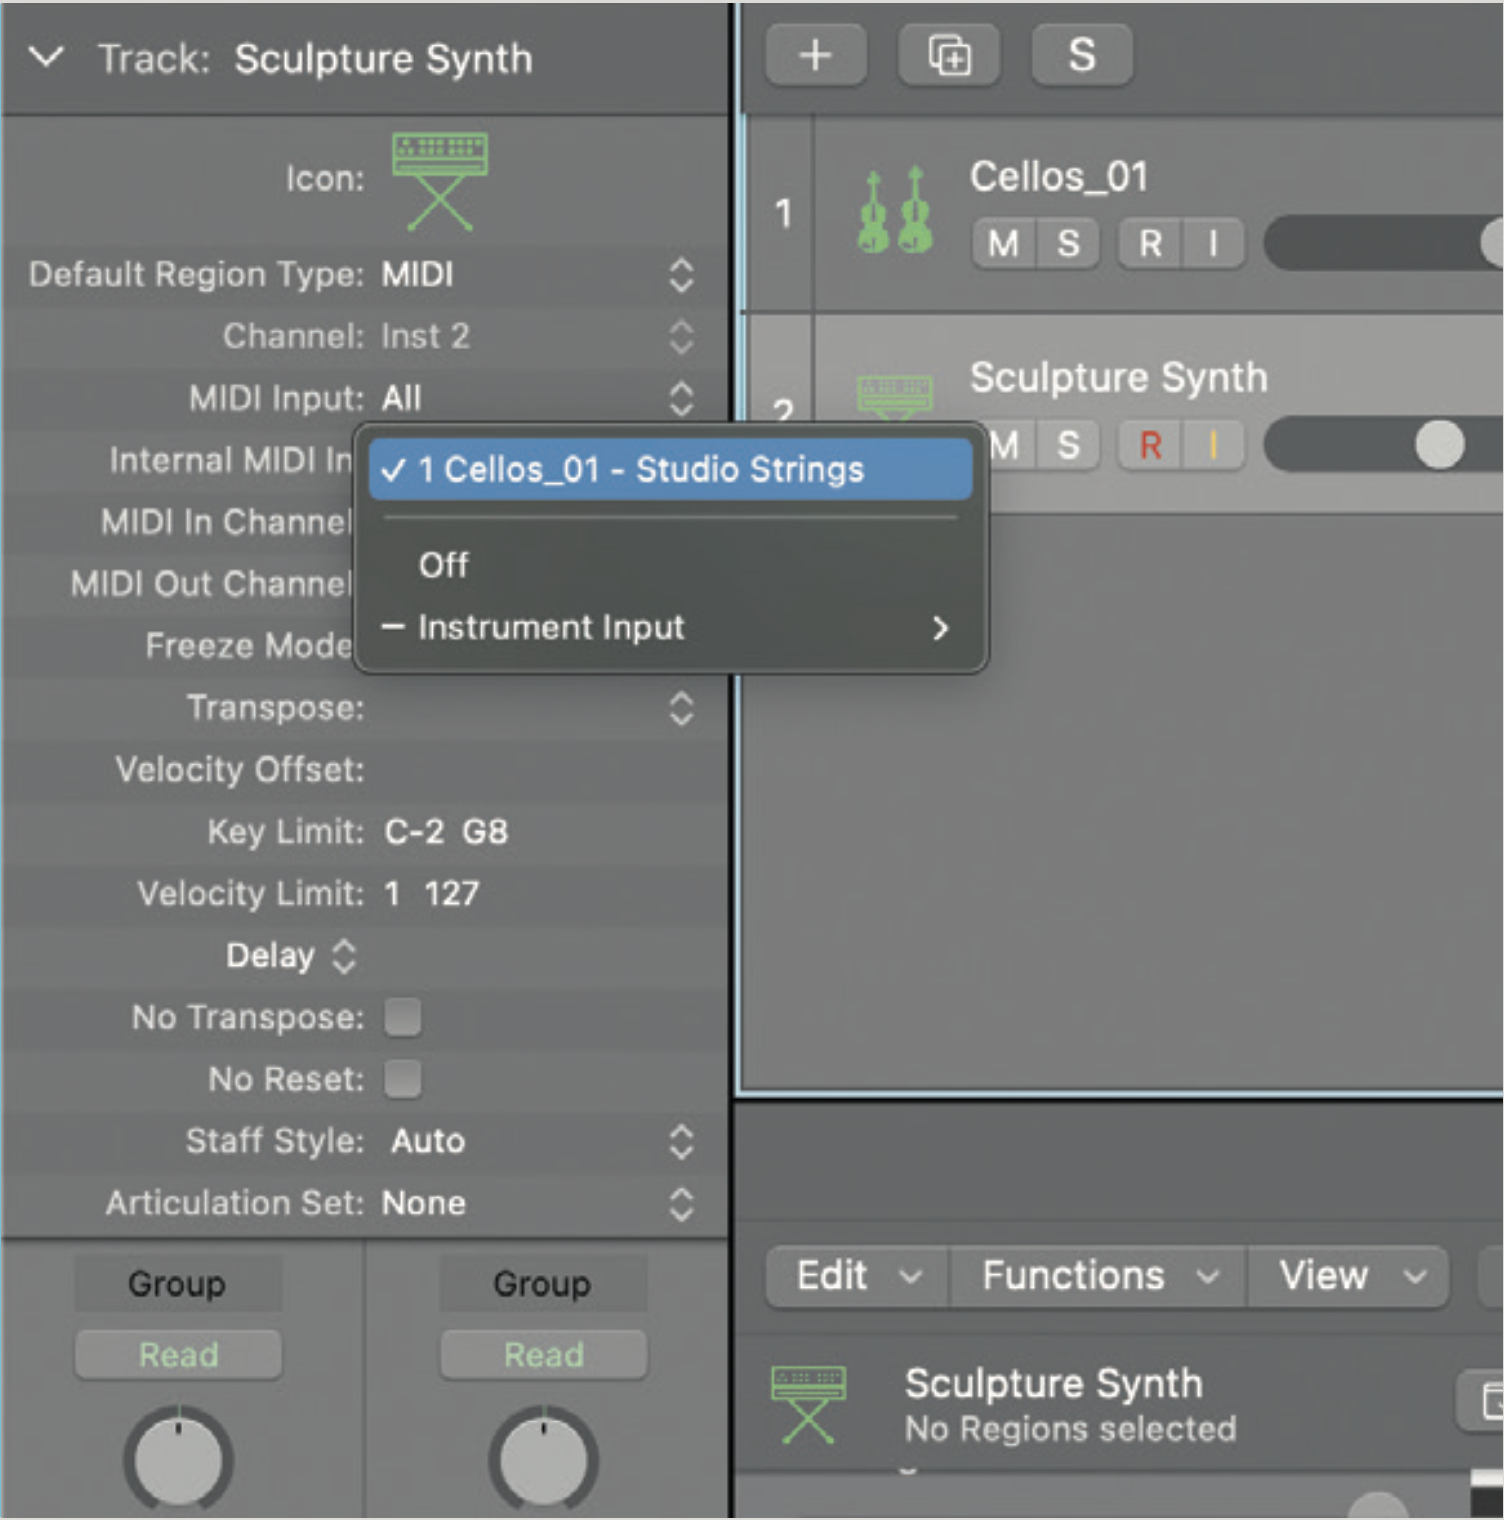
Next, open a new Instrument Track with another software instrument of your choice. On the track’s drop-down menu you’ll see the new MIDI Routing settings. Click the Internal MIDI In field and select your first track from the drop-down list.
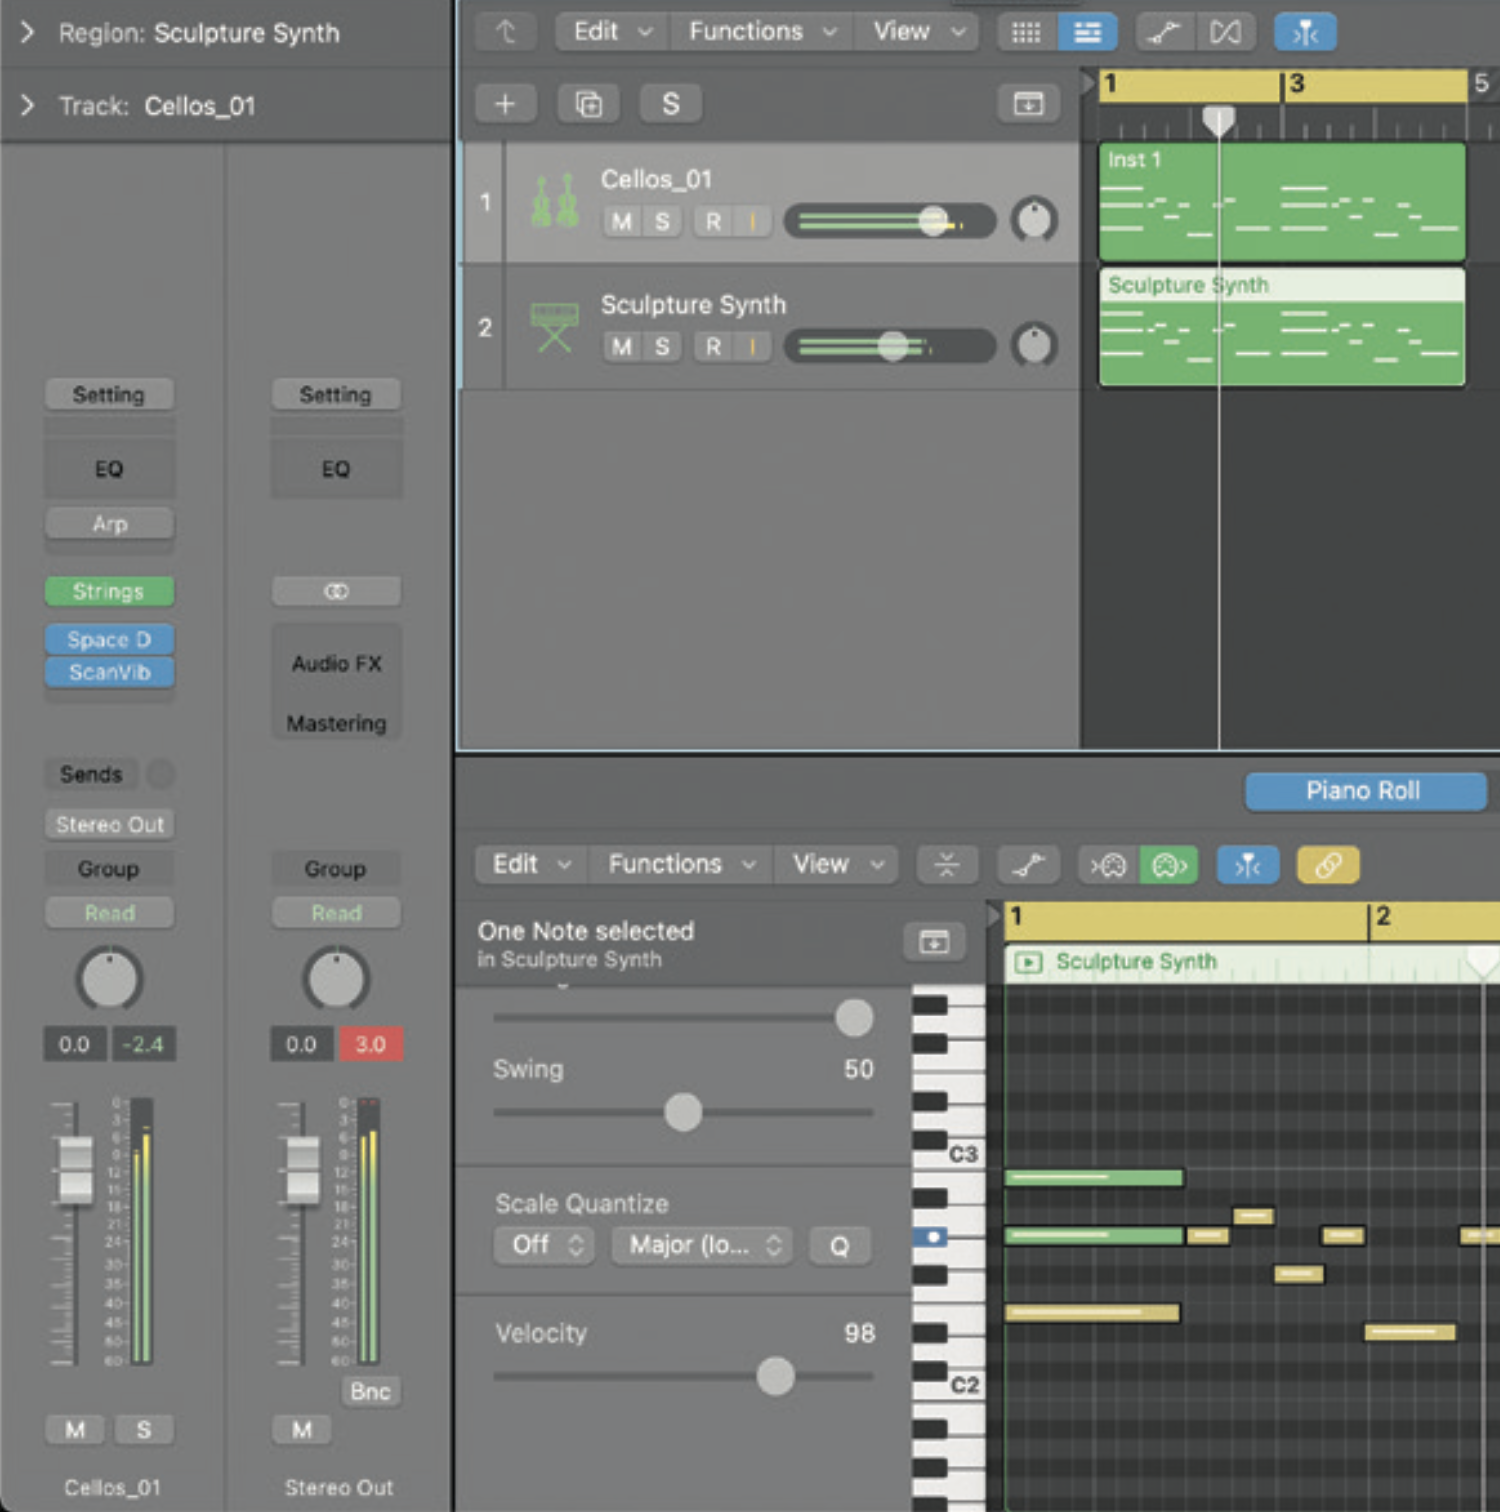
Pressing play, you’ll hear the MIDI data from your first track’s melody/chord progression on the new track too. You can mute Track 1 and hear the sequence playing on Track 2 for a clearer preview. Arm and record Track 2.
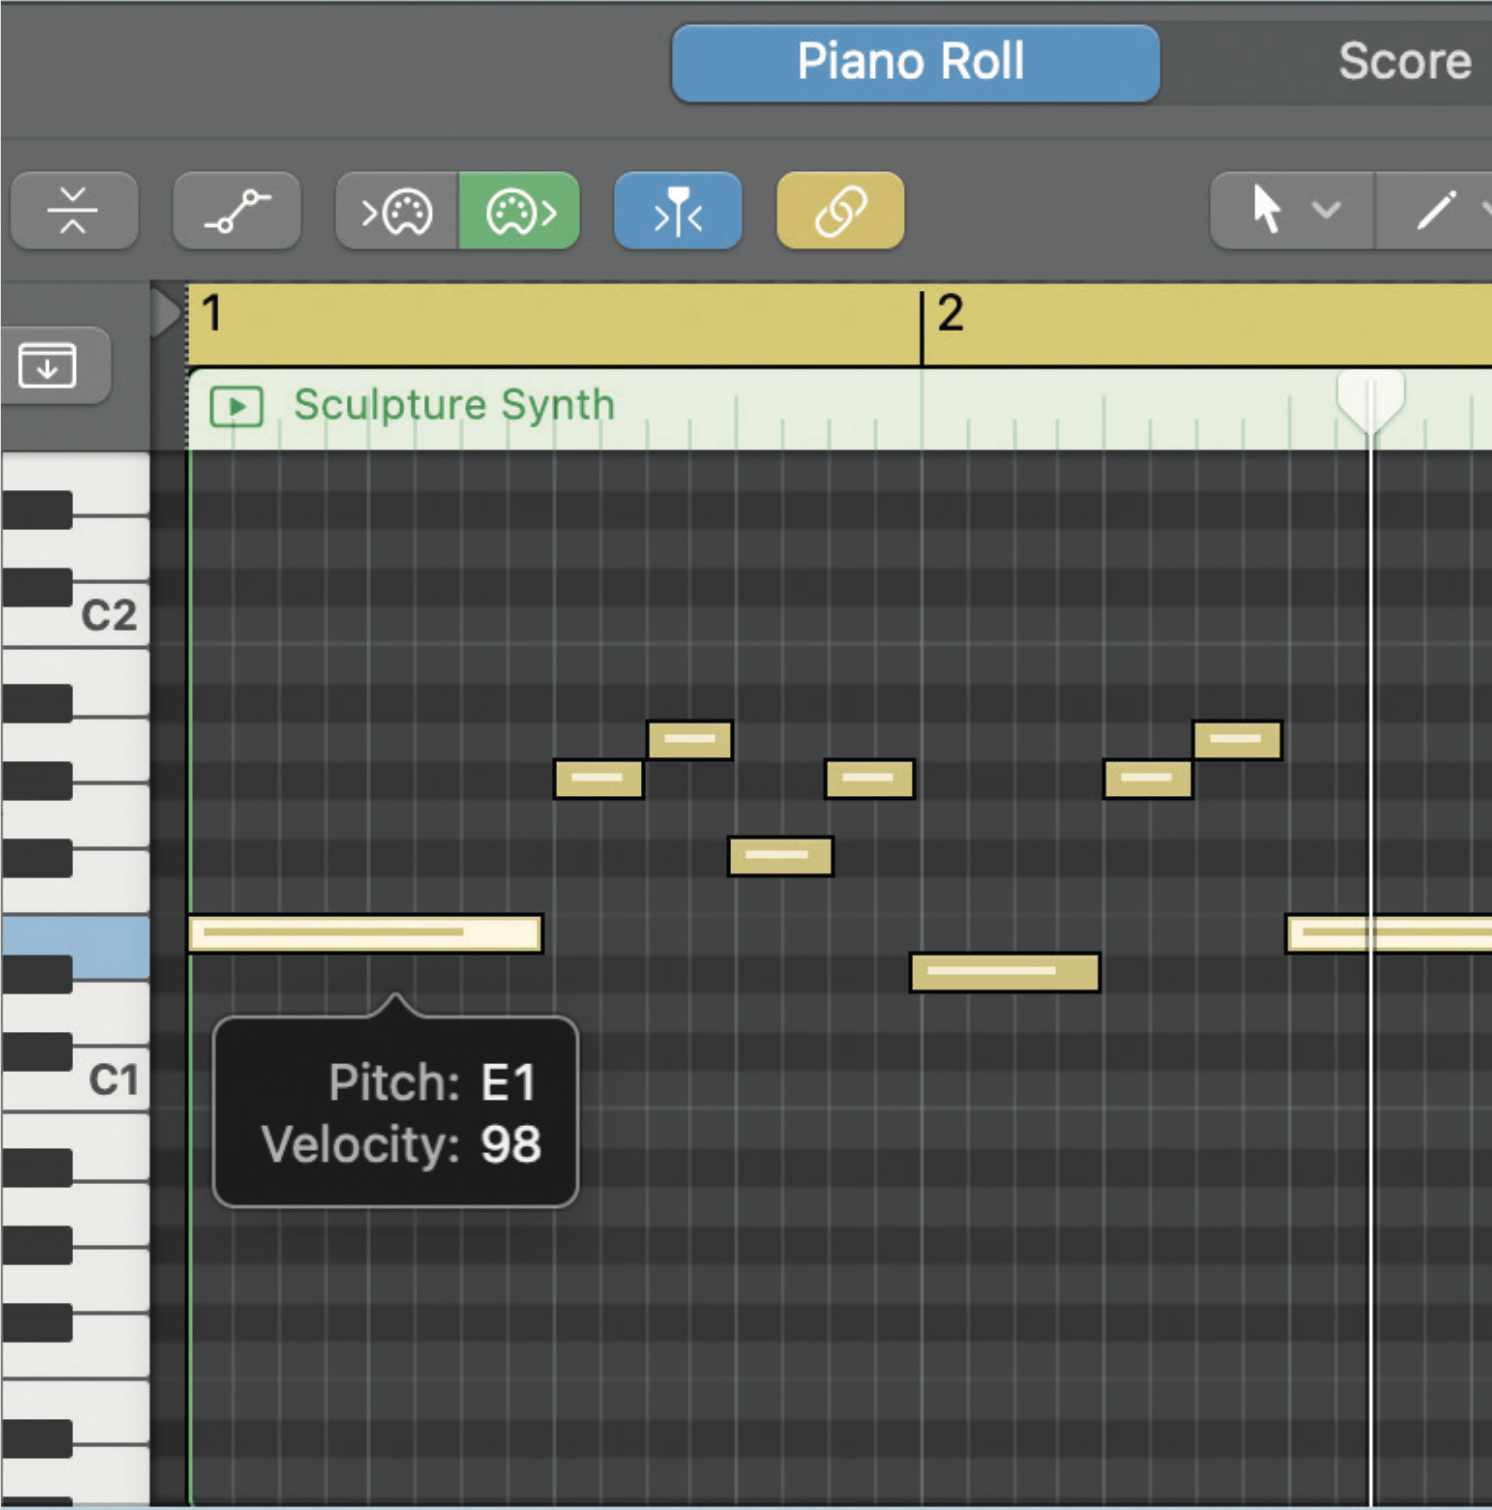
Adjust the new sequence and build from there if you like, or keep it the same to serve as an extra harmonic layer. You could even pitch it up or down an octave. The choice is yours, but with this new feature, all of these options are available.
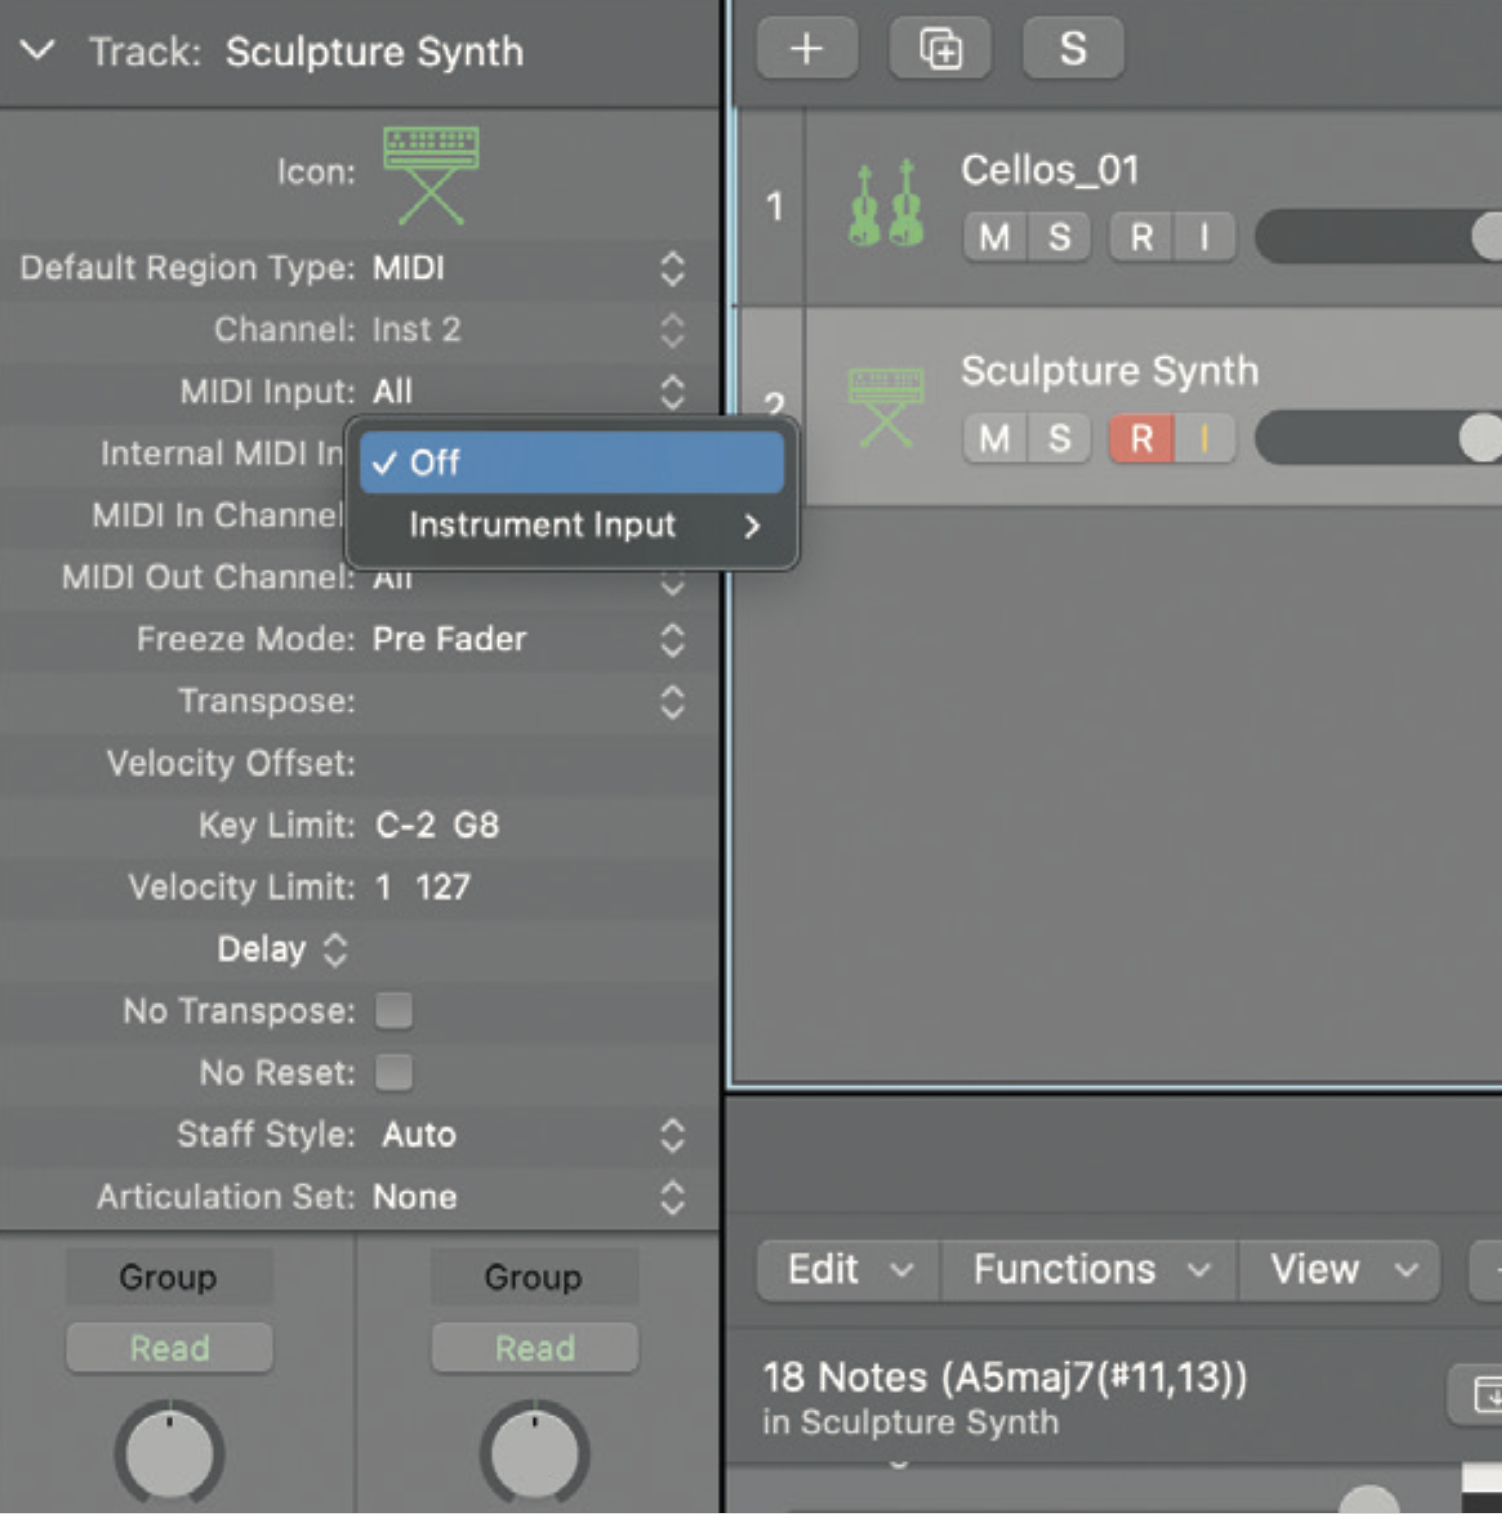
To avoid confusion, reset the Internal MIDI In on your second track back to Off once recording is done. Otherwise, you’ll be hearing the MIDI data playing from your newly recorded region, as well as the inputted MIDI signal from Track 1.
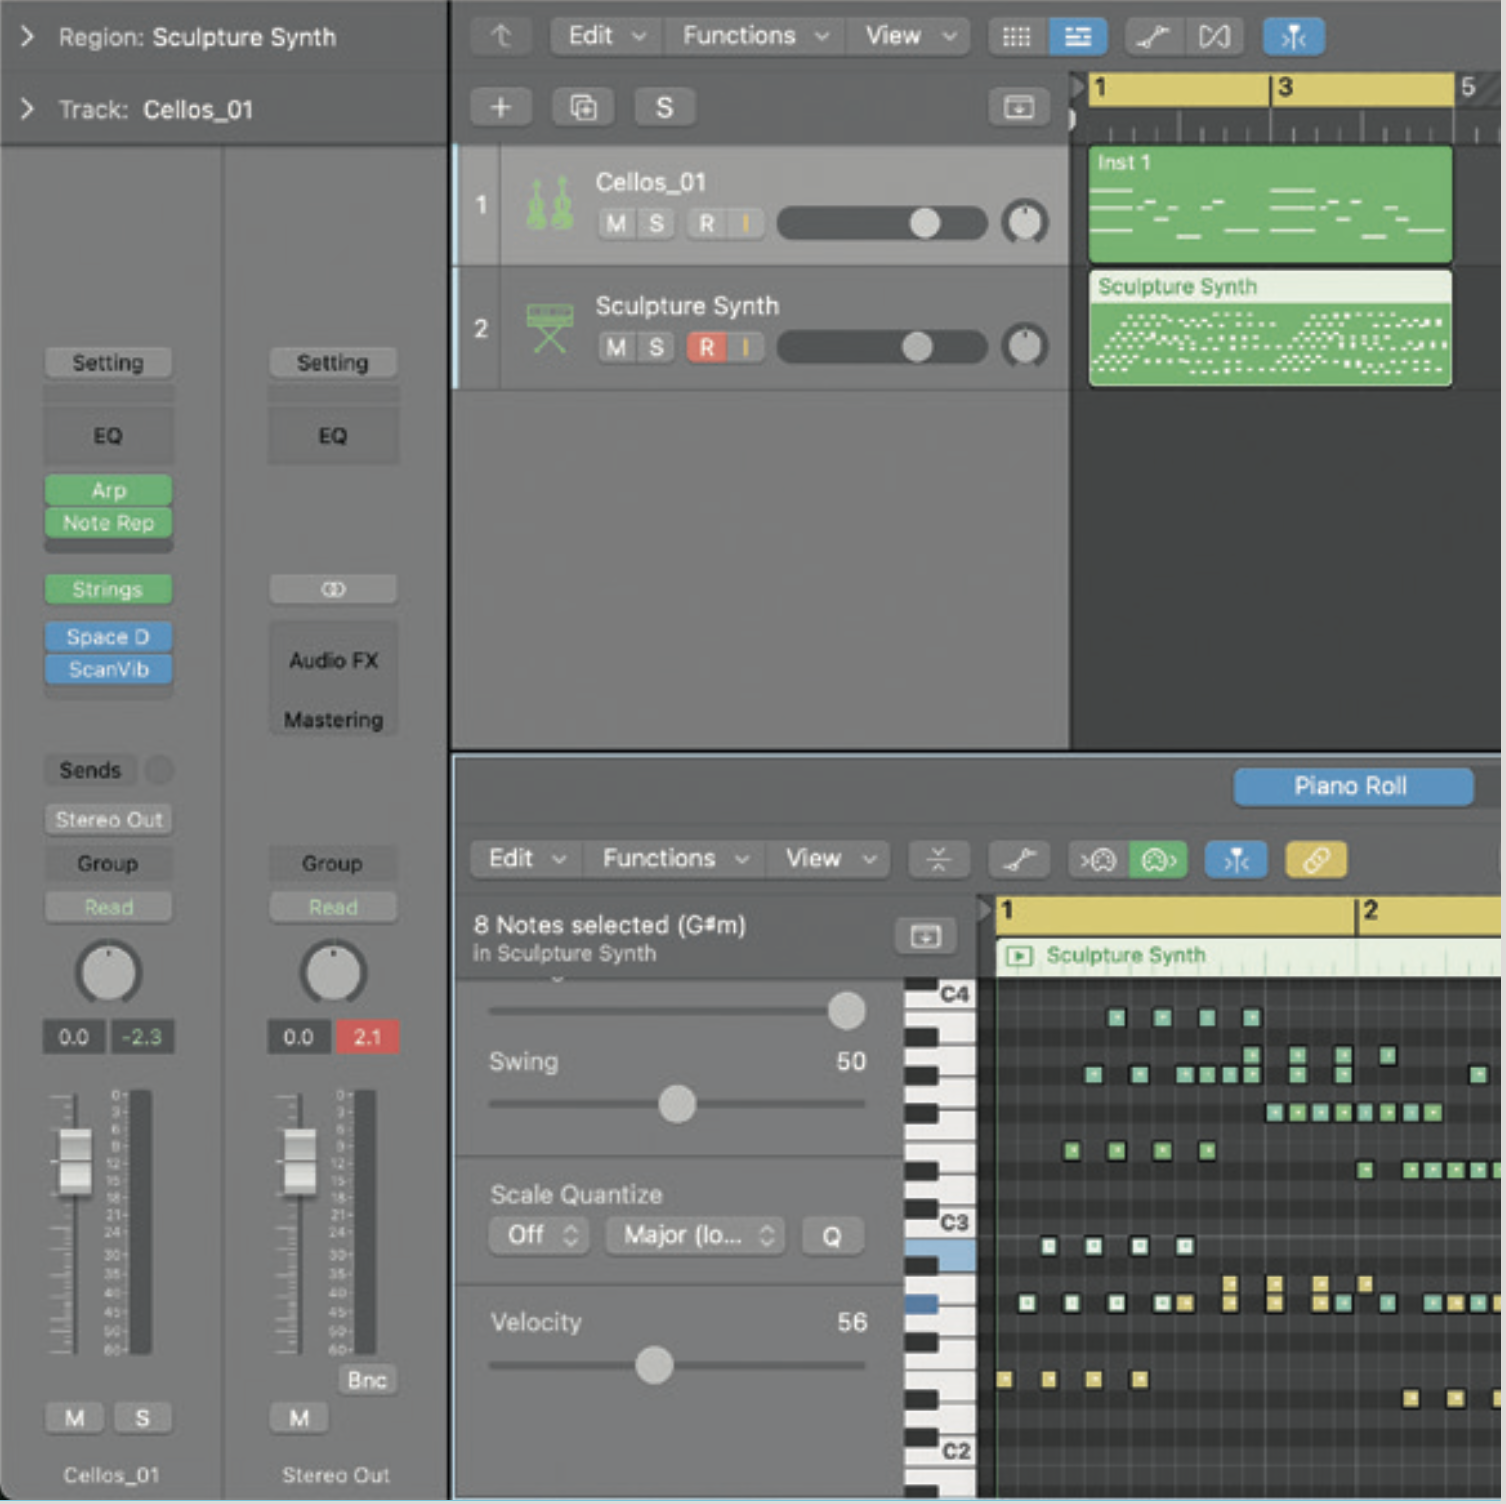
What if you want to print MIDI FX onto your new region? Go back to step 1, but this time load some MIDI FX onto your track. Now, when you get to Step 4, you’ll see the effects from Track 1 will also be recorded.
5. FL Studio 21’s upgraded piano roll
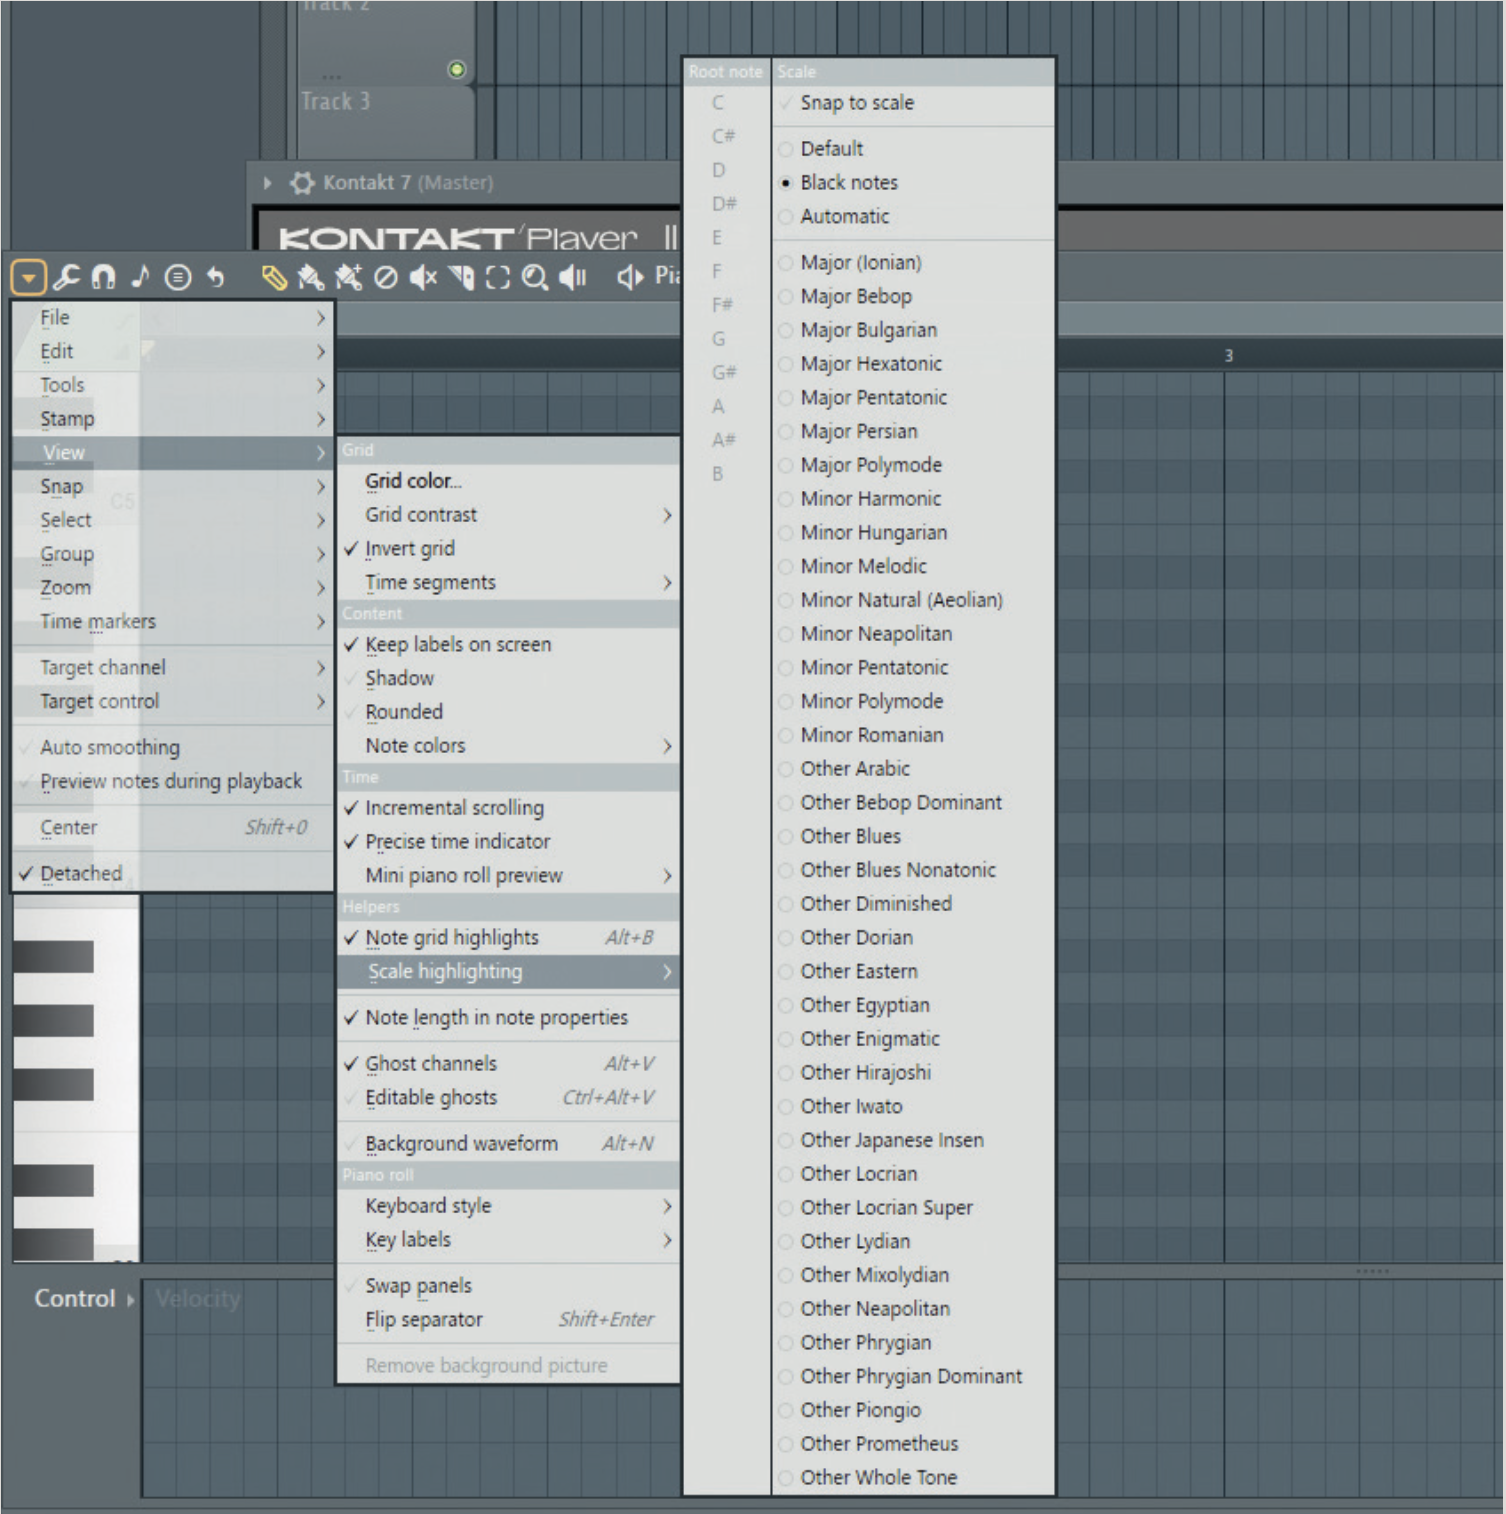
FL Studio’s piano roll has had Scale Highlighting for some time now, but its latest update offers advanced features. Notes can be snapped to a specified scale, there are scale modulation markers. Open the Piano roll and click the dropdown menu in the top left, then View >> Scale highlighting.
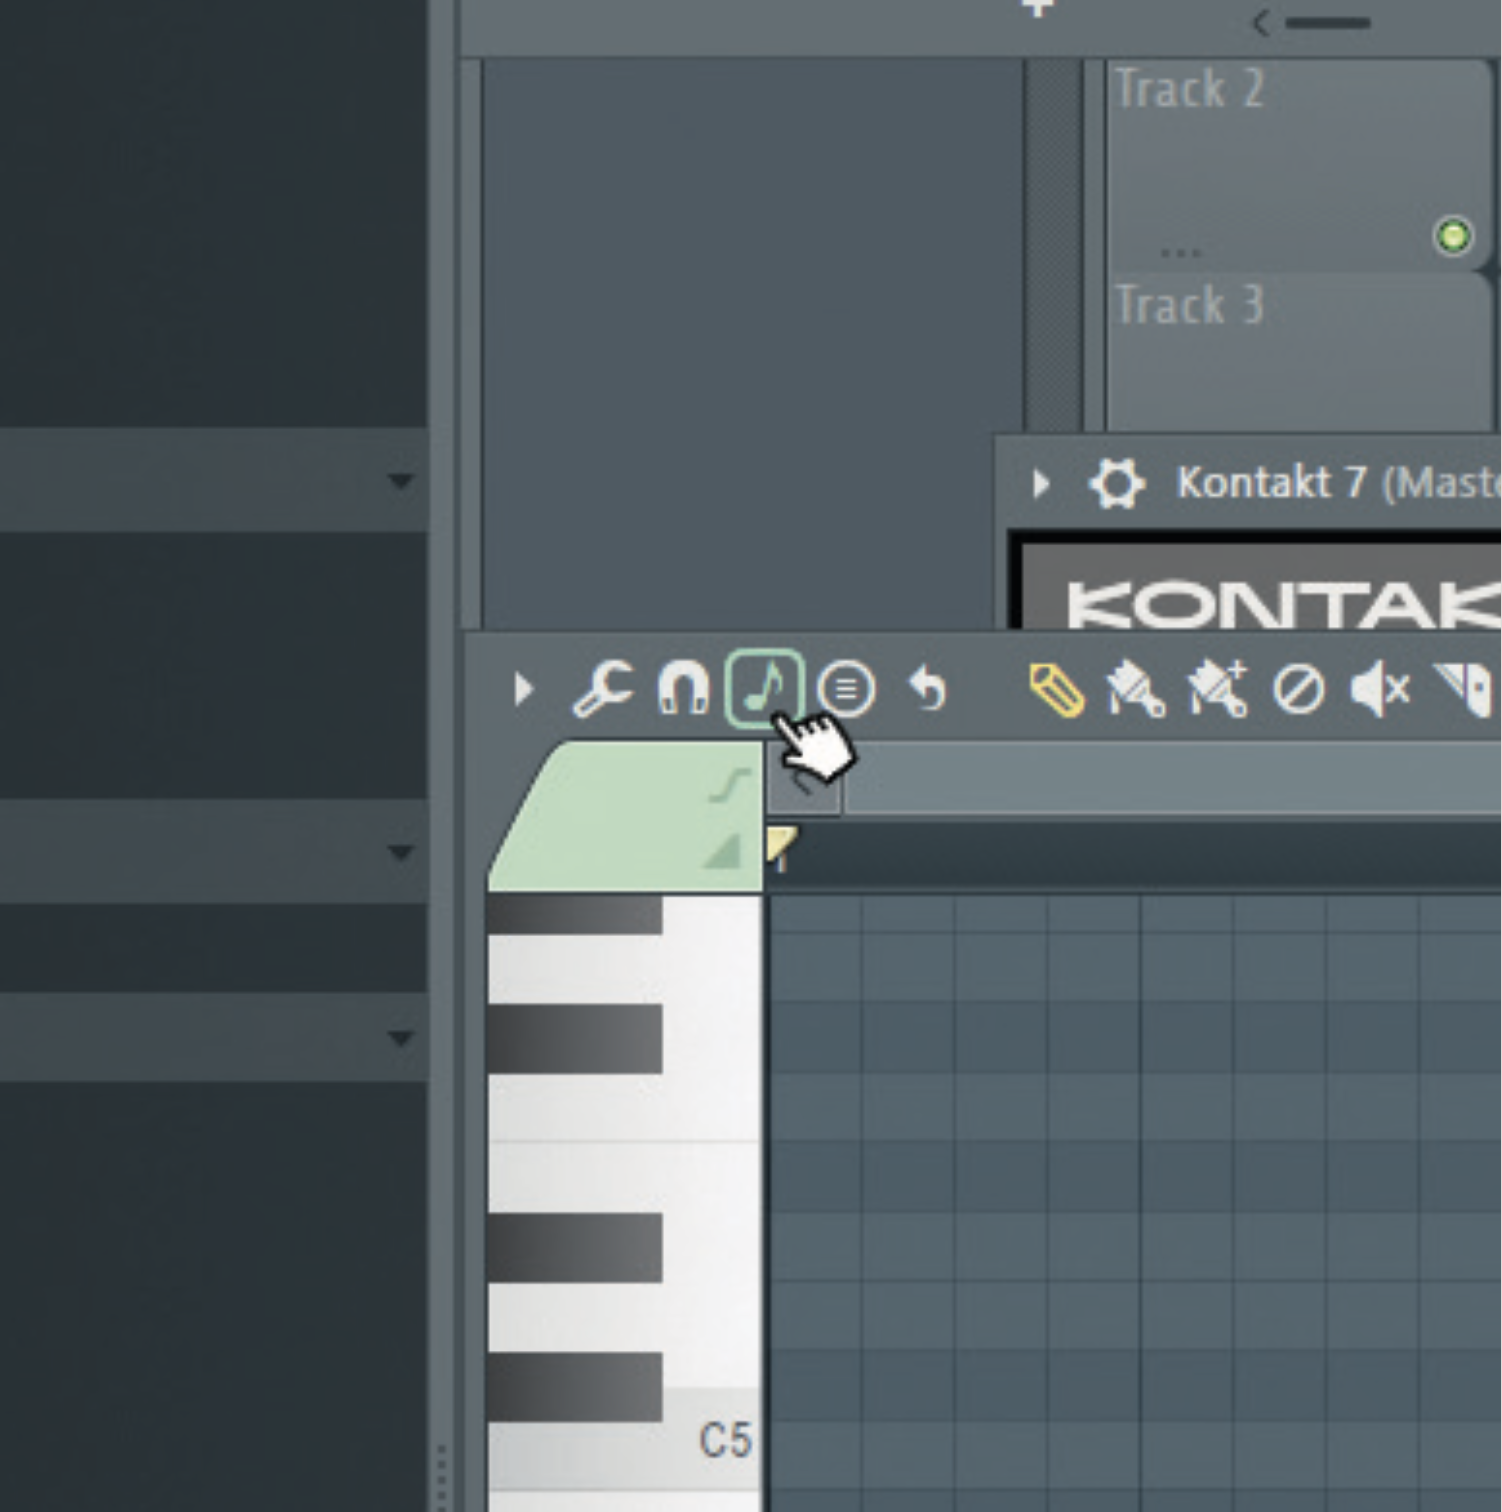
From this menu, set your desired scale type from the list. Let’s go with Minor Natural (Aeolian). You’ll also want to enable the newly added Snap to Scale function by clicking on it from the same menu or clicking the Snap to Scale button (symbolised with a musical quaver icon) in the Piano Roll toolbar.
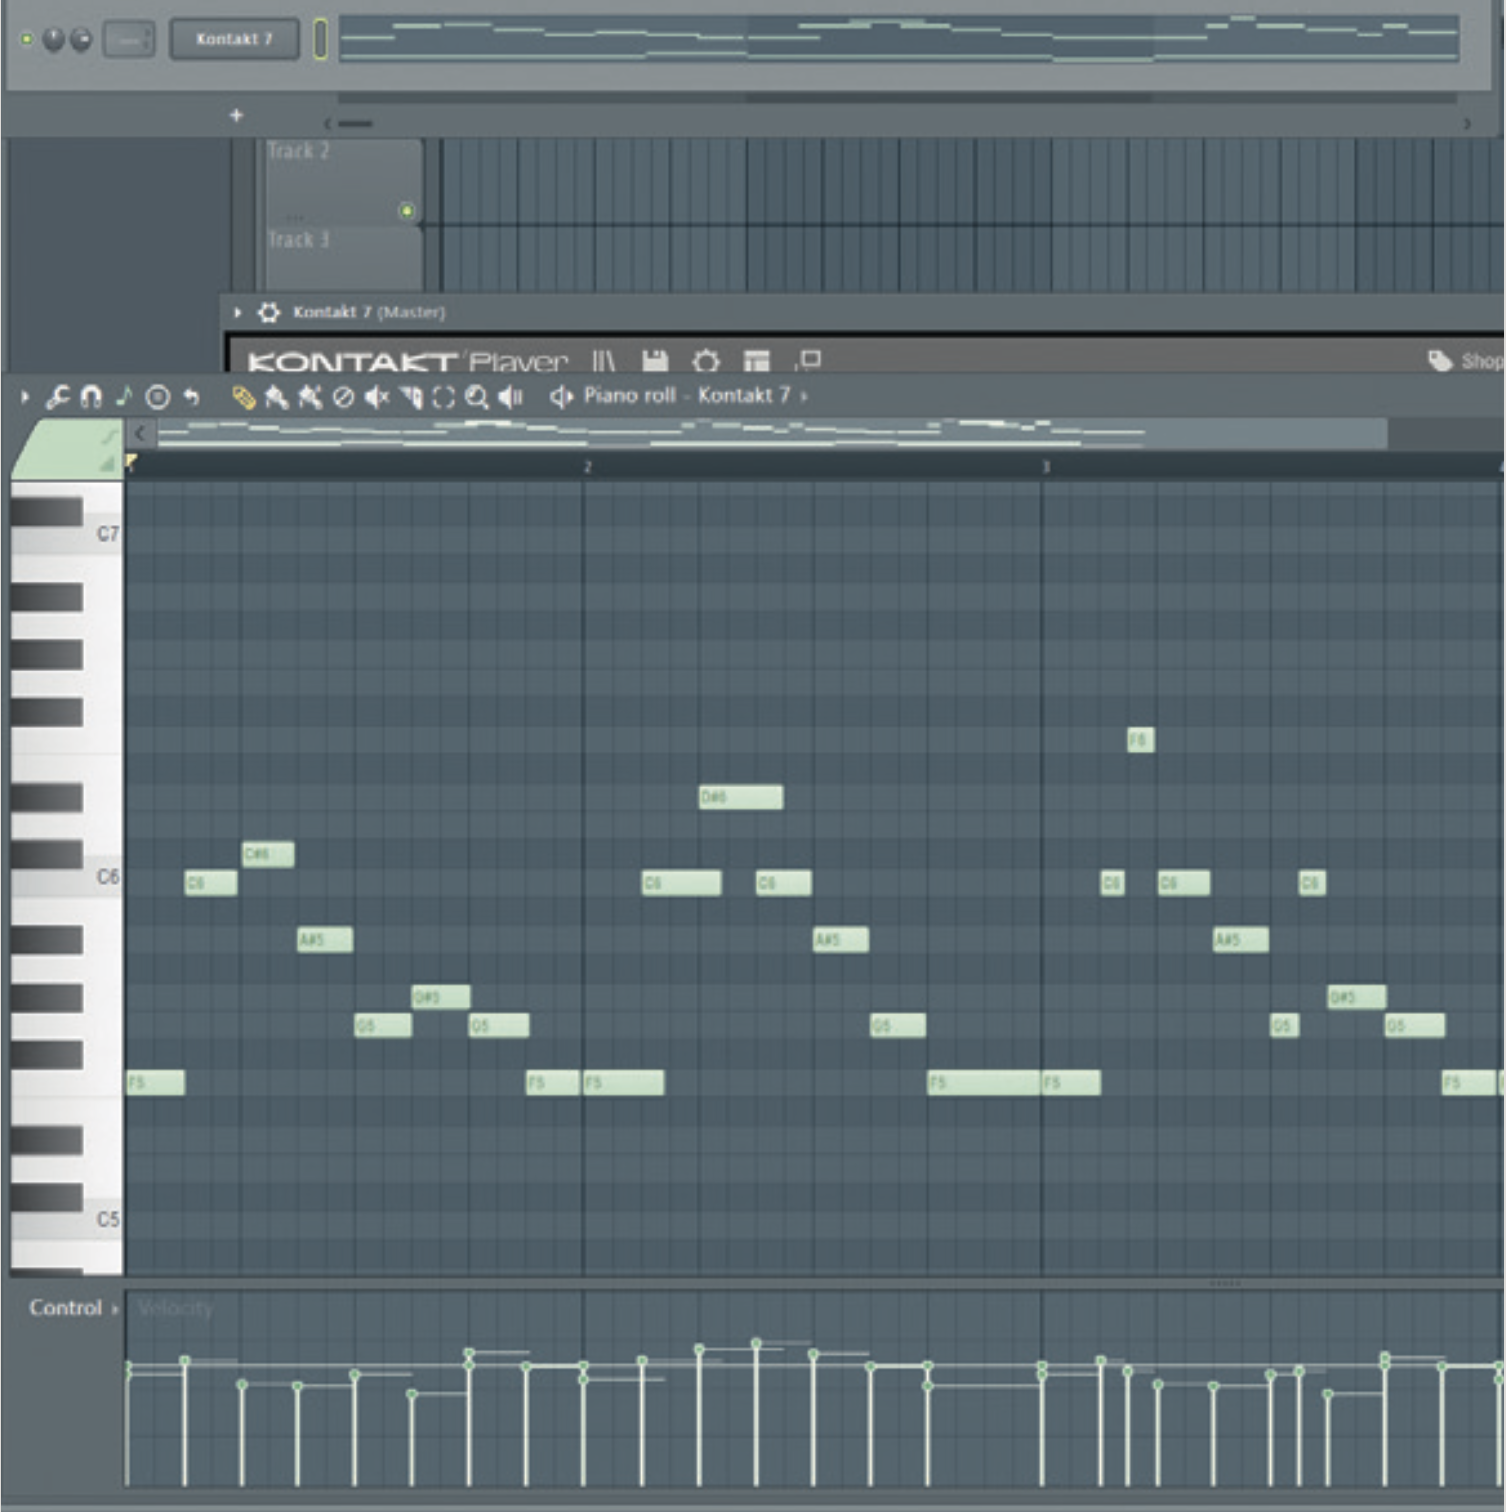
Now when you add notes, they’ll automatically snap to the specified scale. Your root note will be set by the first note you place or by selecting it from the same drop-down menu used in Step 1. Let’s lay down a four-bar melody using F as our root note. Change your project tempo if you wish.
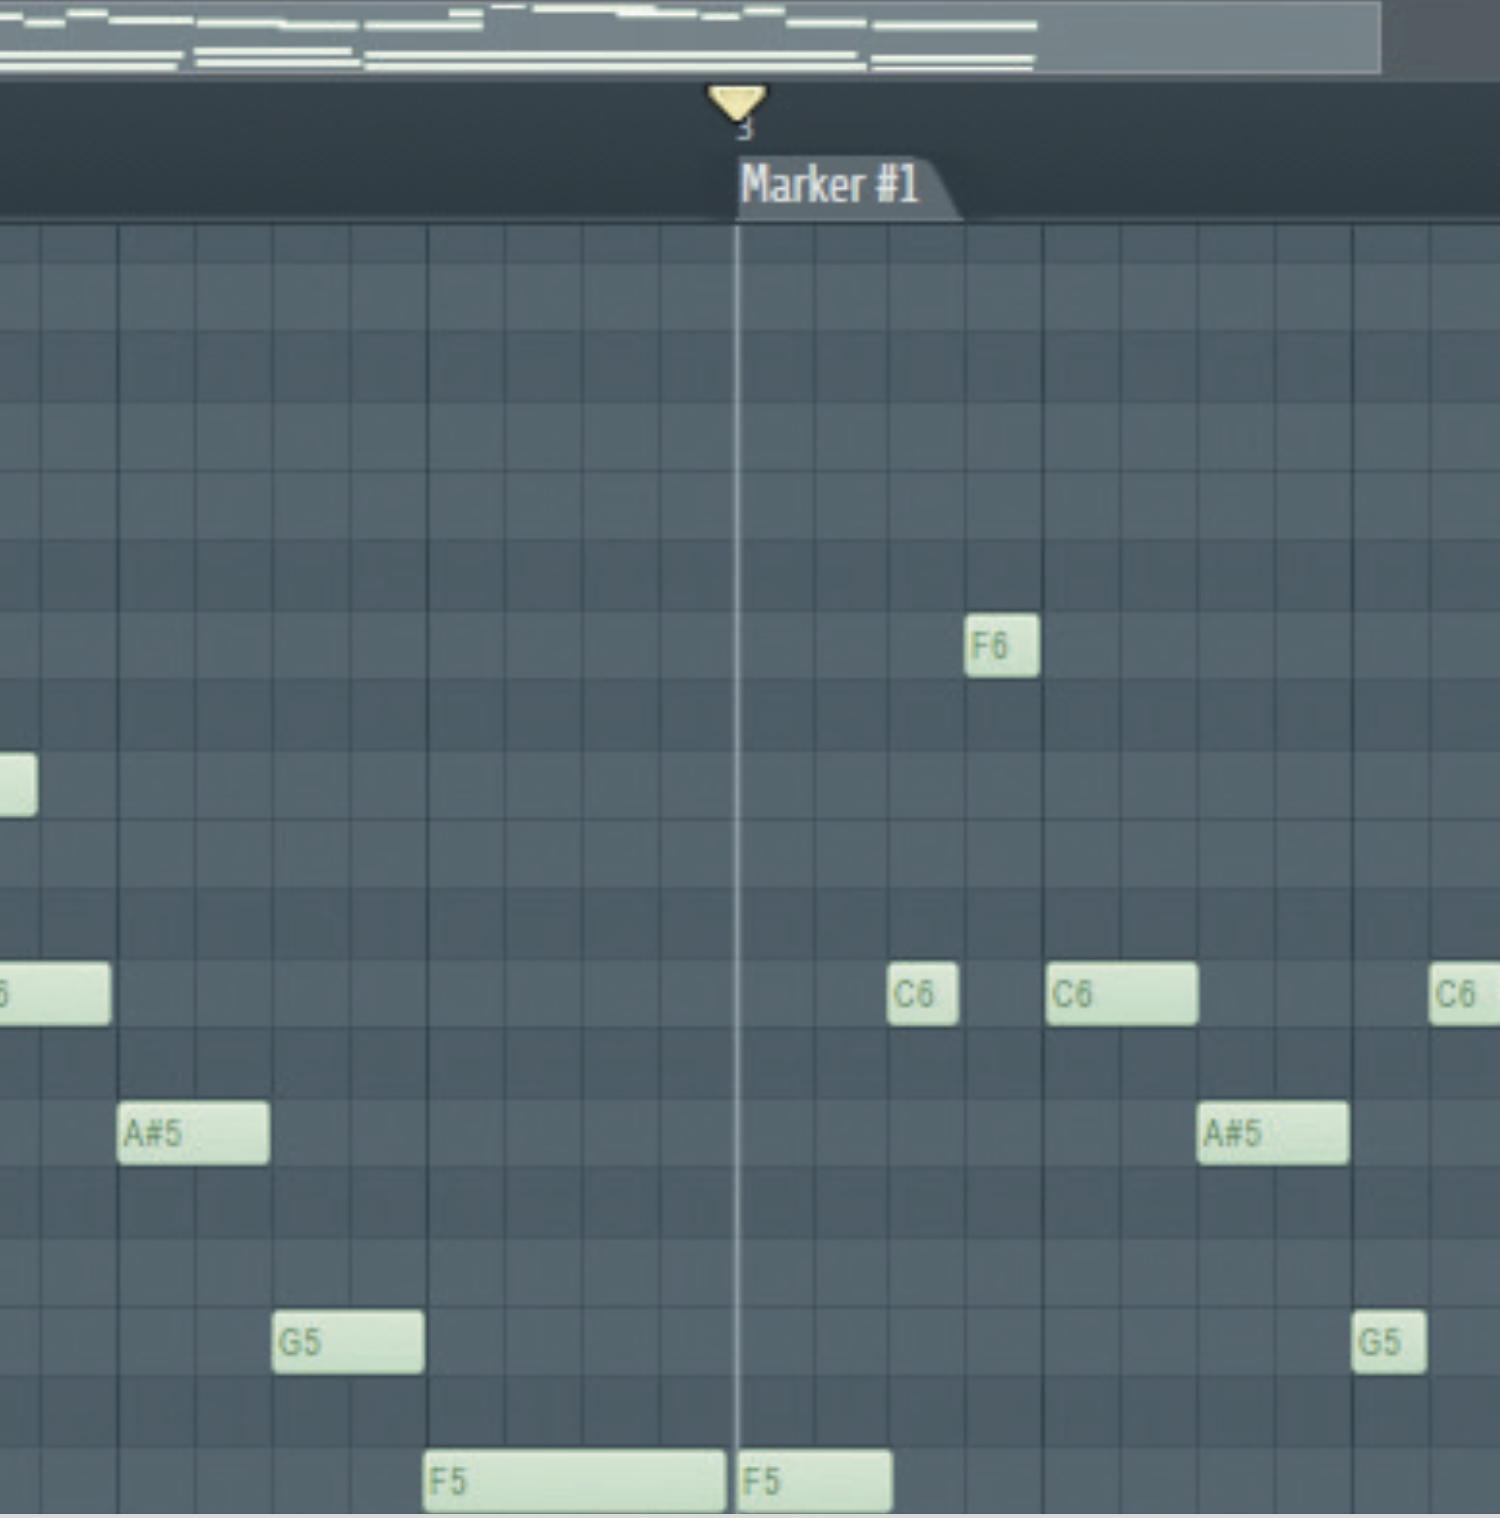
FL Studio 21 doesn’t stop there. We can now add markers to our piano roll and change our key and/or time signature during a loop, for more swift, complex composing. Add a marker by placing your Playhead at the desired point and clicking Alt+T on your keyboard. Don’t worry about the name.
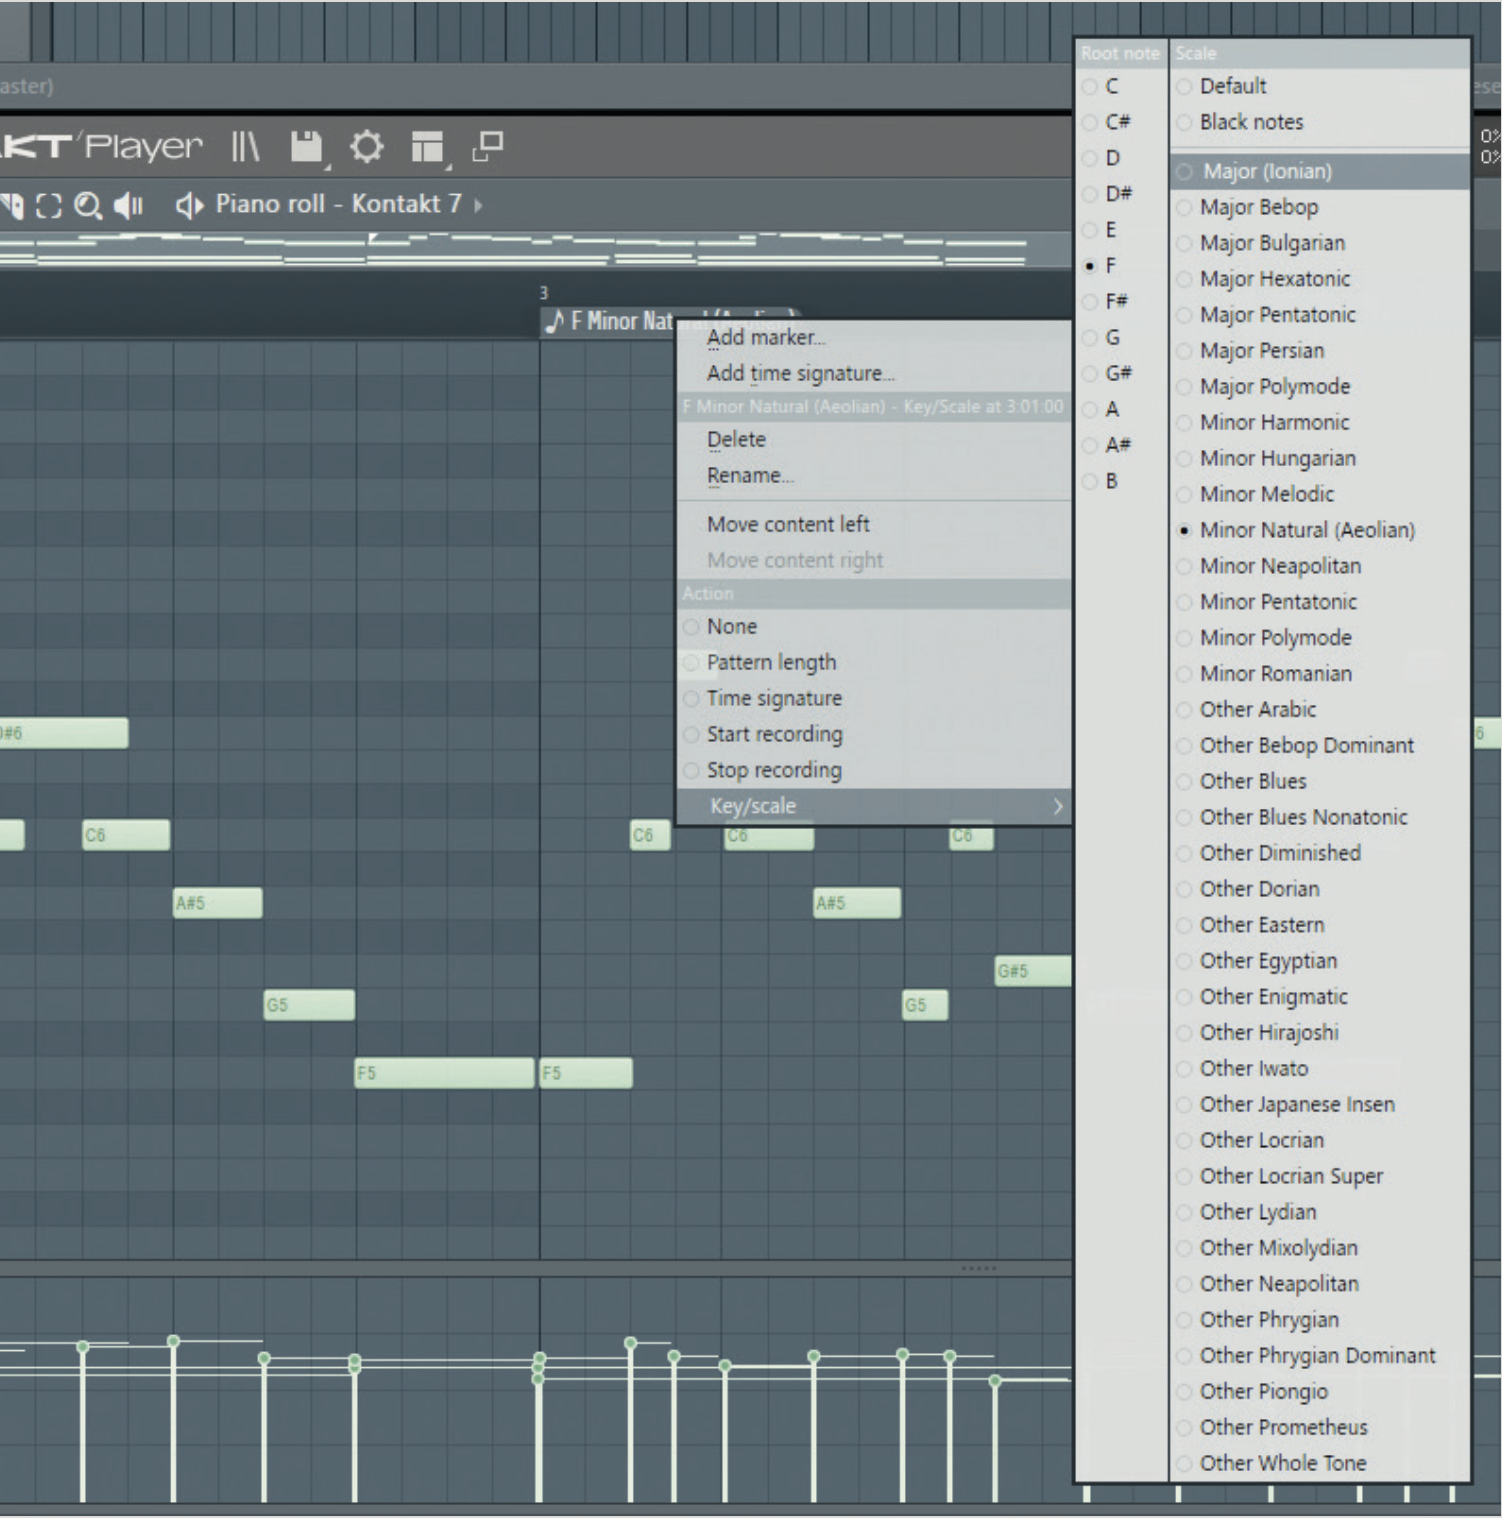
To change the key signature at the marker, right-click on it and navigate to key/scale. You can then set a new scale and root note in the same way we did in steps 2 and 3. Let’s change our scale to F major, with our marker placed at the two-bar interval. The marker name will change.
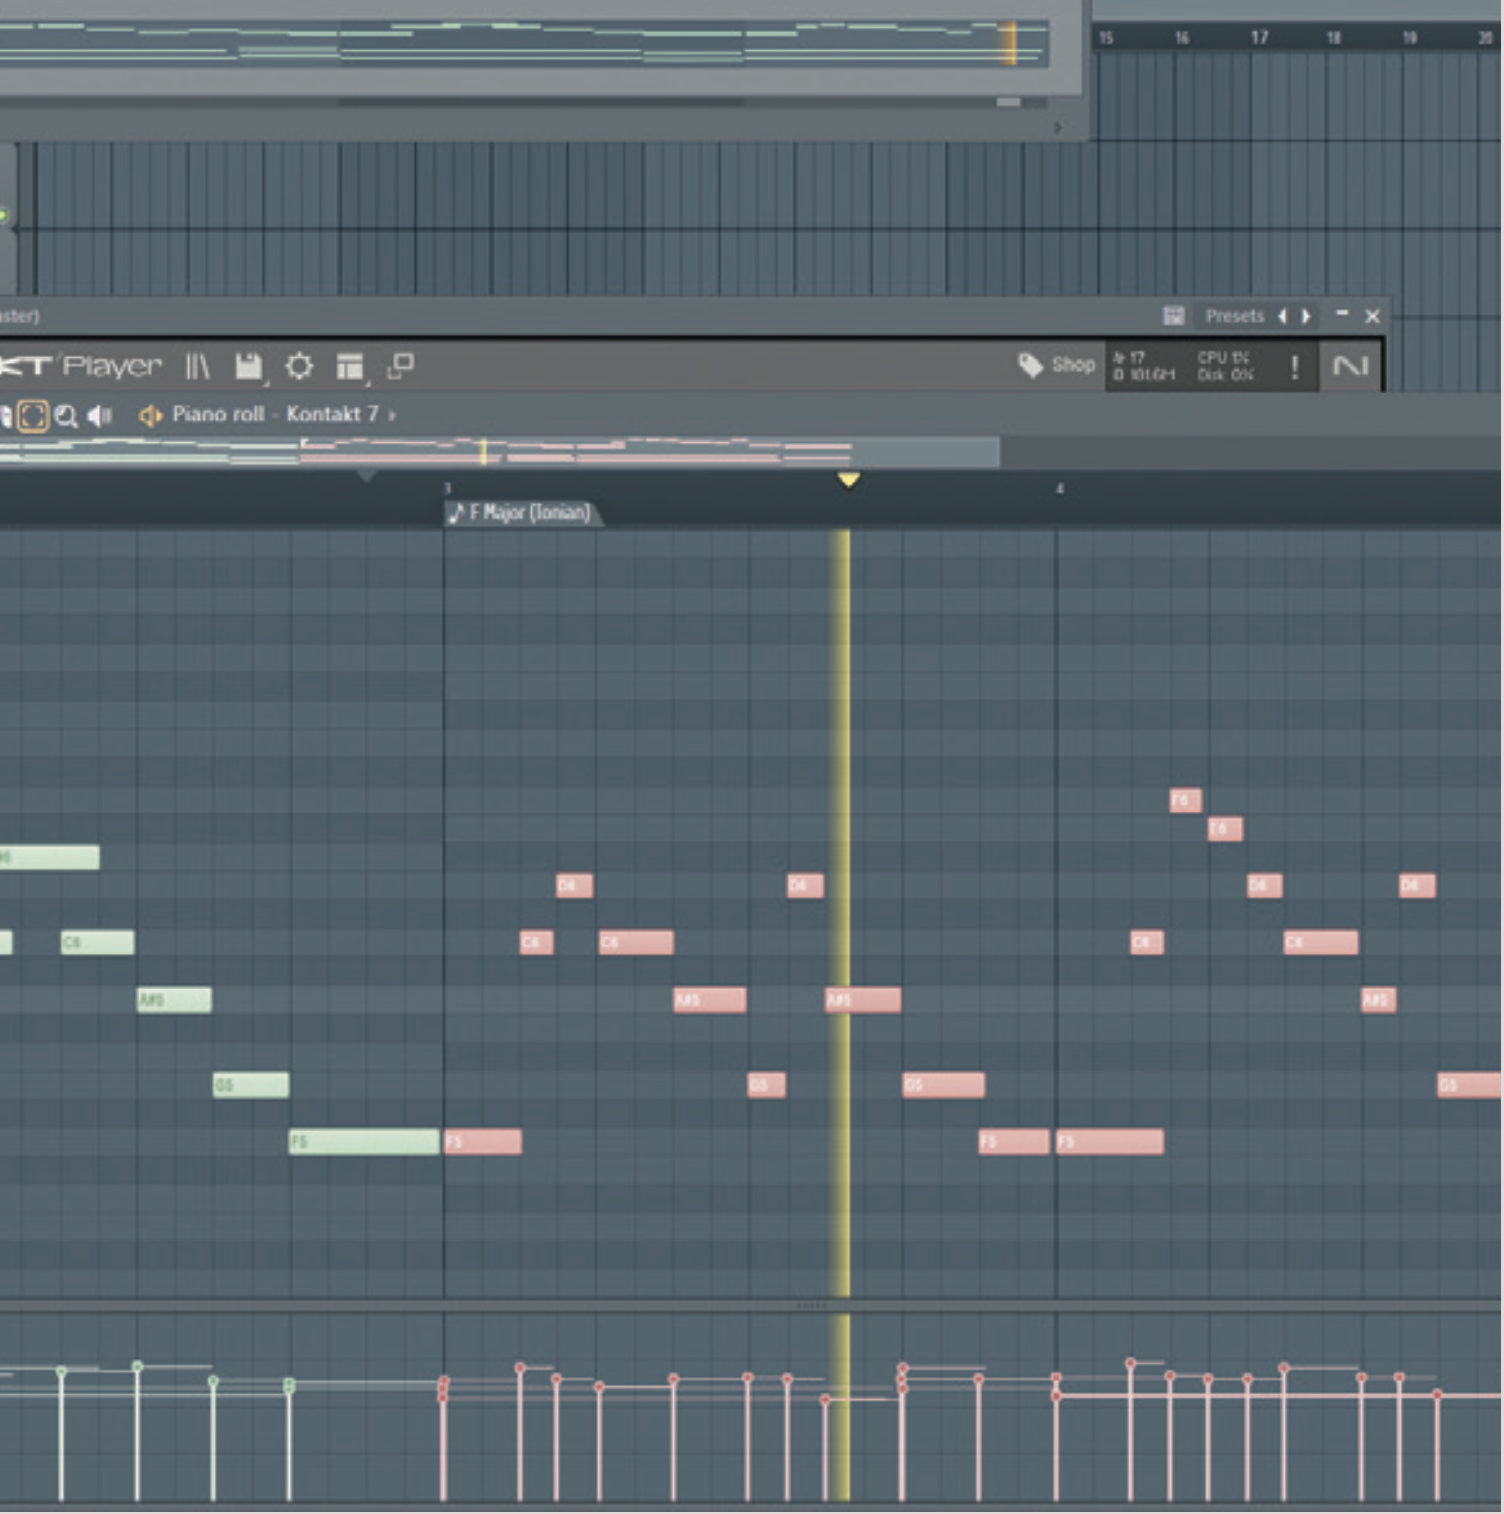
Our previous notes placed beyond the marker point won’t automatically re-map into the new scale. To manually map them, with Snap to Scale still enabled, highlight notes beyond the marker, and click and drag them. Now they’ll be snapped into the new scale. Adjust single notes if you wish.
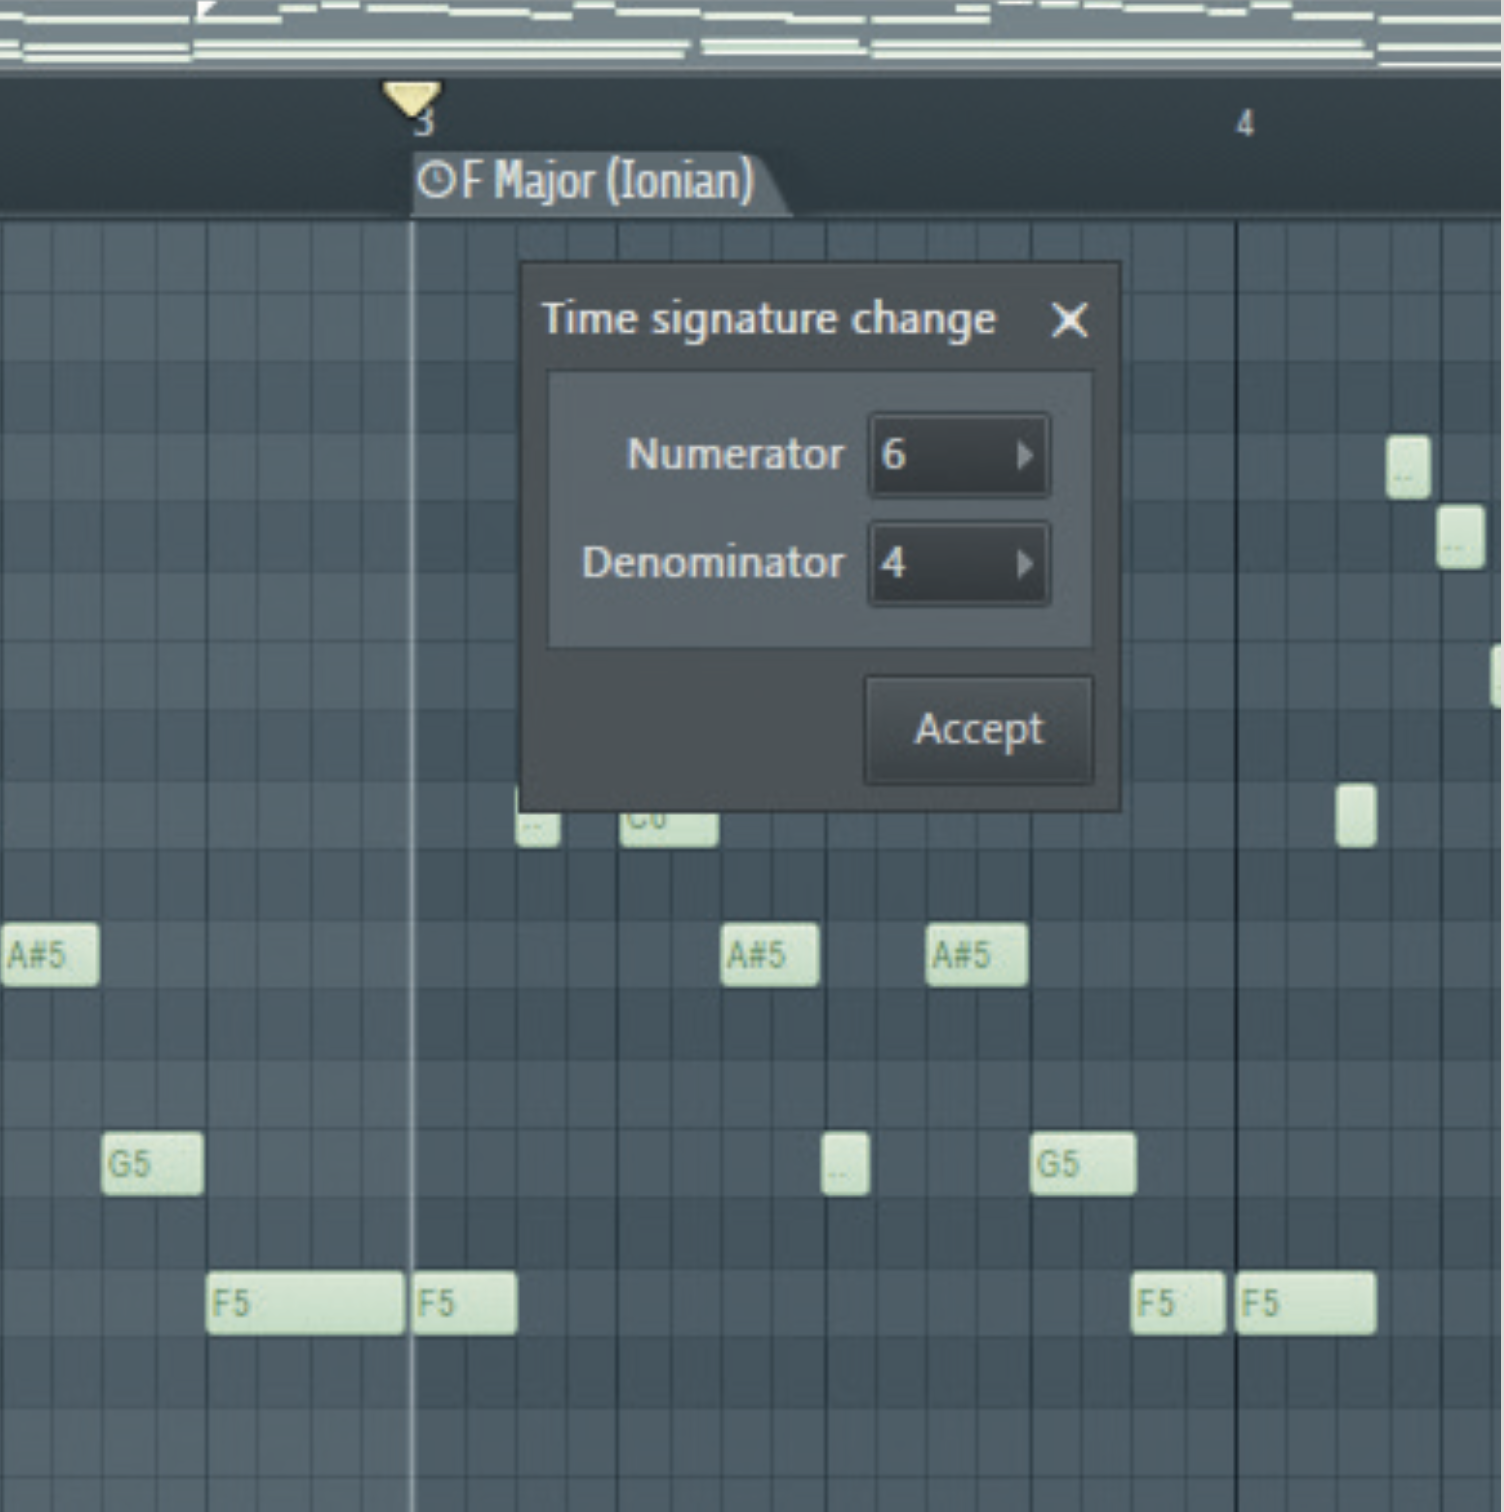
You can also change the time signature of your Piano Roll pattern at the marker. On the same drop-down menu, right-click the marker and select Time Signature, Add Time Signature or Set Time Signature. Enter your desired Numerator and Denominator. Adjust your melody accordingly.
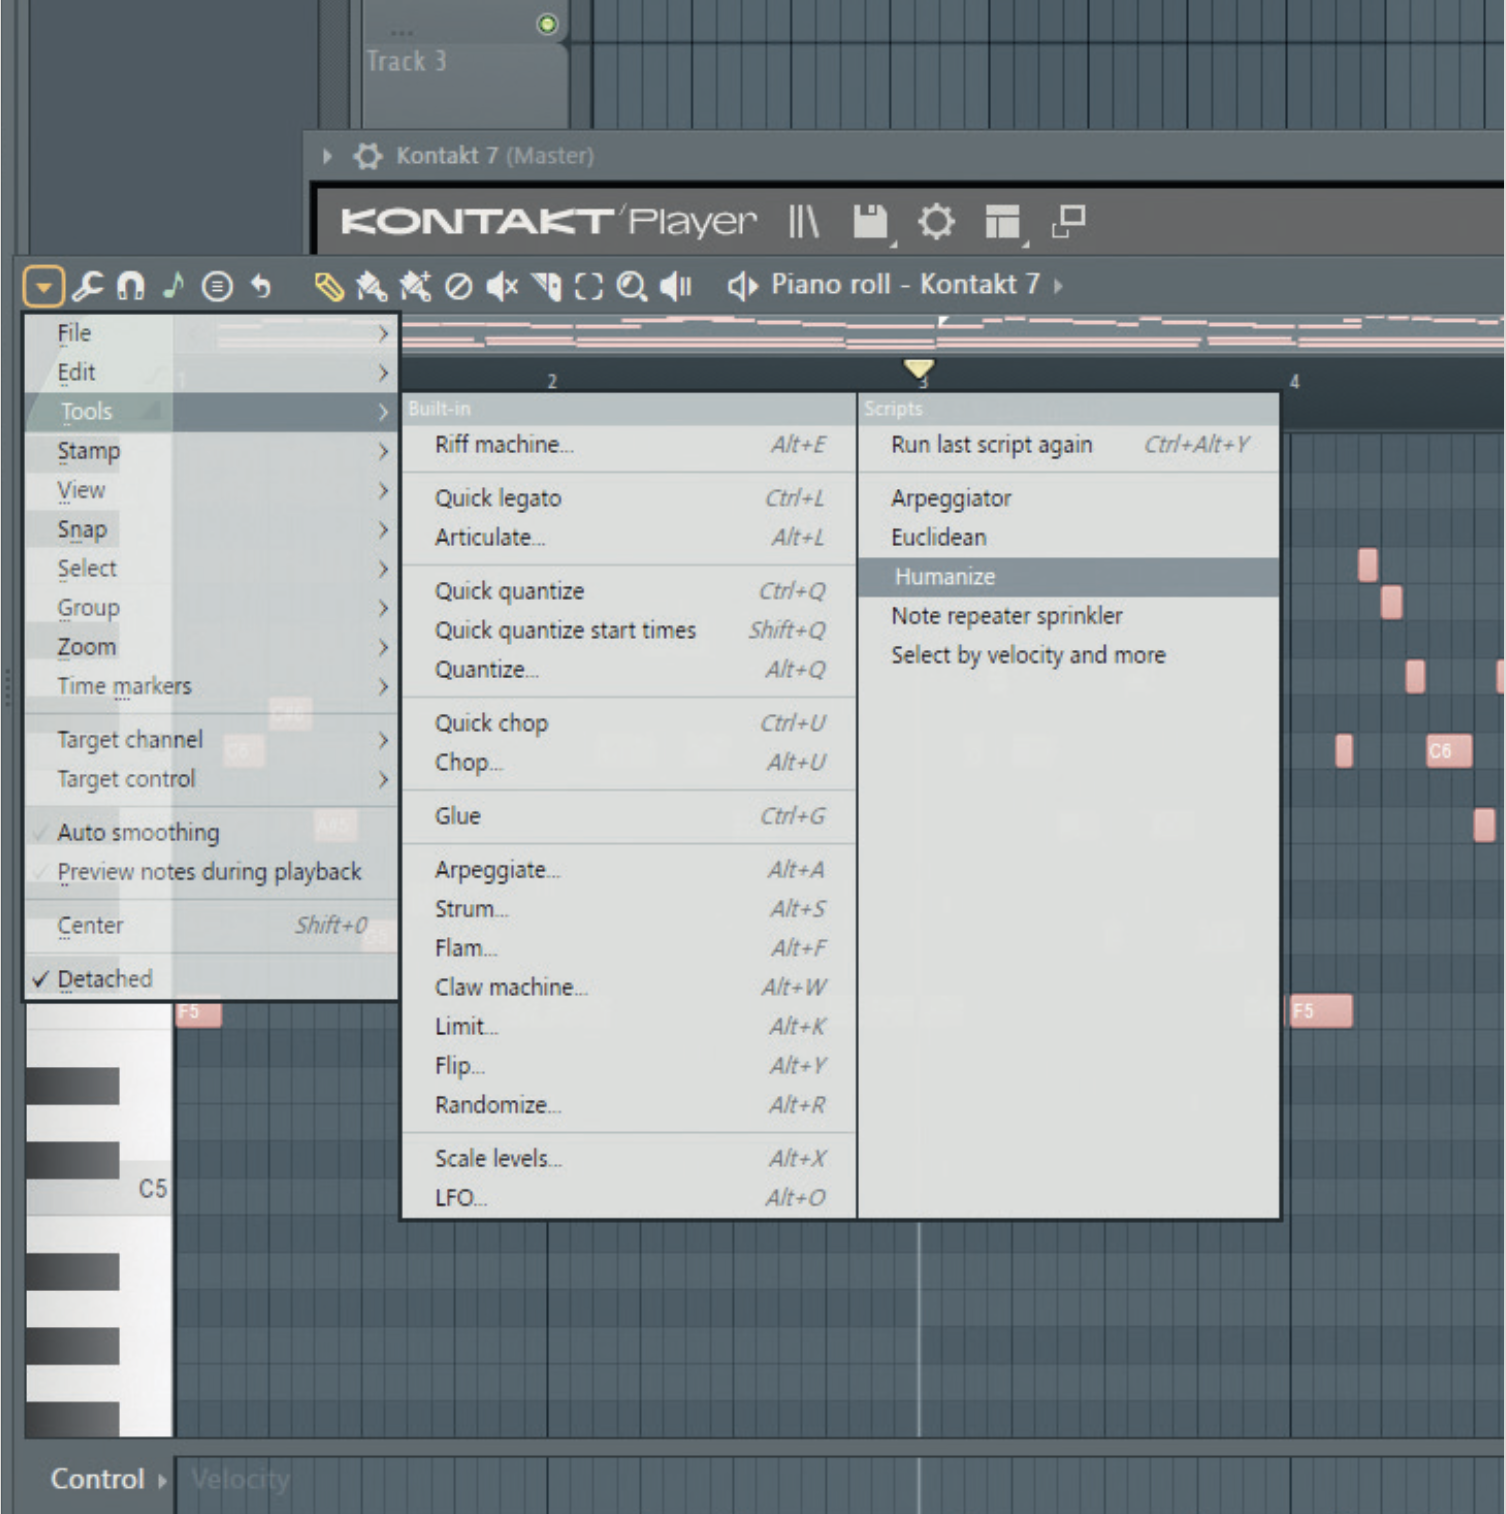
The final upgrade to the Piano Roll in FL Studio 21 is its new Scripts tool: Python-coded scripts allowing custom modulation of your MIDI notes. There are five default scripts on the Tools menu, or import your own coded scripts. Find scripts under the Tools sub-menu in the top-left drop-down menu.
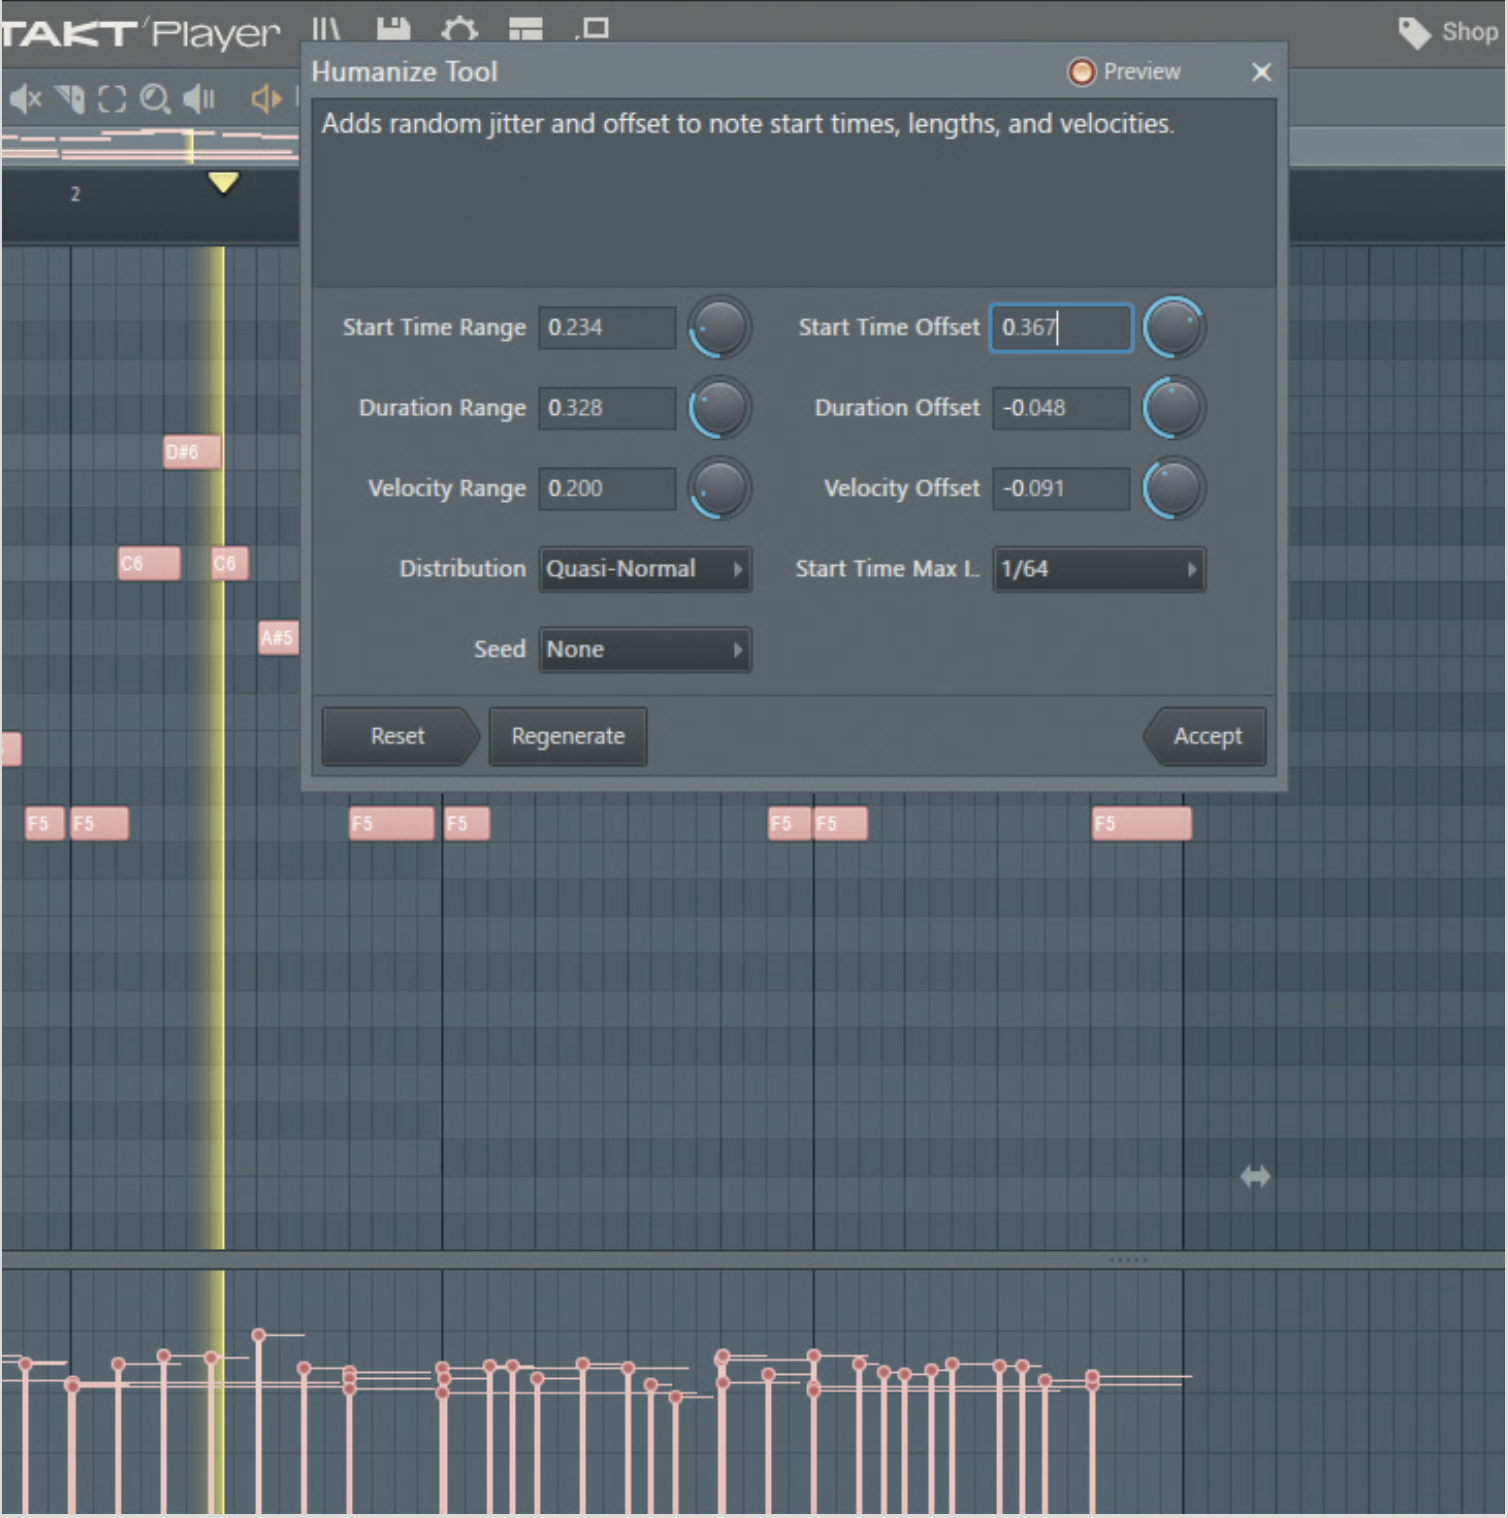
FL Studio’s Humanize script ‘humanises’ MIDI sequence notes. It first offers settings to alter how the script behaves. Its script lets us randomise note start times, lengths and velocities. You can see/hear the randomisation happening with the toggleable Preview button enabled. Click Accept.
6. Studio One 6’s Note Editing features
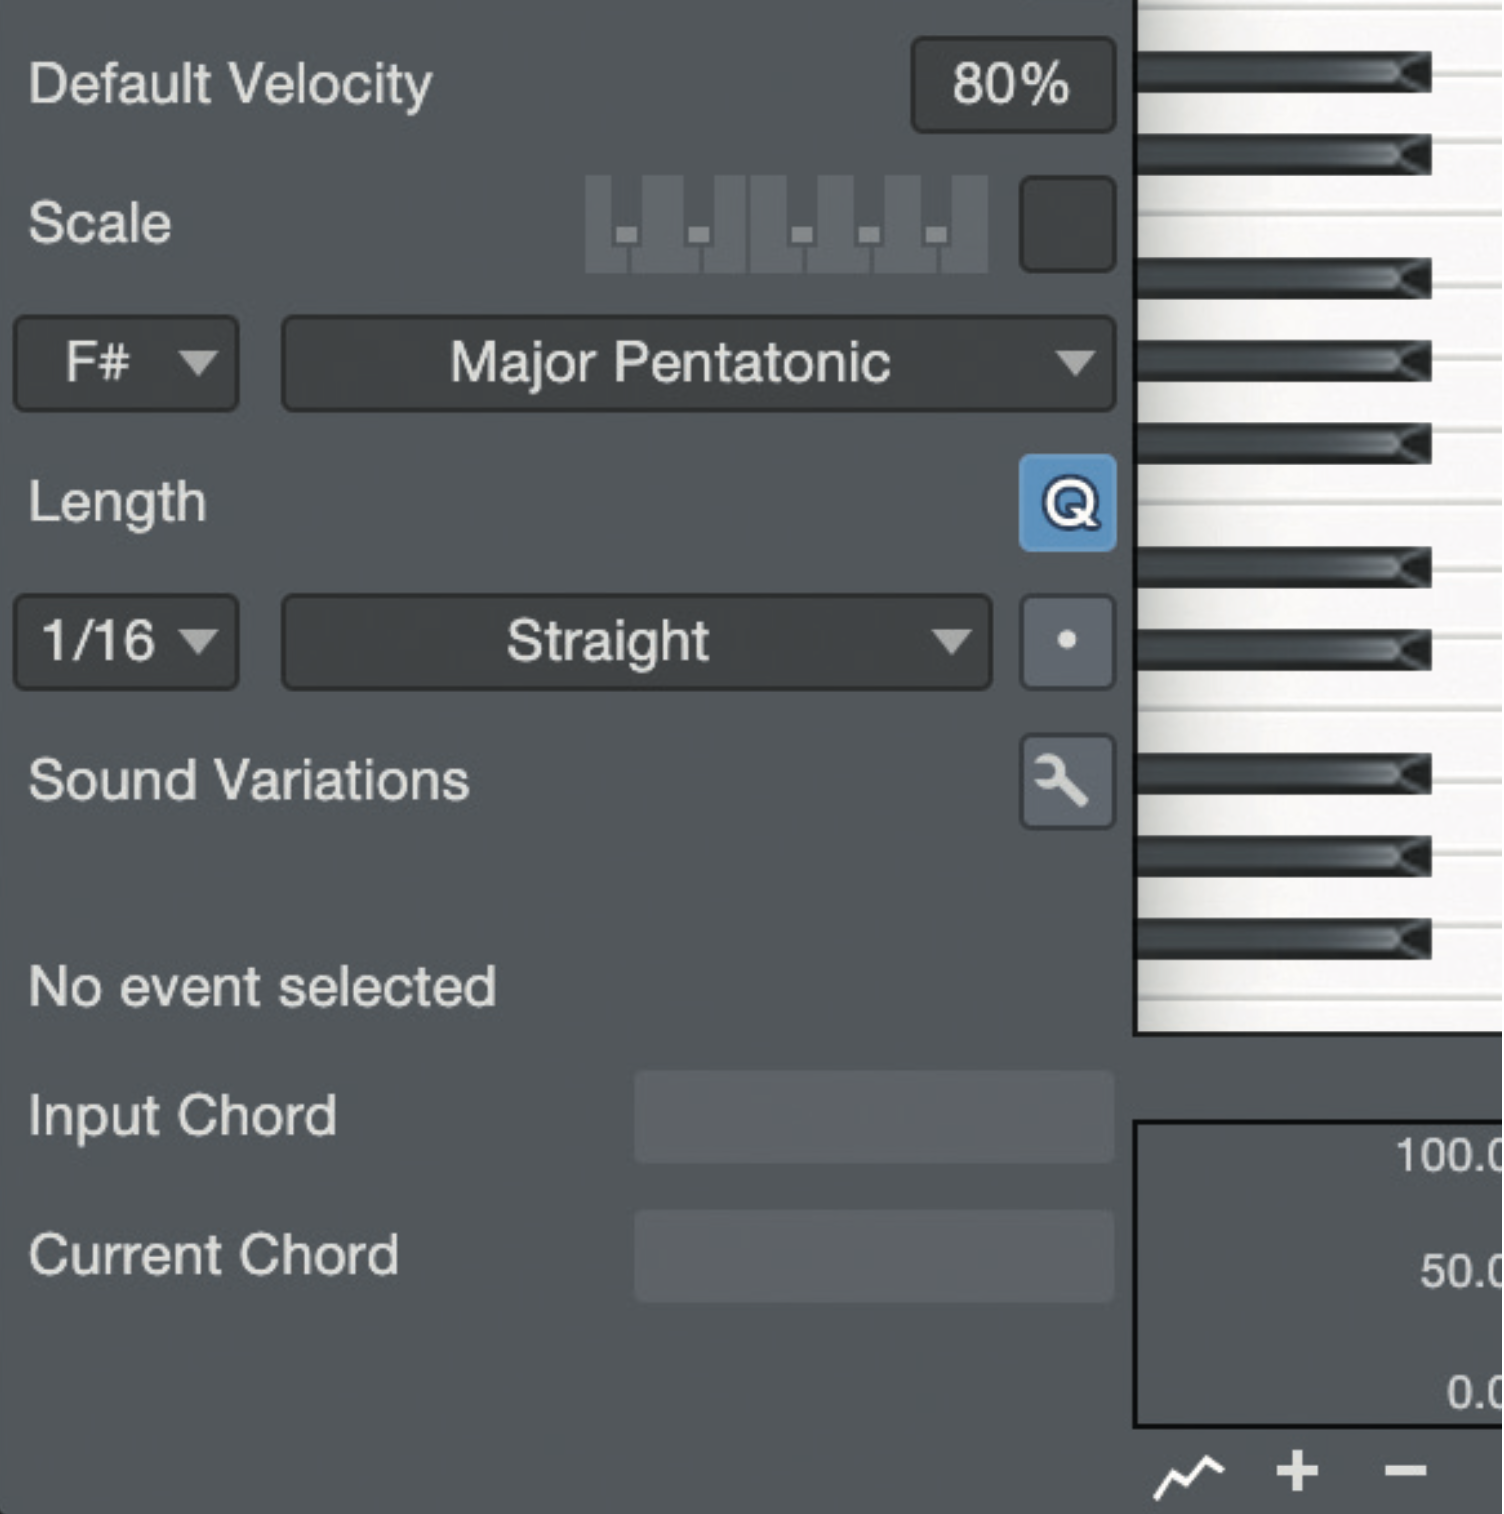
For version 6, Studio One now comes equipped with some decent features for working with keys and scales inside the piano roll. Inside a MIDI clip editor, choose the scale you’re working in in order to start the fun.
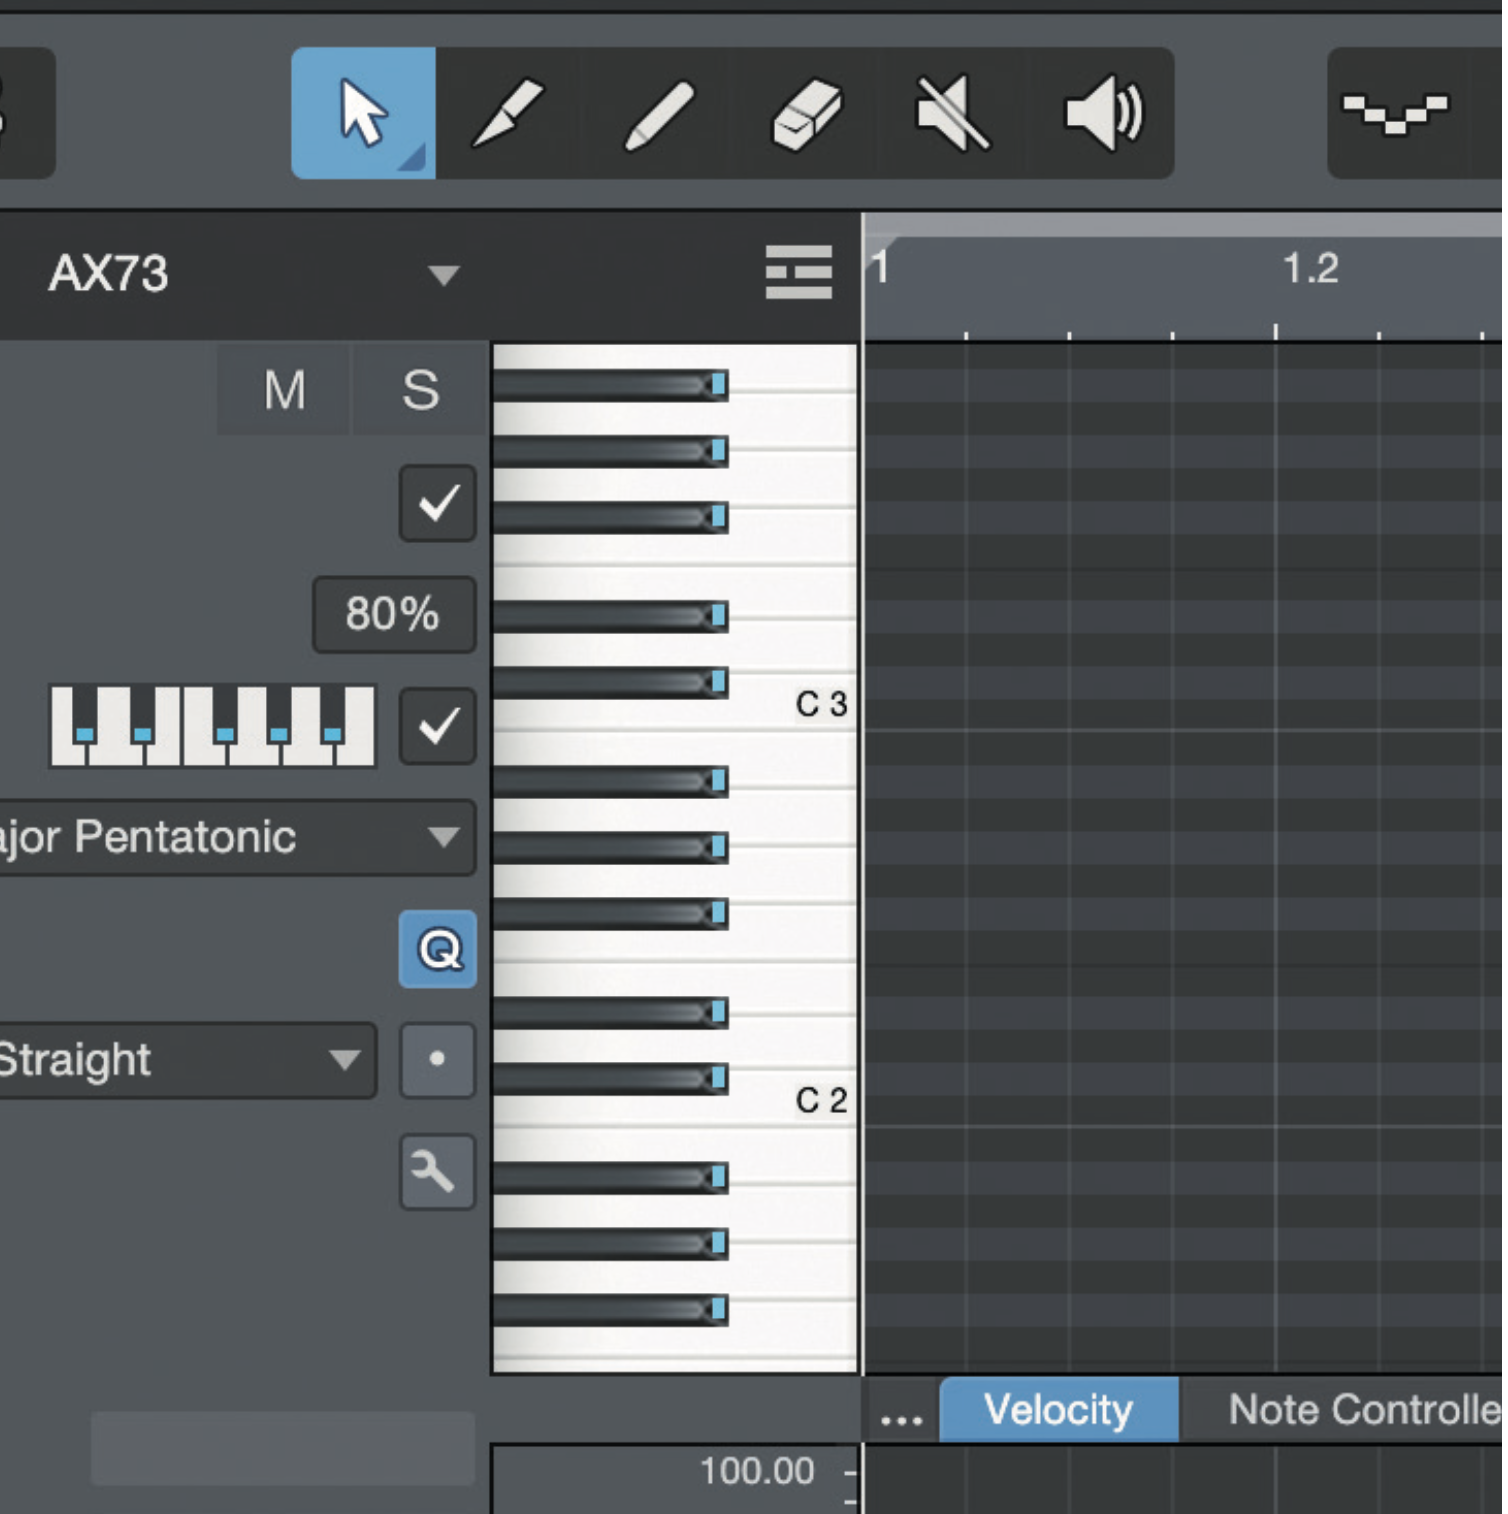
By activating the Scale tickbox above, the piano roll will adapt, leaving all the notes you can use a light grey colour, and all the ones you can’t a dark grey colour. It’s like the backgrounds for black and white note lanes, only for whatever scale you have selected.
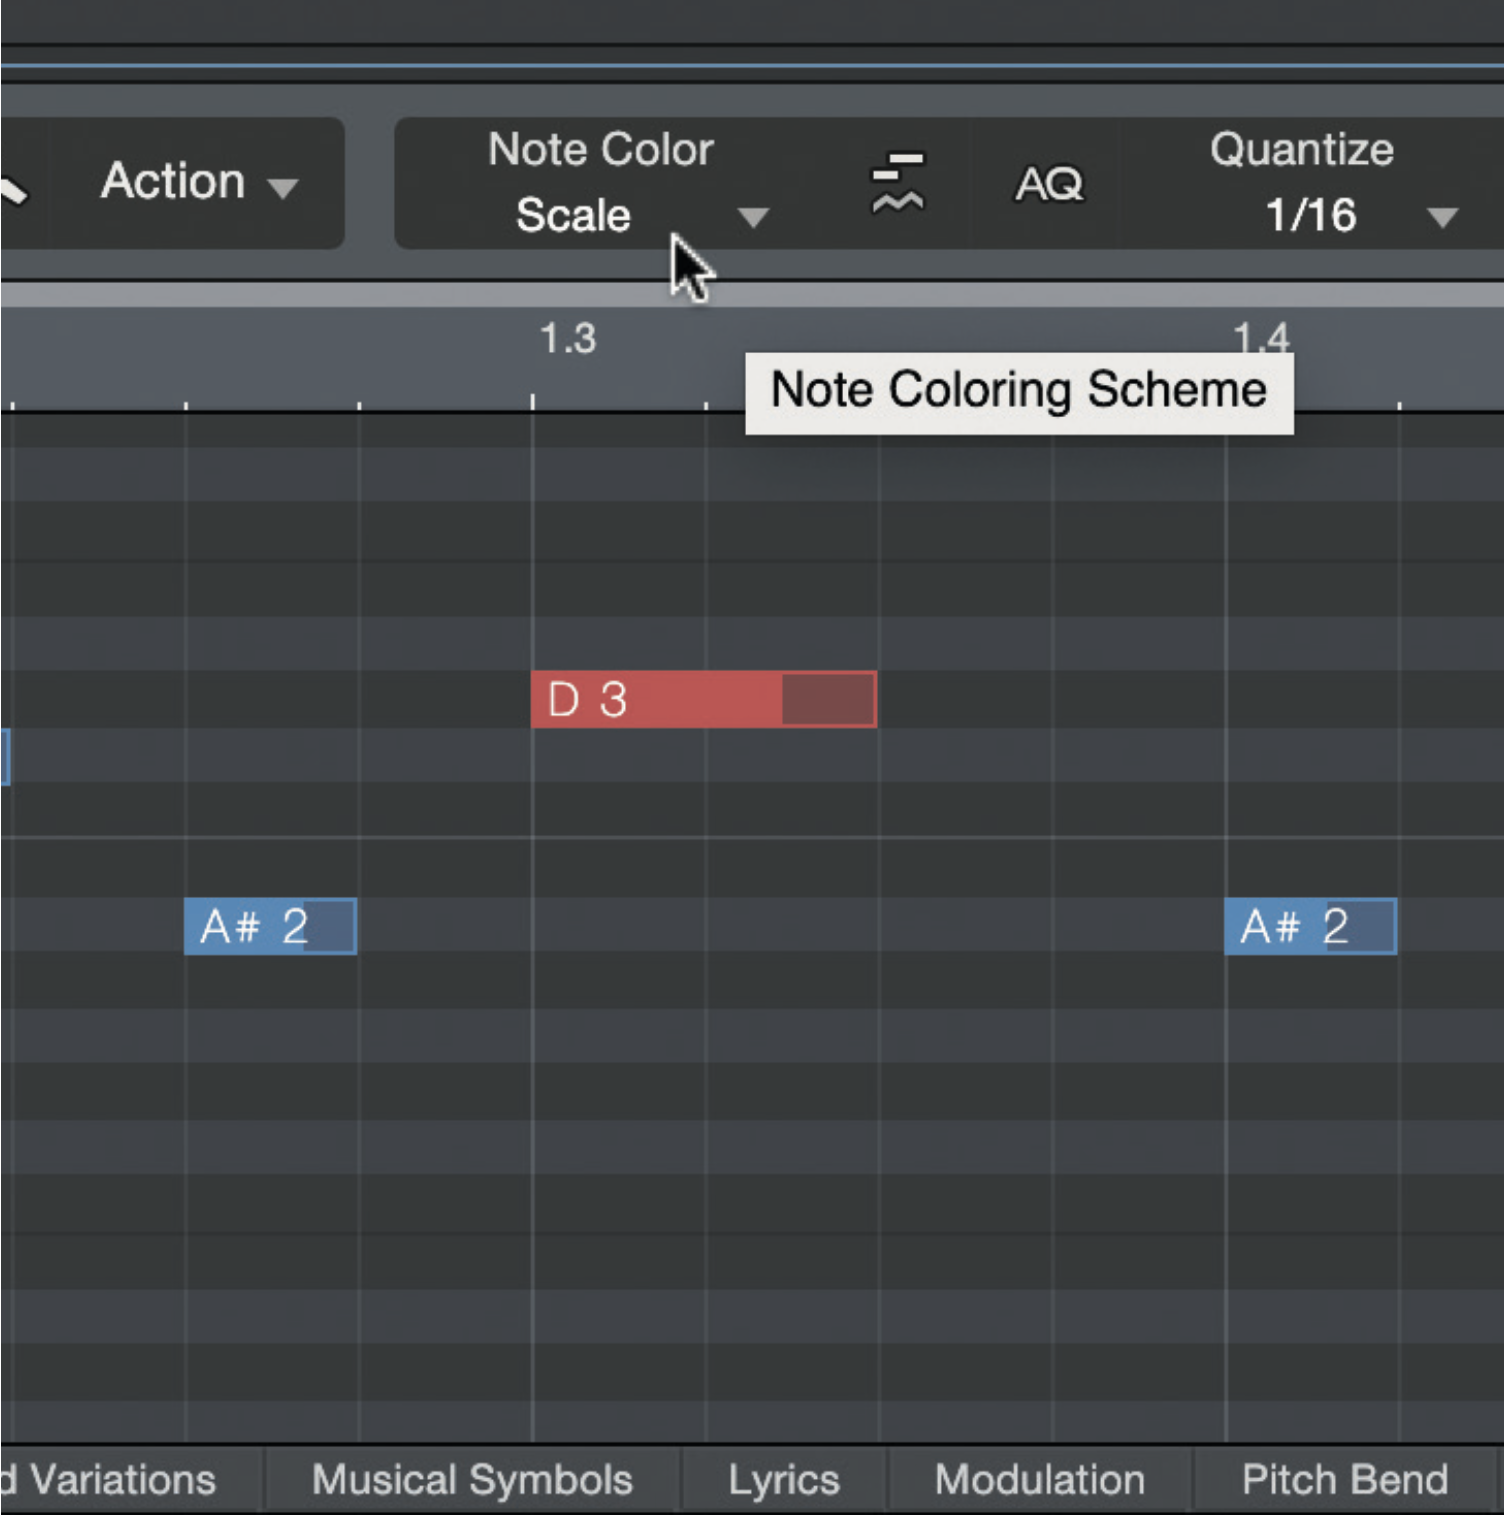
If you add notes, you’ll actually find that you can only do so on your in-scale notes, making it pretty easy to get something that sounds right without trying. If you’ve got pre-existing MIDI, you can also colour your piano roll notes to a scale, with anything out of scale appearing in red to alert you. Easy.
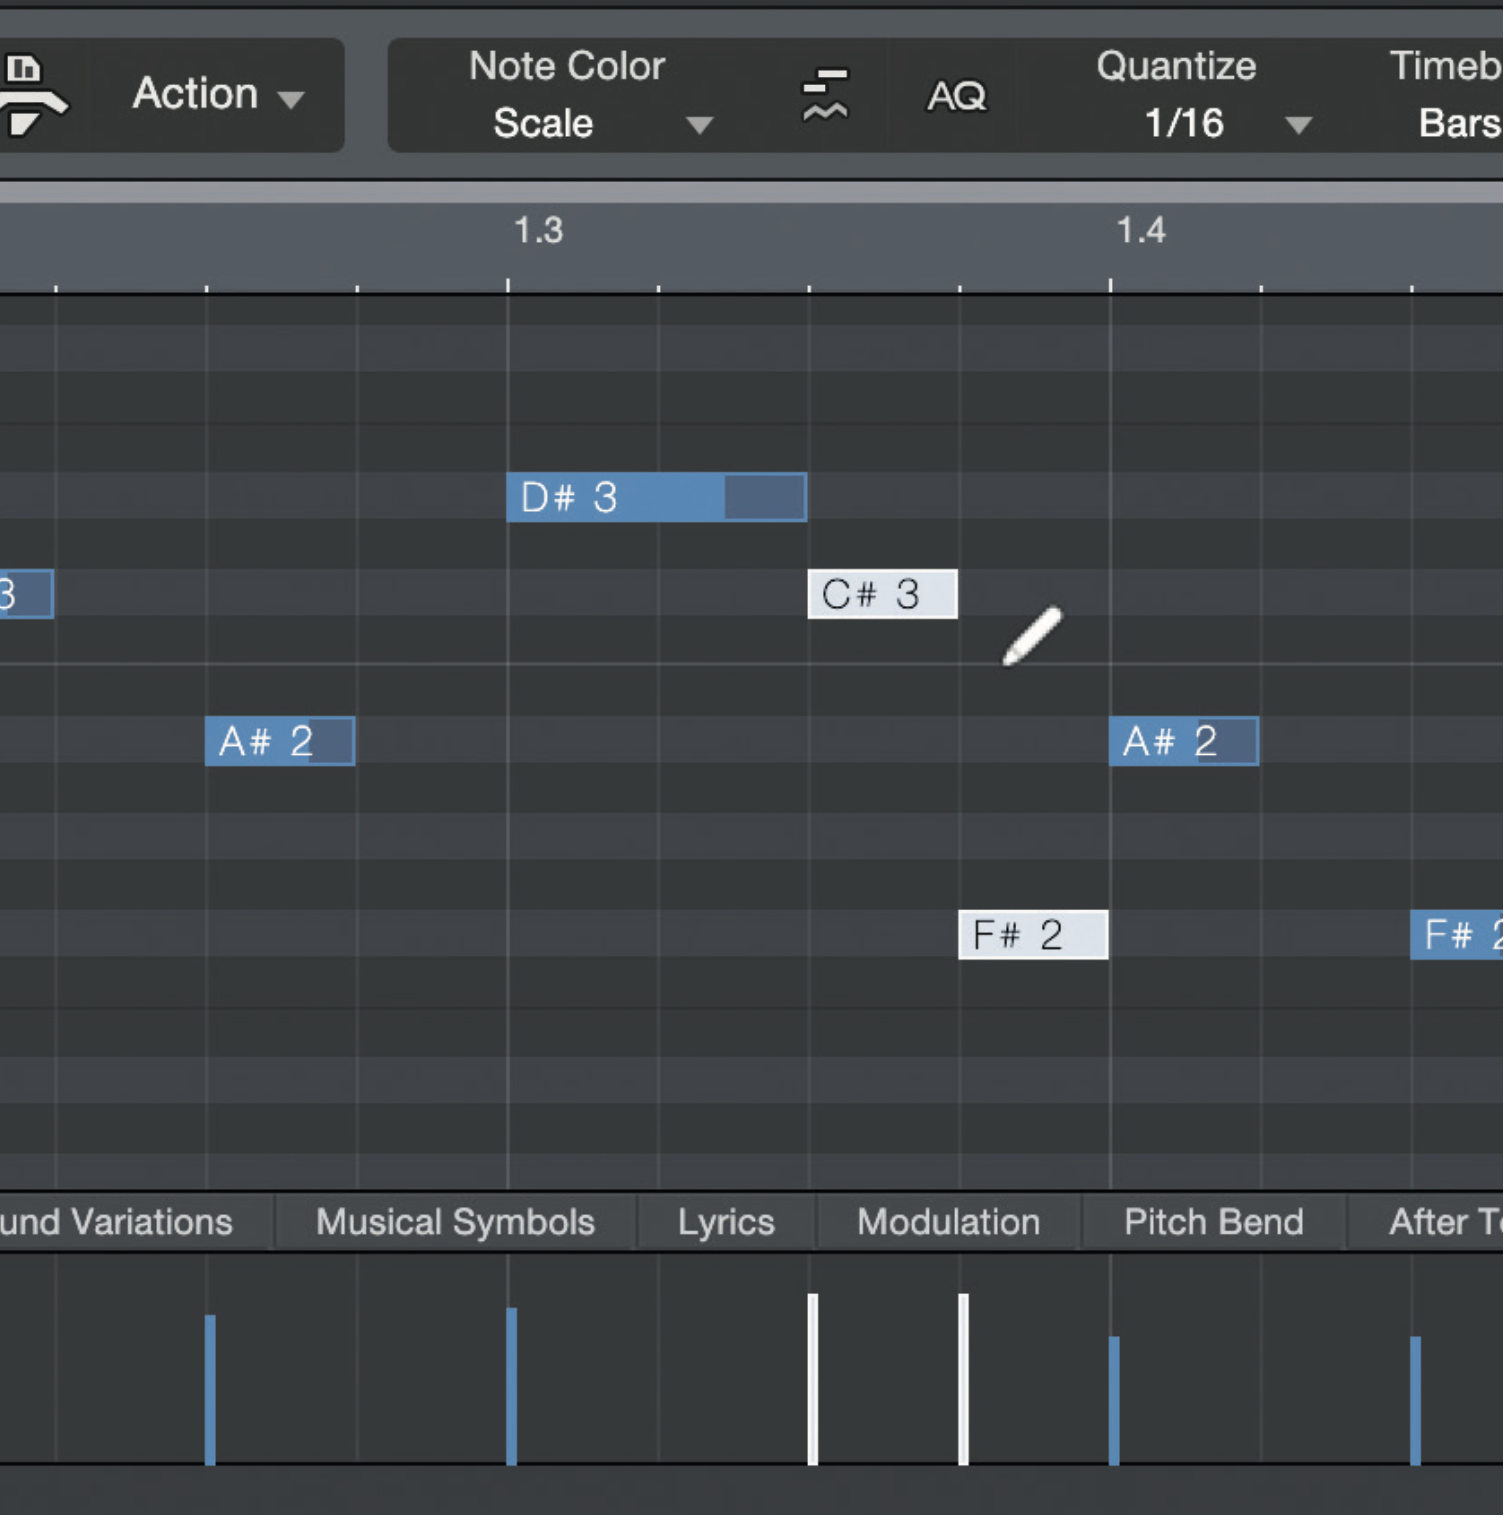
One more tip for Studio One 6: hold down Cmd-Opt (or Ctrl-Alt), and then click and drag across the piano roll. This adds notes into any empty spaces you cover, of a length set by your Quantize setting. With the scale feature snapping you to scale, it’s even easier to get something that works, quickly.
7. MIDI plugins
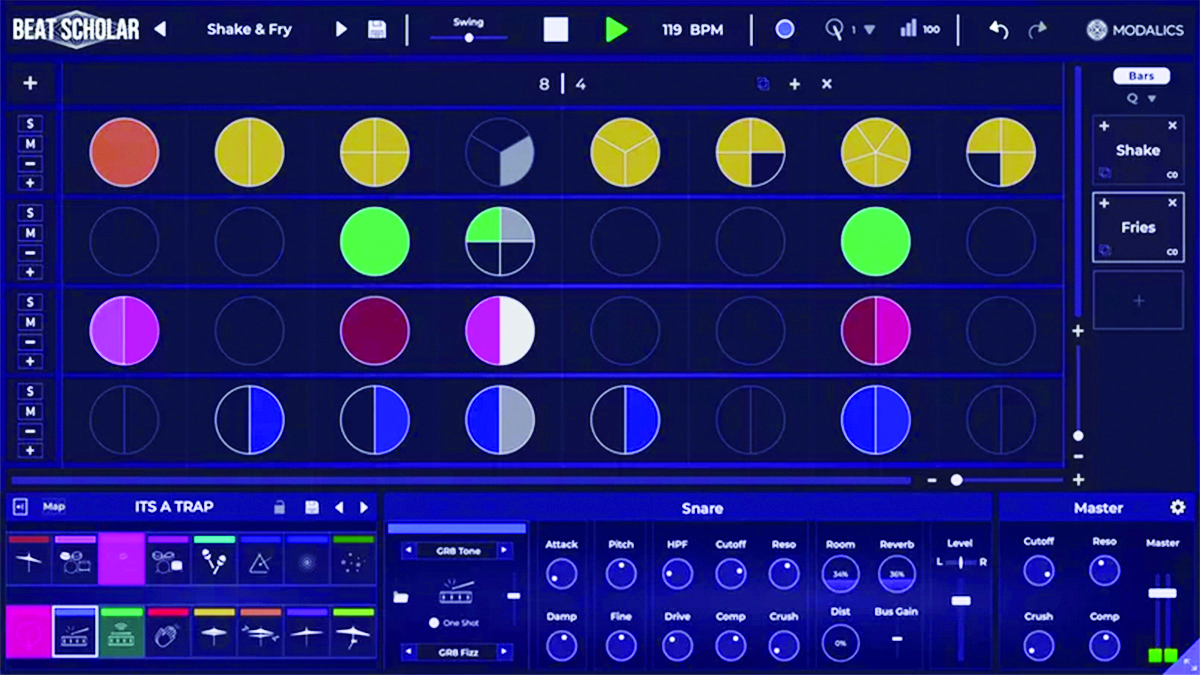
Beyond your DAW’s basic MIDI programming and sequencing functions, chances are it’s got a few MIDI Effects plugins it can use as well. We’ve shown a couple of these already, with Bitwig’s having the most blurred lines.
Most DAWs have basic note effects that usually include chord creation, scale filtering, and arpeggiation. Some have their own specialties, like Ableton’s ability to work with probability or Reason’s dual arpeggiator and ability to ‘print’ output notes to a piano roll.
Beyond your DAW’s stock plugins, there’s also – you guessed it – a large number of third-party plugins offering MIDI processing and generation out there. From simple arpeggiators to full-on competitors for your DAW’s sequencer, there’s a lot of innovation here.
3 of the best
1. MixedInKey Pilot Plugins
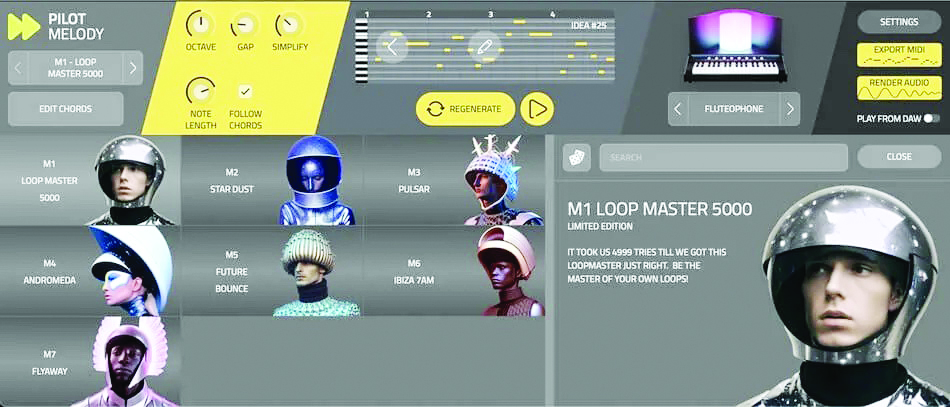
Pilot Melody, Bass, Chords, and Arpeggio all work harmoniously to maximise your creativity when composing. Choose one of the genre-based presets and you can start producing. From Mixed In Key.
2. Plugin Boutique Scaler 2
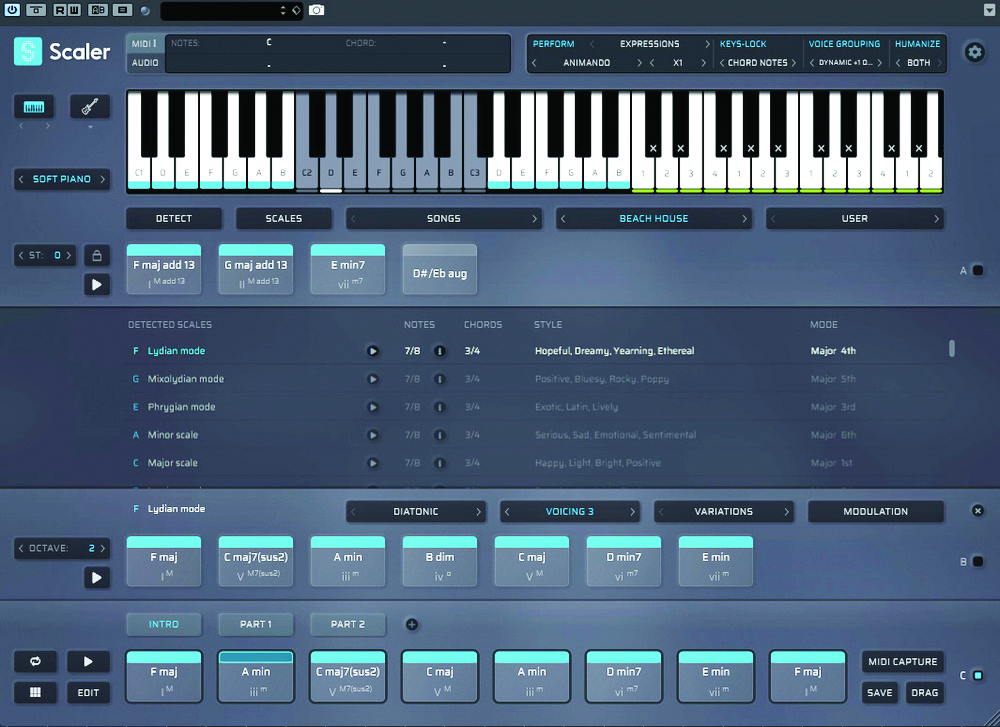
This composition wizard provides everything you need to write effective melodies and chord progressions. Complete with a whole host of music theory tools, even beginners can compose advanced, complex MIDI sequences and transfer them to any software instrument. With such a low price, you can’t go wrong. From Plugin Boutique.
3. EVAbeat Melody Sauce 2
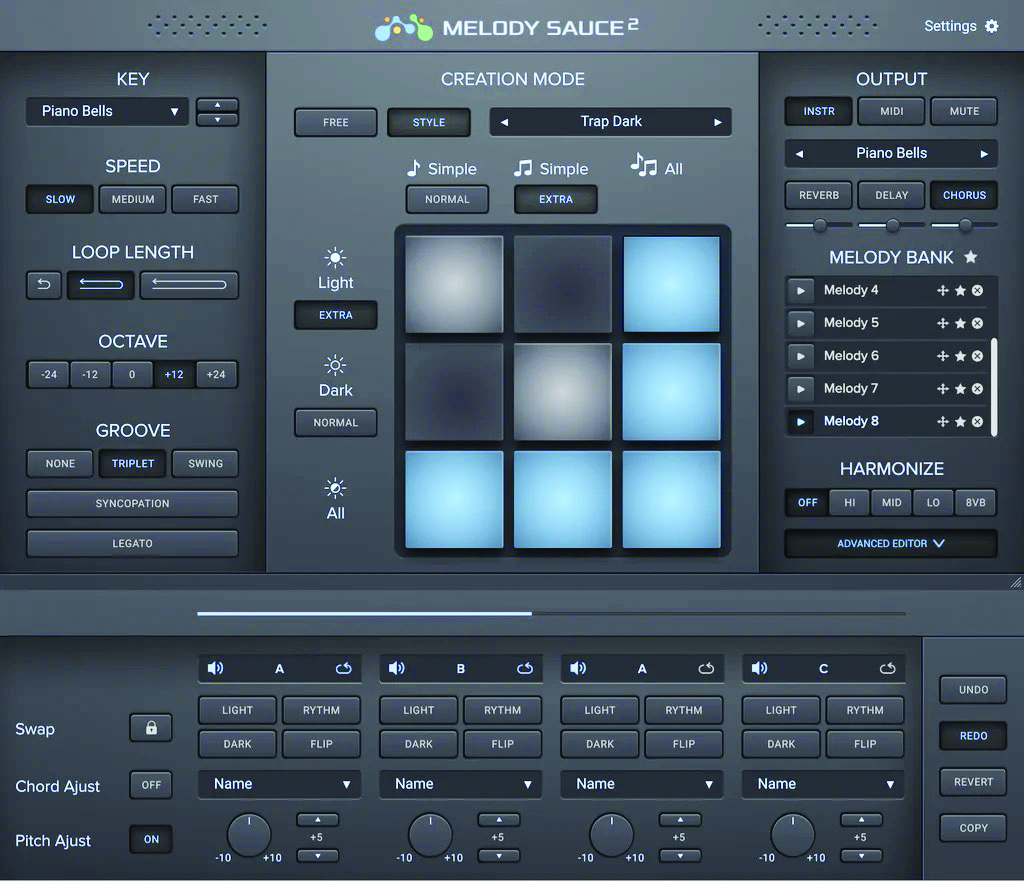
With a shallow learning curve and welcoming GUI, Melody Sauce 2 is a composition assistant useful to beginner and advanced musicians alike. Connect any DAW software instrument to this plugin and shape your sequences using the Advanced editor. Or, get writing in Creative Mode. From EvaBeat.



A former Production Editor of Computer Music and FutureMusic magazines, James has gone on to be a freelance writer and reviewer of music software since 2018, and has also written for many of the biggest brands in music software. His specialties include mixing techniques, DAWs, acoustics and audio analysis, as well as an overall knowledge of the music software industry.
"If I wasn't recording albums every month, multiple albums, and I wasn't playing on everyone's songs, I wouldn't need any of this”: Travis Barker reveals his production tricks and gear in a new studio tour
“My management and agent have always tried to cover my back on the road”: Neil Young just axed premium gig tickets following advice from The Cure’s Robert Smith


