10 things you didn't know Ableton Live could do
The basics of Live are easy enough to grasp, but there’s far more to this DAW than meets the eye. Here are our ten choice picks of hidden (and not-so-hidden) extras
Want all the hottest music and gear news, reviews, deals, features and more, direct to your inbox? Sign up here.
You are now subscribed
Your newsletter sign-up was successful
Whether you’re a relative beginner or an experienced user of another DAW making the jump to Live, you’re going to be impressed, and maybe even surprised, at how capable it actually is.
Having said that, Ableton as a company have their own way of doing things; some features might not be so obvious, and you may even discover things that you didn’t expect it to do at all.
The days of Live as a mere loop-launcher are long, long, gone - although thankfully, it still does that too. Some of these tips go back to the very early days of Live, some are right up to date: all are worth checking out.
1. Capture MIDI, no recording necessary
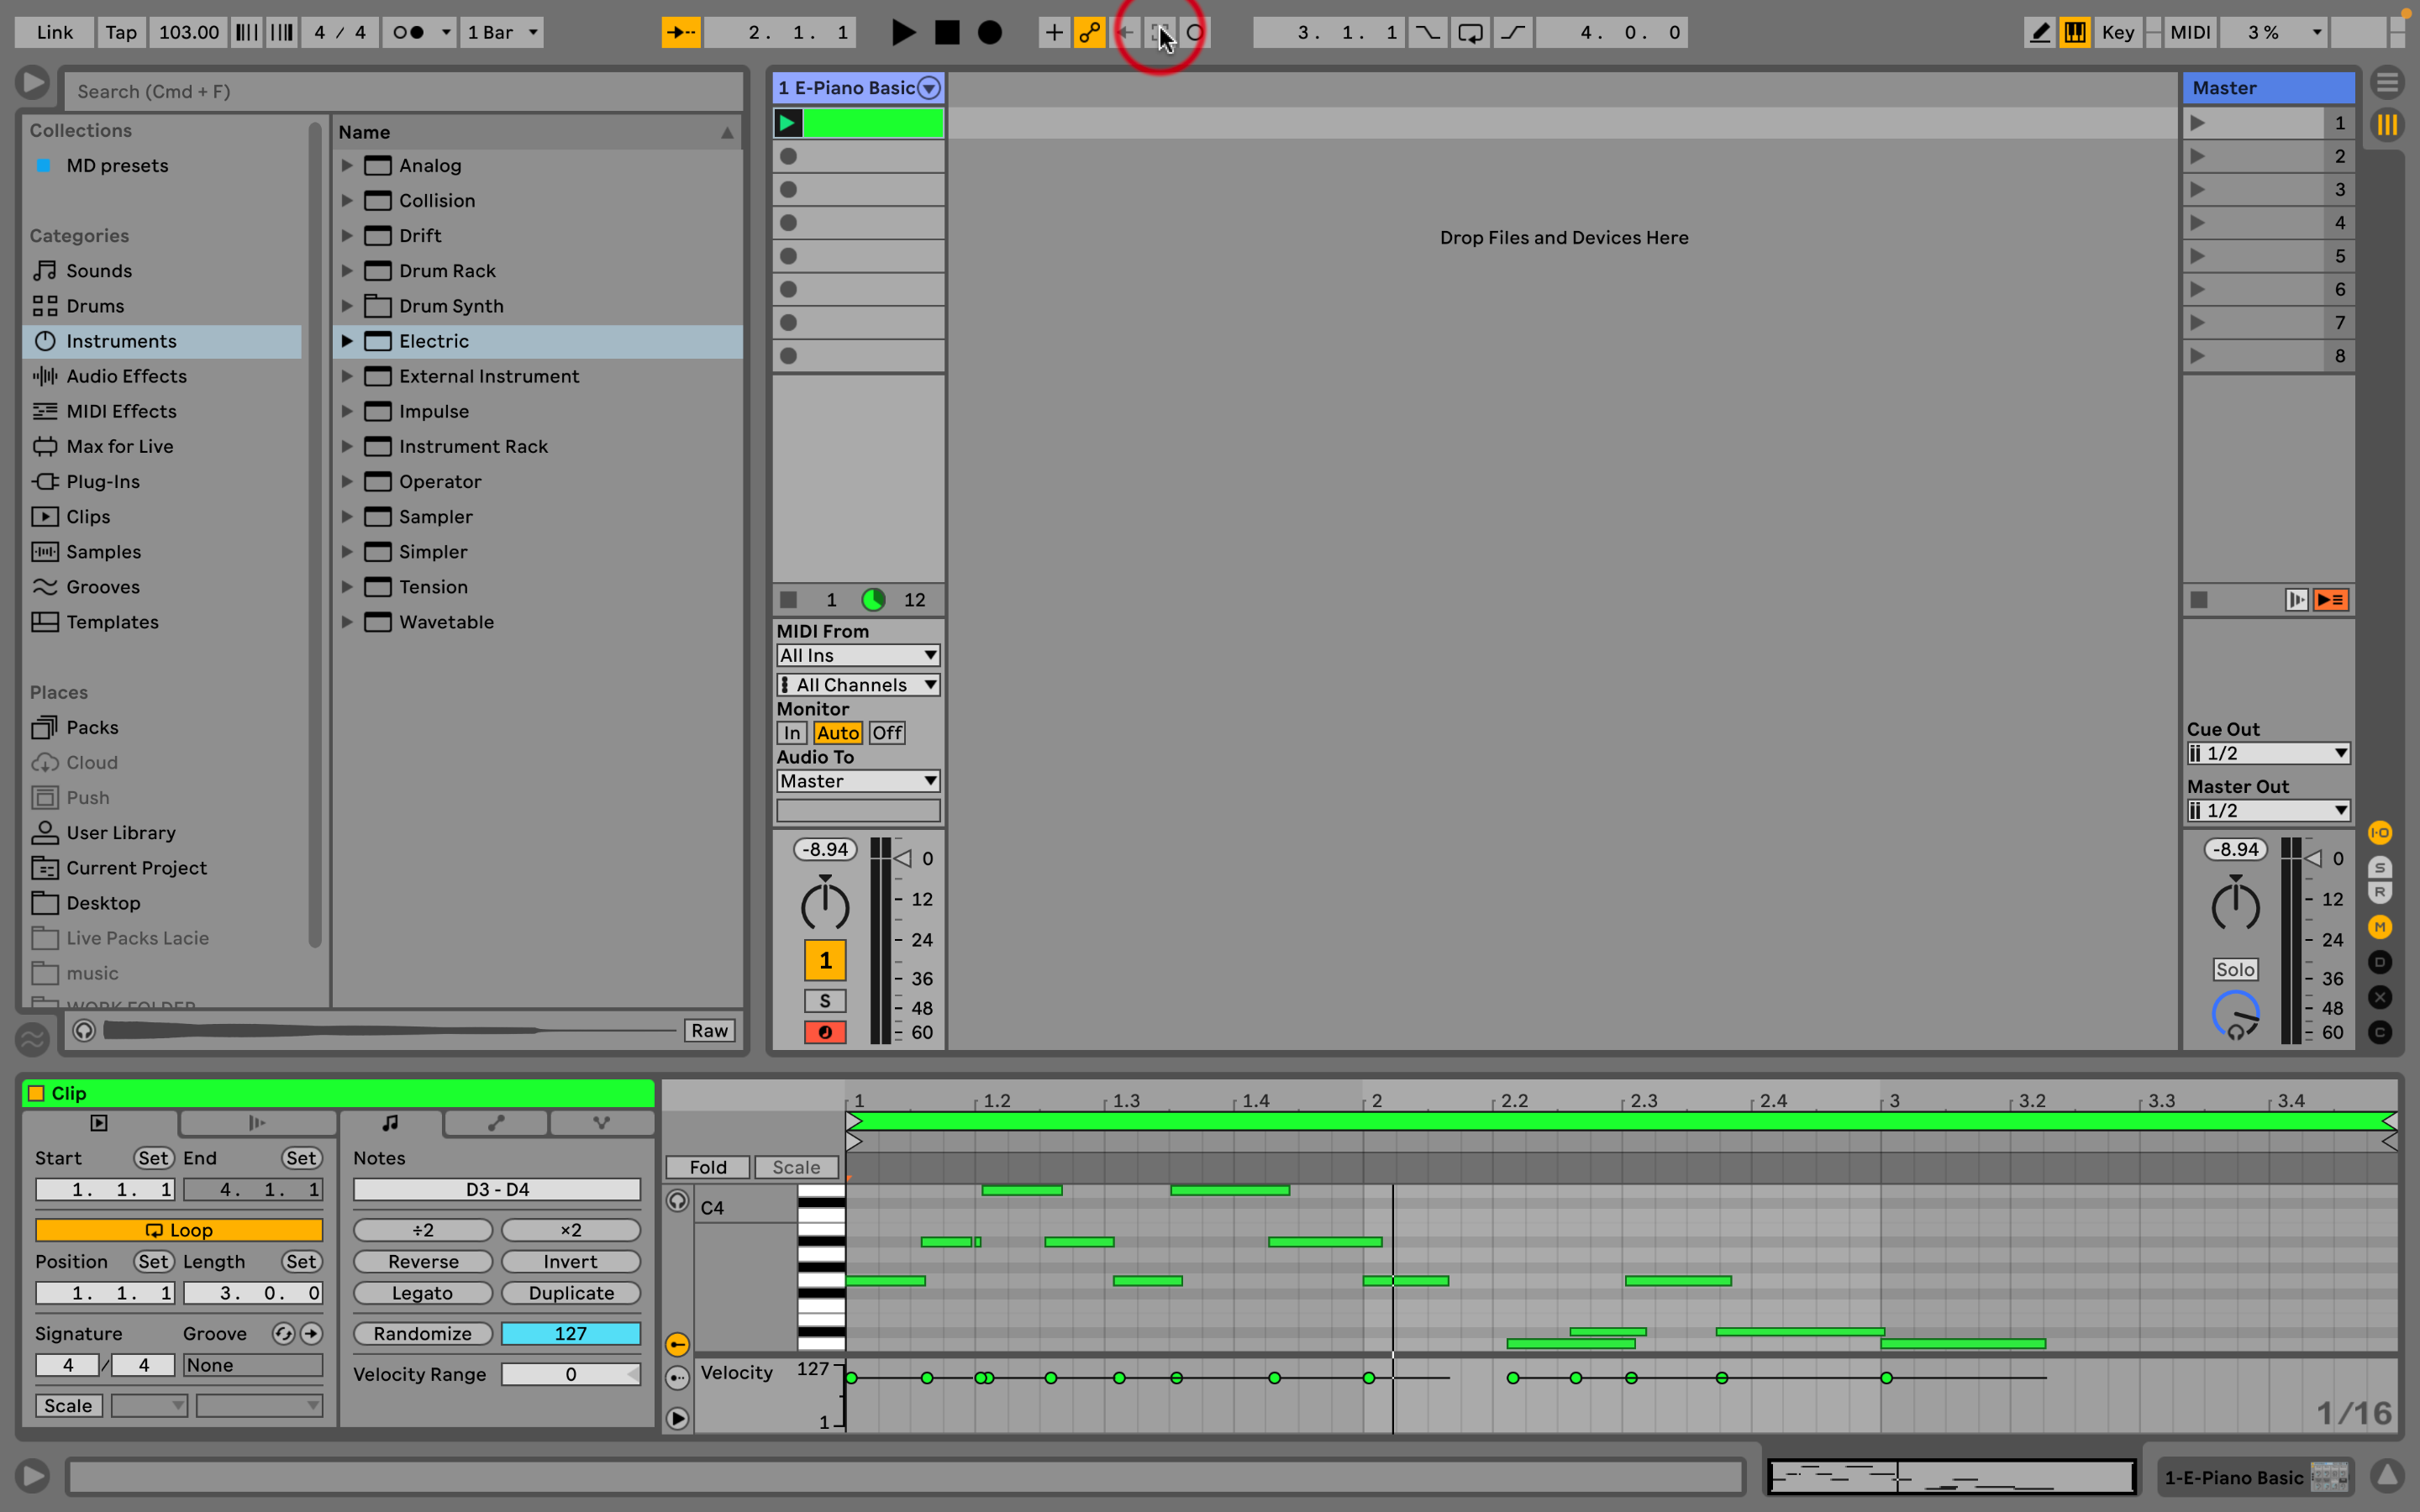
This little square at the top of the screen is Live’s Capture MIDI button. If you have a MIDI instrument or drum rack loaded, and you’re using an external hardware controller, or even Live’s virtual MIDI keyboard, which uses your computer keyboard (just tap M to enable it), you don’t even have to hit the usual Session or Arrangement record buttons to capture what you’re playing. Simply play your part, then hit Capture and a new MIDI clip will appear, containing the part you just performed.
This is great for any kind of jamming, noodling, or improv, where you might spontaneously come up with something, then immediately afterwards wish you’d recorded it. Even better is that if your captured clip is the first thing in a new project, Live will detect your playing tempo and change the global BPM to the same value. You may never have to hit ‘record’ again.
2. Import movie clips
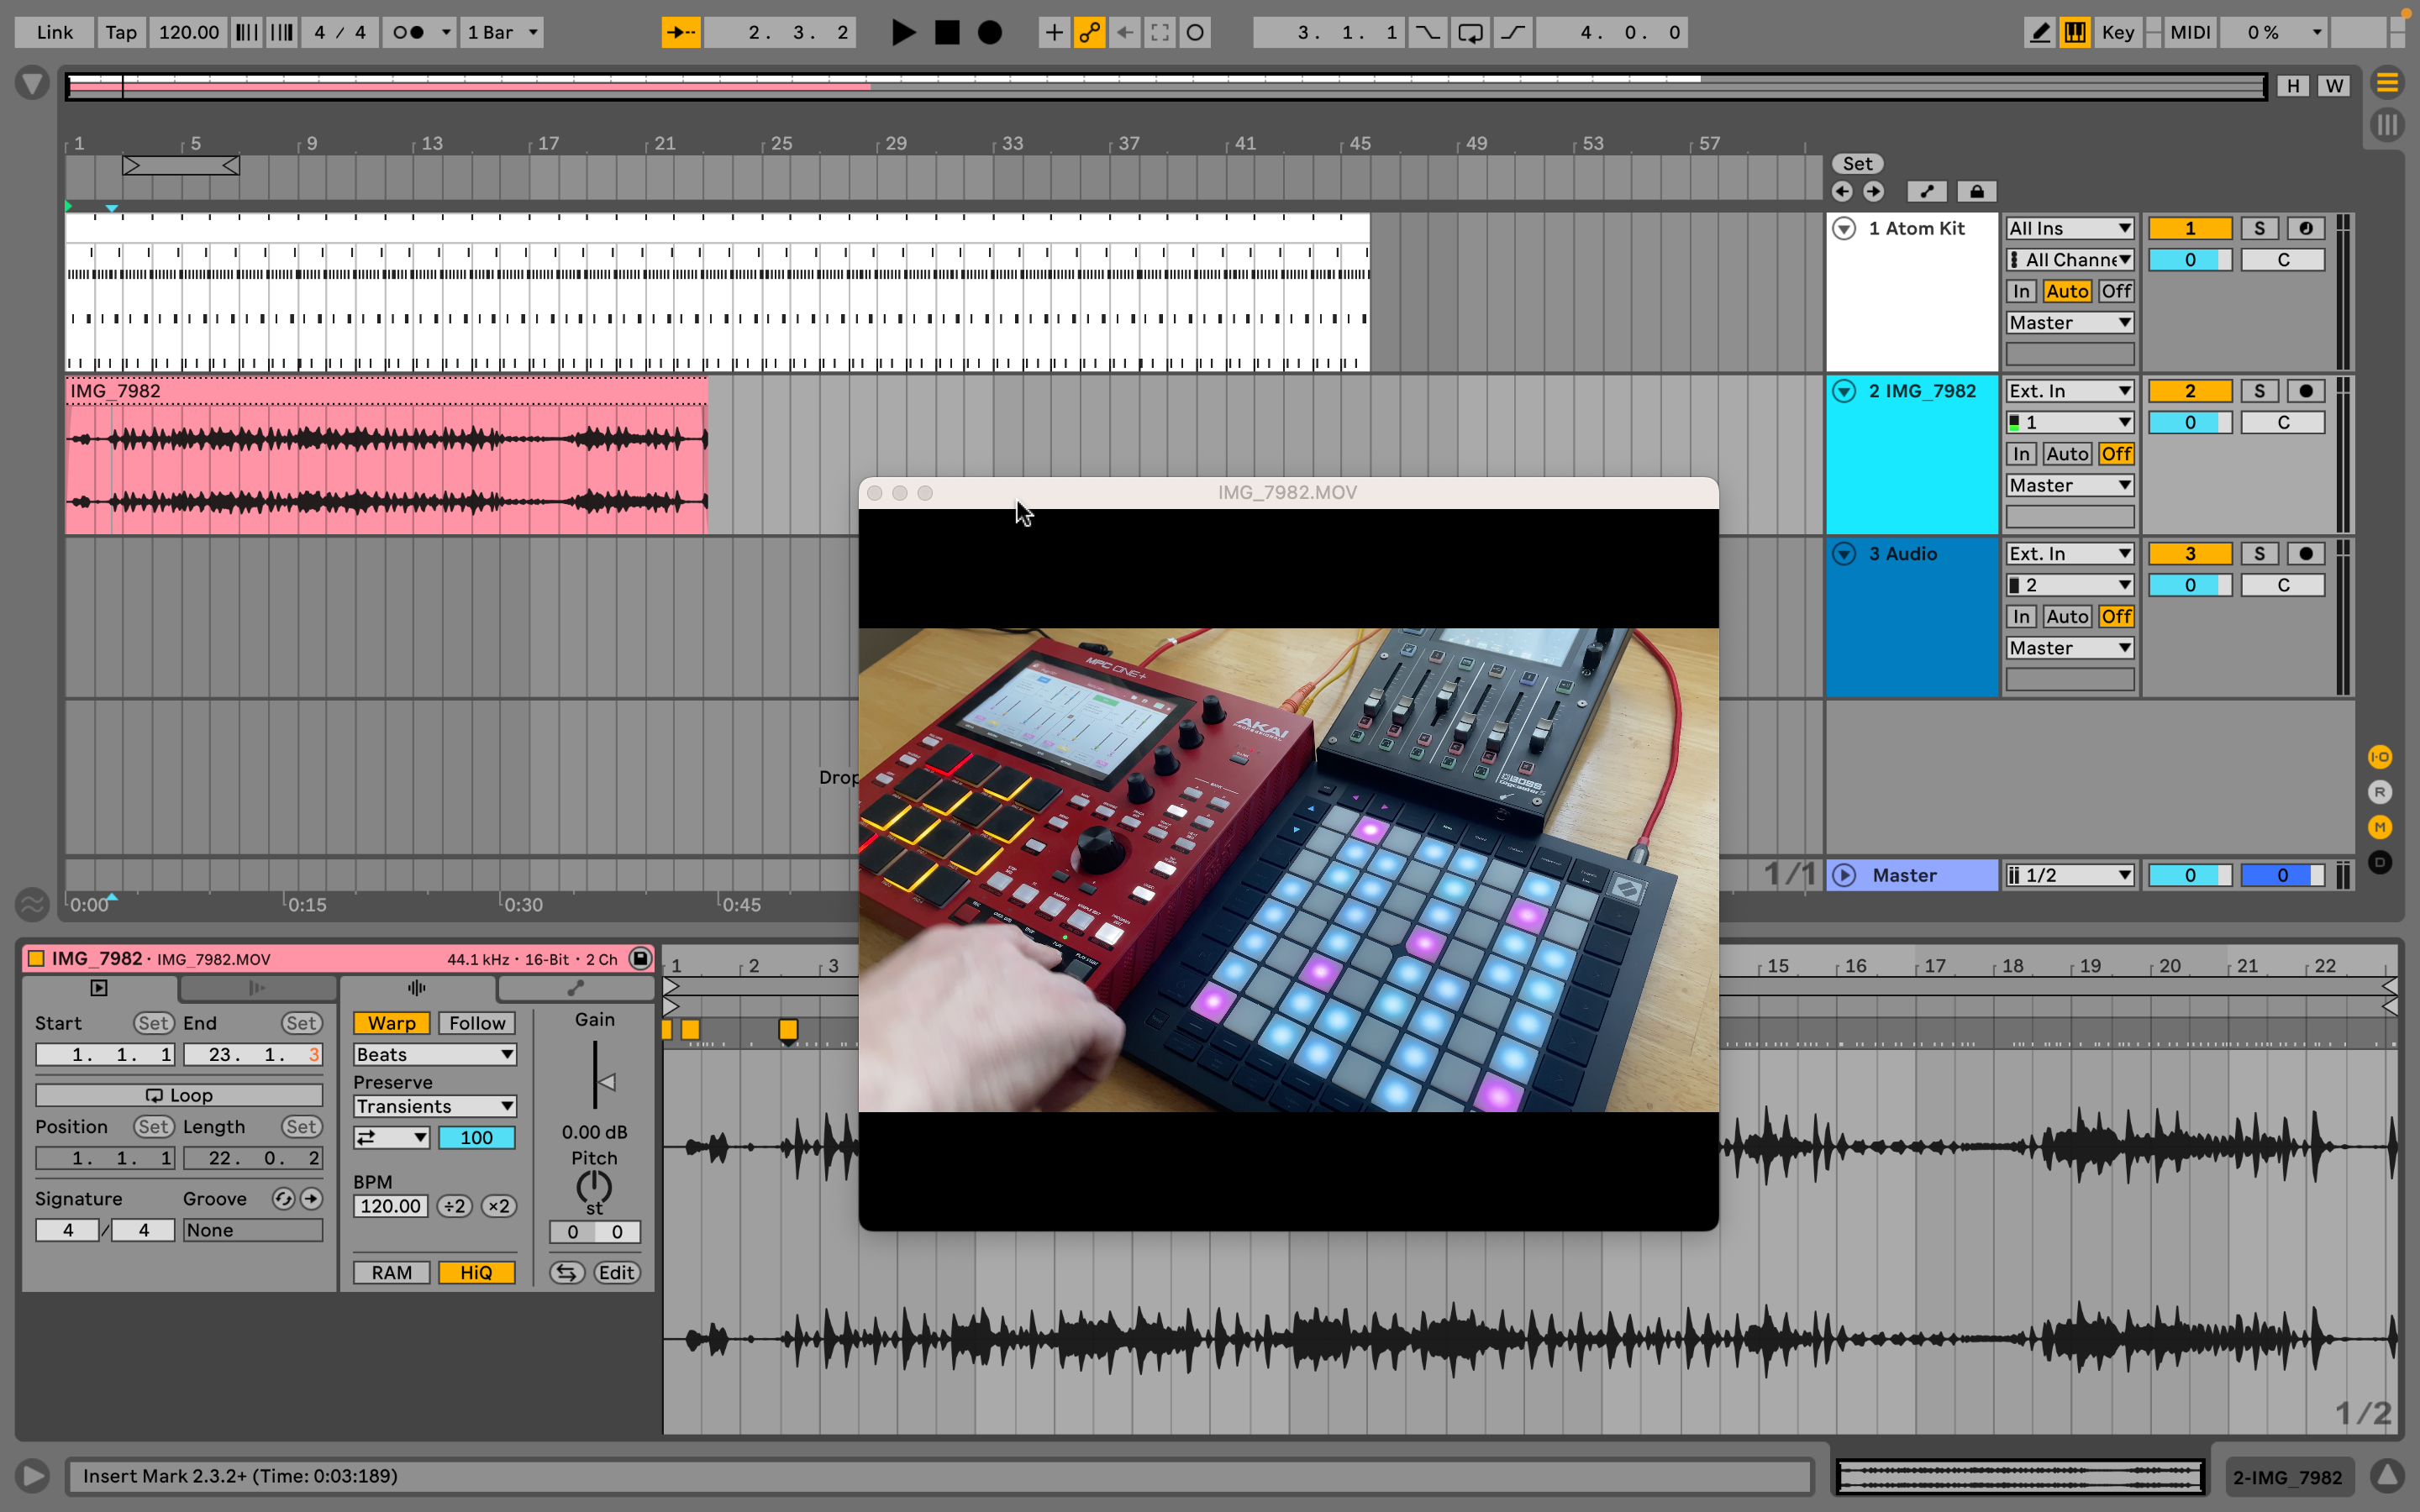
Did you know that Live can import video clips? Drag a movie clip into the Arrangement View’s drop area, and a new audio track will automatically be created to host it. Live’s video window should also open automatically, use the menu command if it doesn’t. This window can be dragged to resize, or repositioned on a second display or output to a projector.
If the movie clip has audio, you’ll see the waveform, and be able apply audio effects as usual. By judicious use of warp markers, you can change the playback speed of the video as well, which can be useful for lining it up precisely with a piece of music.
Want all the hottest music and gear news, reviews, deals, features and more, direct to your inbox? Sign up here.
3. Edit video
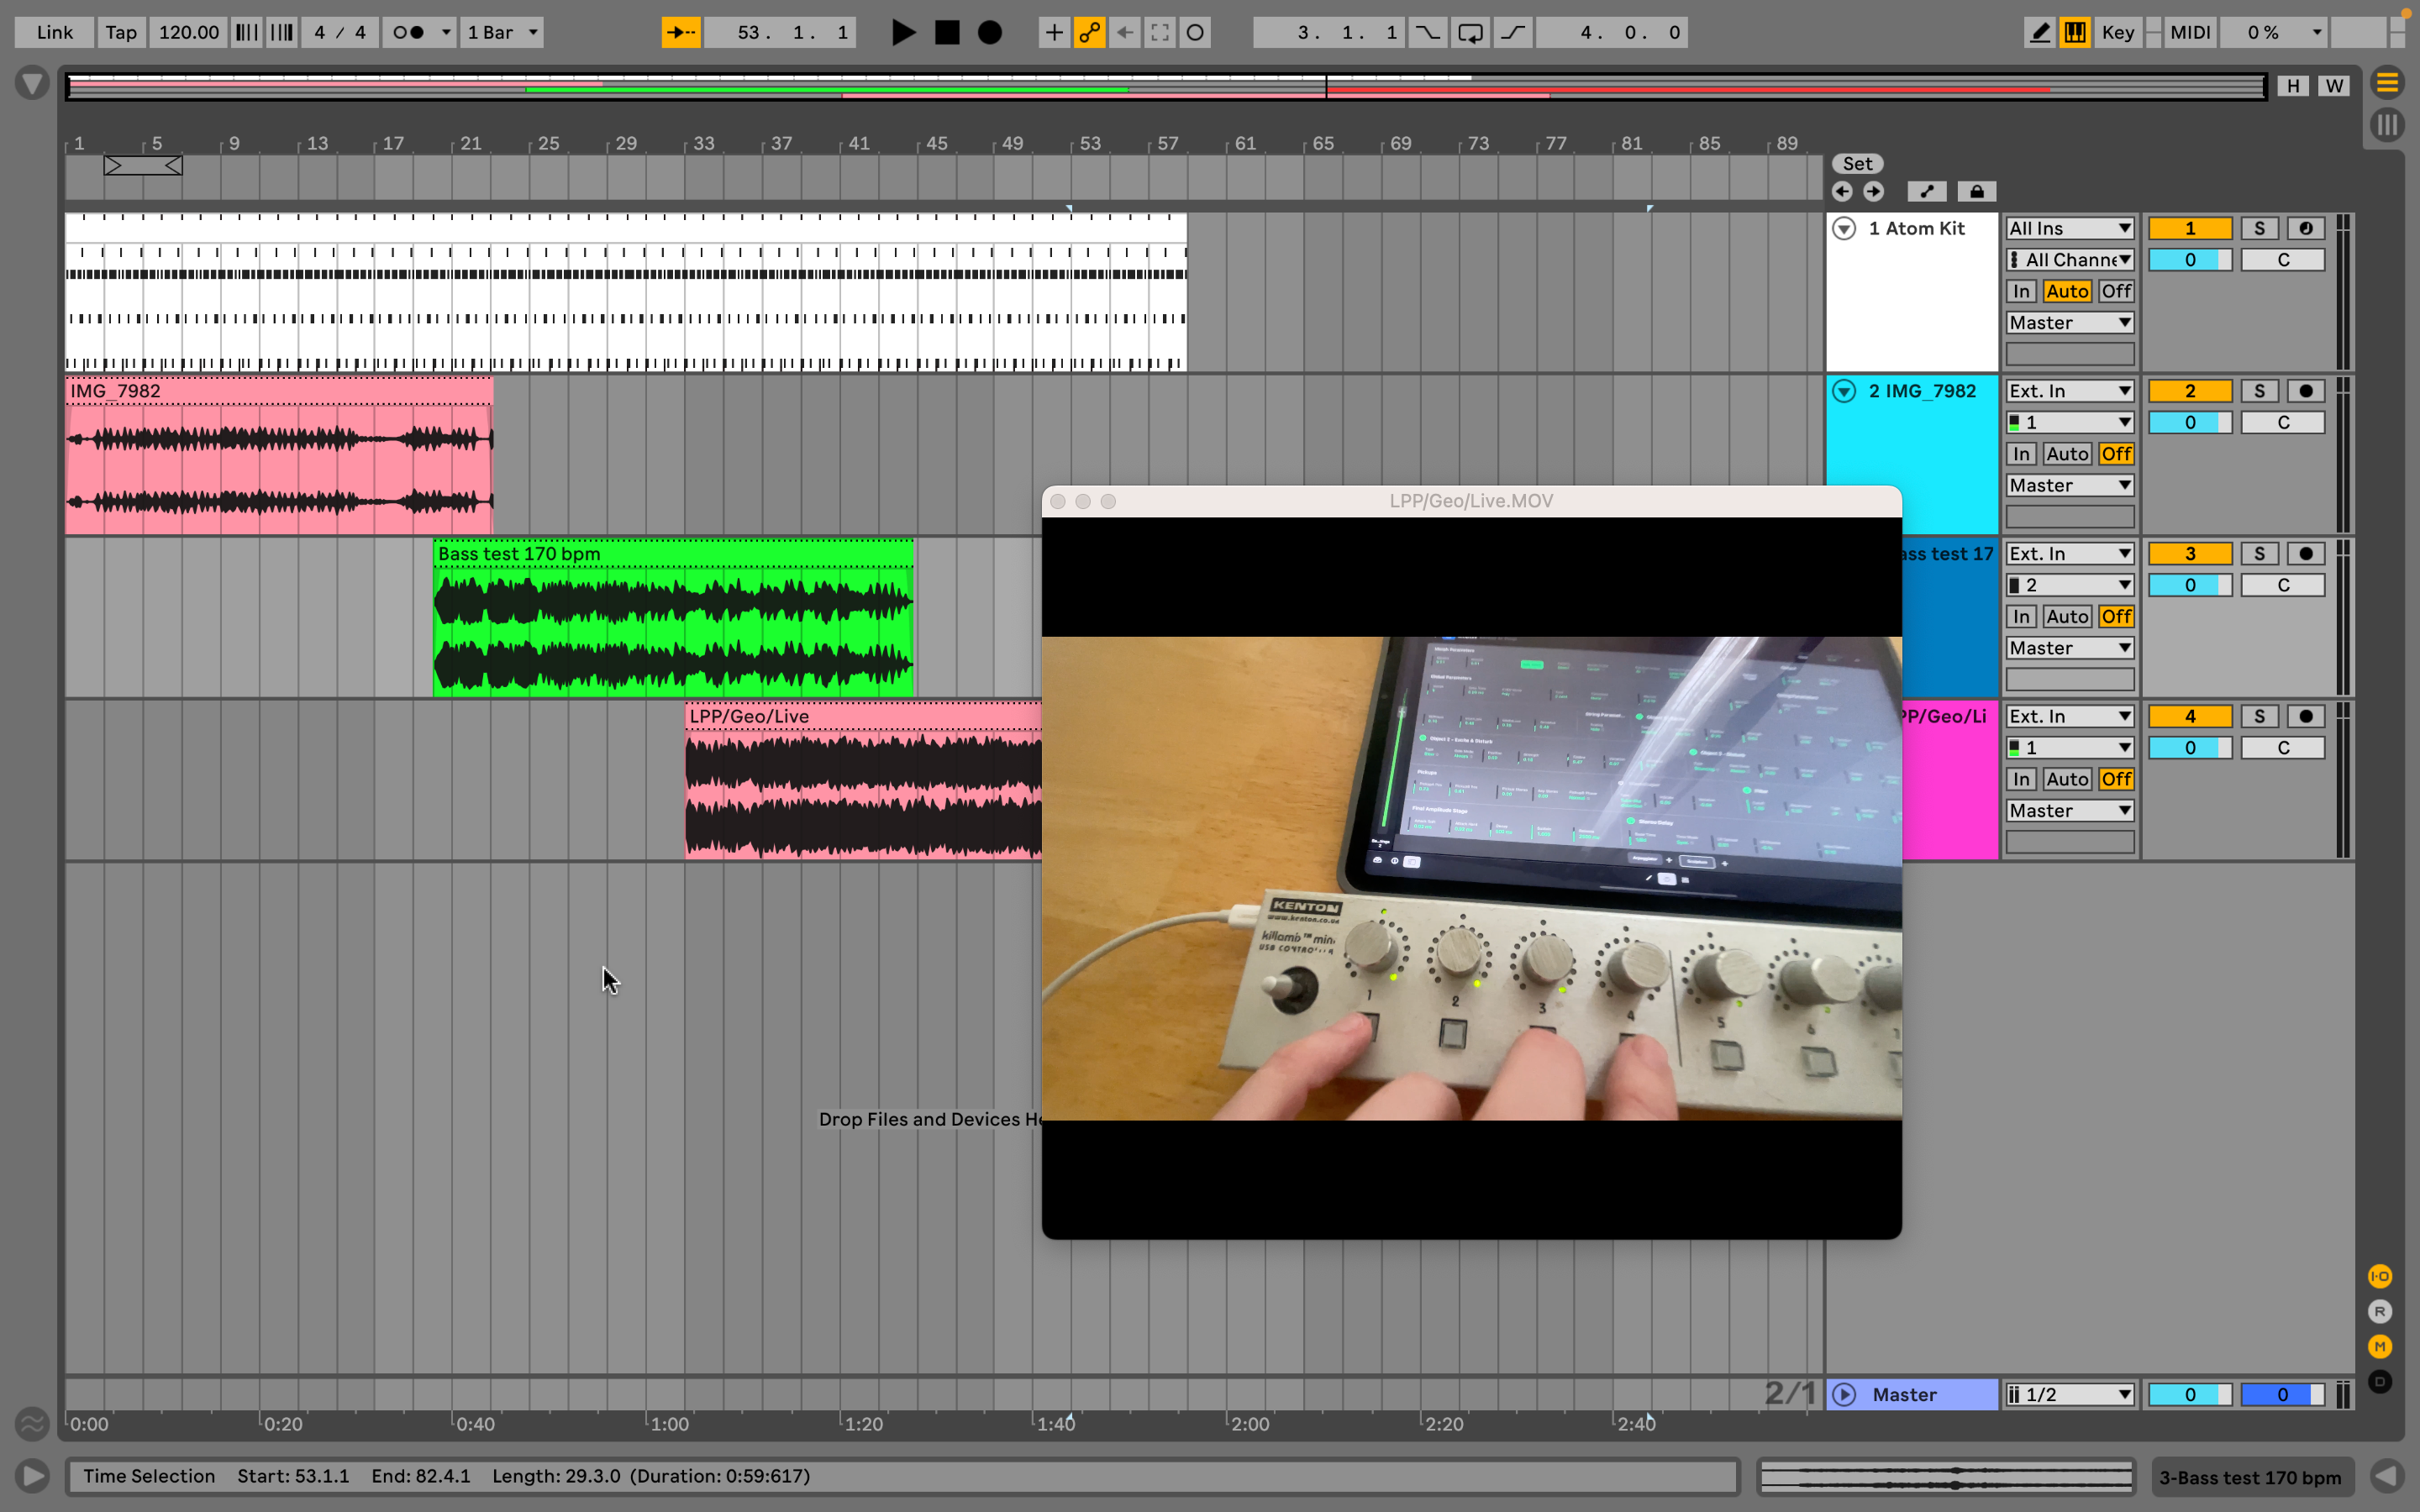
You can add as many video clips as you like to a single track, or drag each to a separate new track. In this case, Live will prioritise playing back the video in the uppermost track, and any gaps in the timeline without video will simple appear as a black screen. Using this method and by dragging the starts/ends of clips, it’s feasible to use Live as a basic video editor (although there aren’t any video effects or deeper editing tools).
This is a basic way to give yourself a movie timeline to accompany your live music - most venues these days have video projects installed. If you drop a movie clip into Live’s Session View, however, only the audio from the clip will be imported - which is actually quite a fast way to sample audio from a movie clip into Live. Now when you come to export your finished song, you get a world of video format options as well.
4. Use machine learning
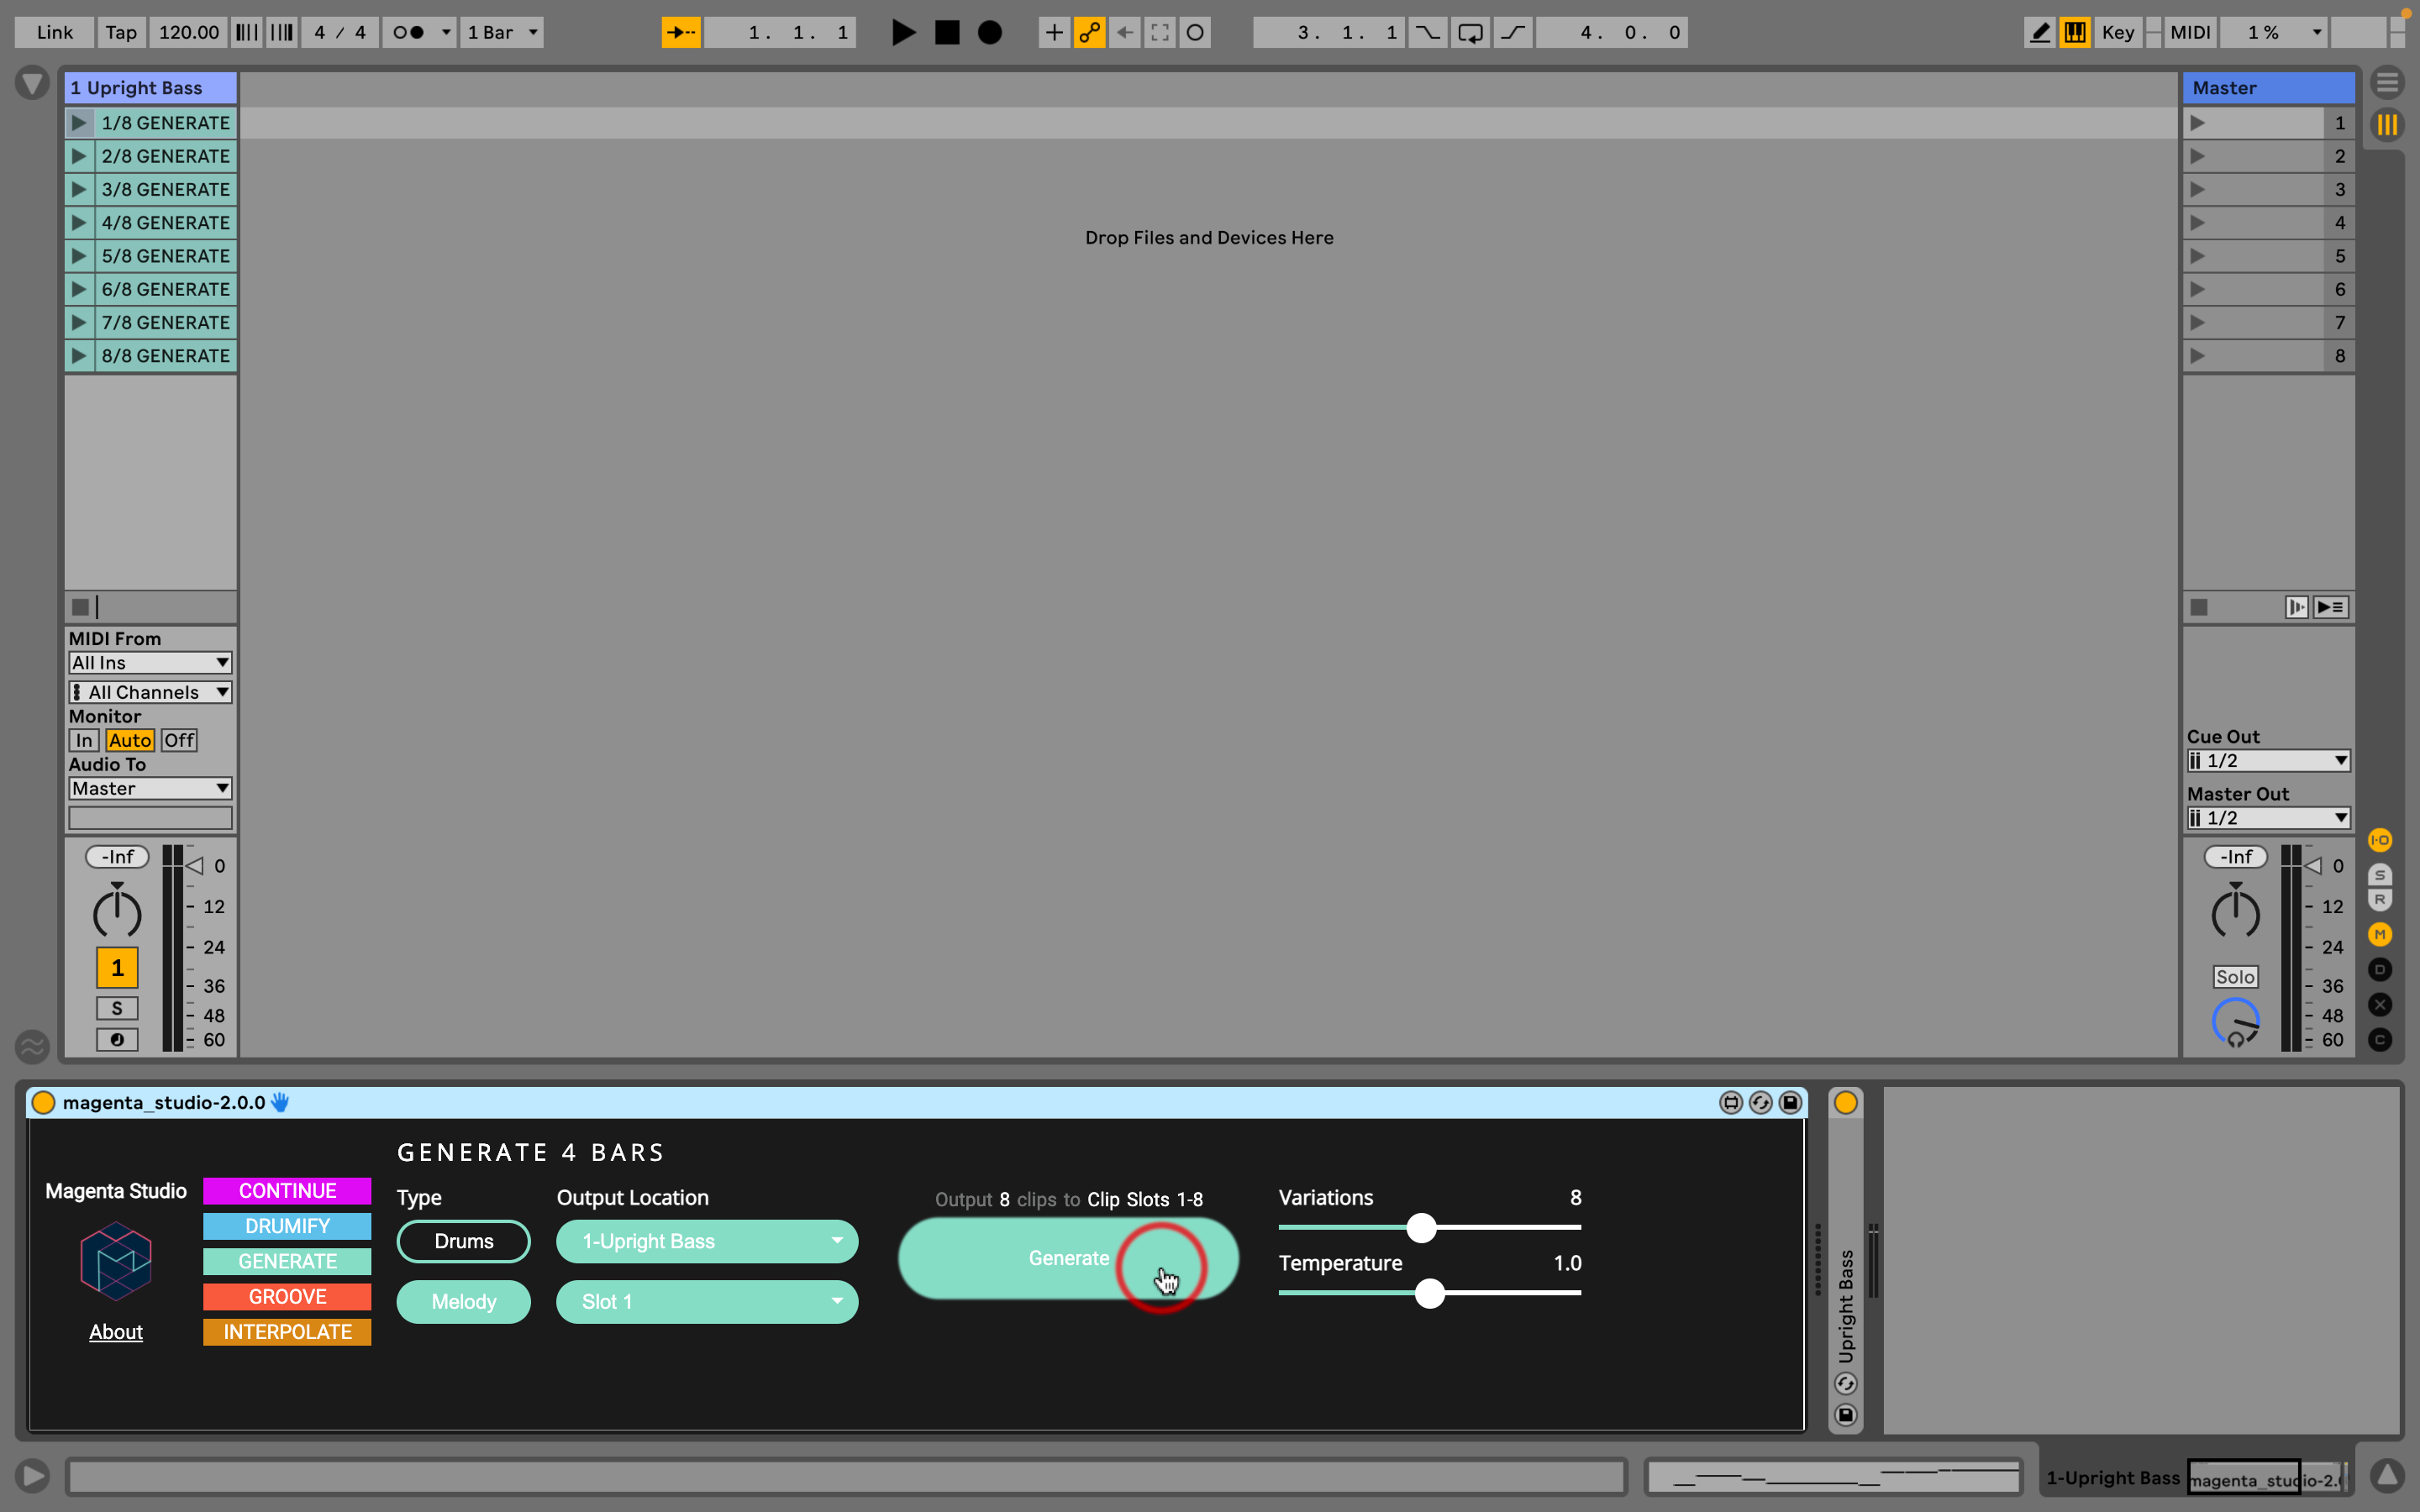
You’ve probably read that not all of us creative types are thrilled about the advancement of AI. However, one thing we can approve of is machine learning, a good example being Google’s Magenta Studio, which we find interesting and inspiring. Begin by visiting the Magenta website and downloading the Magenta Ableton Live device (you’ll need a version of Live that will open Max For Live devices). Drop it into any MIDI track that contains an instrument and you’re ready to play.
The Magenta Studio device contains five elements that produce different results, but let’s use Generate. Click on that, then choose Melody, the name of your MIDI track, and the number of a clip slot. Then click the Generate button, and eight new MIDI clips will appear in the track.
Used in conjunction with Live’s other MIDI tools, such as Scale and Arpeggiator, these clips can be put to use as the basis for a new track. As well as for composing, this is an excellent tool for instrumentalists who want to generate new parts to practice with and switch up their playing habits.
5. Make Live projects on your phone
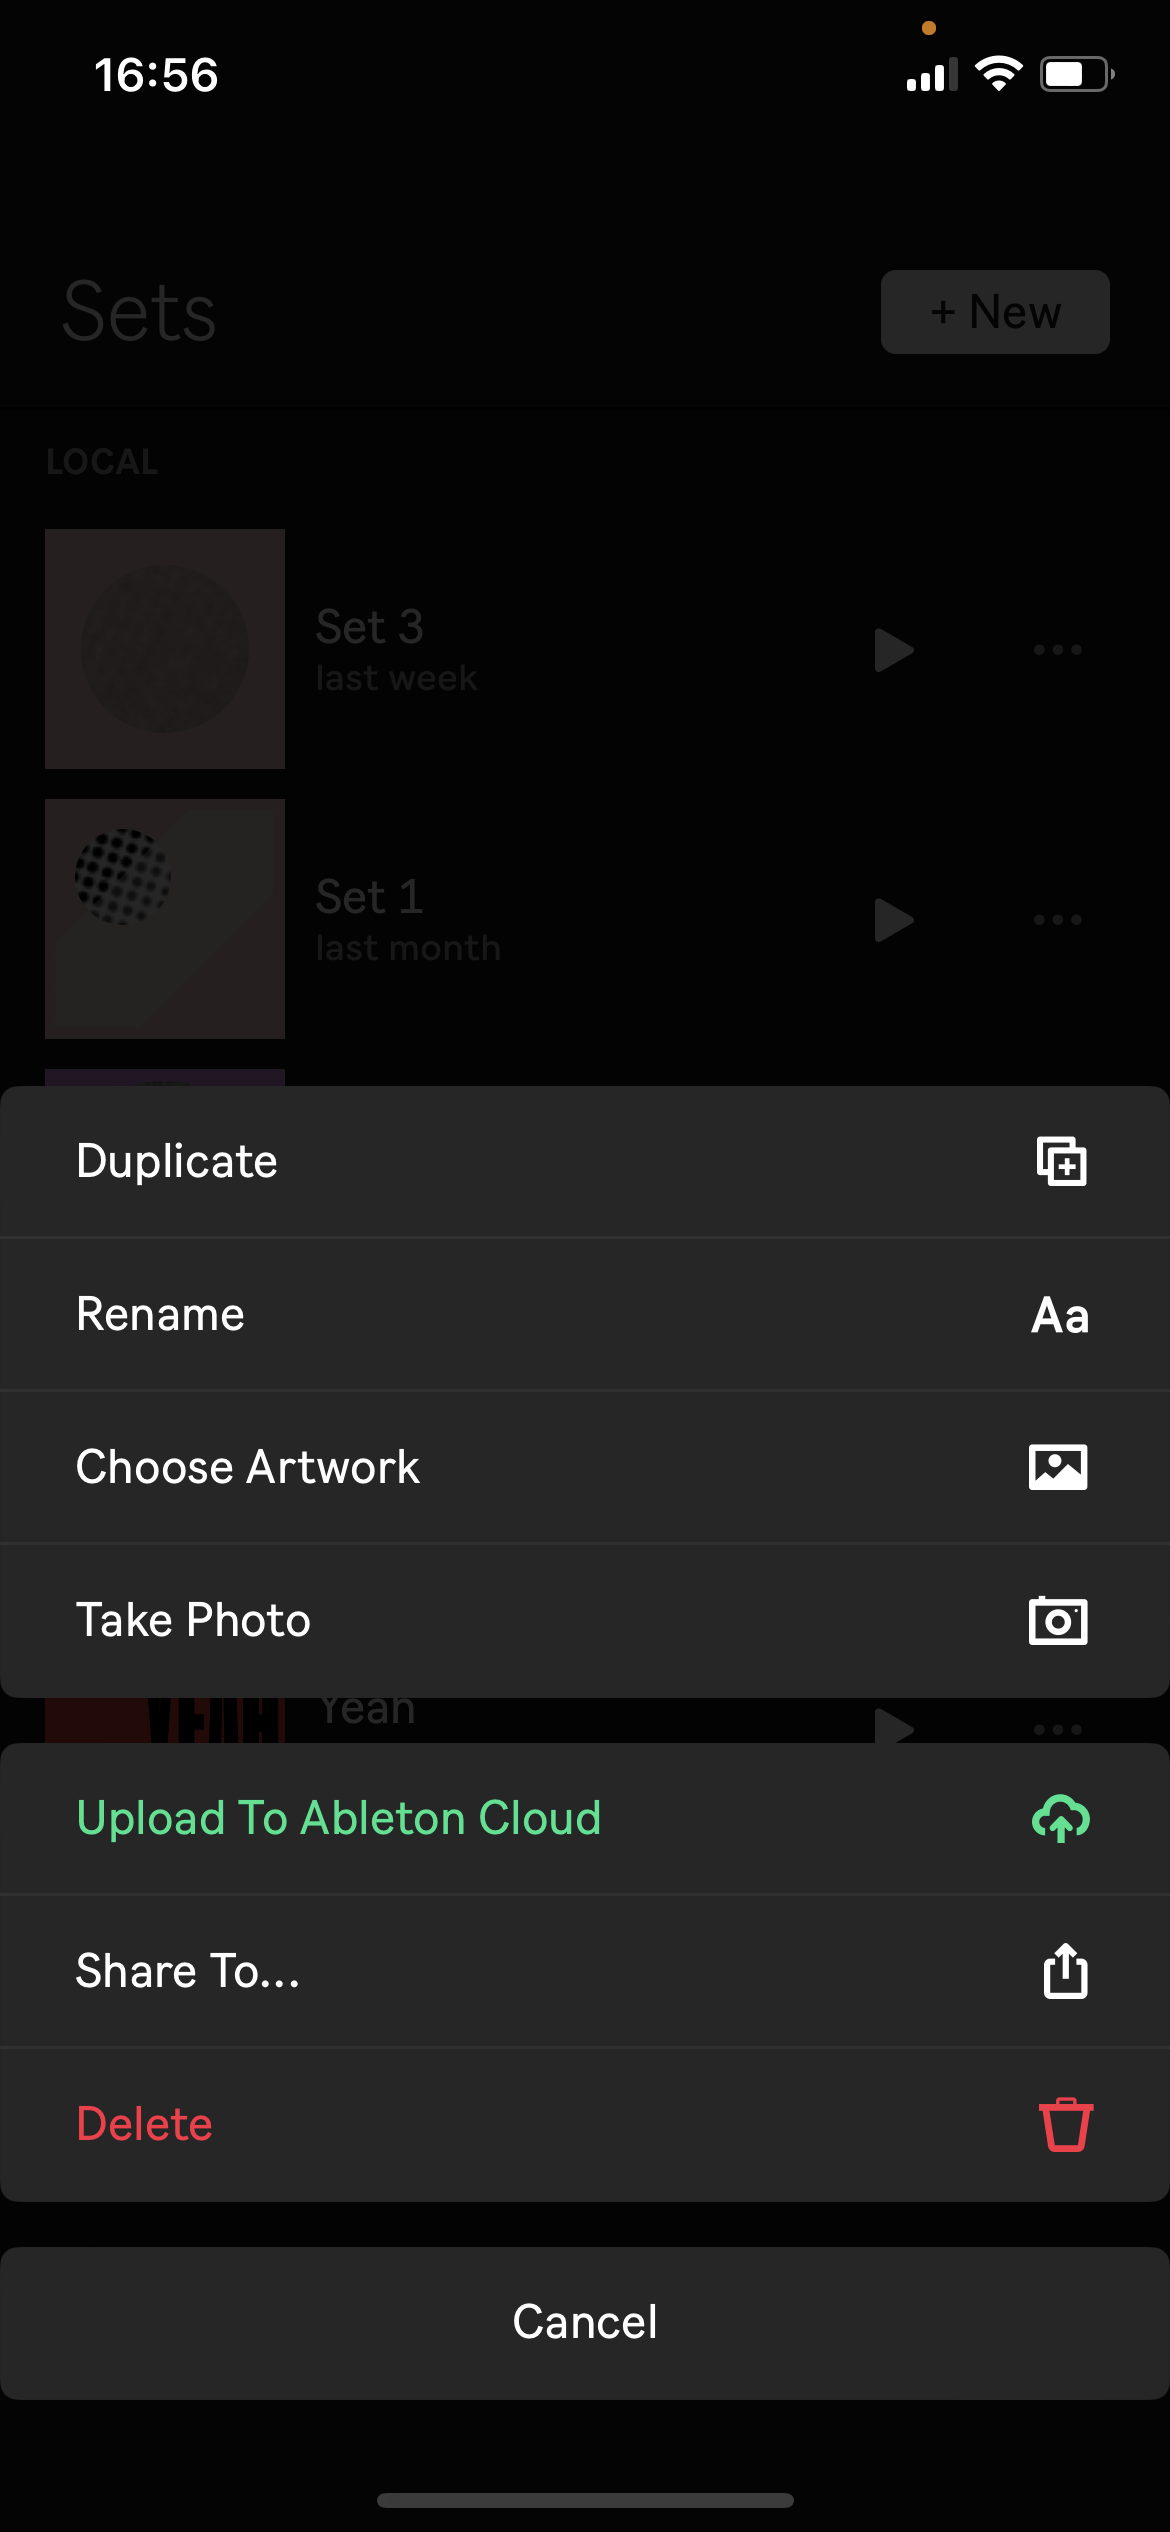
Ableton’s Note app runs on iOS and the closely-related iPadOS, although arguably it’s better suited for smaller devices - a lot of real estate goes to waste on bigger displays. Note isn’t likely to replace Live any time soon, but it’s becoming a useful little music creation app in its own right.
Importantly for us, projects can be sent from Note to a Mac or PC, so the sketched-out piece of music can be fully developed in the complete Live environment (files can not be sent back the other way, unsurprisingly). This can be accomplished via your device’s usual Share menu, and emailed or Airdropped, but Note can also access your Ableton Cloud account, which means after uploading it’ll appear in the Live Browser on your desktop application.
If you don’t have it installed already, keep an eye on Note’s progress, as they're very active with improvements and new features.
6. Use Scenes to change BPM and time signature
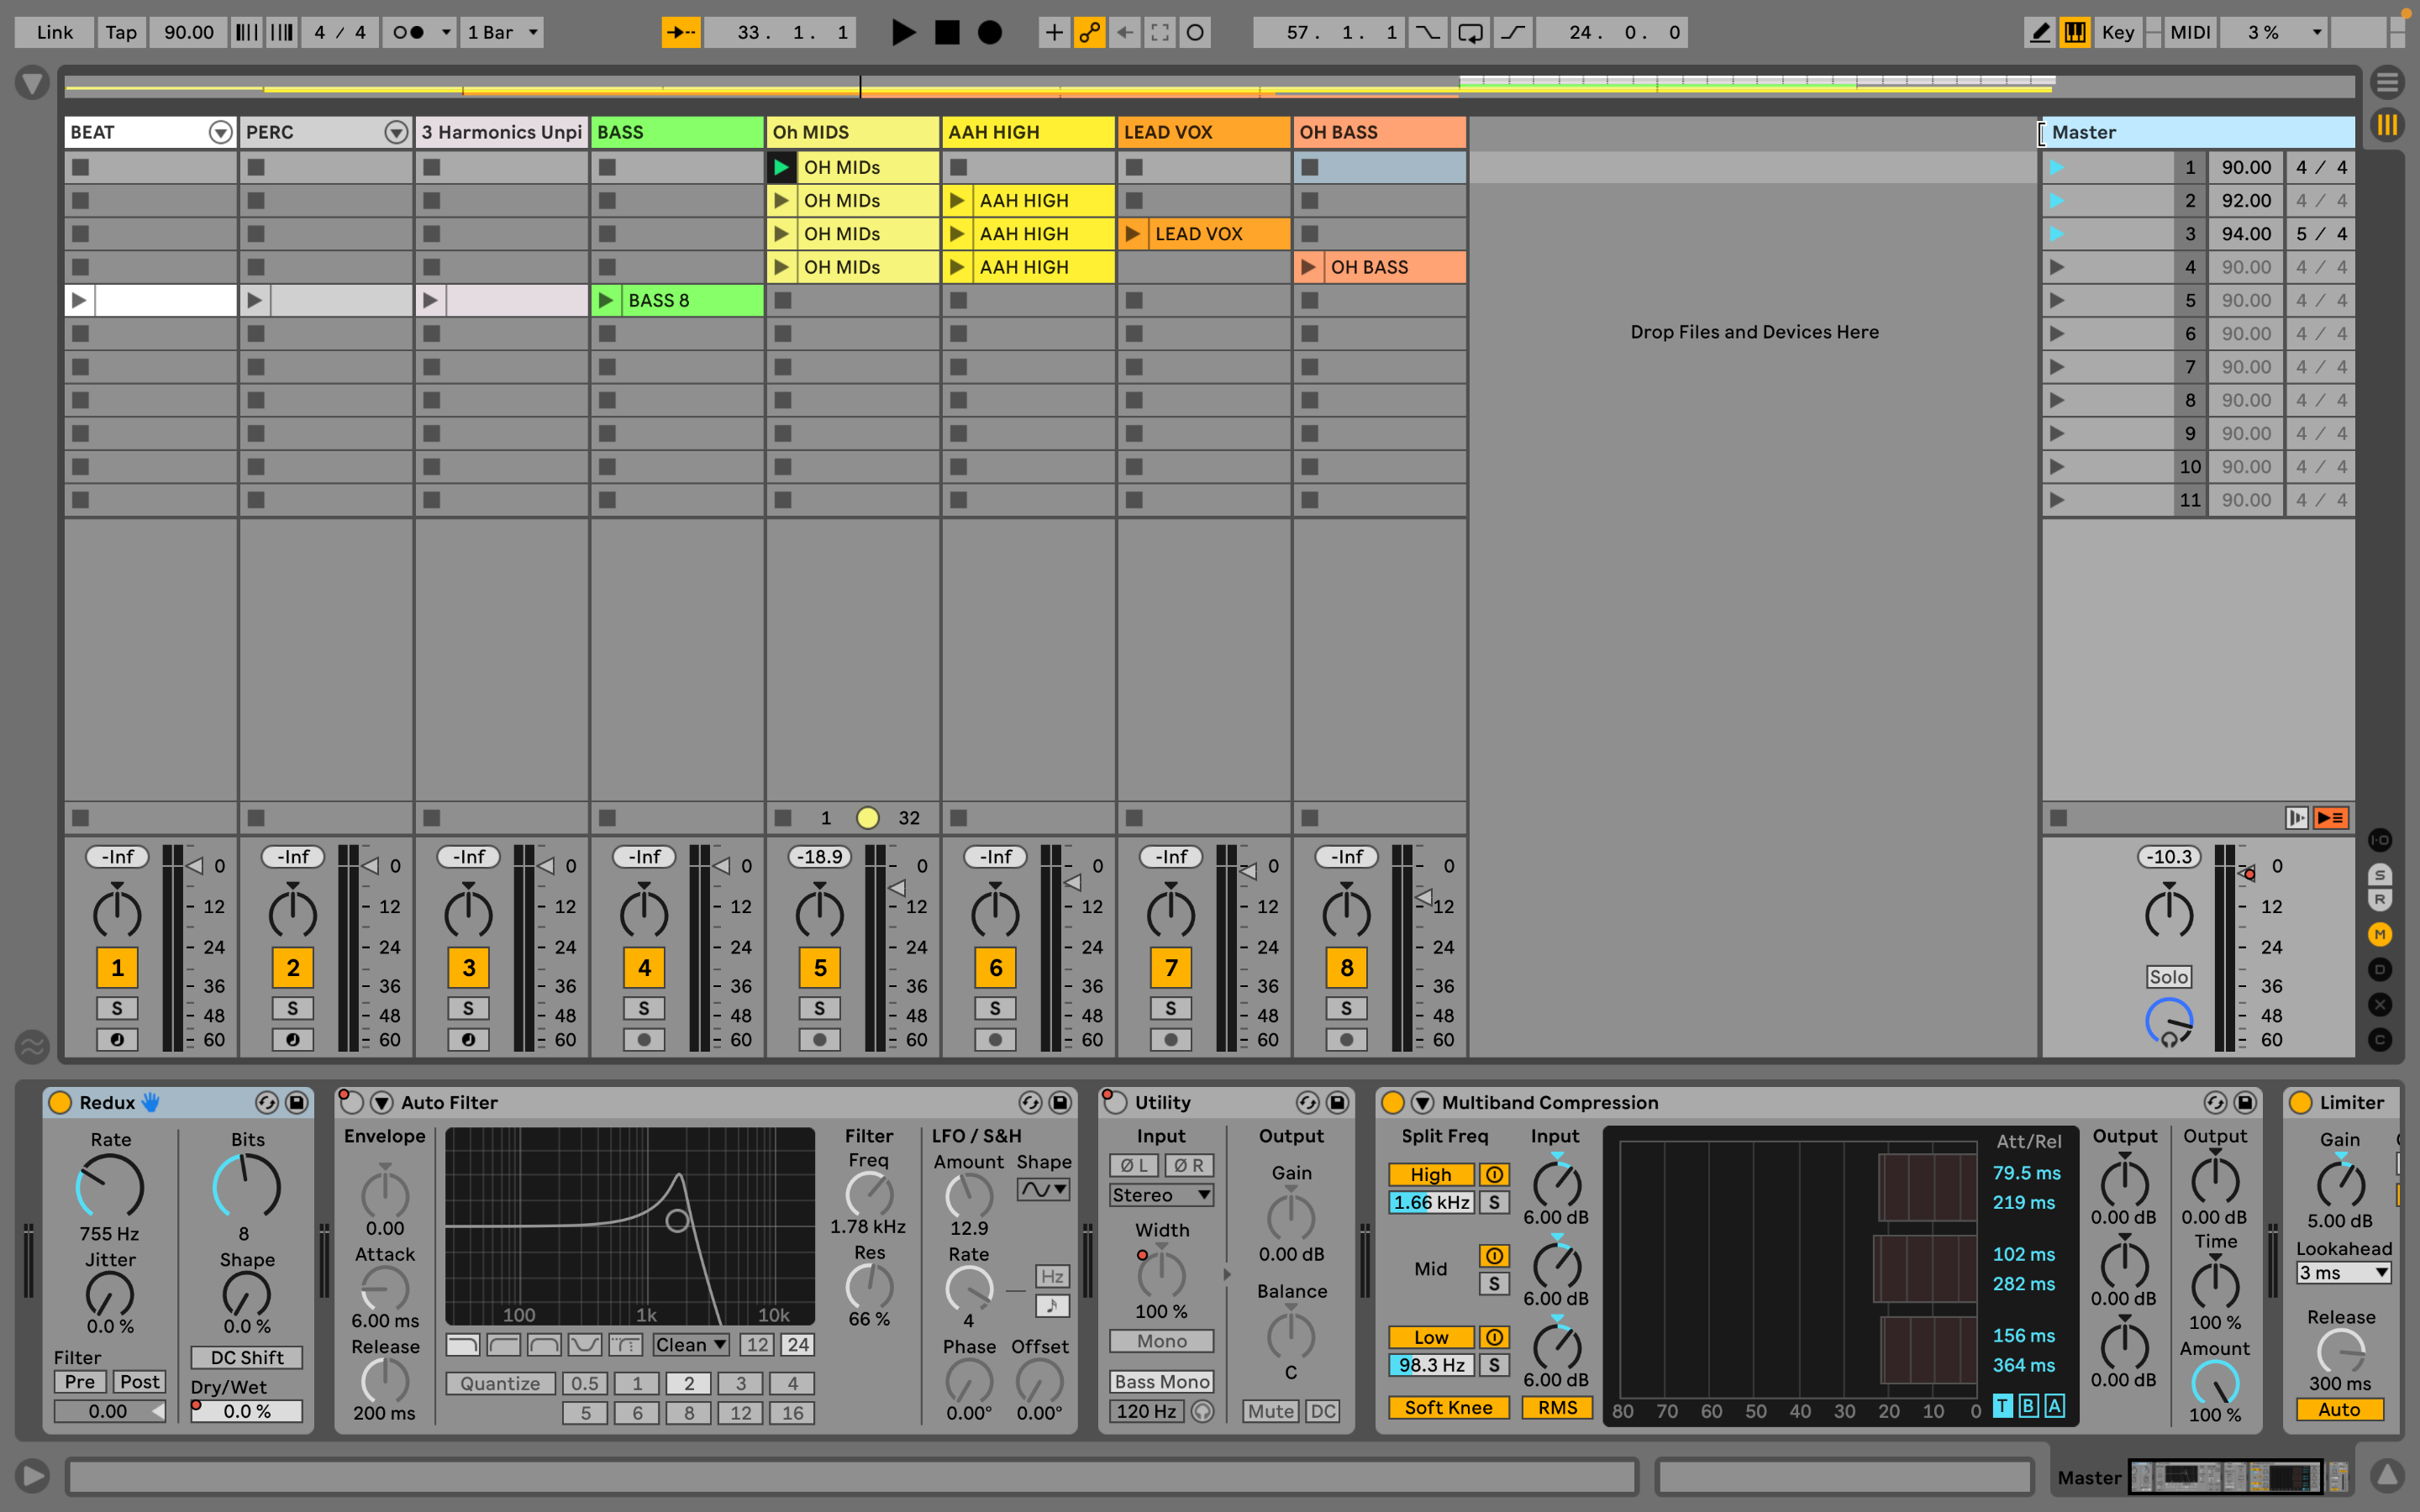
In Live, we aren’t restricted to straight tempos at 4/4, and both can be changed as a song progresses or switched up instantly during a performance.
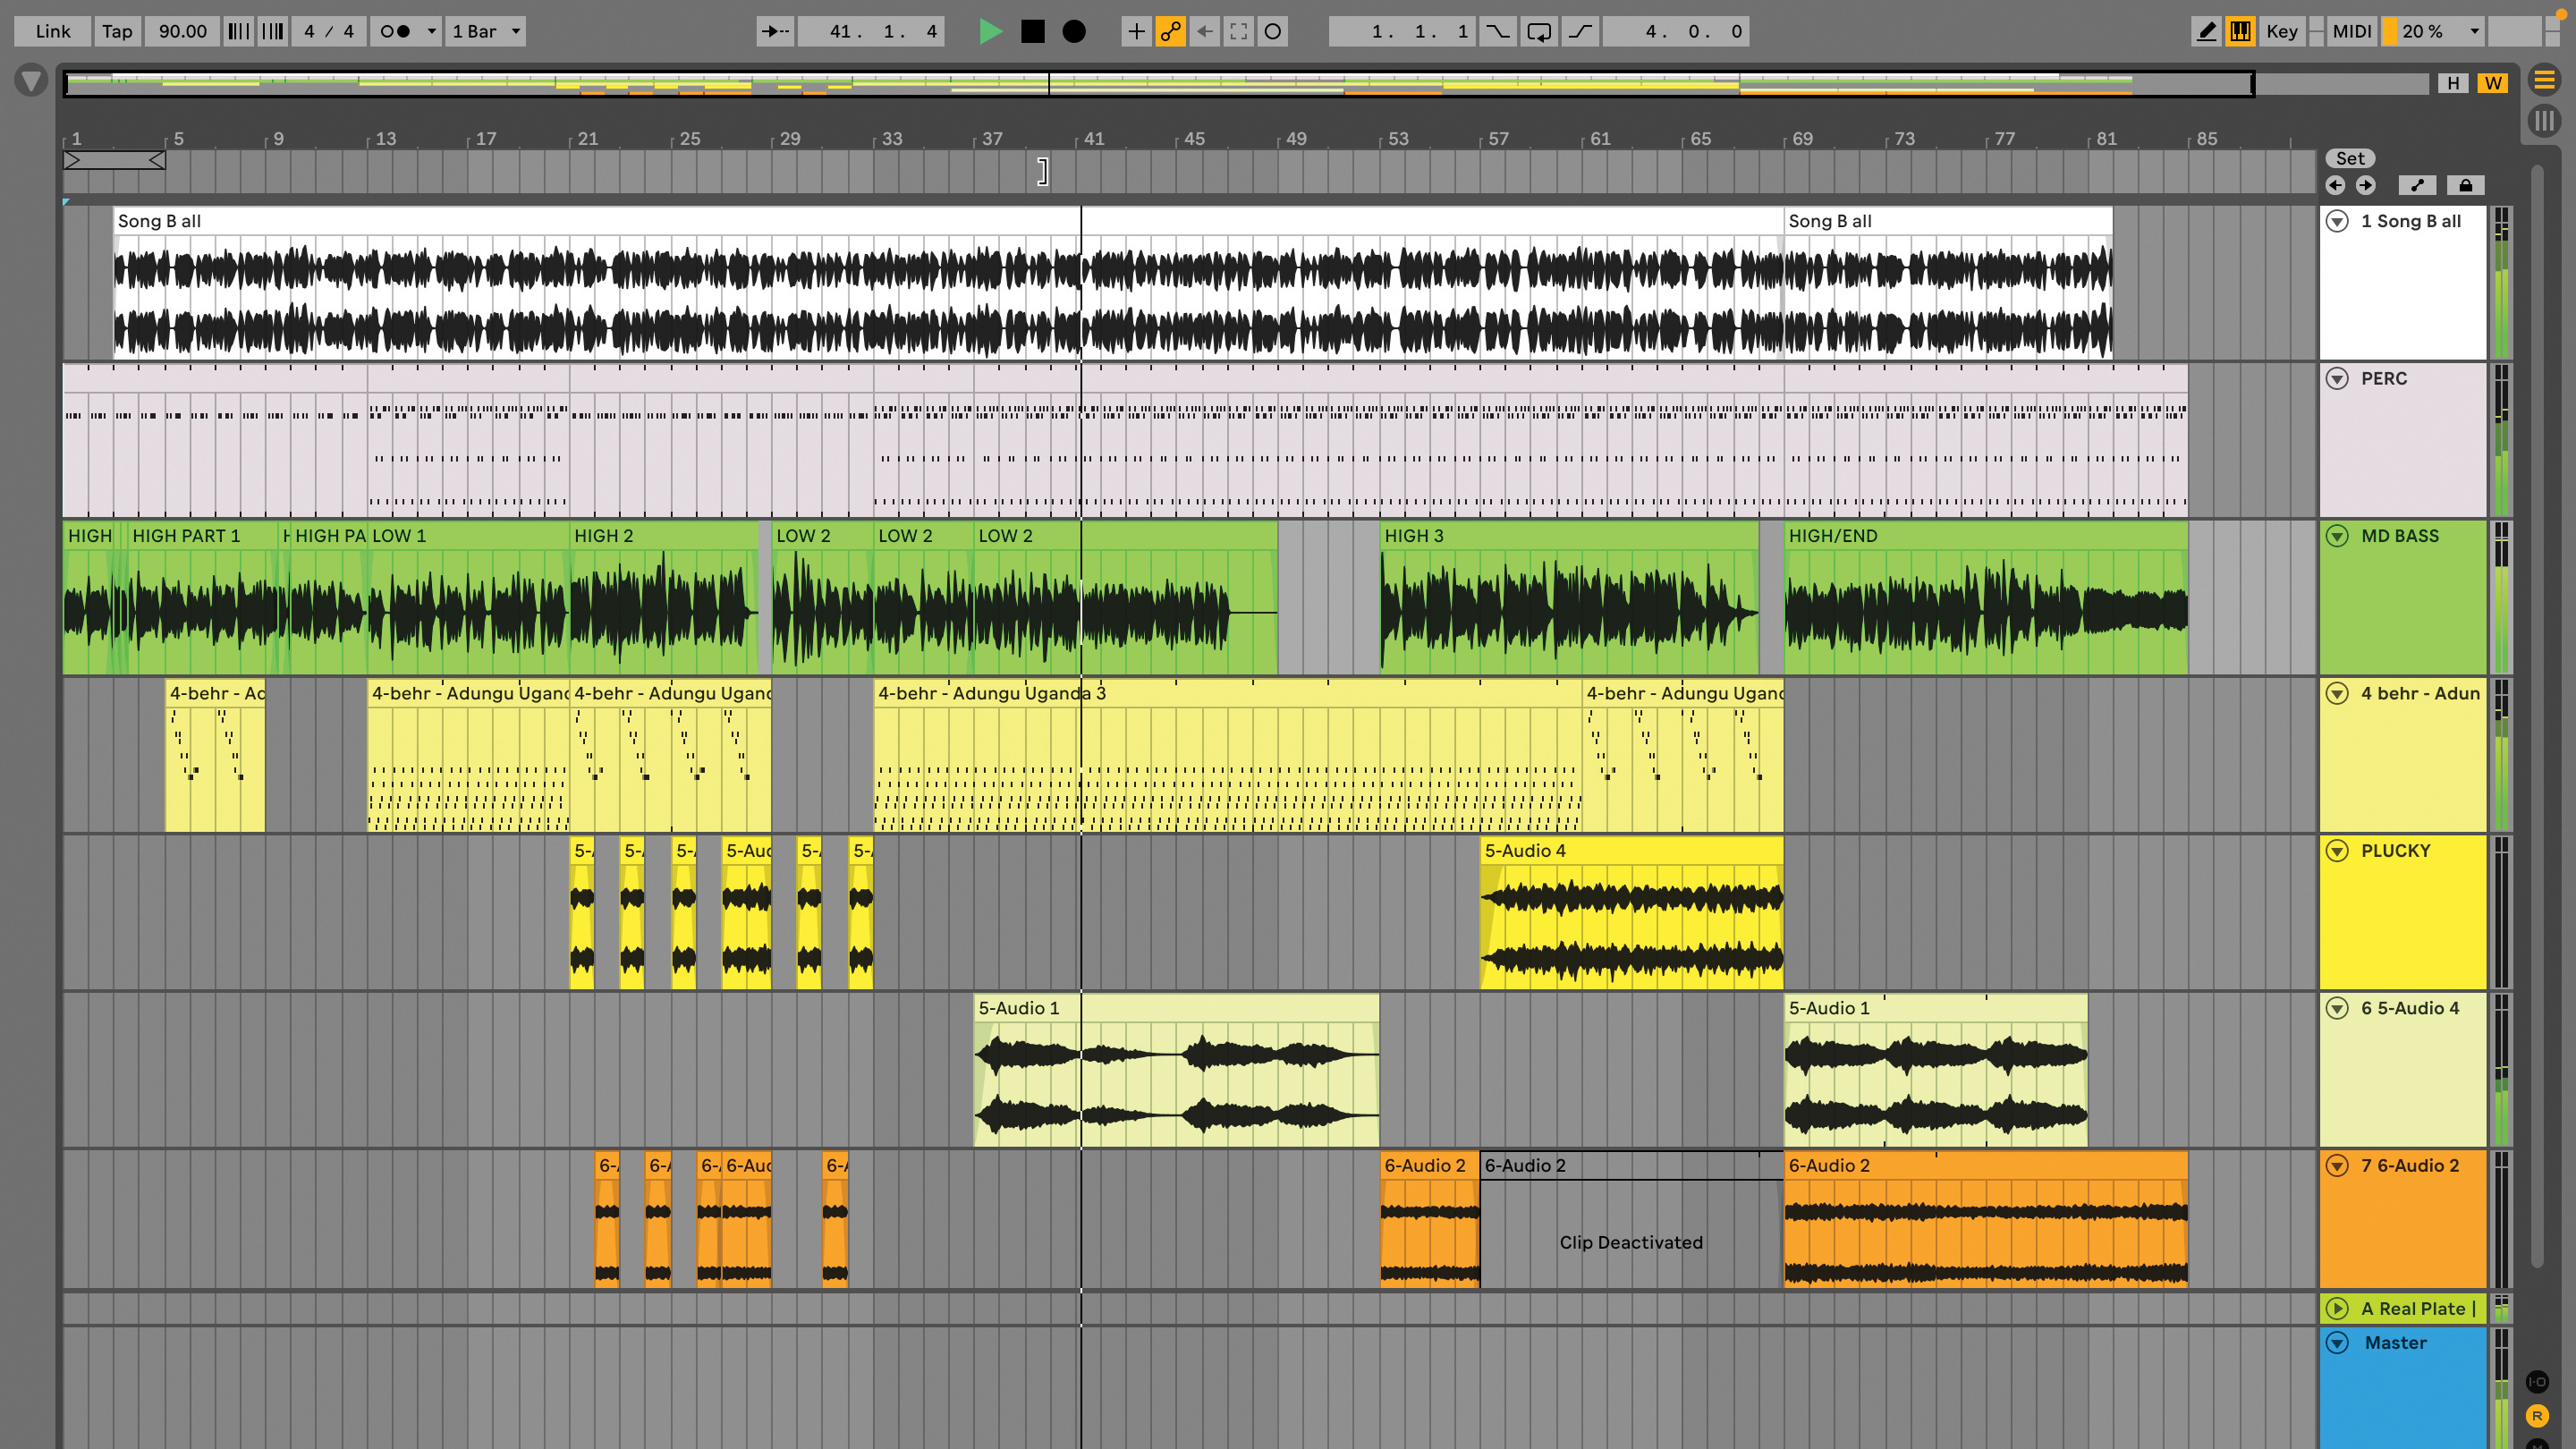
In Session View, this is achieved by making entries in the scene tempo and time signature columns at the right of the Live Session View, in the Master track (users of previous versions of Live can get the same result by using Rename to type in tempo and time signature information in the scene name). If you can’t see the columns, grab the left hand edge of the master track title bar, and drag it to the left until you can see the columns. Scenes with tempo and time signature information are highlighted.
In Arrangement View, time signature changes are inserted along the top of the timeline, while tempo changes are included as automation in the master track along the bottom. You can of course also change time signature within each individual clip, and globally at the top of the display.
7. Colour-coding
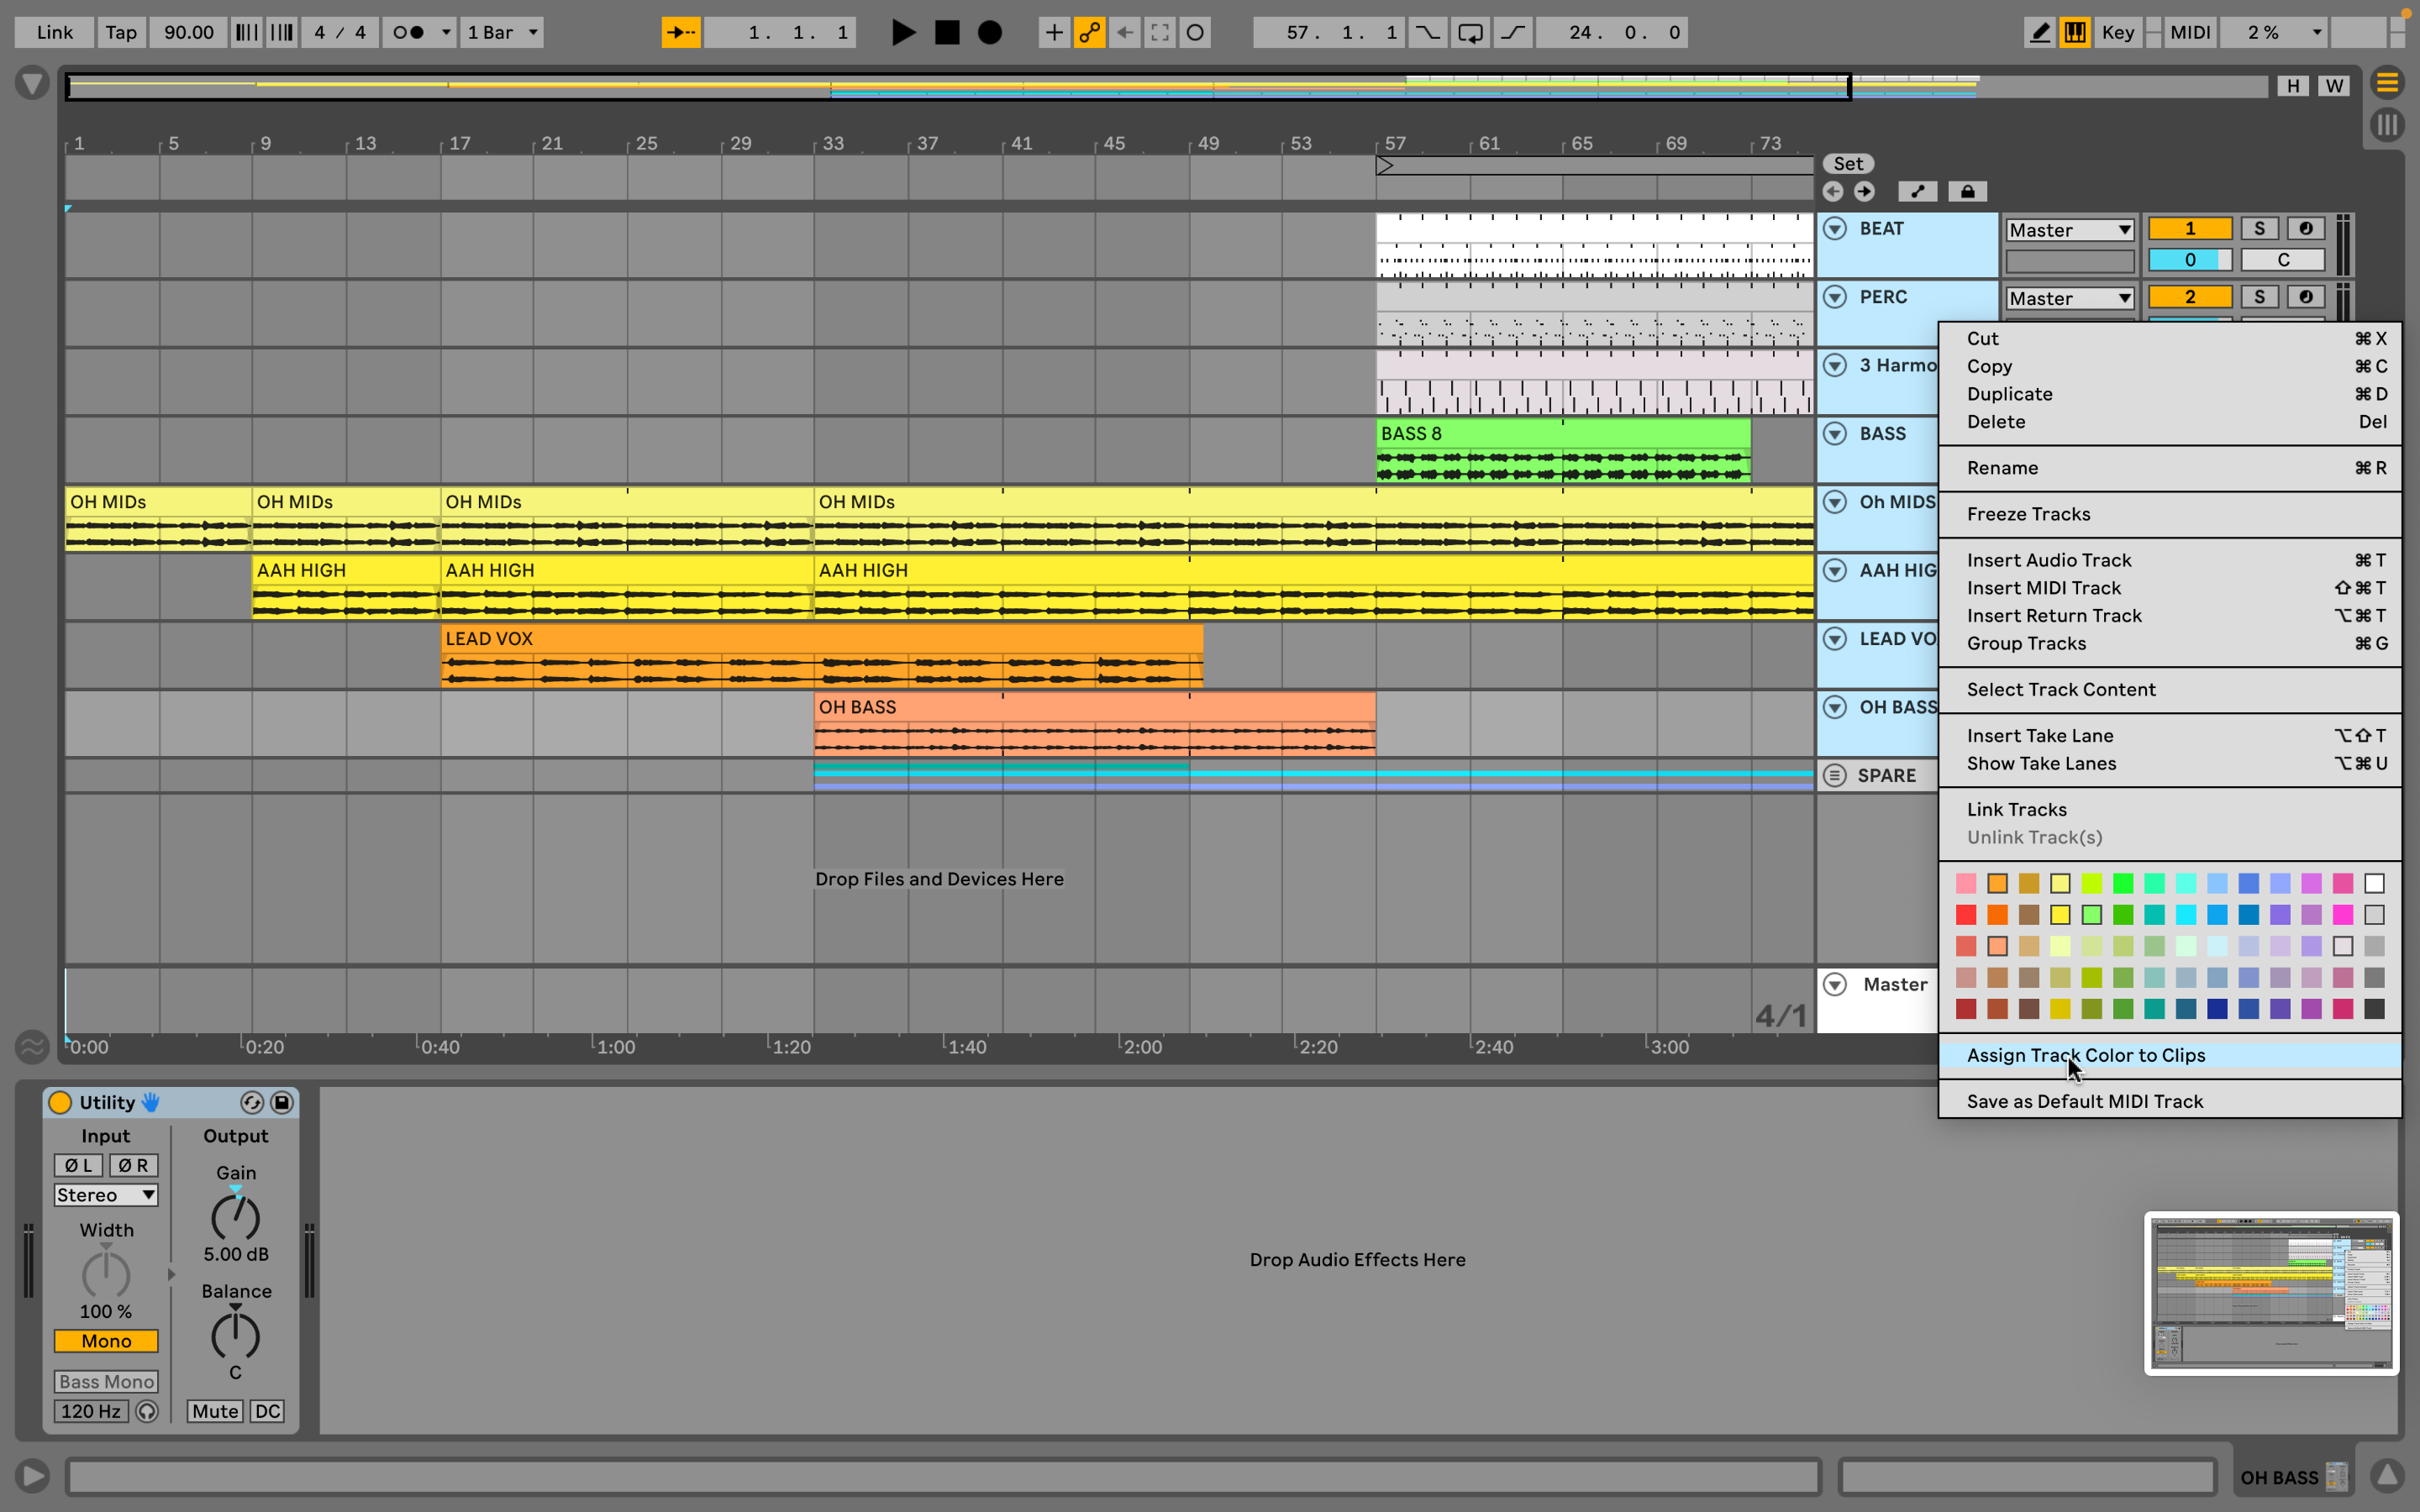
Colour-coding your Ableton Live projects can help to readily identify sections and even specific clips - this is of course convenient in the studio, but even more so in live performance situations, where a bit of colour can help to orient yourself quickly if you’re distracted or looking around the stage. Colour-coding is the first thing we do with a new project, and we know many big-name producers do this as well.
First we can go to Preferences/Look Feel and specify an overall colour Theme, that suits our taste or environment. Then we can right-click on a number of items on the Live interface and apply custom colours to them, including track headers, clips, and macros. The Context Menu also has an item called Assign Track Color to Clips, which will colour all clips at once - and if you have multiple tracks selected with shift-click, you can use this to apply track colours to all clips in the project.
8. Turn audio into MIDI
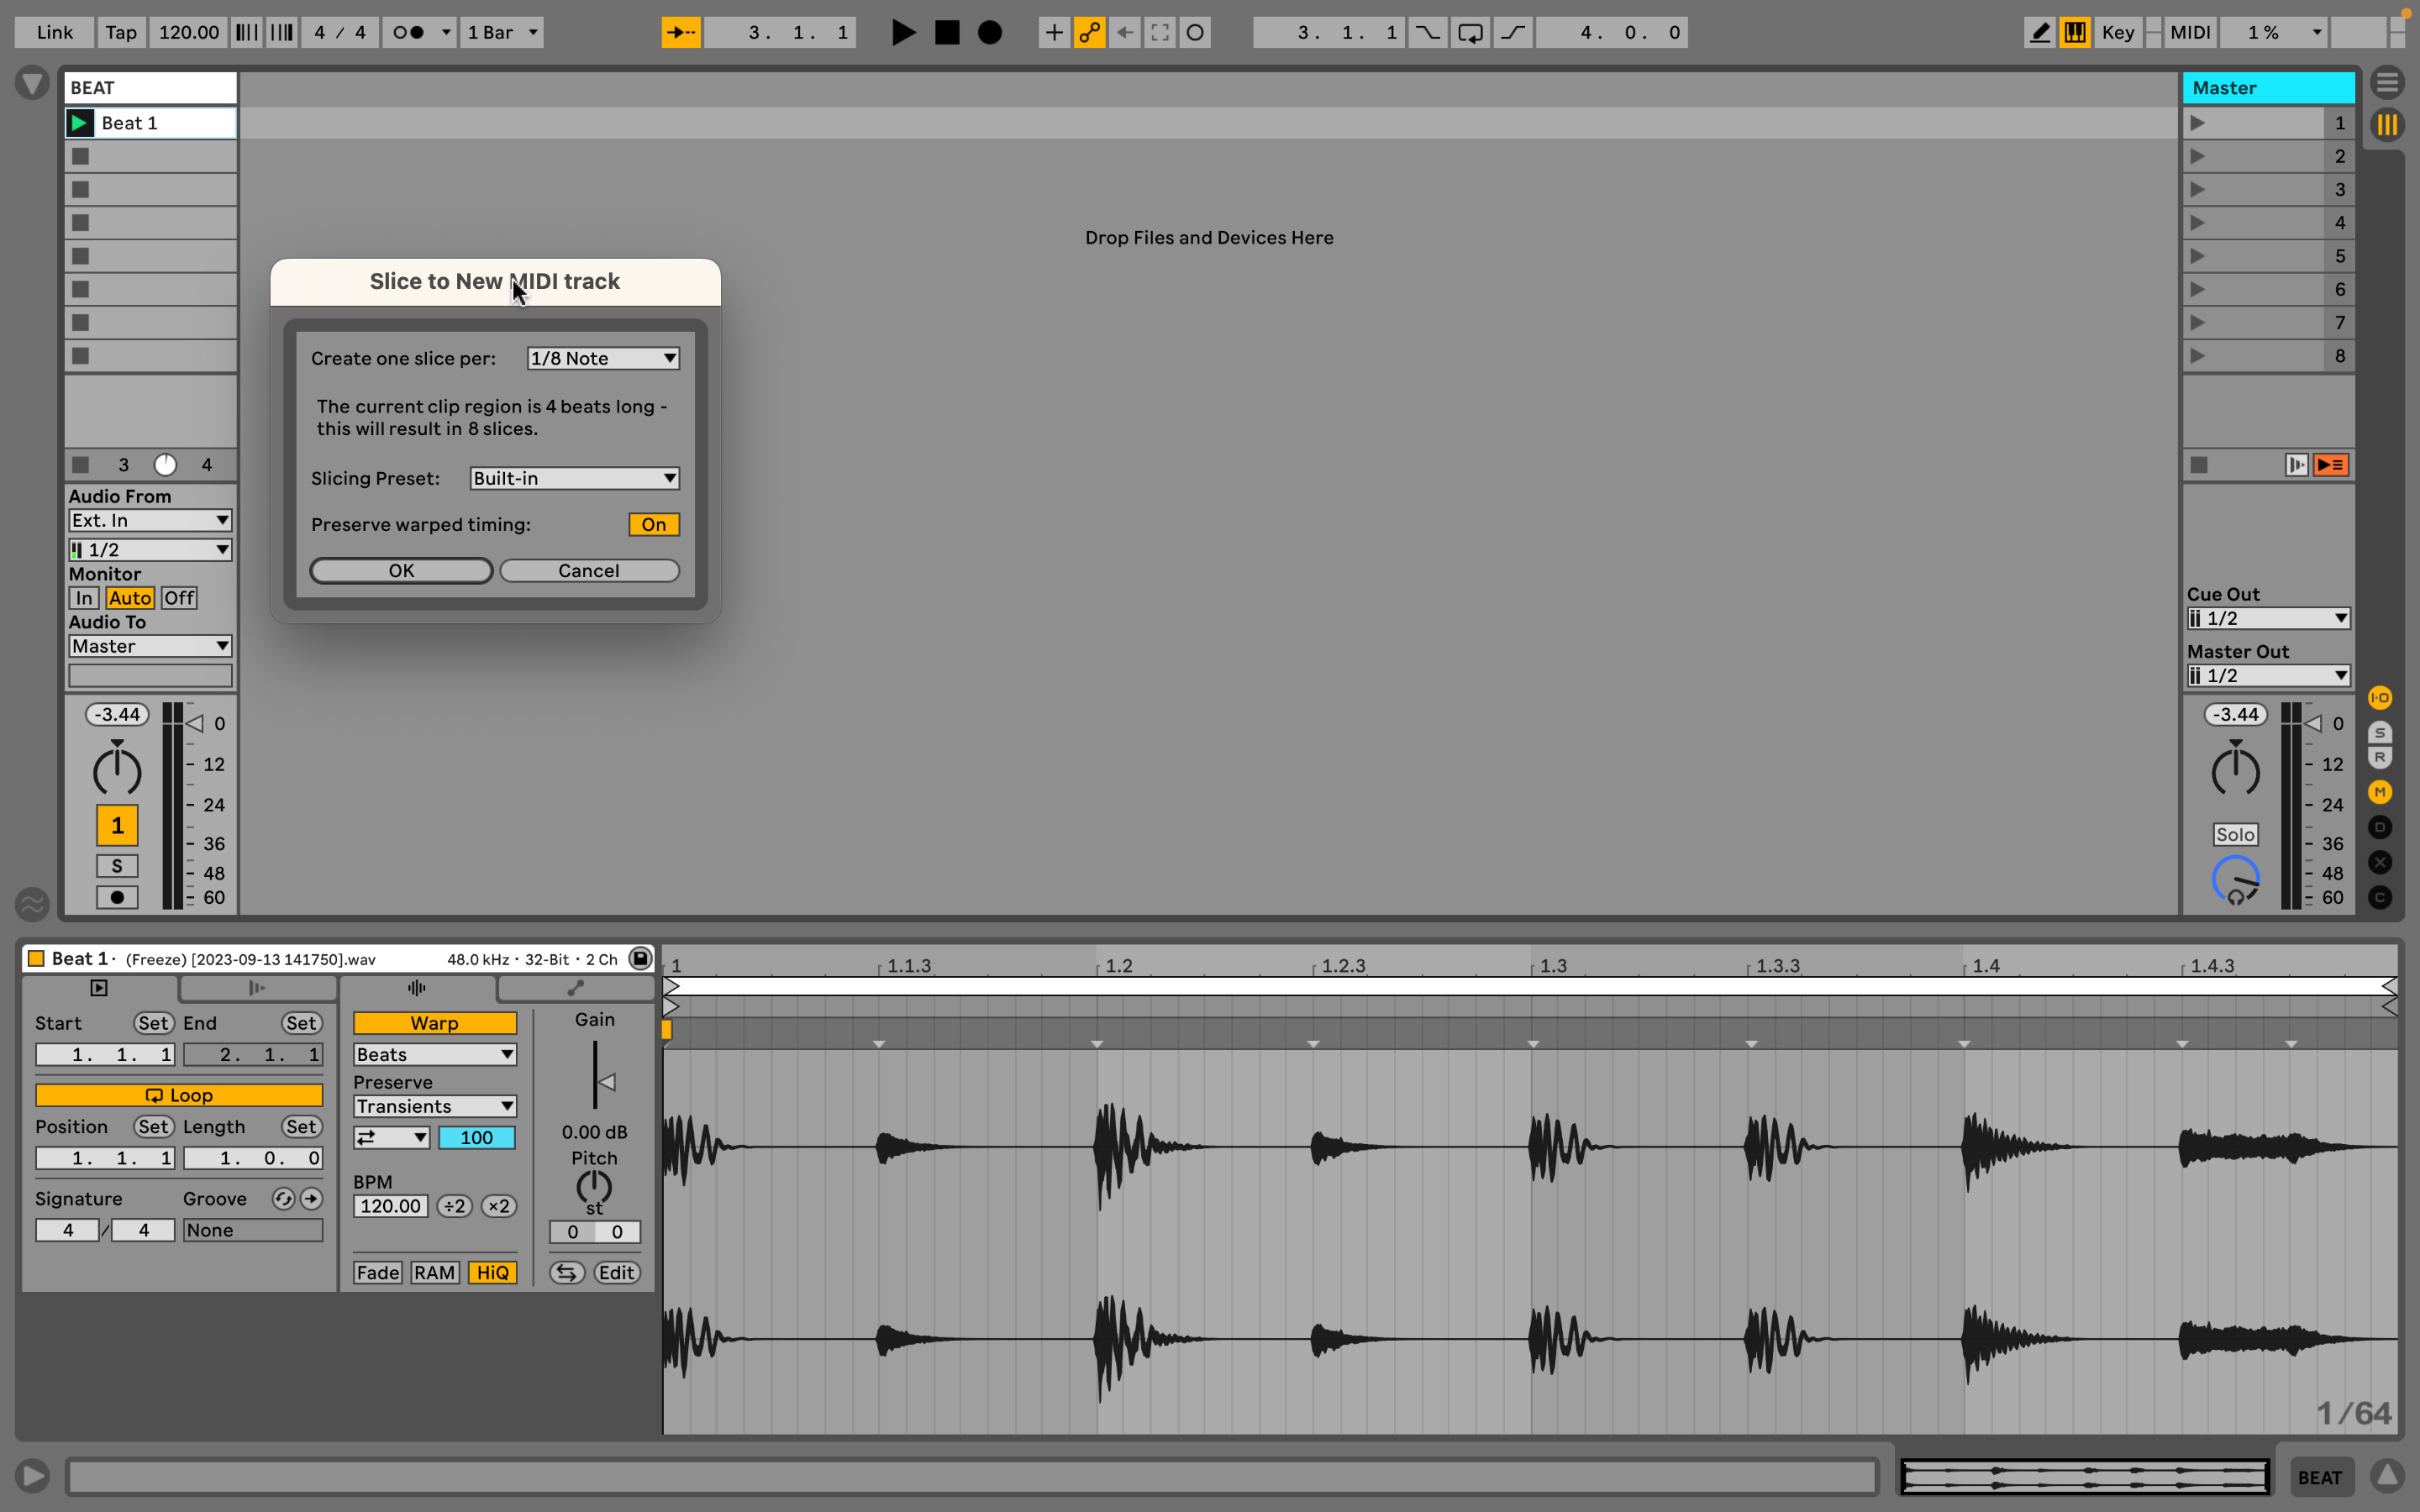
There are a few reasons why you might want to convert an audio sample into MIDI; probably the most common is to slice up an audio beat so it can be rearranged and recycled in a different form. But it also works for other types of sound source, and you may want to transform a piano sample, a bass sample, or even a field recording, into MIDI clips which you can use. There are few ways we can get this done.
There are a few ways to do it. Slice to New MIDI Track, for example, is a great way to turn your audio clips into drum racks, ready to rearrange or to play from a keyboard or pads. Just right-click on the source audio clip and select Slice To… from the Context Menu, then choose from the popup the number of slices you want.
A new MIDI track will be created, with a MIDI clip containing the notes representing each slice, and an instance of the Simpler instrument to contain each slice. These elements can be rearranged or even replaced, by dropping in new instruments, samples, or effects, onto each pad in the drum rack.
9. Map an audio clip directly to your MIDI keyboard
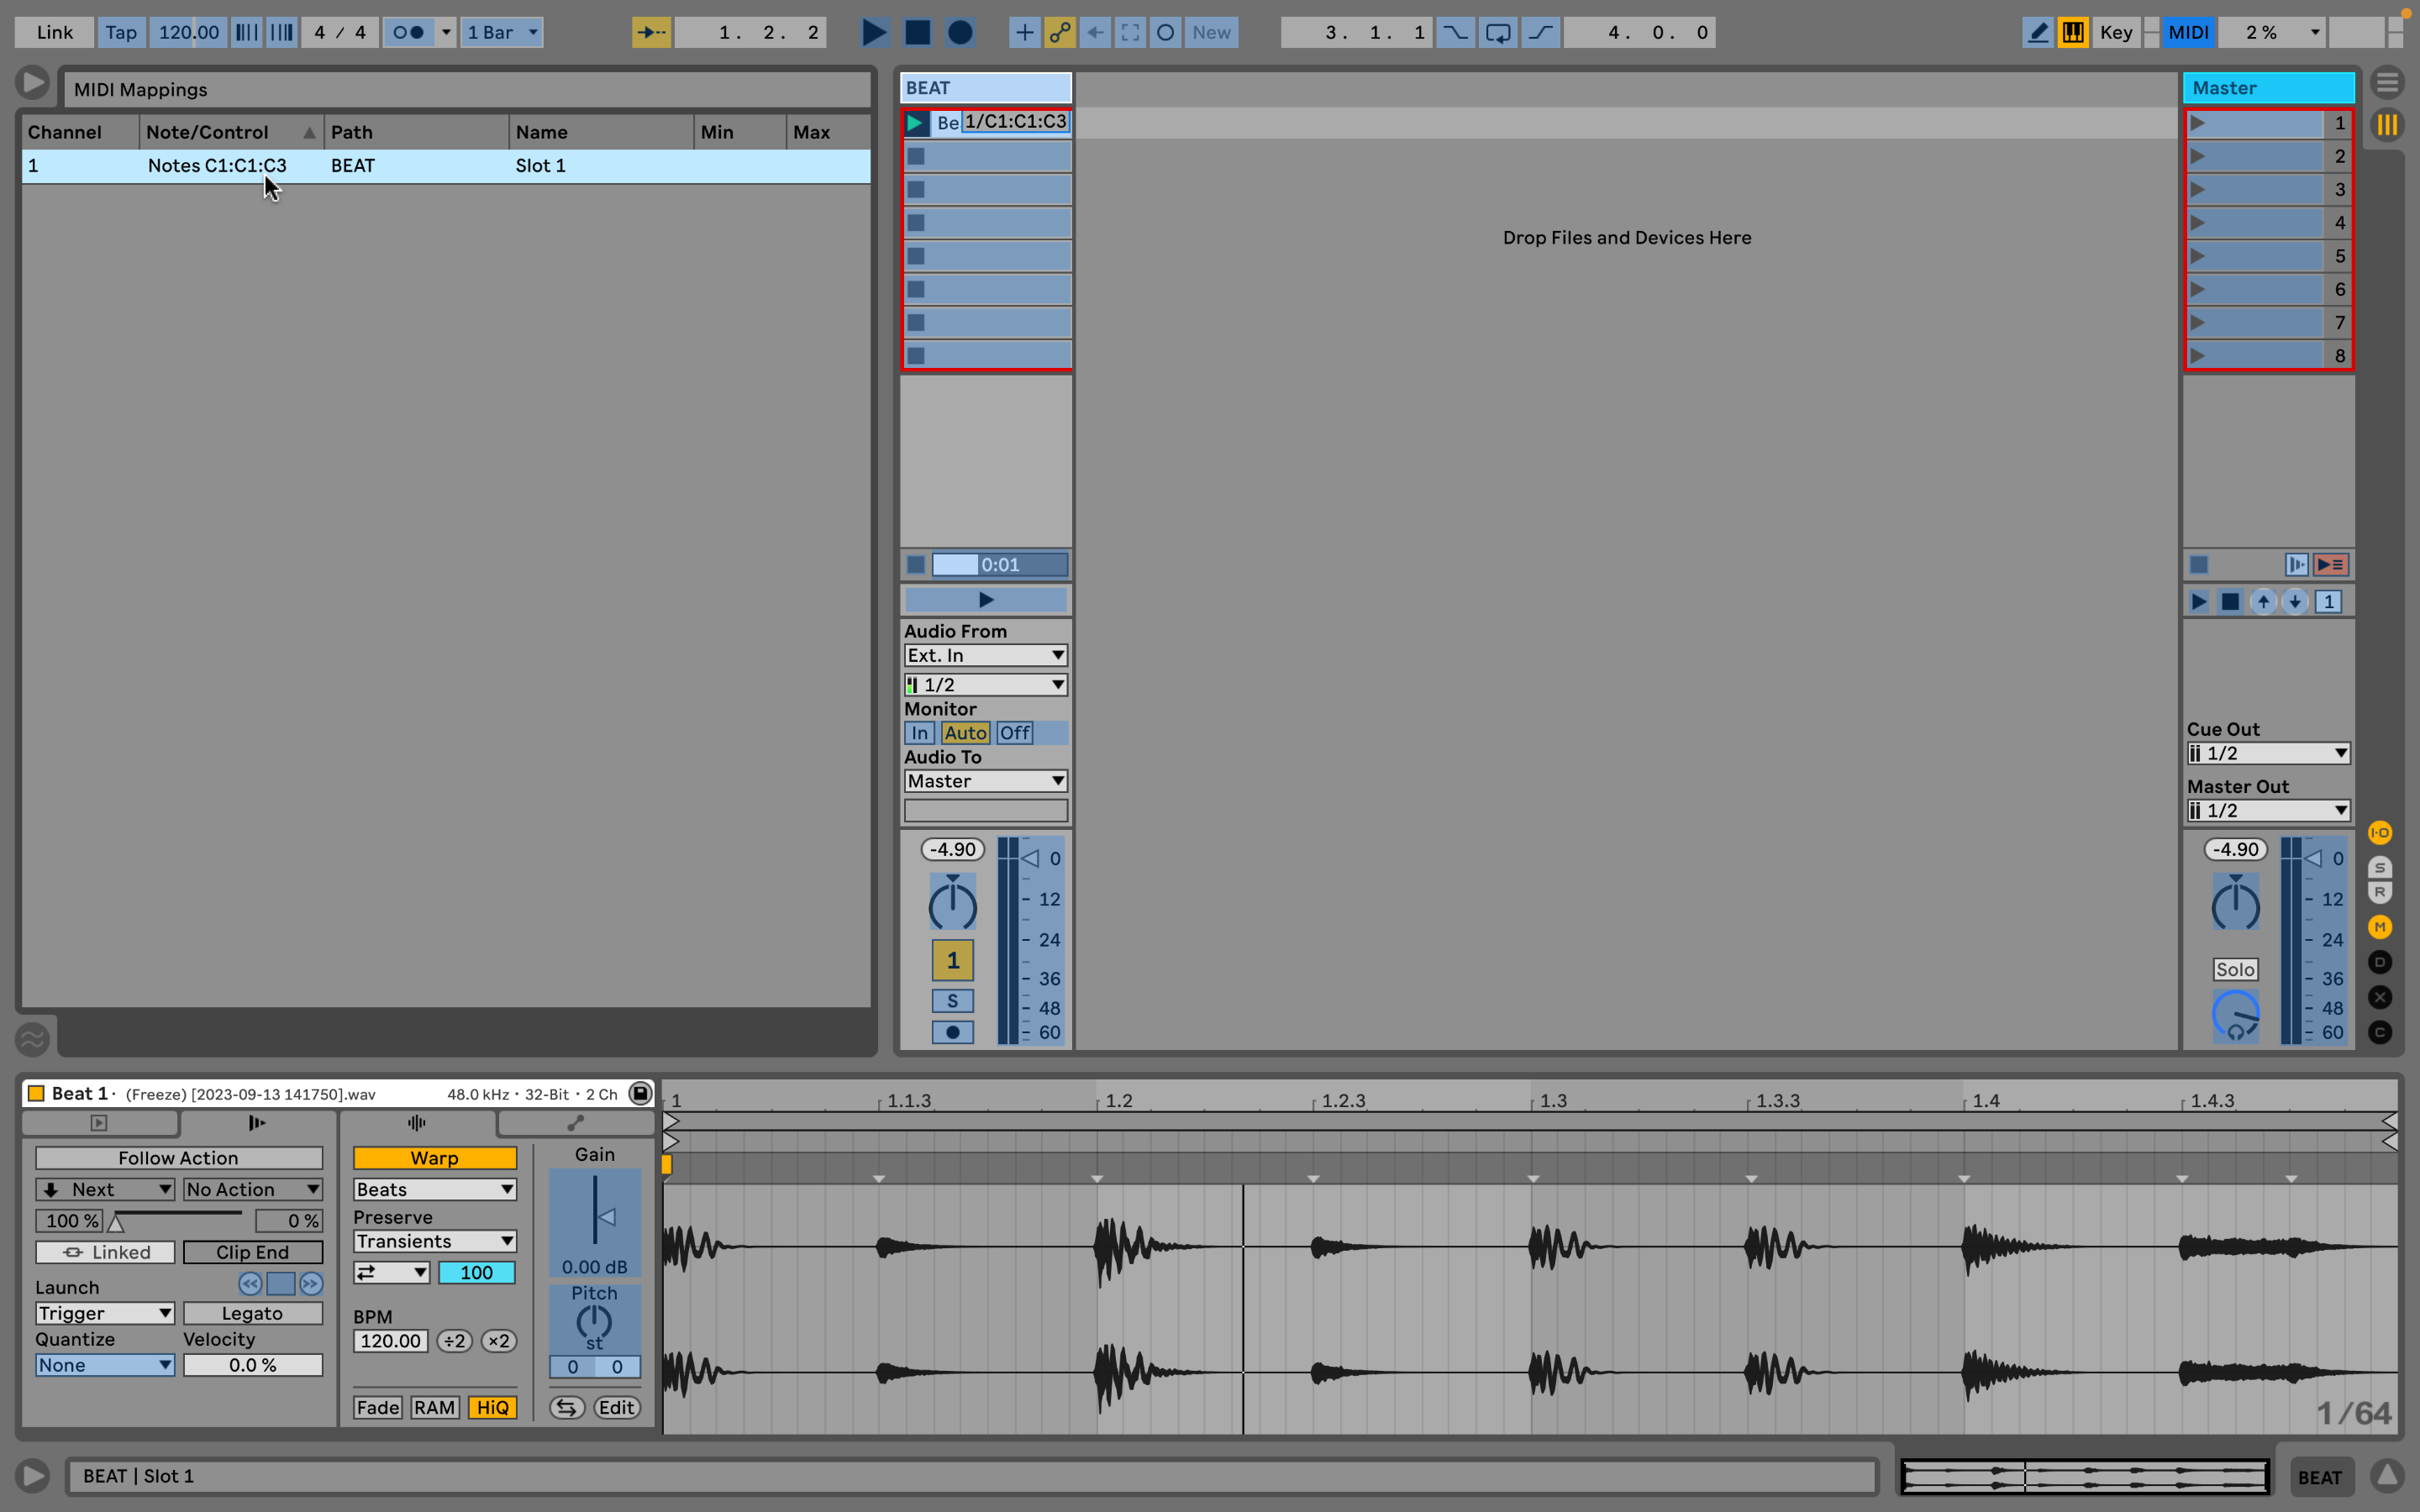
This is probably the oldest tip on our list, but we think it’s too good to be forgotten, and it still works - it’s the quickest, dirtiest, possible way to map an audio clip to your keyboard. Let’s say you have an audio clip ready to use - it can be literally anything, but we enjoy using speech recordings or beats.
Connect your MIDI keyboard, and go into MIDI Map Mode by tapping cmd-m on your computer keyboard (make sure your virtual MIDI keyboard is off). Click once on the audio clip in question to select it. Then on your MIDI keyboard, press the highest and lowest keys that you want to map to the sample - press them together - you’ll see the notes appear superimposed on the clip. Exit MIDI Map Mode and play individual notes on your keyboard, within your specified range, and the clip will play at that pitch.
Exactly how the clip behaves will depend on clip quantization, the launch mode, warping, and the location of the start marker. This is really old-school style sampling, and can sound quite frankly trashy, but it’s a lot of fun.
10. Invert MIDI control movements
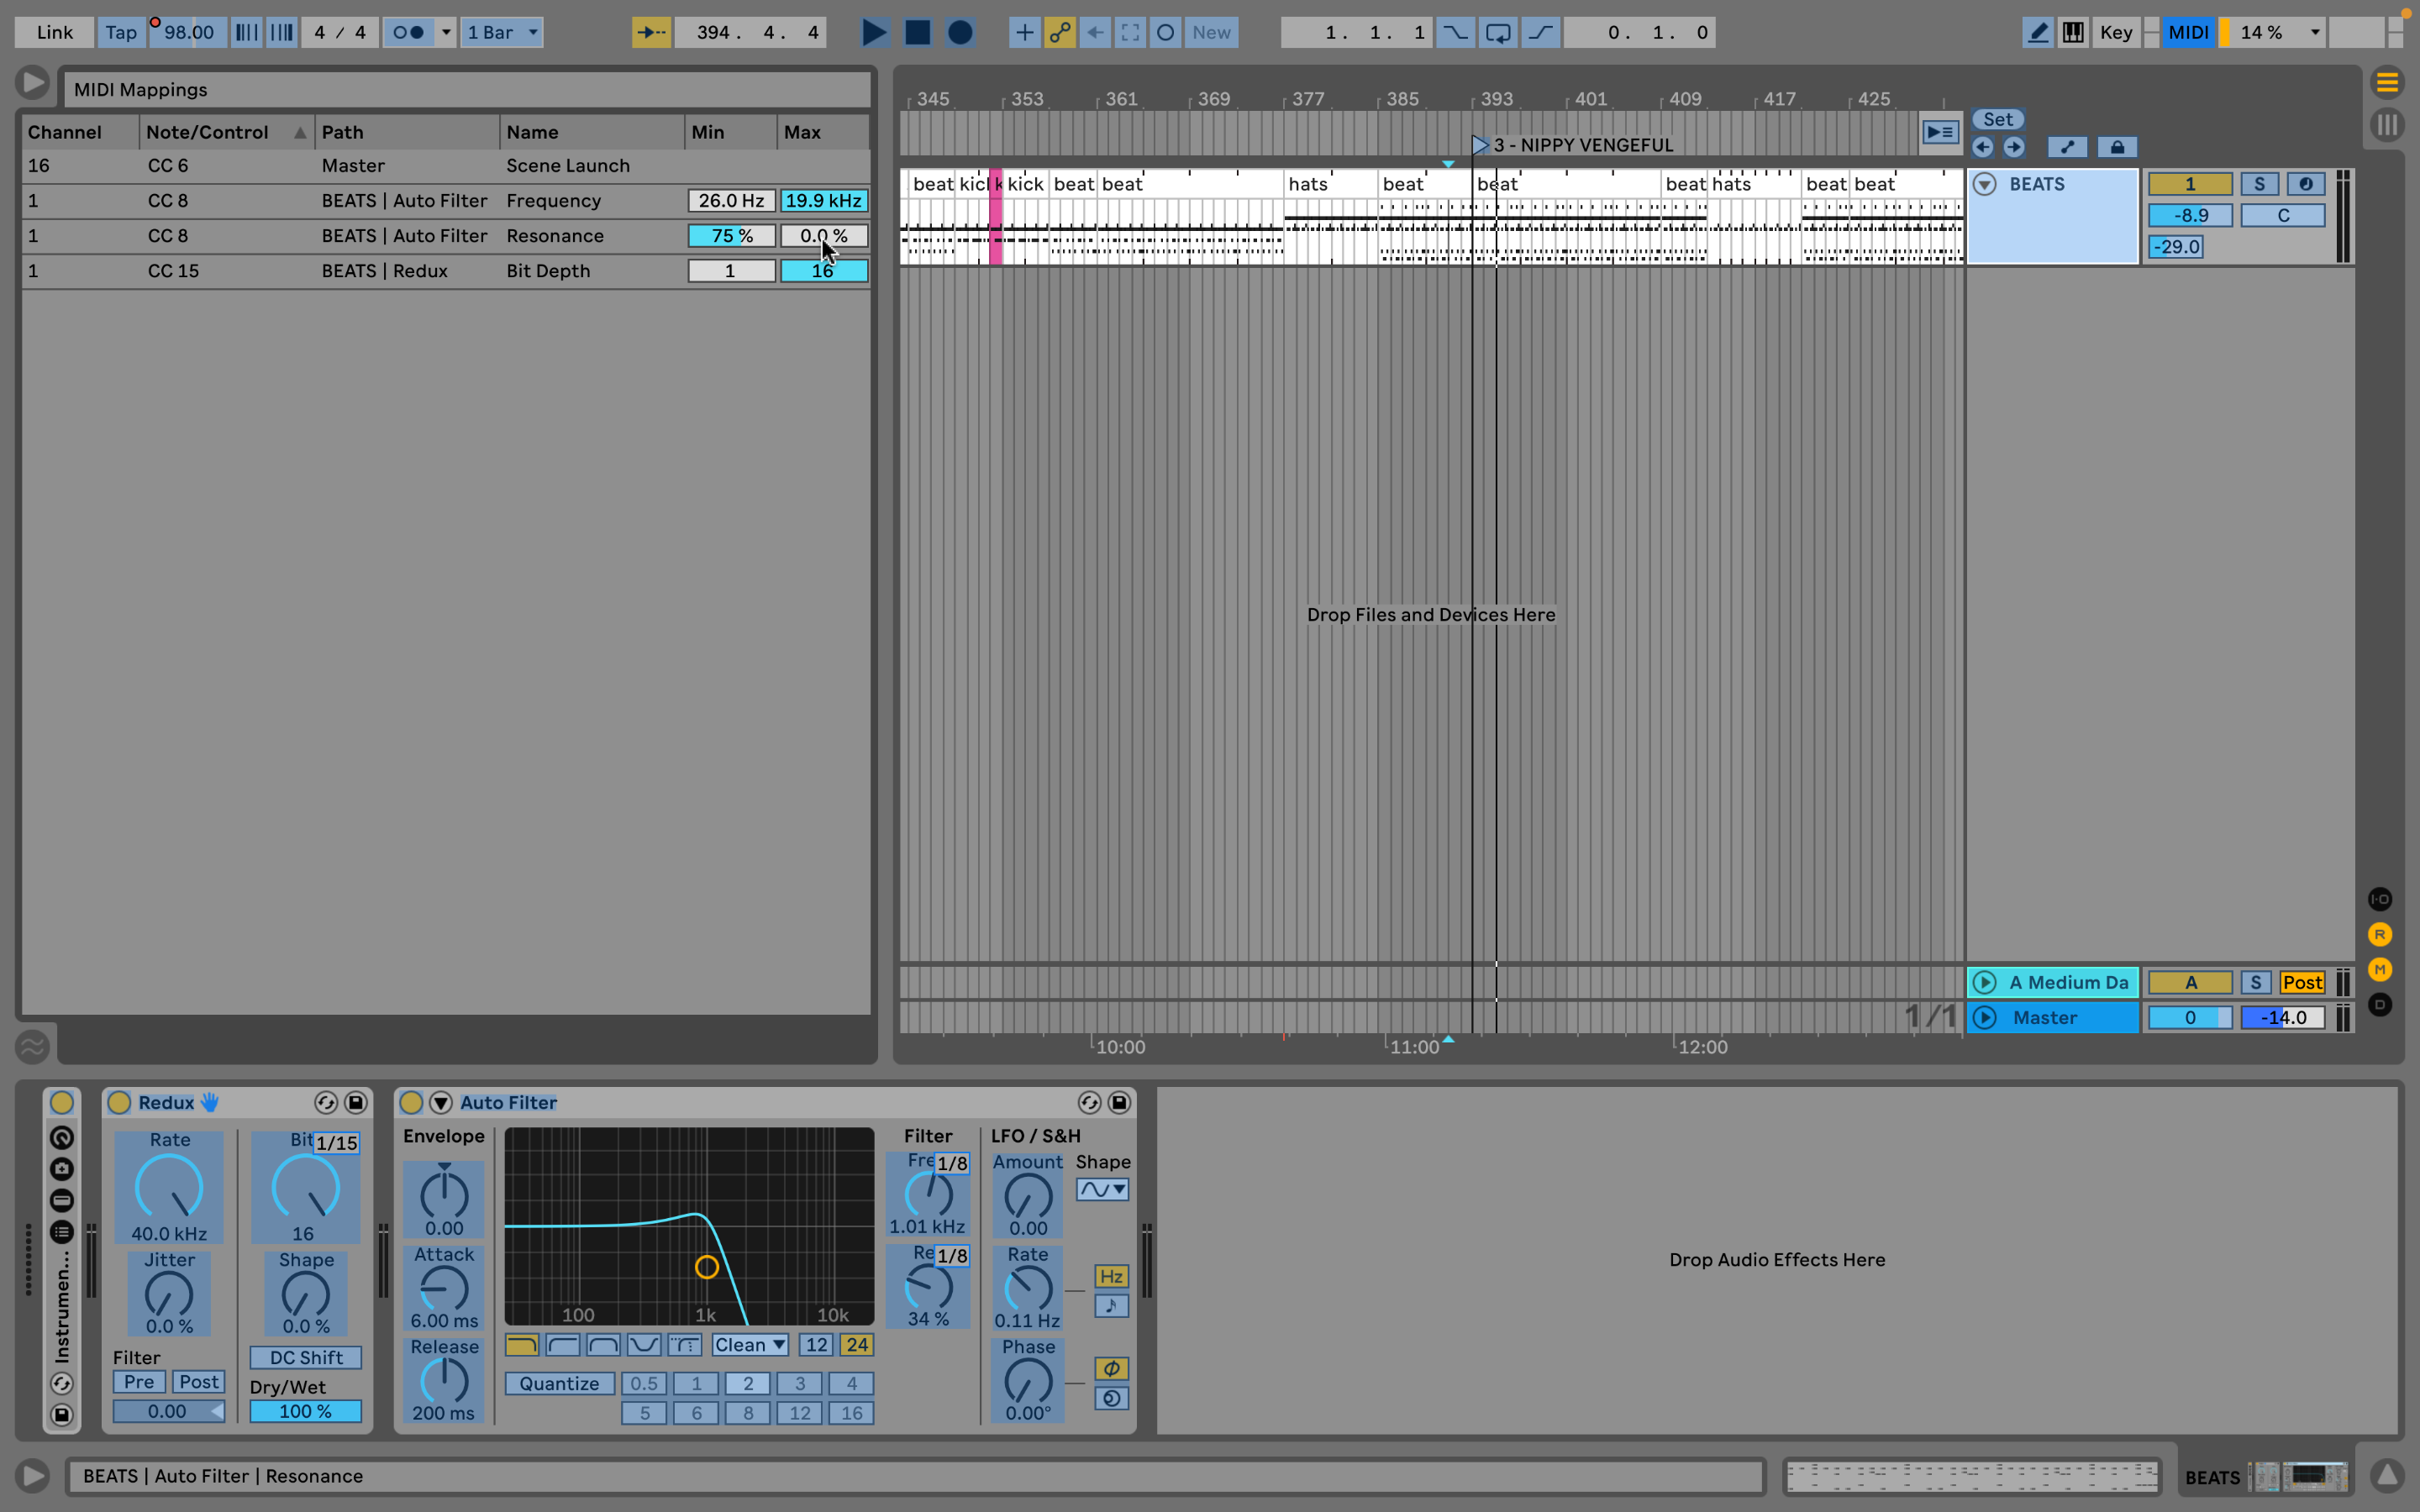
Live is head and shoulders above other DAWs with its ease of MIDI controller assignments. Just go into MIDI Map Mode, wiggle your knob or fader, and an assignment is made (you can view assignments by looking at the Browser while in MIDI Map Mode).
This is all good, but some times you may want your controller movement to be inverted, so as you move a knob from lowest to highest position, the assigned software control goes from high to low. We find we do this particularly when assigning the same physical controller to more than one software parameter. It means you can turn one knob, and two or more things will happen at once. In the Browser you’ll see that assigned controls display their highest and lowest values. To flip these all you have to do is type the different values in the small boxes.
This is also your opportunity to limit the ranges of each movement by entering numbers covering a smaller range. This will work with any manually mapped MIDI control, so give it a try - with faders in the mixer, instrument controls, or as we see here, effects parameters.
That's our ten, but there are so many more ideas we could put in a list like this. The real must-try for Live users in 2023 is MPE, or MIDI Polyphonic Expression. This is an expansion of existing MIDI technology which can add new levels of expression for instrument performance, particularly when using physical modelling synthesis. This has been integrated into Ableton’s recently-updated Push 3, as well as Roger Linn Design’s Linnstrument and Roli’s Seaboard and Lumi keyboards.

Martin Delaney was one of the UK’s first Ableton Certified Trainers. He’s taught Ableton Live (and Logic Pro) to every type of student, ranging from school kids to psychiatric patients to DJs and composers. In 2004 he designed the Kenton Killamix Mini MIDI controller, which has been used by Underworld, Carl Craig, and others. He’s written four books and many magazine reviews, tutorials, and interviews, on the subject of music technology. Martin has his own ambient music project, and plays bass for The Witch Of Brussels.