How to make your mixes translate across different systems
The best mixdowns will sound great on any playback system, big or small. Here’s how to ensure your tracks do the same

A trap that it’s all too easy for the aspiring music producer to fall into is that of creating mixdowns that only work well on one kind of playback system. It’s an infuriating problem, as we tend to assume that once we’ve got our productions up to a standard where they sound great on one system, they’ll also sound good on headphones, in the car, or anywhere else.
Sadly, this isn’t the case, and we often find ourselves becoming so focused on the requirements of a particular type of system that we fail to consider how a project will sound in other contexts. This leads to disappointment when we test our music out elsewhere. While there’s no substitute for experience in this type of scenario, the good news is that there are various strategies that we can employ to ensure our music sounds great over as wide a range of reproduction equipment as possible.
Having big, beefy bass and solid kicks might be enough to make your track bang on a club system, but unless you’ve got the right energy in the mids it’ll sound tinny and unimpressive on laptop speakers
They key to transferability is in ensuring that you’re not leaving any ‘gaps’ in your mix, in terms of both frequency spectrum and stereo panorama. Having big, beefy bass and solid kicks might be enough to make your track bang on a club system, but unless you’ve got the right energy in the mids it’ll sound tinny and unimpressive on laptop speakers, which will be unable to reproduce the lows. Likewise, your mix might sound fine on a big rig and a laptop, but have a listen to it on headphones and you might discover that its stereo image is lacking.
Working in bedroom or project studios can make getting that elusive perfect mixdown much trickier, because it’s harder to trust what you hear in such a restricted environment. But don’t worry, because in the following walkthroughs we’ll reveal some essential tips and tricks that make use of analysis plugins to ensure that you’re getting a full-sounding mix no matter how compromised your monitoring environment.
We’ll also look at how to make your tracks more frequency-rich using layering and processing techniques that will help them sound better on smaller systems. As ever, while we use specific DAWs here, the techniques will translate to any other DAW.
Using spectral analysis to balance musical elements with beats and basslines
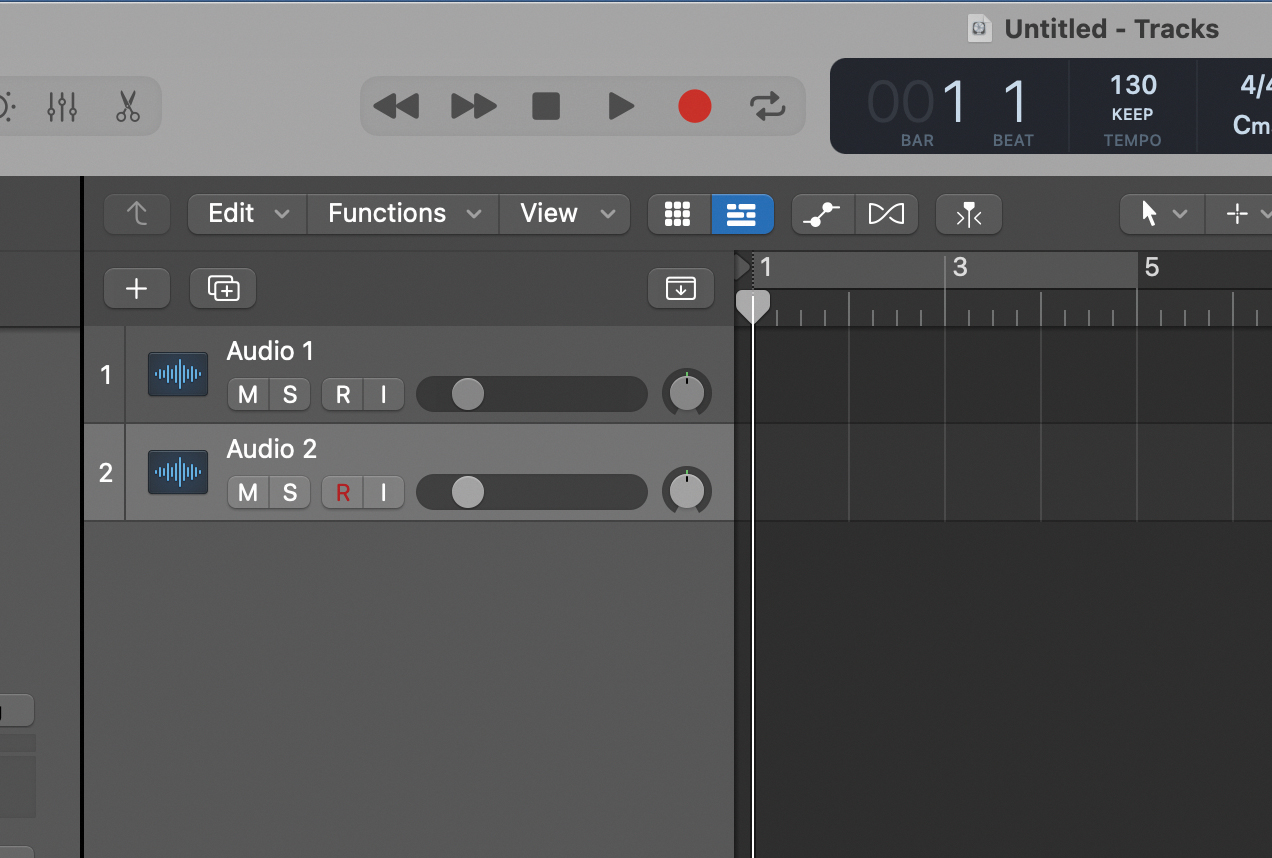
While your ears must have the final say in any mixing decision, spectral analysis can be helpful for balancing elements in a mix, especially if you’re working on headphones or in a less than ideal studio. Launch your DAW, set the tempo to 130bpm and create two audio tracks.
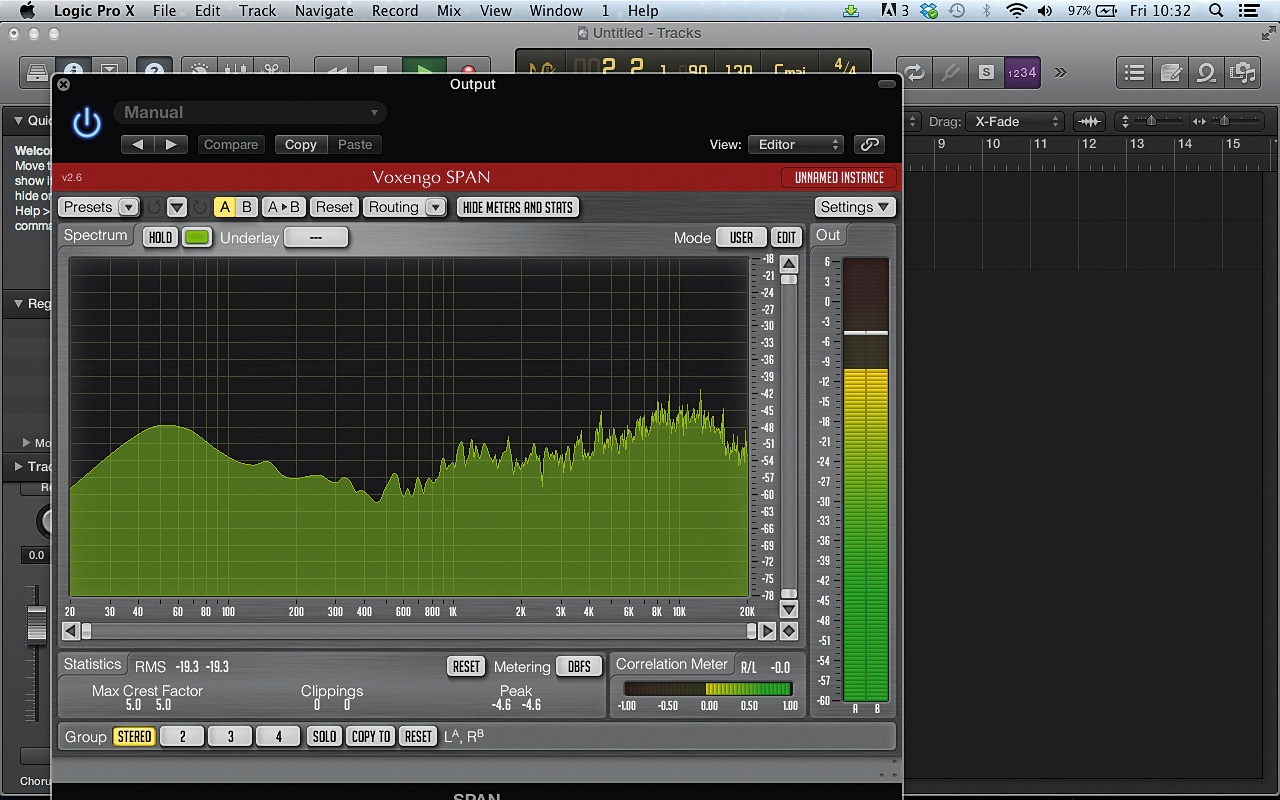
Drag Groove.wav onto the first track and Chorus piano.wav onto the second, then add Voxengo SPAN to your master buss. The plugin can be downloaded free from Voxengo's website. Solo the first track so that you can monitor the drums and bass. In SPAN, you’ll see that the highs and lows peak at between the -39dB and -42dB regions.
Want all the hottest music and gear news, reviews, deals, features and more, direct to your inbox? Sign up here.
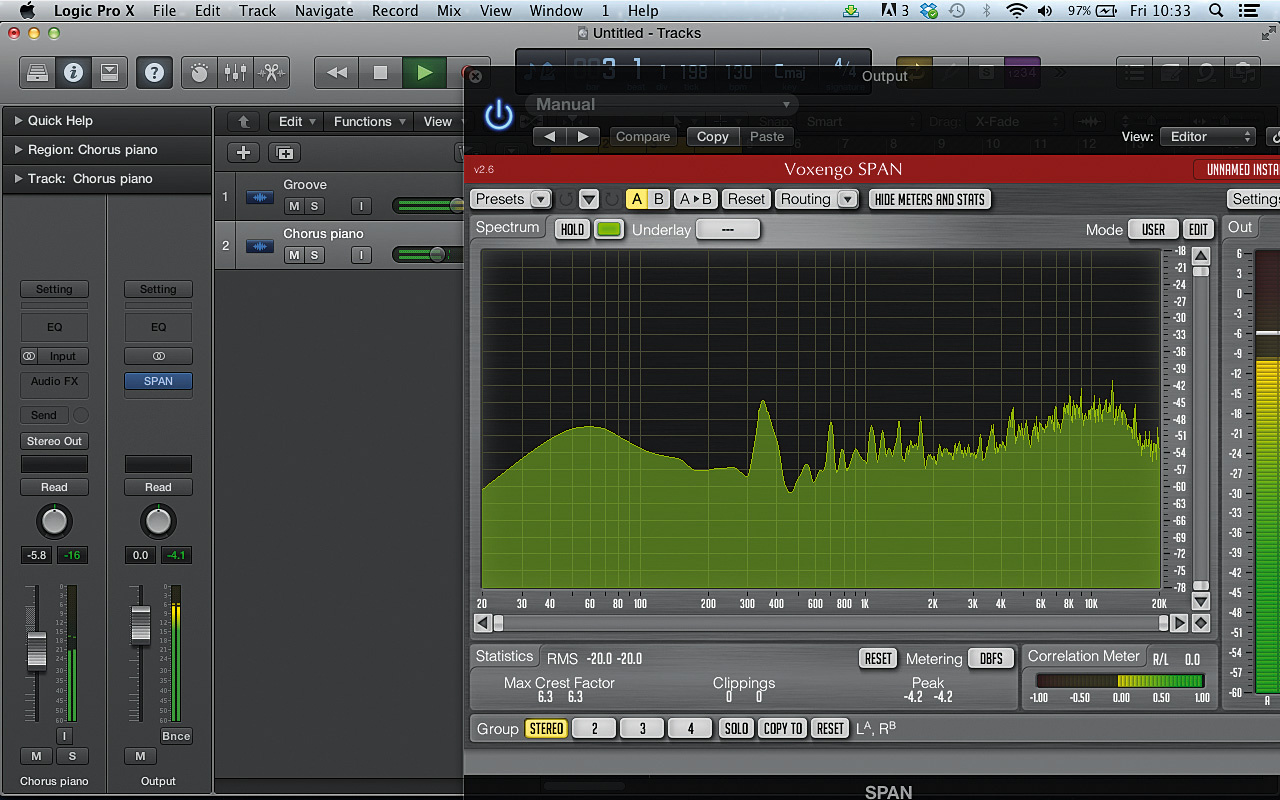
The mids don’t peak that high, so we know that we have some room in the mix there to accommodate other sounds. Unsolo the first track. The piano is quite loud, so turn its track down to -12dB. Now, watching SPAN’s display as you do so, gradually turn the level of the piano channel up.
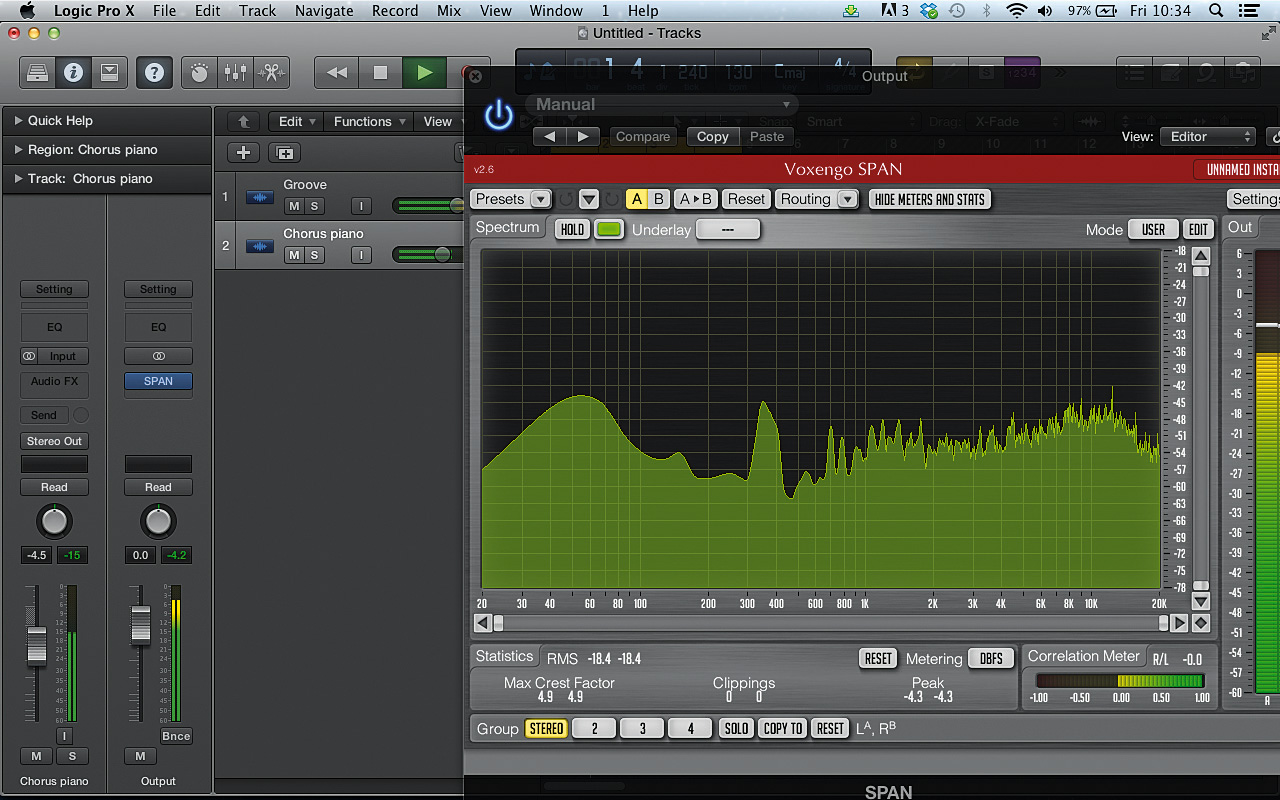
As the channel reaches the -4.5dB mark, you can see that the piano’s fundamental (that is, lowest) frequency is reaching a similar sort of level to the low and high peaks of the beats and bass. However, you can also see that the piano sound is relatively dull, as the fundamental frequency is quite a bit louder than its harmonics.
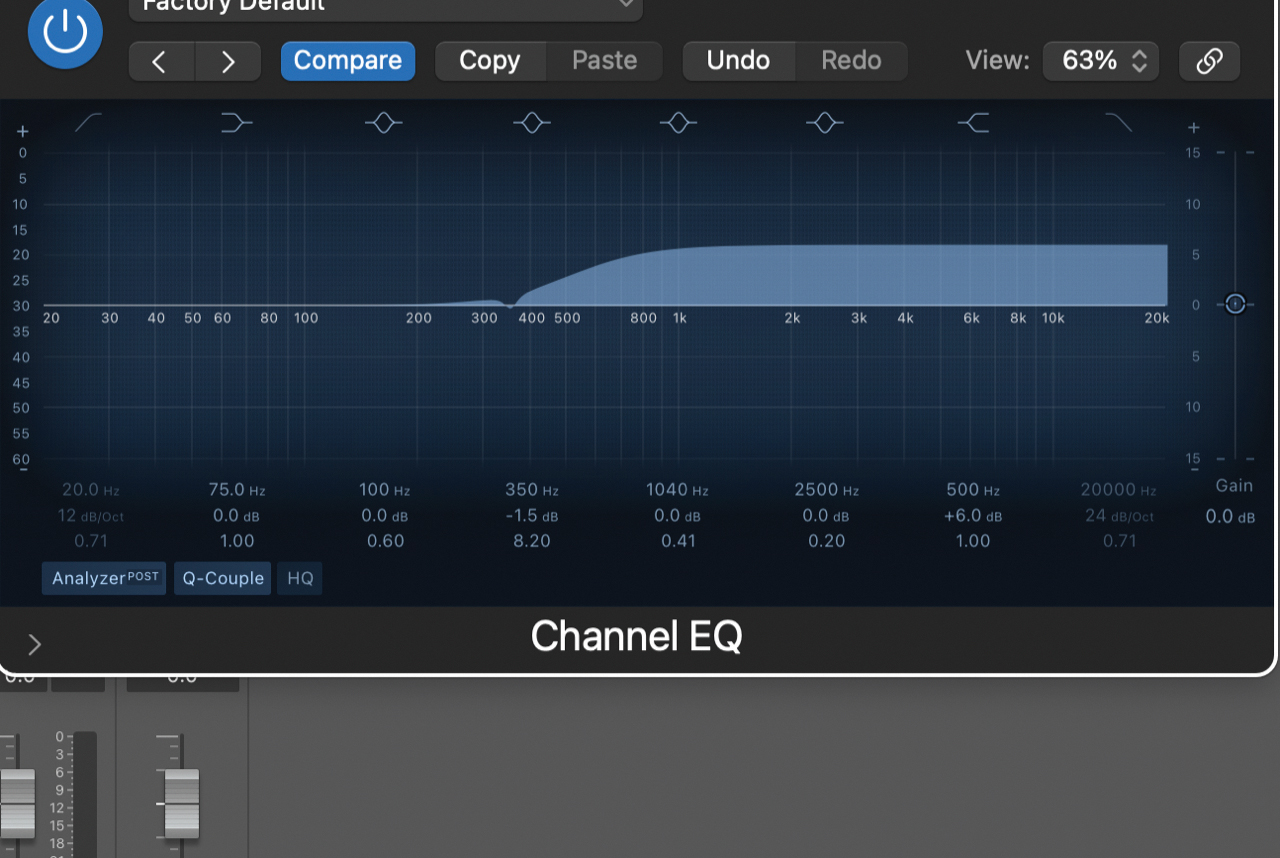
The signal isn’t peaking as high in the 600Hz-4kHz region, which means we’ve got some leeway to boost the piano’s mids and highs. Add an EQ plugin to the piano track, and use a high-shelf EQ to boost by 6dB at 500Hz. We could also do with making the piano’s fundamental slightly quieter, so use a bell-shaped EQ band to take off 1.5dB at 350Hz.
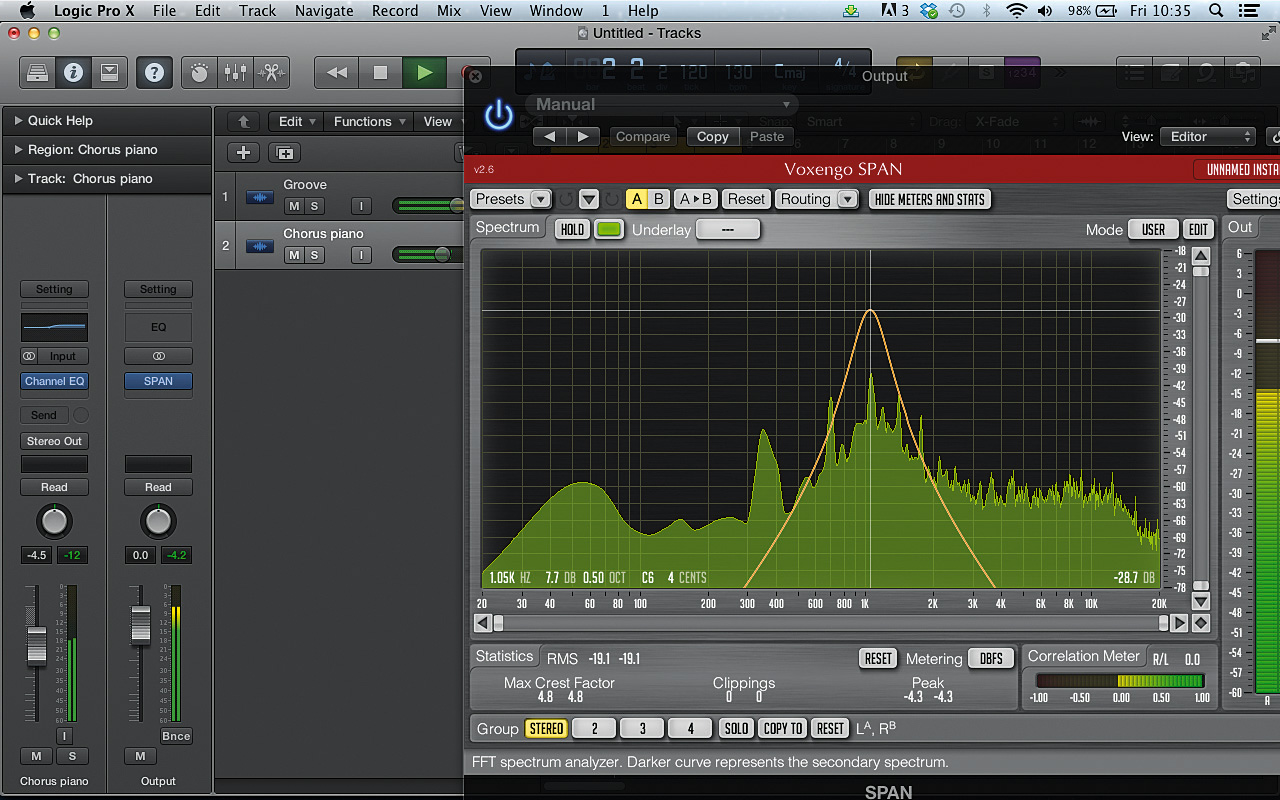
Now we have a mix with a solid mid-range. You can take a listen to any specific frequency range to hear how full it sounds by holding Ctrl/Cmd and dragging over SPAN’s analyser panel. This is handy for making sure that your mix has an appropriate energy level over the entire frequency spectrum.
Mixing vocals using spectral analysis
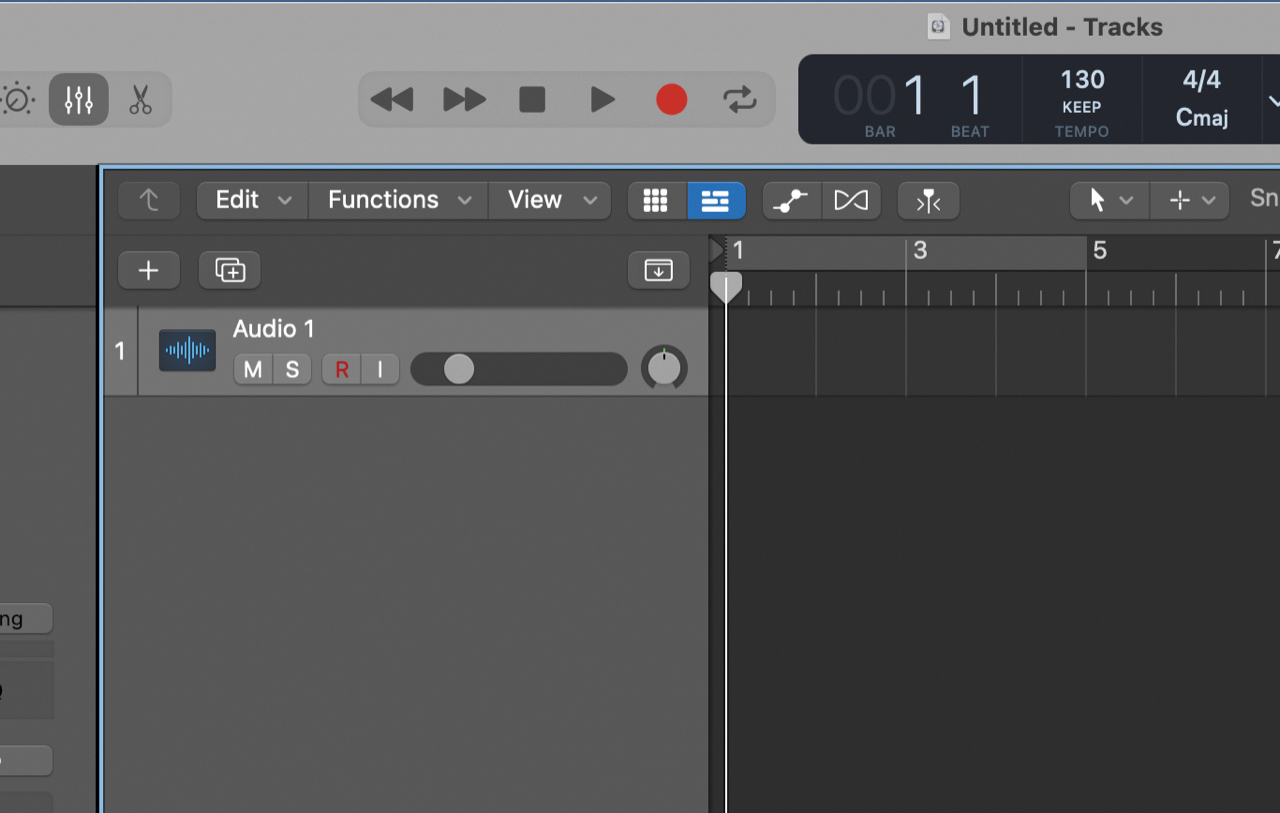
As we saw in the previous tutorial, generally you’ll want all your musical elements to peak at about the same level on a spectrum analyser for an even-sounding mix. The one exception to this rule is vocals, which need to be heard as clearly as possible. Create a new project in your DAW, and set the project tempo to 130bpm.
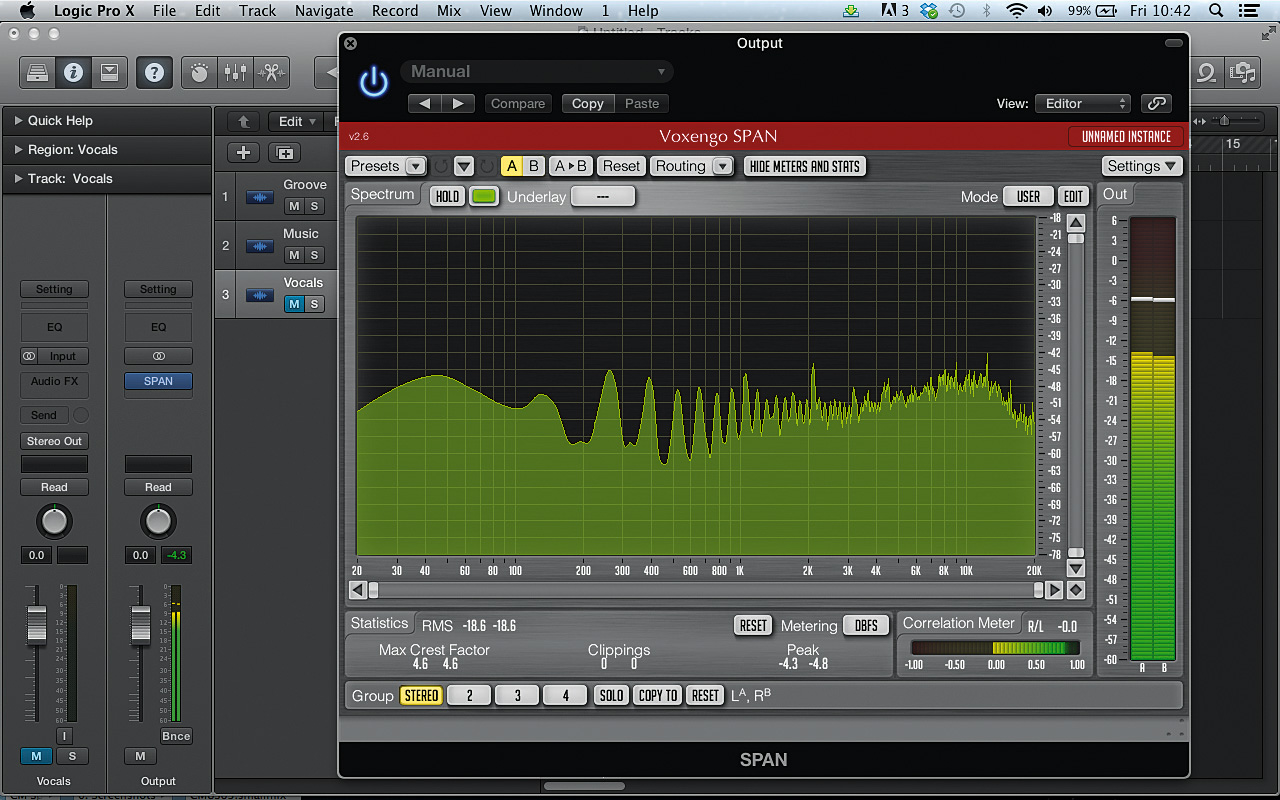
Create three audio tracks, and name them ‘Groove’, ‘Music’ and ‘Vocals’. Drag Groove.wav onto Groove, Music.wav onto Music, and Vocals.wav onto Vocals. Mute the Vocals track and put Voxengo SPAN on the master. Bring up SPAN’s interface and you’ll see that the instrumental tracks really fill out the frequency spectrum.
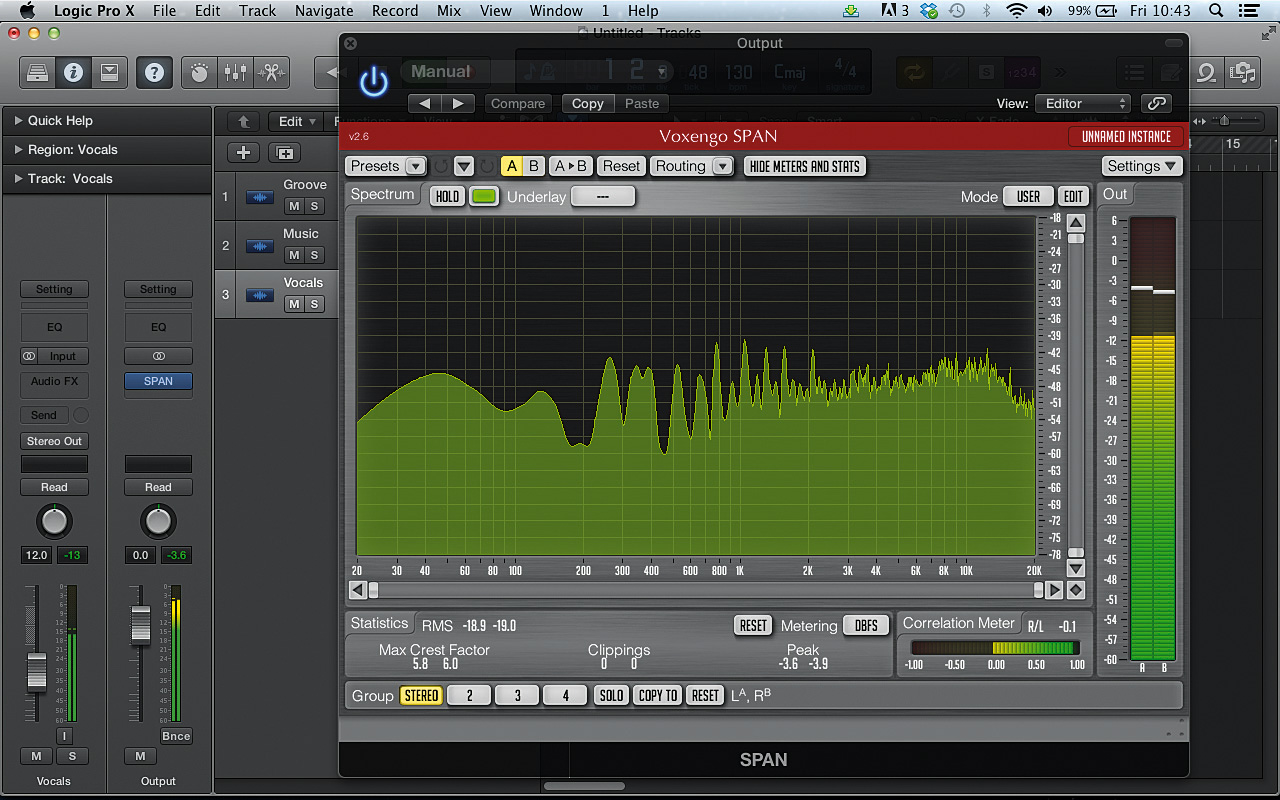
Turn the Vocals track down to -20dB, and unmute it. Gradually turn its volume fader up. By the time you get to about -12dB, the vocal will be at the right kind of level to be intelligible over the backing tracks. You’ll see in SPAN that at this level it peaks the highest of all the elements, even though it doesn’t sound overly loud in the mix.
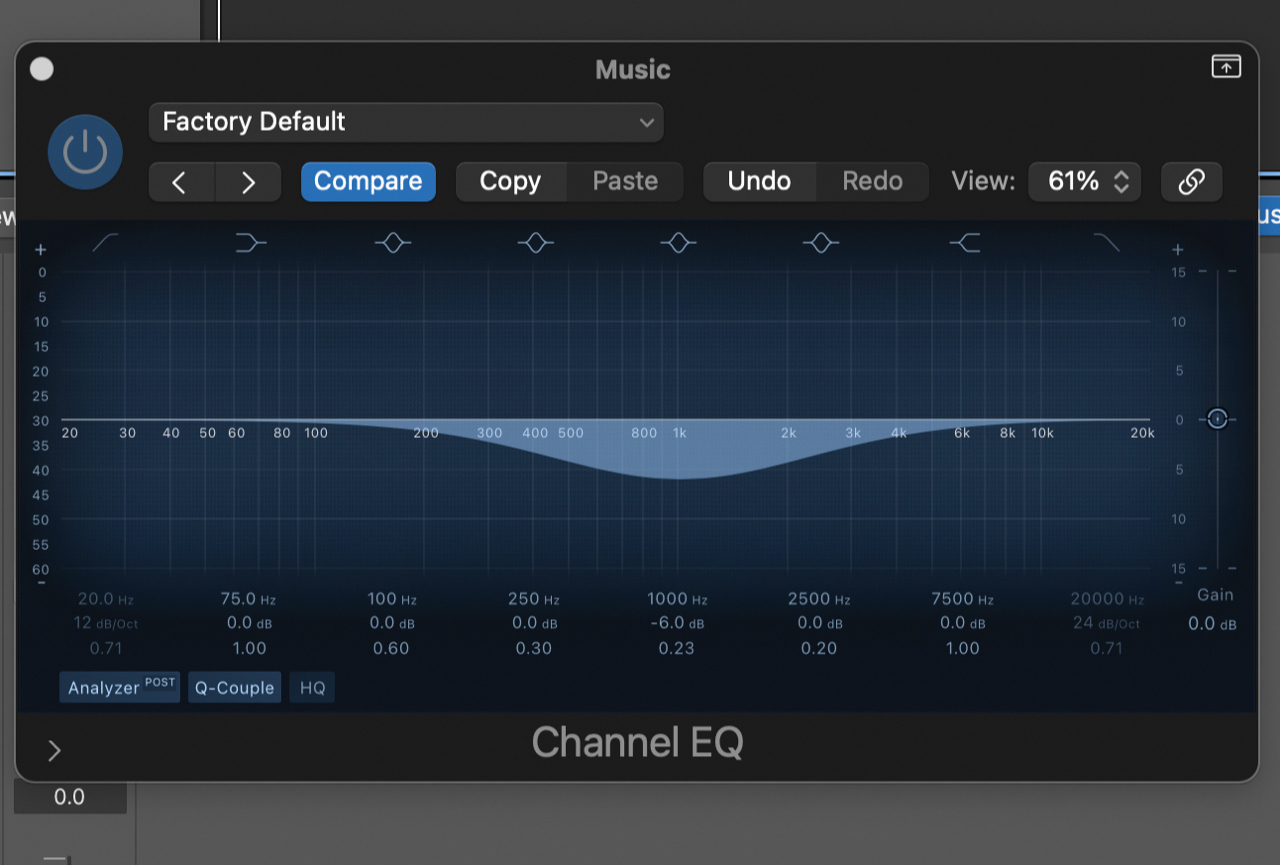
We can make the vocal stand out in the mix more by EQing the music track. Add an EQ to the Music track and use a bell-shaped band to take out about 6dB at 1kHz. You can use the Q parameter to establish the width of this band. The wider the band, the more the music is weakened, but the stronger the vocal will sound.
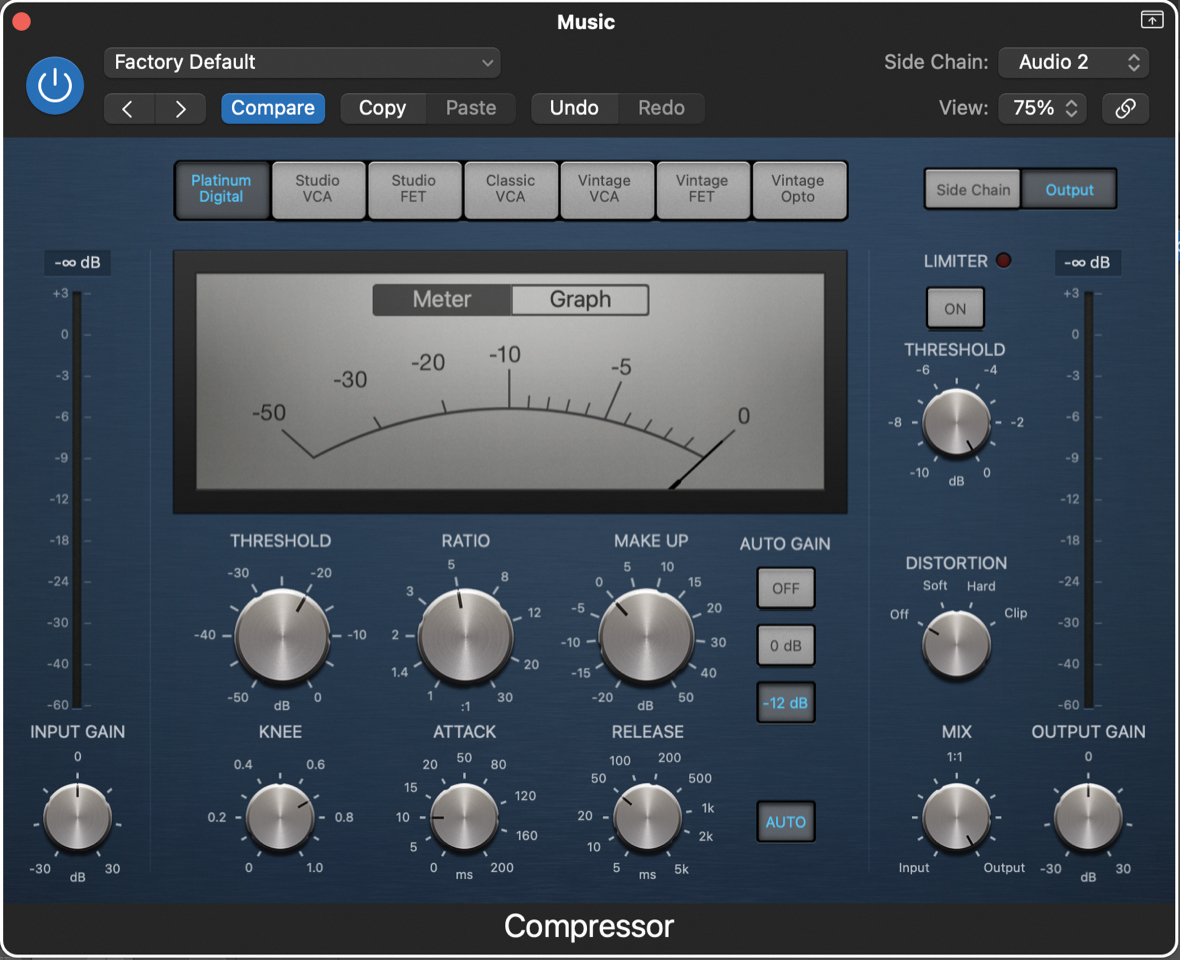
Another way to make the vocal sound clearer is to duck the volume of the Music track when it plays. To do this, add a Compressor effect to the Music track, activate its sidechain and set the sidechain source to the Vocal track.
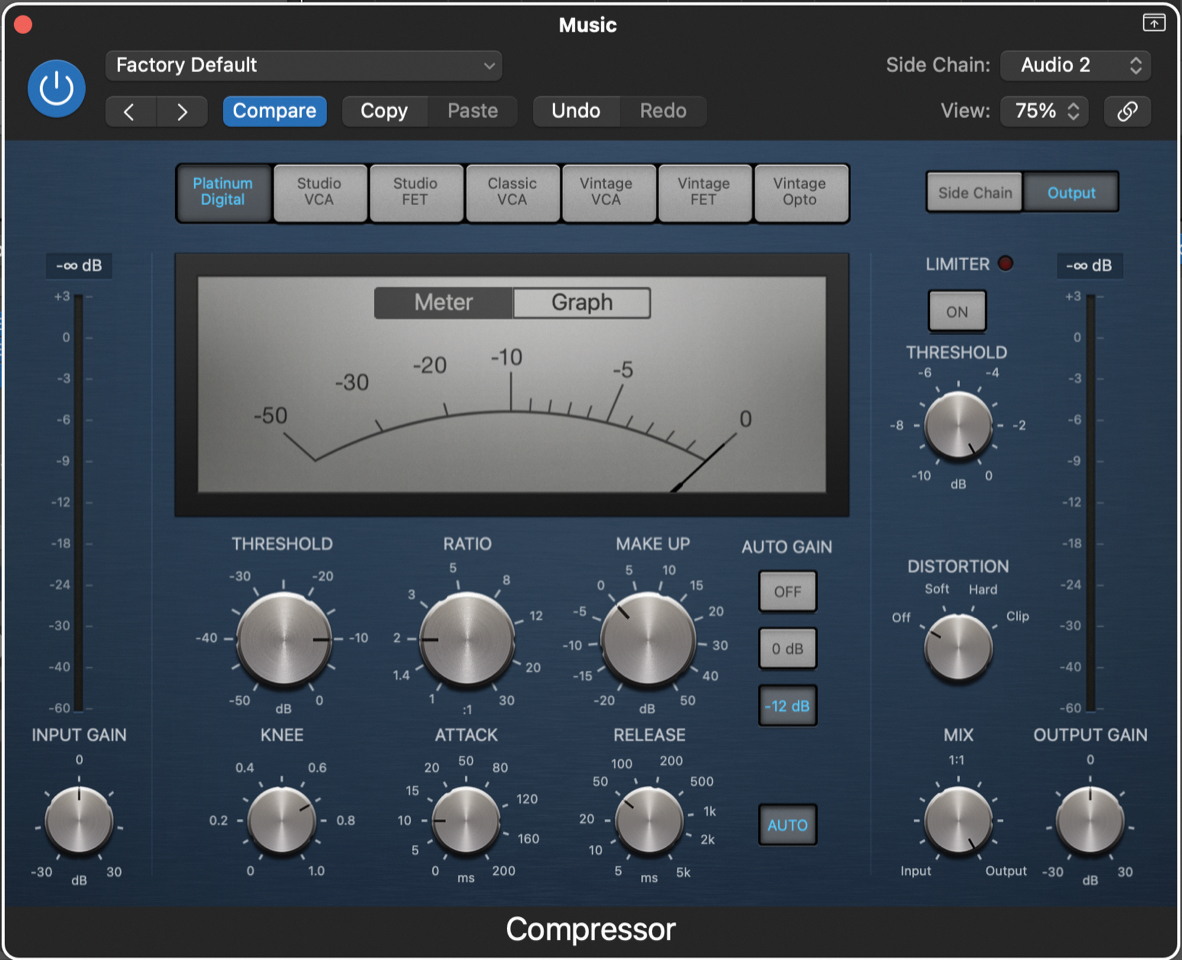
Set the Compressor’s Threshold to -10dB and Ratio to 2.00:1. Now the Music track will drop in volume slightly when the vocal plays. This helps maintain a consistent level of energy in the mids, and the reduction in volume isn’t obvious because the vocal focuses our attention. (Audio: Balanced music and vocal.wav)
Using the Haas technique in Ableton Live
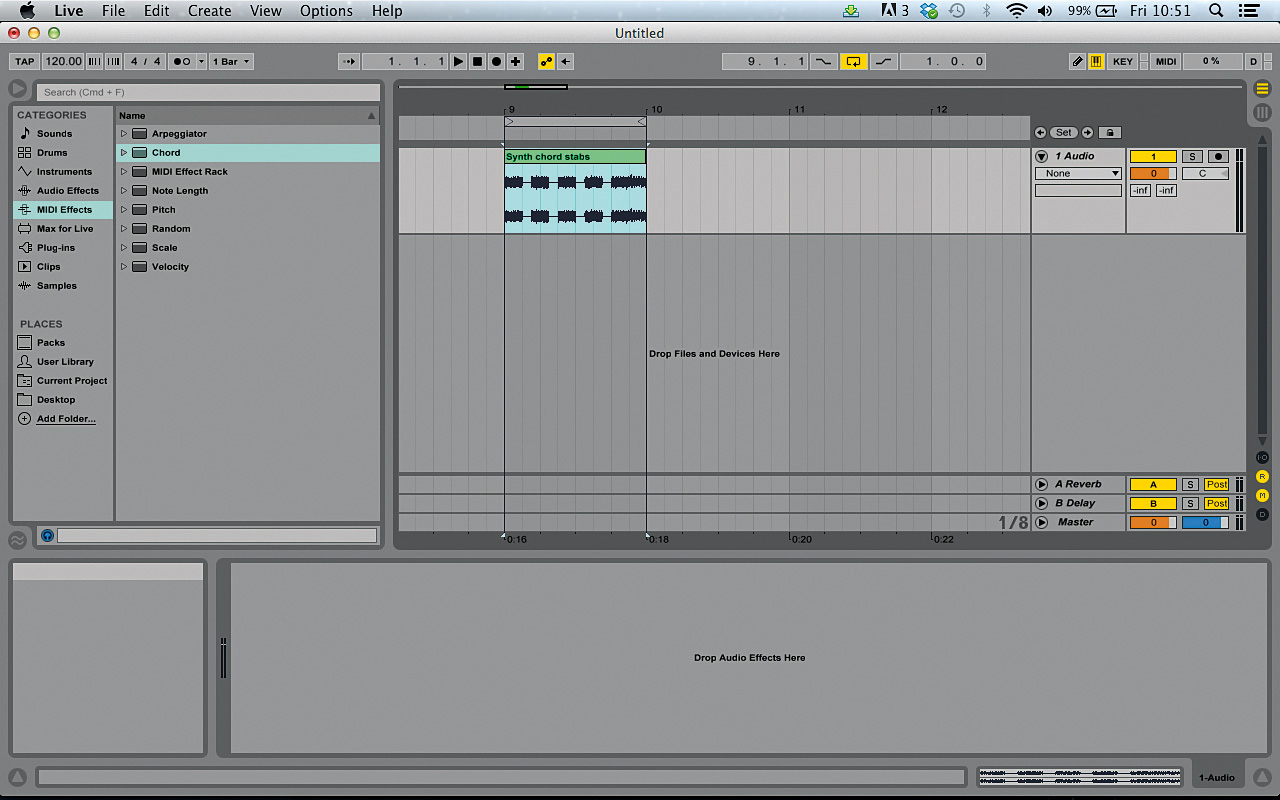
You can use the Haas technique – using a slight delay to create the effect of a wide stereo signal. The downside of this is that it can have a less desirable effect on the mono signal. Let’s see how we can create this effect manually, then check it for mono compatibility. Start by creating a new project in Live and putting Synth chord stabs.wav on an audio track.
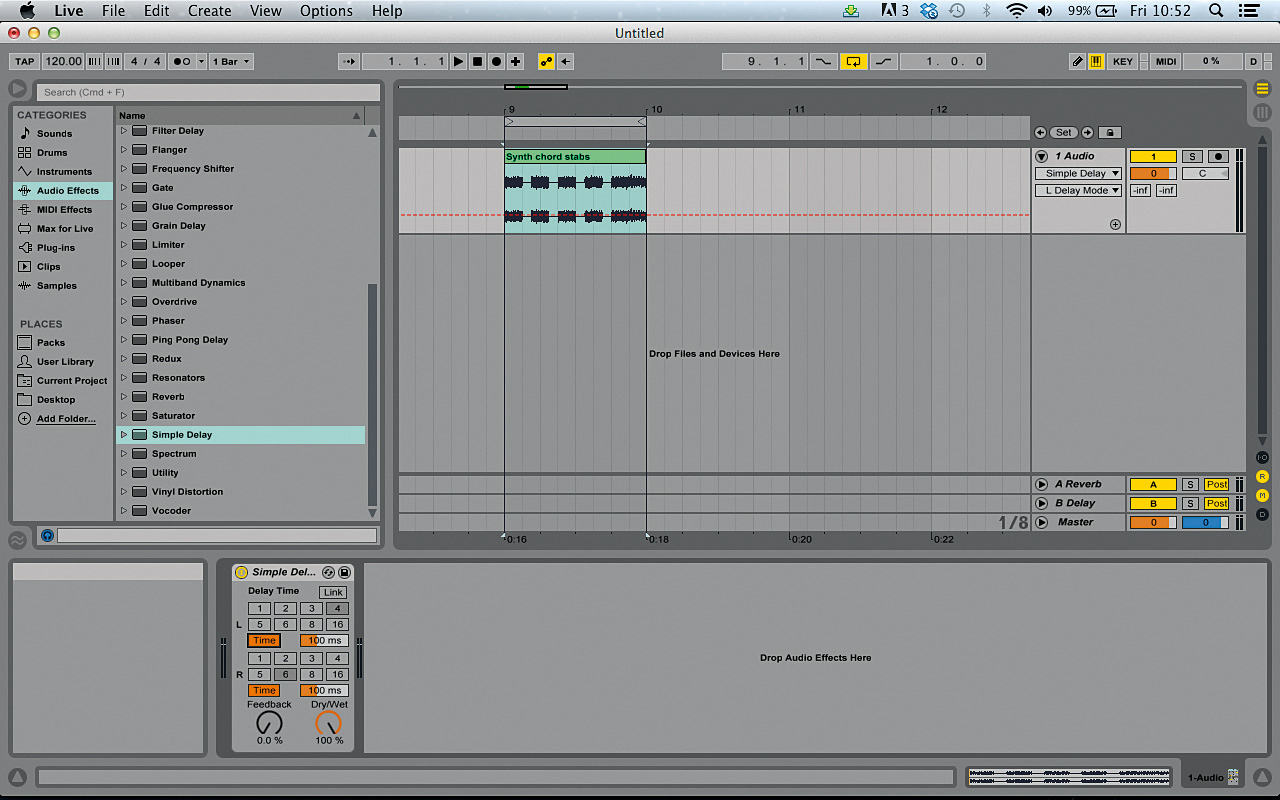
Add Live’s Simple Delay effect to the audio track. At the default settings this creates a basic stereo delay effect with no feedback. Set the Dry/Wet level to 100% so that we just hear the delayed signal. Now click the left and right channels’ Delay Mode buttons to switch them from tempo-synced to time-based.
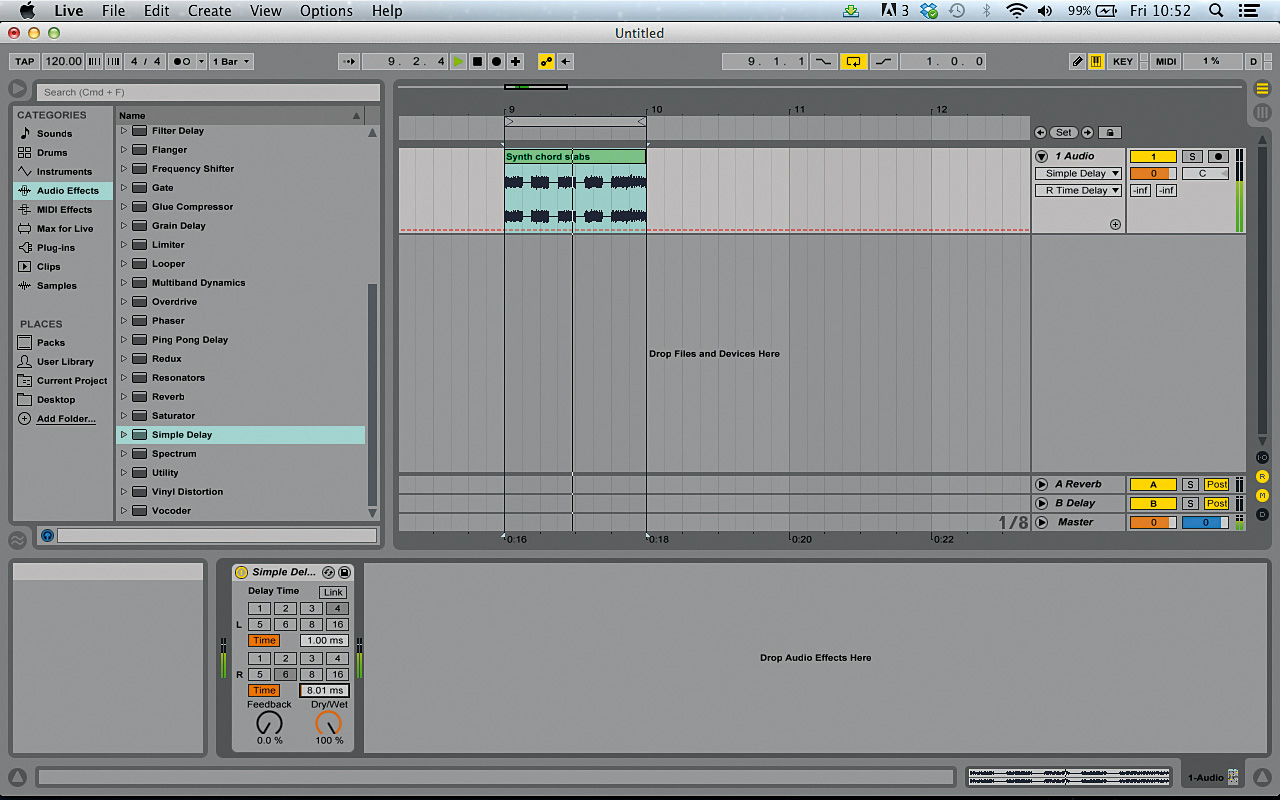
Turn both Ms Delay values down to 1.00ms. Now we can control the delay on each channel using specific millisecond values. Gradually turn up the right channel’s Ms Delay amount, and listen to how the signal goes from mono to stereo.
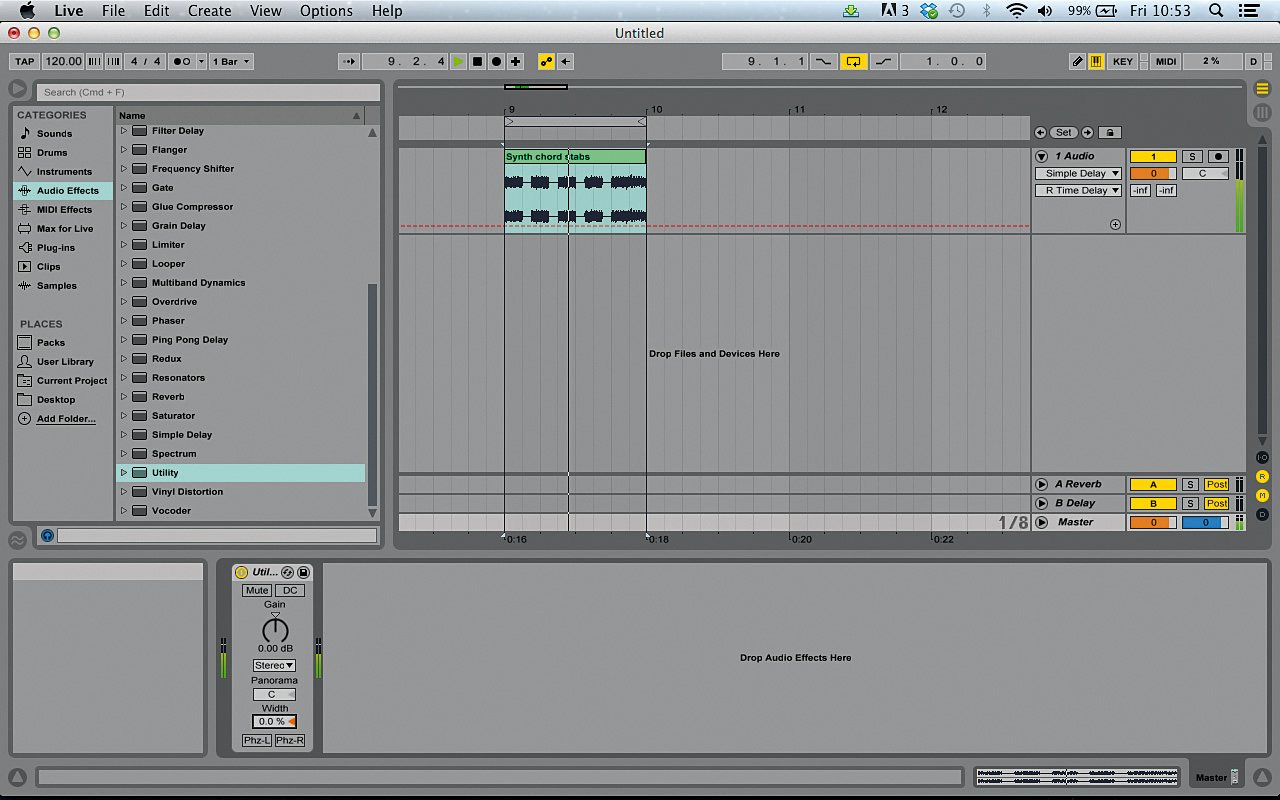
The bigger the gap in the delay between the left and right channels, the wider the stereo image becomes. Set the right channel’s Ms Delay to 26.7ms, and add Live’s Utility effect to the master buss. To check how the signal sounds in mono, bring Utility’s Width down to 0.0%. The signal still sounds good in mono, so we know the Haas technique isn’t having too much of a detrimental effect.
Doubling a bassline with a mid-range part
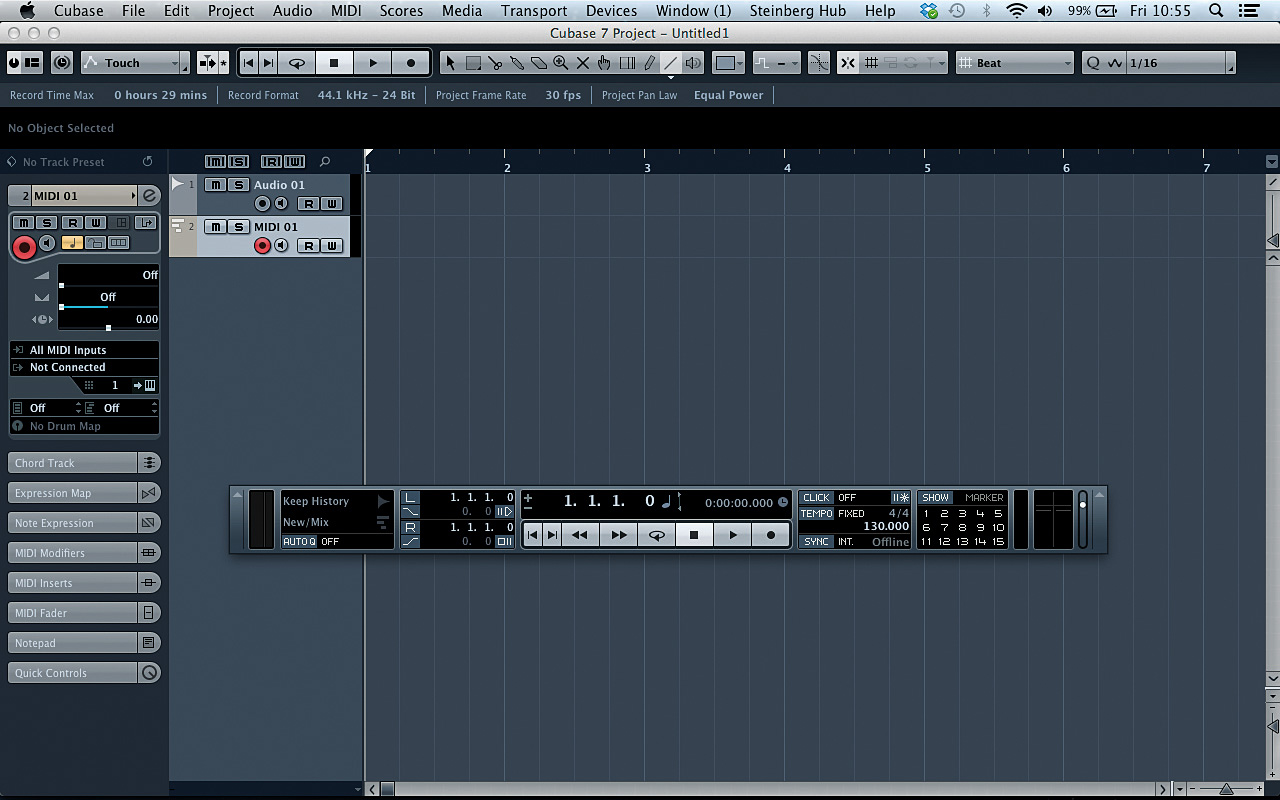
The problem with any genre of music that relies on bass as a platform – that’s any genre in truth but we’re thinking drum & bass, dance and so on – is that the bass doesn’t reproduce very well on smaller speakers. Create a new project in your DAW, set the tempo to 130bpm, and create one audio track and one MIDI track.
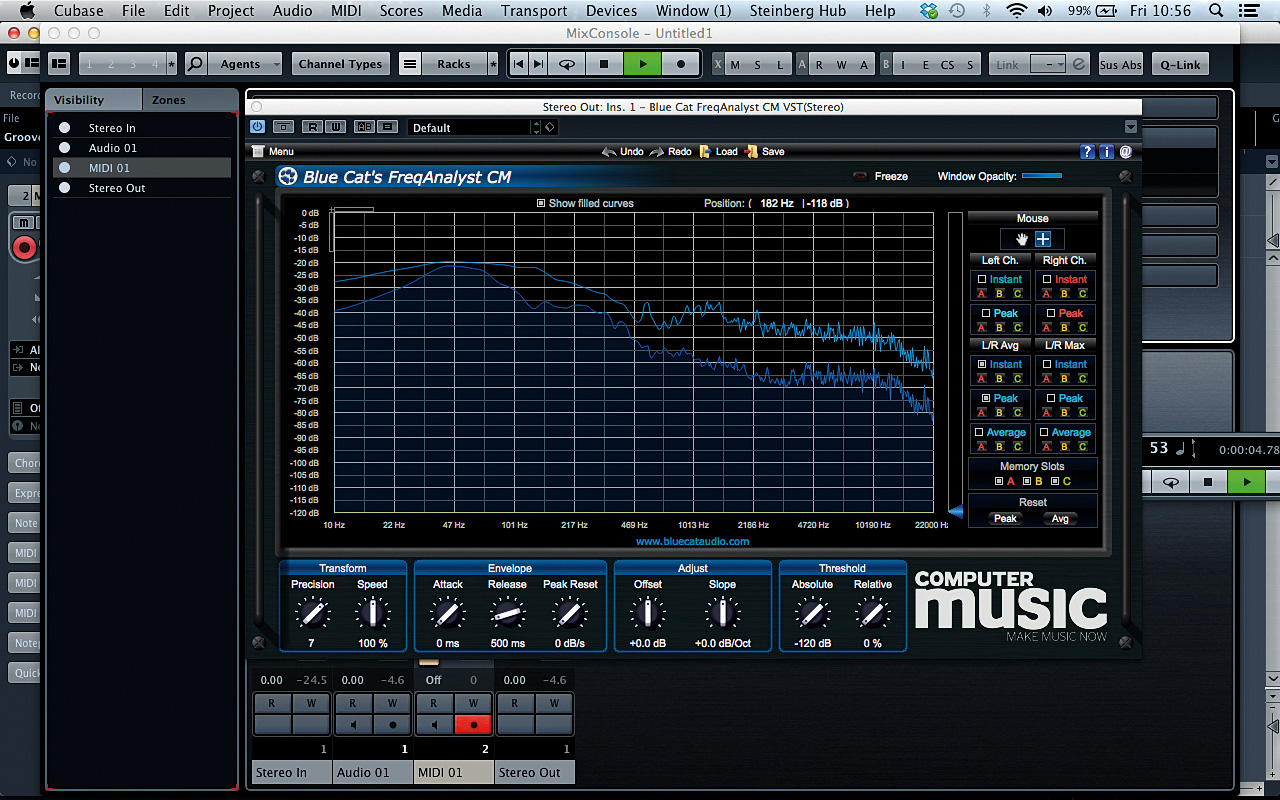
Drag Groove.wav onto the audio track. If you’re using laptop speakers rather than serious monitors or decent headphones to follow these tutorials, you might not be able to hear the bassline at all, but by putting a spectral analyser on the master output you’ll see that it’s definitely there. Use Blue Cat’s FreqAnalyst CM from our Plugin Suite – it’s free after all!
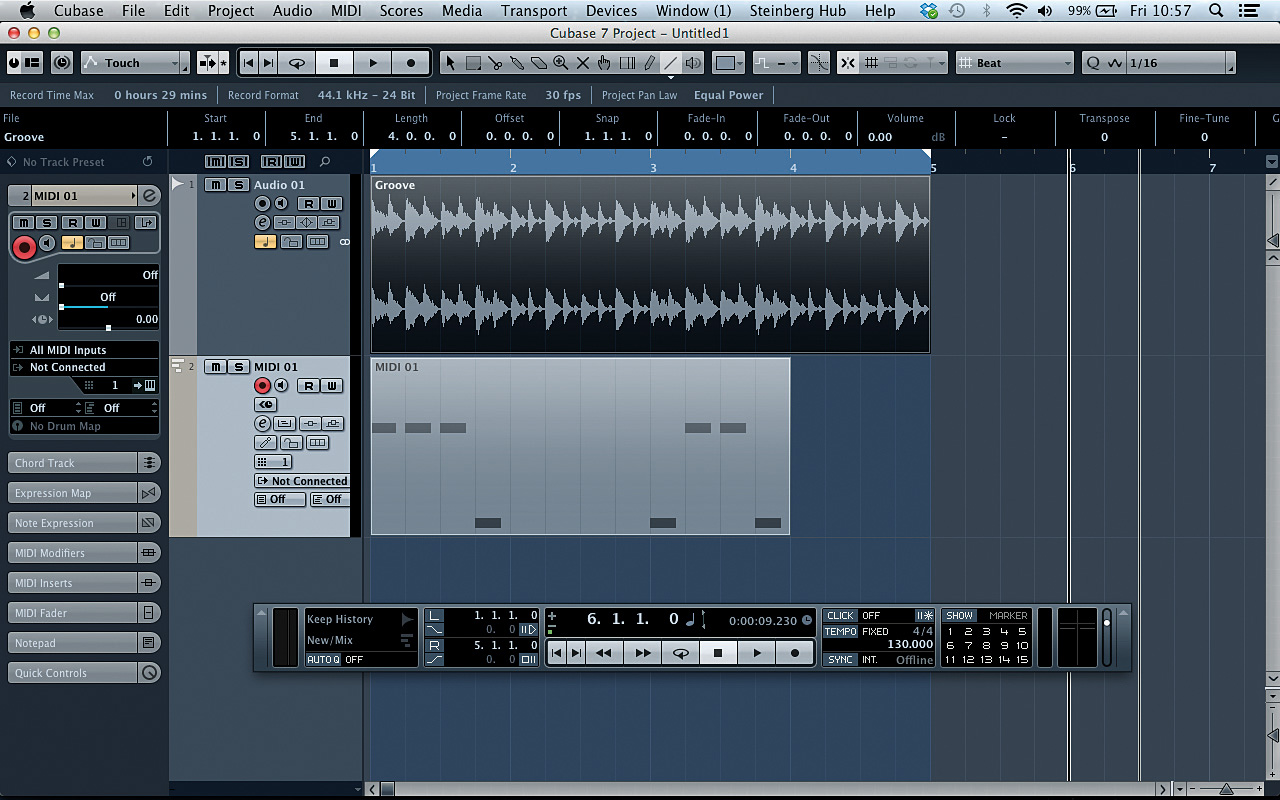
If we want the bassline to be audible on smaller speakers, one solution is to layer it with a mid-range element that can be more easily reproduced. Drag Bass.mid onto the MIDI track. This is the sequence used to create the bassline, and by using it to play another instrument we can double the bass part.
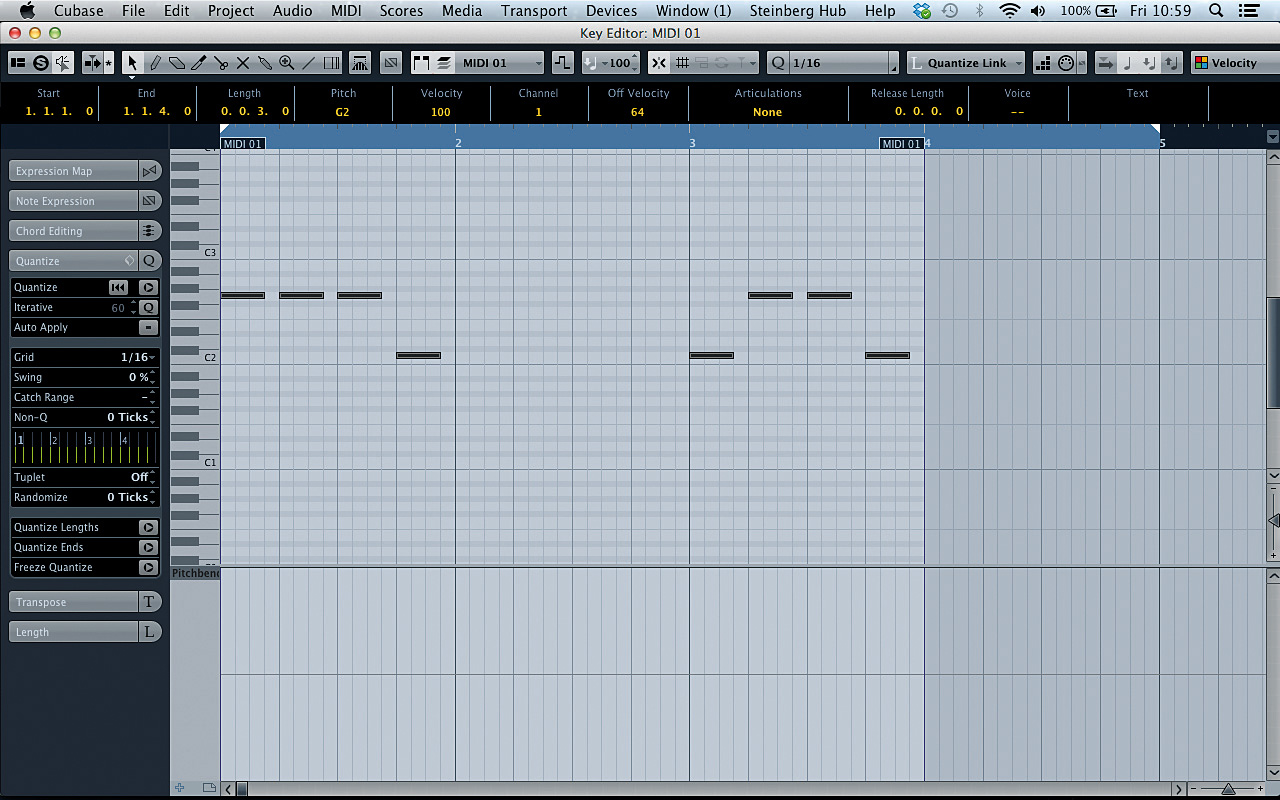
Load Dune CM (this plugin is from the free Computer Music Plugin Suite, but any software synth will do) onto the MIDI track. Click the Bank B button to initialise the patch. Currently the MIDI part is in the octave of C0, which is fine for a sub-bass but too low for a mid part. Open the MIDI part, select all of the notes, and transpose them up a couple octaves so that the part starts on G2.
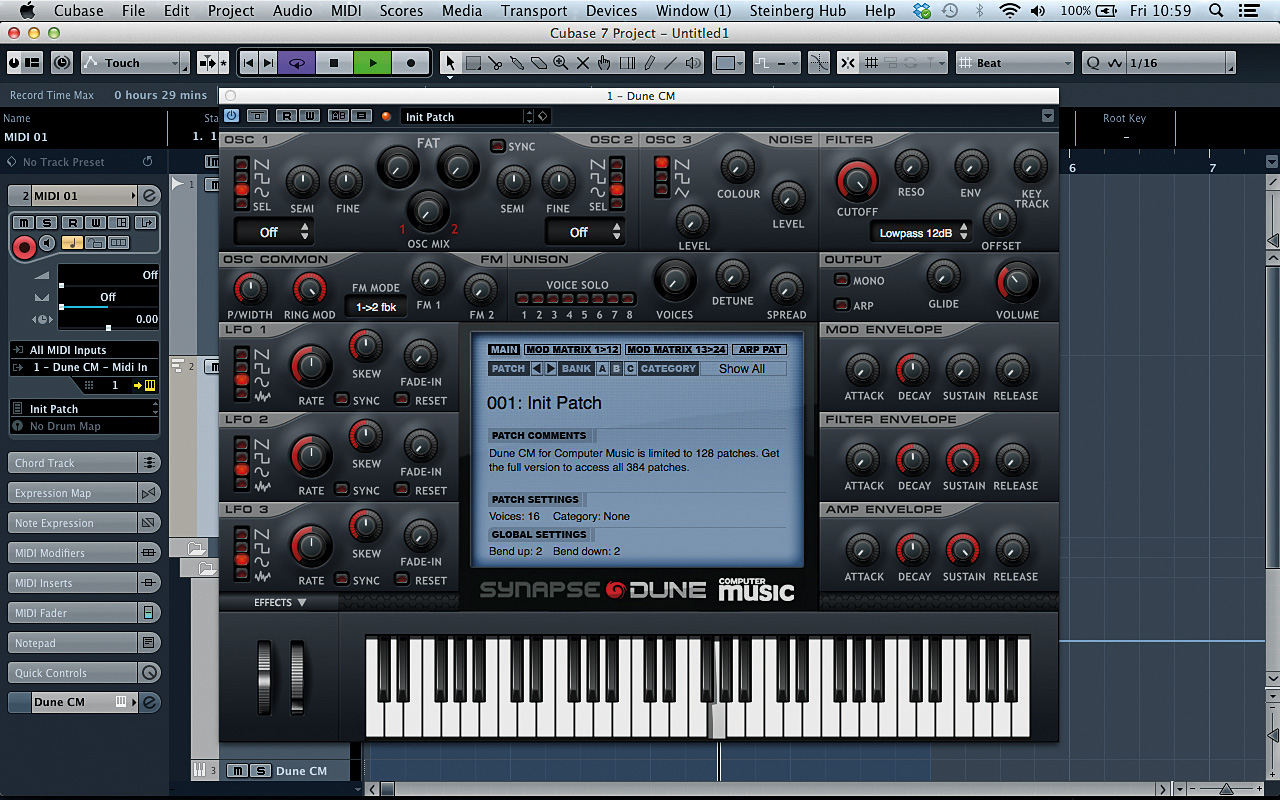
Now we need to make a suitable sound for Dune CM to play that sits with the sub-bass. Set Osc 1 and Osc 2 to sine waves by clicking the buttons next to the sine waveforms in each one. This gives us a simple sine tone, but by turning up the Ring Mod knob in the Osc Common panel, we can increase the number of harmonics present in the signal and get a more interesting timbre. (Audio: Ring mod.wav)
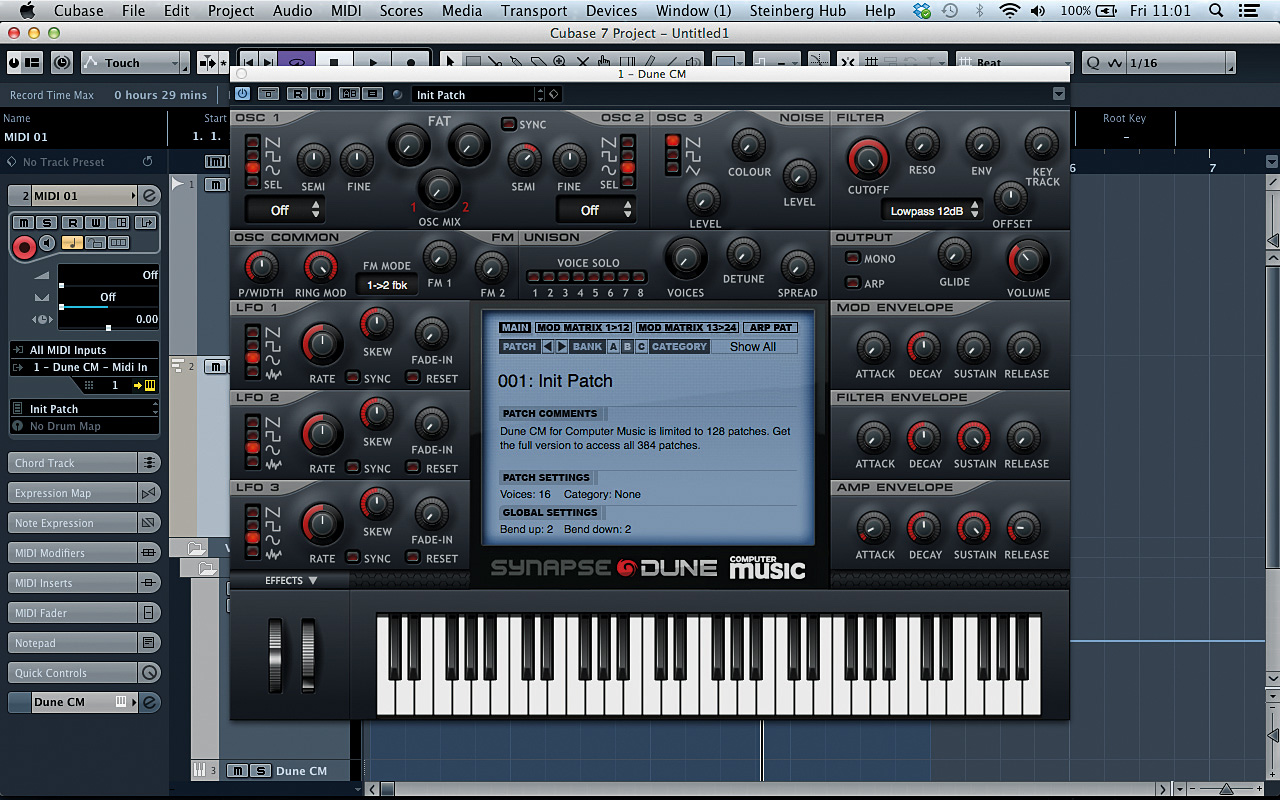
Set Ring Mod to 100%. We can’t hear Osc 2, but changing it still affects the synth’s output because it’s ring modulating Osc 1. Turn Osc 2’s Semi (semitone transpose) up to +12 to create a classic house organ sound. In the Amp Envelope section, set the Attack time to 9% and the Release time to 19% so that the start and end of the note don’t click. (Audio: Mid layer.wav)
Push it to the limit
There are plenty of ways to make your music sound louder, wider and weightier. The quest for this kind of ostensible improvement in sound quality has been ongoing since the dawn of recorded music, but it seems that, now more than ever, the pursuit of the loudest possible mixdown is dictating the actual content of the music (although the advent of streaming platforms has meant that a level playing field is now more common). While it’s obviously futile to even attempt to reverse this trend, it’s probably worth questioning whether or not you, personally, need to follow it.
While some dance tracks might benefit from huge amounts of sidechain compression and gigantic, frequency-filling unison-detuned saw patches, these techniques aren’t necessarily applicable to every track or every genre. Be realistic when you compare or A/B your music with that of other producers – your soulful deep house groove is unlikely to ever fill the frequency spectrum in the same way that a full-on, sawtooth-powered EDM-style banger does, but it definitely needs to stand up to the current production values of its own genre.
Once you’ve followed and understood the techniques presented in tutorials like these, the next thing you need to develop is an ability to judge how far you should take them. This skill can only be developed through experience, so try to actually finish as many tracks as you can to as high a standard as possible, and compare them with some pro tracks in the same genre. Eventually you’ll understand which tricks work well in your music, and how far you can take them.


Computer Music magazine is the world’s best selling publication dedicated solely to making great music with your Mac or PC computer. Each issue it brings its lucky readers the best in cutting-edge tutorials, need-to-know, expert software reviews and even all the tools you actually need to make great music today, courtesy of our legendary CM Plugin Suite.
