How to use Logic Pro X's Arrangement track to try out ideas
Drag 'n' drop your intro, verses, chorus and more
Apple’s Logic Pro X has evolved into a true production powerhouse since the company acquired it from Emagic, back when dinosaurs roamed the Earth.
One of the main elements to be added to the app over the years is a dedicated Arrangement track, intended to make it easier to come up with new arrangement ideas with the minimum of fuss and bother. You can literally pick up chunks of your song up and move them around on the timeline into whatever order you like.
The Arrangement track works by treating song sections as single entities to be relocated at will - picking up a section collects all of the regions on all of the tracks contained vertically within it. Not only is this great for playing around with arrangements of your own tracks, it’s also a brilliantly simple way of creating extended versions of songs you like - drag the MP3 into Logic, sync it to the grid using the Adapt Project Tempo to Region Tempo command, then get rid of that annoying trumpet solo and extend that catchy outro chorus to your heart’s content!
To see the Arrangement track, you first have to make sure it’s set to be visible in the Global Tracks area that appears above the regular track headers in Logic’s main window. To do this, simply hit the Alt-G key command to reveal the Global Tracks Configuration pop-up, and tick the Arrangement checkbox.
Once the track is visible, you can reposition it vertically in the global track list (so you can situate it directly above the main window if you like), and make it taller by dragging the divider above the track headers downwards.
Here's how Logic Pro's Arrangement track works, and what you can achieve with it.
For much advice on arrangement, pick up the December 2018 edition of Computer Music.
Get the MusicRadar Newsletter
Want all the hottest music and gear news, reviews, deals, features and more, direct to your inbox? Sign up here.

Step 1: Open Global Tracks to reveal the Arrangement track. Hit the + button in order to create a new arrange marker, and drag the right edge out to the required length of your first song section. The default length for a new arrange marker would be eight bars.

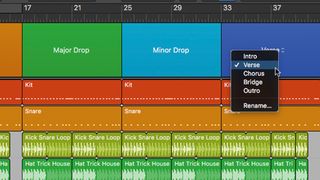
Step 2: New markers are titled automatically from a menu of existing names. Choose one that suits, or rename it by choosing Rename from the menu. You can also colour code regions by pressing Option-C and assigning a colour to each highlighted marker.
Step 3: Construct the rest of your Arrangement track by hitting the + button, dragging new markers out to the required lengths and renaming them as you go. Each new marker will always appear ‘glued’ to the right-hand edge of the previous marker.
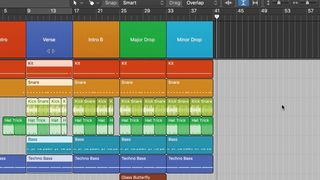
Step 4: Now for the cool bit. To move a whole section from one place in the song to another, simply drag it along the Arrangement track to its new location. The other markers will snap together to fill the gap so that the new arrangement flows seamlessly.
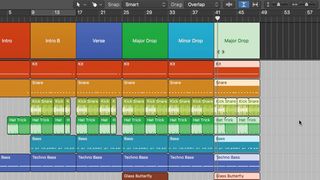
Step 5: To copy a marker - in order to create another chorus, say - hold down the Option key while dragging. The new copy will be placed before the start of the marker over which you release it.
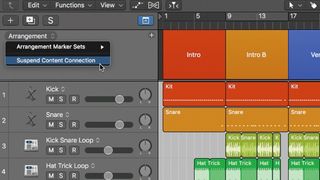
Step 6: Delete an arrange marker by hitting Backspace twice - first to delete the regions below it, then the marker itself. To delete markers without deleting the regions of the song that are associated with them, select Suspend Content Connection before hitting the button.
Computer Music magazine is the world’s best selling publication dedicated solely to making great music with your Mac or PC computer. Each issue it brings its lucky readers the best in cutting-edge tutorials, need-to-know, expert software reviews and even all the tools you actually need to make great music today, courtesy of our legendary CM Plugin Suite.

