How to set the correct levels on stage monitors
Maximize gain before feedback and improve the sound of your P.A. system by following these simple steps

One of the most difficult aspects of performing live is the monitor mix, especially when you’re in a working band who runs their own PA, or when you’re the engineer in a small venue. Whether monitors are being mixed from front of house or from a separate monitor desk, there are plenty of ways to improve the quality of your mixes, reduce feedback, and have a more pleasant show. This month we’ll concentrate on wedge monitors; we’ll look at in-ears another time.
Monitor signal flow
A monitor system provides easy communication between the monitor engineer and musicians; separate mixes between house and stage systems, with individual mixes for each musician; and high gain before feedback in the monitors so that the monitor level can be raised above the volume of the band.
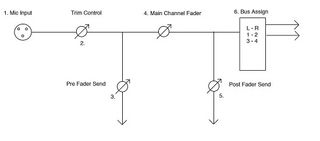
Figure 1 shows a simplified signal-flow diagram of audio passing through a mixer channel; the circles with arrows represent trim controls or faders. (Think of these as audio “valves,” as I explain below.) Monitor mixes should be generated using pre-fader sends from the mixing console. This is a critical detail because it means that the monitor mixes will not change when the faders are adjusted for the main “house” mix. Note the position of the prefader send (3) relative to the main channel fader (4). If you use a post-fader send from the console (5), then every time a vocal fader is adjusted for the house mix, the vocal level in the monitors will also change. This is very distracting to performers and “ties” their monitor mixes to the house mix— defeating your intent in the first place. If you are having trouble understanding this scenario, think of signal flow as water, with each fader as a valve. If you shut the valve at position 4 (Main Channel Fader), water is stopped from flowing at position 5 (the post-fader send).
The microphone factor
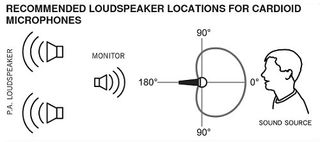
Take a look at figure 2, which shows a vocalist and the monitor position for a cardioid microphone. A cardioid pattern is most effective at rejecting sound that comes from directly behind the mic, also known as 180 degrees off-axis. That’s the spot where you want to place a stage wedge, because the mic will reject sound coming from that direction, whereas your ears will not. I often see two wedges placed on either side of a singer’s mic stand without regard to the mic’s pattern, but a cardioid mic is more prone to feedback when monitors are placed in this configuration because even though a cardioid mic rejects some sound from the sides, it still picks up a fair amount.
If we substitute a super-cardioid or hyper-cardioid pattern microphone, we need to move the monitor(s) to a different location from the one we used for a cardioid mic.
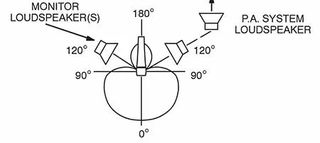
Figure 3 shows the super-cardioid pattern with optimum monitor placement. The front of the mic is at 0 degrees. Note that the areas of maximum rejection for this pattern are roughly 120 degrees off-axis on either side. If you look carefully, you’ll see a small lobe at the back of the super-cardioid pattern, which indicates that the mic will accept some sound from the rear. When using a super-cardioid mic, if you place a single monitor at the rear of the mic (i.e. directly in front of the performer where you’d place the monitor for a cardioid mic), you are inviting feedback. For those reasons, super-cardioid vocal mics are more conducive to configuring two monitors, one on either side of the performer. If for whatever reason you don’t need a second monitor, place one monitor into the pattern’s null on either side, not directly behind the microphone. The maximum points of rejection for a hyper-cardioid mic are more like 105 and 255 degrees off-axis; place the wedges accordingly.
Gain, feedback and EQ
Now we can turn our attention to tuning or “ringing out” the monitors, in order to maximize volume before feedback occurs, which basically means pushing gain until feedback occurs, then using EQ to reduce the troublesome frequencies until you achieve an ideal balance with the P.A. system.
Get the MusicRadar Newsletter
Want all the hottest music and gear news, reviews, deals, features and more, direct to your inbox? Sign up here.
We know that one of the goals of a monitor system is high gain before feedback. In the old days, this concept was paramount, almost to the point where the sound quality of the monitor didn’t matter. As long as it was loud, the talent would be happy. Fortunately, times have changed: Microphones are better, and so are monitors. Musicians have become conscious of their stage volume and their hearing. But feedback is still a possibility, so use the technique of ringing out a monitor to reduce feedback while being able to make the monitor loud.
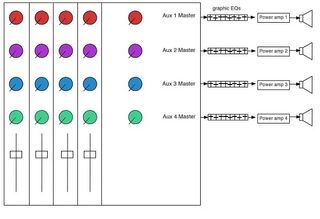
It’s almost a rule that there should be a 31-band, “third octave” graphic EQ patched between the send output and power amplifier input for a wedge monitor mix. In the old days, engineers would have a rack full of 31-band EQs: one for every monitor mix on stage. A monitor send from the mixing desk would be patched into a graphic EQ; output from the graphic EQ would be patched into a power amp, which would then feed a monitor, or possibly a pair of monitors; see Figure 4. A club hosting national acts would usually be able to supply eight monitor mixes, which required eight graphic EQs and (at least) eight power amps. You didn’t really have to worry about being cold during the winter while mixing monitors in a club because the processing rack would throw enough heat for you to toast marshmallows.

The best PA speakers 2020: the best compact live sound systems for bands and buskers
Why not use the channel EQ to fix monitor problems? There are many reasons. Let’s say the monitors are being mixed from the front-of-house desk. You don’t want to hack away at the EQ on a vocal channel to fix the ringing while at the same time making the vocal sound weird to the audience. This idea also assumes that the monitor sends are tapped from the channel after the EQ—but it is very possible (in fact, likely) that the pre-fader sends are also pre-EQ, in which case the EQ does not affect the send anyway. (Check the manual to be sure.) When monitors are mixed from a separate console, you probably still don’t want to hack away at the EQ on a channel because the result may sound odd to the rest of the band in their monitors. Channel EQ is not really the right tool for EQing monitors, anyway: The bands in a graphic EQ are relatively narrow, disturbing as little of the surrounding frequencies as possible, but the bands in a channel EQ tend to be broad and more gentle, in particular, on the low- and high-frequency bands.
Nowadays, EQ processing takes many forms: Most digital mixers feature either a graphic EQ on every output, or several graphic or parametric EQs that can be soft-patched across the sends of your choice before they leave the console. These builtin EQs greatly reduce the amount of hardware, wiring, and space dedicated to monitor world. Regardless of whether you are using hardware or software processing, whether you are mixing monitors from the front-of-house console or a dedicated monitor console, the process is almost always the same. (Exceptions include certain network-capable digital mixers that enable you to physically stand on stage behind the mic while you are also adjusting the EQ using an iPad or possibly even an iPhone for remote control.) You’ll probably need to go through this process for every performer’s wedge mix, certainly for every performer who sings and has his vocal mic in his personal wedge. If a performer’s monitor does not include his own vocal mic or the vocal mic of another band member, there’s likely less need to ring out the monitor—but be aware that on very loud stages, drum monitors can also benefit from the procedure, to help avoid feedback from kick drum and toms.
Let the ringing begin
Pick a mix to work with and set all of the sliders on the graphic EQ for that specific mix to “0” (flat). (The EQ on the microphone channel can be set flat, but as I explained earlier, this may not make any difference.) Stand at the microphone position on stage and speak into it. While you are doing this, have the person who is running the mixing board slowly (and I mean slowly) raise the level of your voice in that monitor, and only that monitor. (If you’re smart, wear hearing protection while you do this.) As the level of your voice gets louder, you will begin to hear ringing, indicating the onset of feedback. That’s when you stop increasing the volume of the monitor. At this point your job is to identify the frequency that’s starting to ring. Experienced monitor engineers can do this with frightening accuracy, but if you are inexperienced, you’ll have to guess, or use a spectrum analyzer. If you don’t own a spectrum analyzer, you can download any one of a number of available apps, and if you decide to get really ambitious, you can buy a measurement mic that can be attached to your phone for this specific purpose. PreSonus and other companies are adding spectrum analysis to their digital mixing consoles to help you with the process.
Let’s say that you’re really good (or really lucky) and you identify the frequency correctly on the first try. The next step is to have the person “driving” the system slowly (again, I mean really slowly) raise the level of the corresponding slider on the graphic EQ. If you picked the right frequency, you’ll hear the ringing get worse. (If it does not, put that EQ control back to “0” and try one of the adjacent EQ sliders. It’s a process of trial and error for the first few hundred times.) When you’ve found the frequency, use the EQ control to cut that frequency a few dB. Listen for the ringing to be reduced or eliminated. Then bring up the overall volume of the monitor a bit and listen for the ringing to return. It may return at a different frequency. Repeat the process. As you do, the ringing frequencies will likely change. Try to determine the offending frequency, raise the EQ control to confirm your suspicions, and use that same EQ slider to cut the ringing. Try not to hack away large chunks of EQ with severe cuts because then the monitors won’t sound very good. With a bit of practice, you can get the overall volume of the monitors pretty loud without feedback. Then turn them down. We don’t want to encourage excessive stage volume. Just because you can make the monitors loud doesn’t mean you should make them loud.
Keep in mind that ringing out monitors is as much a daily chore in venues where the equipment is the same every day as it is when you are on tour. Changes in temperature, humidity, stupidity, and stage setup will affect monitor EQ. Stage clothing, particularly hats changes the way monitors and microphones react. Just because you do it once doesn’t mean you never have to do it again. But you’ll get better at it, we promise.
EQ 101: the graphic equalizer
The type of EQ most often used in monitor systems is graphic EQ—specifically, 31-band graphic EQ. This type of EQ has 31 boost/cut sliders, each tuned to a specific frequency. When referring to bands, “third-octave” means you have control over three frequency bands per octave. The frequencies for a 31-band, third-octave EQ are usually set as follows: 20, 25, 31.5, 40, 50, 63, 80, 100, 125, 160, 200, 250, 315, 400, 500, 630, and 800 Hz; 1k, 1.25k, 1.6k, 2k, 2.5k, 3.15k, 4k, 5k, 6.3k, 8k, 10k, 12.5k, 18k, and 20 kHz. It is not a coincidence that most spectrum analyzers have bargraph meters at exactly the same frequencies (which have been determined through years of audio research). Manufacturers generally agree on the frequencies for ease of use.
The good news about using a graphic EQ is that you get a lot of frequency bands. The bad news is that each frequency is fixed and you cannot retune any of them. For example: What if you have feedback at a frequency of 450 Hz? You don’t have a boost/cut control at 450 Hz, so you’ll have to play around with the controls at 400 and 500 Hz to compensate. Each control’s bandwidth is usually wide enough that you will be able to “get in the cracks” between frequencies, but if that does not work you may need to use a parametric EQ.
Additional controls on a graphic EQ include:
• Gain: allows you to boost or cut the overall signal level AFTER you have applied EQ
• Range: allows you to set the maximum boost or cut for the sliders. Usually you have a choice between 6 or 12dB range — meaning that the maximum boost/cut is either +/-6 dB or +/-12 dB.
• HPF: Highpass filter, allows you to remove very low unwanted frequencies that you might not hear but that might be causing your power amps to overwork.
Graphic EQs get their name from the fact that once you have set the various sliders, their positions display the EQ curve you have created.
EQ 101: parametric equalizer
Parametric equalizers can be very useful in ringing out monitors when used instead of (or in addition to) graphic EQs. There are three main differences between graphic and parametric EQs. First, a parametric EQ usually has fewer bands than a graphic; typically four to seven. Second, the frequencies of a parametric EQ are not fixed; they can be tuned by the user across a range of frequencies. Third, the bandwidth of a graphic EQ is fixed, whereas the bandwidth of a parametric EQ can be adjusted.
Usually, each band in a parametric EQ provides control over three parameters: frequency, amount of boost or cut, and bandwidth. The bandwidth control determines how wide or narrow the EQ curve is; in other words, how much of the surrounding neighborhood of frequencies is affected. Some people refer to a parametric EQ as a “haystack” EQ, named for the shape of the resulting curve. You can visualize bandwidth as determining how fat or skinny the haystack is.
Electronic Musician magazine is the ultimate resource for musicians who want to make better music, in the studio or onstage. In each and every issue it surveys all aspects of music production - performance, recording, and technology, from studio to stage and offers product news and reviews on the latest equipment and services. Plus, get in-depth tips & techniques, gear reviews, and insights from today’s top artists!

