How to record an entire band in one room
Capture musicians performing in a single space
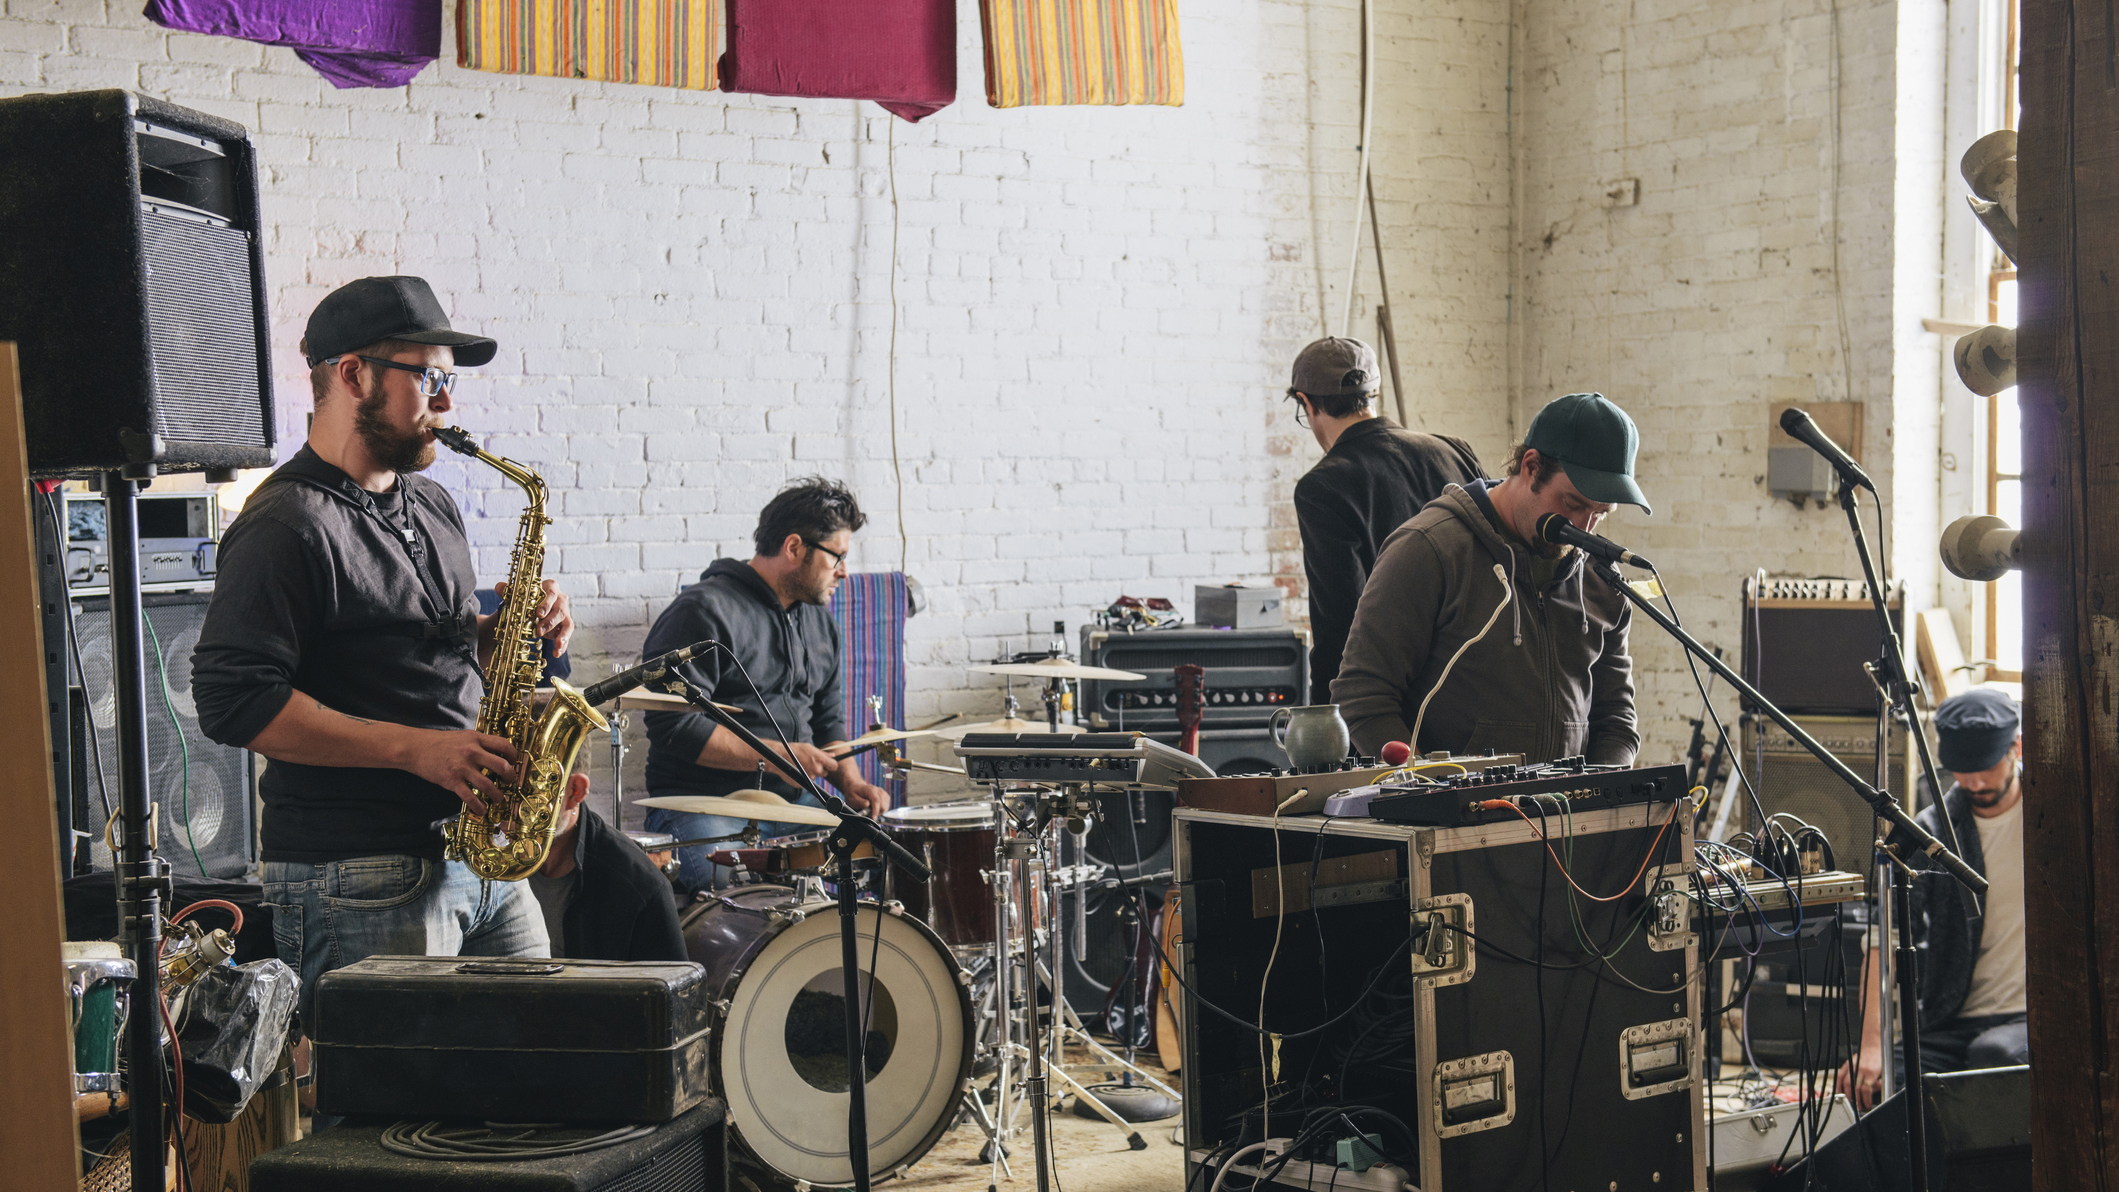
Many years ago I recorded a project with a band called Thick. As I recall, the drummer was renovating a mansion that belonged to his grandmother. At some point during the process, Grandma moved into the guesthouse and the band moved into the mansion to rehearse while the drummer was working on the reconstruction. They called me and asked if we could track the band’s next CD at the mansion, using the rooms that were not covered with plaster and sawdust. It would turn out to be one of my most memorable recording experiences. Good friends, good food, and creating good music. Life doesn’t get much better.
The project was fairly ambitious: We had drums in the first-floor dining room, guitar amps in the bathroom with a Mesa/Boogie 4x12 in the tub (!), and a bass amp in a bedroom closet. We pooled our gear, created a control room in the attic, and ran a 16-channel snake down to the first floor near the drums. We ran lines for headphone mixes, and to facilitate visual communication between the drummer and bassist, we arranged large mirrors that allowed the drummer to see around a corner and up the stairs to the second-floor landing where the bass player was tethered to that amp in the bedroom closet.
Recording that project at the mansion gave us time, and that enabled everyone to be comfortable. We weren’t stressed over the “nuts and bolts” of assembling the rig. Day one was strictly for setup, testing, and troubleshooting.
At the end of that day, we did a few rough recordings. There was no pressure or expectation of getting usable takes. After listening to the roughs, it was barbeque, beer, and a good night’s sleep. The next day, we started tracking for real. On one or two occasions, the band struggled and we left it alone until the next day, when we could return fresh and rested. It was a lot of work, but the feel we captured in those recordings—of live musicians playing in a relaxed, familiar environment—was unmistakably amazing.
Your family may not want your band taking over their mansion, but there’s a lot to be said for recording at home. Having a small home studio where you can do vocal overdubs, for example, can be a major stress reliever in the recording process. But what if you want to track your entire band at home, live? It can be done, with all of the musicians in the same room, where visual communication fosters that magical give and take that happens in a rhythm section. Some of your recording concerns are obvious (I’ll mention them anyway), while others lurk under the radar.
Let’s say you have access to a space where you can set up your band “rehearsal style.” (In fact, a rehearsal space or a garage can be a very good place to record.) The biggest question you’ll face is, do you really have the gear required to make a good recording? We all have computers that run DAW software, and a good mic or two; however there are things to consider, such as the I/O capabilities of your audio interface. You’ll probably need a minimum of 16 inputs to track a rhythm section. Can you record a great drum sound with four microphones? Sure, but maybe not with all of the instruments in the same room. Do you have the right microphones, plus cables and stands? Does your interface have the amount of outputs required to create multiple cue mixes? Is the band prepared to perform the songs, perhaps without hearing a reference vocal? In such a situation, a mixing console with an integrated FireWire or USB interface can solve a lot of problems, including providing a large number of preamps as well as multiple sends for headphone cue mixes.
Explore the space
Want all the hottest music and gear news, reviews, deals, features and more, direct to your inbox? Sign up here.
Isolating microphones from leakage is an important aspect of recording a live band. The less bleed from unwanted sounds into each mic, the more control you’ll have in the mix process. Ideally, the drum mics would never pick up the bass or guitar amps, and vice-versa. As a result, consider distant miking to be a no-no. One way to achieve zero leakage between drums, electric guitar, and bass is to use amp simulators while recording. Notice I said while recording. Once you’ve got the performance down, you can reamp those tracks and go for the tone. Make sure to take DIs from the guitar and bass and record them to separate tracks. If that idea doesn’t float your boat, you can purchase or build a small isolation box for a single speaker with a microphone mounted inside the box. Keyboards can also be recorded via DI, but remember—you’ll need headphone mixes to hear these instruments, since there won’t be amplifiers in the room. Add headphones, headphone extension cables, and a multioutput headphone amp to your shopping list.
There are ways to isolate guitar and bass amps even when they’re in the same room as the drums. Clothes closets make great iso booths. Isolation can be improved by moving amps as far away as possible from the drums, facing them the opposite direction, and surrounding them with acoustic panels, couch cushions, or moving blankets. You’d be surprised at how much bleed a moving blanket can cut when draped over a kick drum or guitar amp and its microphone. Leakage itself is not such an evil thing, but it becomes a problem when mistakes need to be fixed after the fact. You may find, for example, that ghost notes of an old guitar solo remain in some of the drum mics. That’s why it’s important to…
Leakage is a relative thing. Its severity (or lack thereof ) is related to the distance between a microphone and the intended source, distance between the mic and unwanted source(s), preamp gain, and orientation of the microphone itself. Obviously a Shure SM57 pushed within a few inches of a loud guitar amp suffers much less leakage than if it were placed three feet in front of the amp. But the other component in this equation is that—as you move the mic closer to the amp—you need less preamp gain, which in a manner of speaking “turns down” the room sound picked up by the mic. Keeping the mics close is relatively easy for guitar and bass amps and for most of the drum kit. Overhead microphones, however, present a challenge. You’ll have to experiment to see how high you can place the overheads. Place them too high and they pick up everything; too low and the cymbals ‘swish’ every time they’re hit. If you have access to acoustic panels or office dividers, they can help when placed in front of the drum kit. Or you can take the Peter Gabriel approach and tell the drummer that cymbals are not allowed.
As a general rule of thumb, it’s probably a good idea to avoid using omnidirectional microphones because they can’t discriminate against the sounds you don’t want. Mics with cardioid and hyper- or super-cardioid patterns are your friends in one sense and your enemies in another. Aiming the rejection point of a microphone toward what you don’t want is almost as important as pointing the front of that mic toward what you do want it to capture. Example: You have a cardioid mic on the hi-hat. You want the front of that mic pointing toward the hi-hat cymbals. Have you looked at where the back of that mic is aimed? Point the back of the mic (the point of maximum rejection) so that it’s aimed toward the centre of the room, or where the other musicians are set. Unfortunately, many directional mics have a coloured off-axis response, so the bleed can produce phase issues when combined with other microphones. Keep the mics close to the source to minimize this issue. If you have the luxury to experiment you may find that some microphones are more effective at rejecting leakage than others, even though they may have the same pickup pattern.
Another issue to consider is whether to use dynamic or condenser microphones. The same crisp high-end response that we love about condenser mics also makes them more sensitive to background noise, a.k.a. bleed. Toms can benefit from the relatively reduced sensitivity of a dynamic mic such as a Sennheiser MD421, which is effective at reducing cymbal leakage as well as room noise.
Stand over there, please
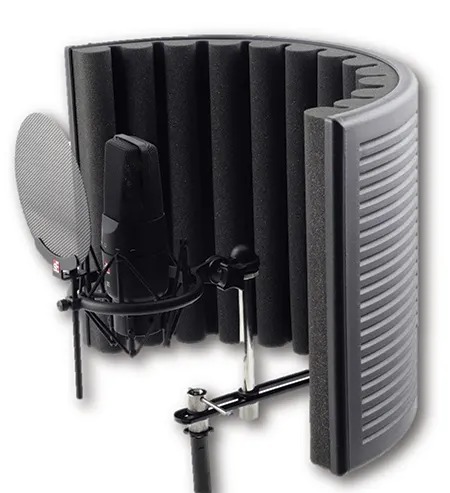
When there is a vocalist in the room, be aware of the area behind him or her because reflections from the rear wall will bounce into the vocal microphone. Acoustic absorbers (gobos) can increase the level of isolation when placed around the singer. (I’m surprised by how often I see common office dividers headed for the dumpster. Rescue them.) Vocal microphone isolation can also be improved by using an acoustic isolator such as the sE Electronics Reflexion Filter. Don’t be afraid to rearrange the furniture in someone’s living room: Large, overstuffed sofas and chairs make pretty decent acoustic absorbers. Throw rugs or carpets reduce reflections and can help hide some of the cables that might otherwise trip you when you’re trying to find your cell phone at 3am.
Perhaps the most challenging aspect of one-room recording is monitoring. Ideally, we’d hear only what is coming through the microphones—not the ambient room noise—but there may be no point in using monitor speakers while the band is playing because A, you won’t be able to hear them over the volume of the band anyway, and B, the monitor speakers will bleed into the microphones. One alternative is for the engineer to use headphones, preferably closed-back “muff”-type models that shut out external sound to some extent. Tried-and-true recording techniques will help you succeed when there is difficulty monitoring. I’ll climb out on a limb and start sawing: If I have a good drummer on a decent drum kit and access to familiar microphones, I can make a very good recording without ever hearing the mics before I push Record. There’s no reason that you can’t turn off the monitors, record a take, and then play it back to listen to the results. It’s more time consuming, but the whole point of a one-room project is doing it in a place where you can take your time…
… and don't get the police involved
Now, some of the not-so-obvious considerations. You don’t want the junkyard dog next door to bark and interfere with your recording. The dog’s owner doesn’t want your death metal band interfering with reruns of Golden Girls. Don’t tick off the neighbours! This might mean working during daytime hours or ending at reasonable times in the early evening. Take a walk outside while the band is playing to get an idea of how loud they are. Open windows are probably not a good idea, but closing them brings ventilation issues. Air conditioning is a must during the summer, and air conditioners make noise. Turn off the AC during takes and turn it on between them. Ditto for steam heat, which can produce more hissing that a box full of snakes. Unfortunately, changes in temperature can cause guitars or basses to go out of tune, so check tuning before every take. Major appliances can create significant amounts of noise, so beware that noise from say, a washing machine, could ruin a take.
Mechanical noise is not the only issue related to household appliances. Some heavy appliances, especially those with motors, generate noise that can leak into electrical lines and infiltrate audio gear. To prevent such noise, keep the recording gear on a separate leg of the AC service and use AC line filters such as the Isobar from Tripp Lite.
Computer fan noise can be an issue when you're recording quiet passages. Computer isolation cabinets are nice but expensive; consider hiding the CPU under a coffee table and placing a moving blanket over it.
Audible artefacts
Be aware of the effect that effects (pun intended) will have on your recordings. Suppose you want to compress the vocal mic during recording, which is generally not a bad idea. If you do so, you will promote leakage because when the vocal gets quiet and the compressor stops reducing gain, it will make the background noise (i.e. other instruments) appear louder. Getting rid of leakage might sound like a good reason to gate the kick, toms, or snare, but gating during the recording process is a slippery slope on which grace notes could be lost if the threshold is set too high. Save the processing for the mix.
The whole point of setting up to record at home in one room is so that you can be relaxed, interact with other musicians, and take your time in the process. A comfortable environment always makes better recordings. When musicians play in the same room, communication is easy and the feel is unmistakable. It could be the most fun you’ll ever have recording.
Dealing with Ground Loops
Grounding issues arise when audio gear is grounded in multiple places. Here’s an example: You plug a bass into a DI. The instrument cable has a ground, which is carried through the DI to the bass amp. The amp is plugged into an AC circuit on one side of the room, which is grounded. That DI also connects to the mic preamp in a mixer via XLR cable. The ground from the XLR cable is carried to the mixer, through to an outlet across the room on another AC circuit and then to another ground.
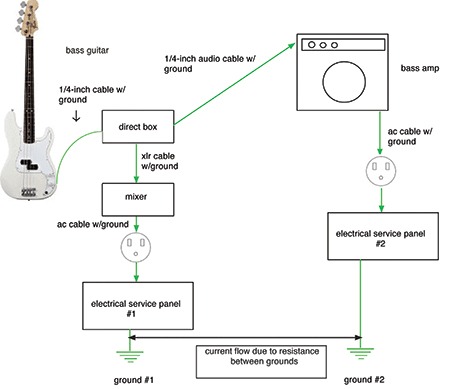
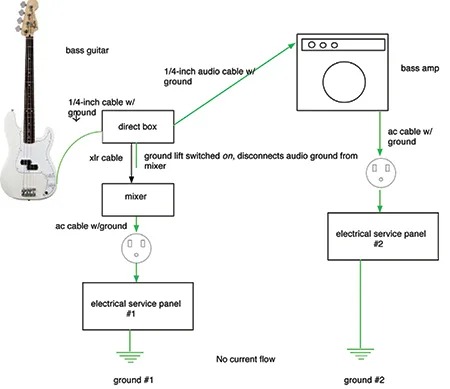
In theory, the mixer’s ground should be at the same potential as the ground for the bass amp, but often they are not. As a result, current flows between them, producing a low-frequency (60Hz) hum (see Figure 1). The solution is removing one of the grounds, but it is unsafe to remove the ground lug (the round pin) from an AC cable. The safe way to solve this problem is by using the ground lift switch on the DI to break one of the audio ground connections (see Figure 2). The whole mess can often be avoided by feeding AC to the gear in a “star ground” manner, whereby all of the gear is ultimately plugged into one or a duplex pair of AC outlets by daisy-chaining power strips or rack power distributors. This ensures that all audio equipment shares a common ground.
Fortunately most modern audio gear uses little power, so you should be able to safely run the band and recording gear from a single 15- or 20-amp AC circuit.
Electronic Musician magazine is the ultimate resource for musicians who want to make better music, in the studio or onstage. In each and every issue it surveys all aspects of music production - performance, recording, and technology, from studio to stage and offers product news and reviews on the latest equipment and services. Plus, get in-depth tips & techniques, gear reviews, and insights from today’s top artists!
