How to make your guitar stay in tune
Avoid frustration by improving your electric guitar's tuning stability

It’s understandable that professionals hire a stage guitar tech to tune up everything before they play. It’s not a job anyone enjoys. So we thought we’d run through some of the techniques used by a pro repair shop to crack down on those tuning gremlins, whether you're dealing with a high-end instrument or a cheap guitar.
In thepast we've covered installing tuners and how they’re only partly to blame for poor tuning performance. As the causes can be numerous, it’s helpful to have checklist to run through if your tuning problems are reoccurring. As you will see, it’s a lot of small steps and mostly it’s a matter of minimising friction with a dab of stabilising this and that.
The guitar of choice this month is a Gibson ES-335. The owner wants a set of 13-54s on - and in standard tuning. We’ve built in some other bridges for illustration showing how to service those too.
Check over each of these points when you’re stringing up the next time as part of your regular maintenance. Here’s how to tune up and stay tuned...
What you need:
- Fresh strings
- String winder
- Tuner
- String cutters
- Tuning lubricant: Big Bends Nut Sauce, or similar 3-In-One light oil
- Blue roll
- 10mm spanner
- PH1 screwdriver
Skill level
Intermediate
Step 1

Let’s check the guitar’s setup is right. A super-high string height means that in effect you have to bend the string to fret a note.
The action at the 12th fret should usually be 2.2mm on the sixth string and 1.5mm on the first string. Intonation and pickup height should be set first too.
Get the MusicRadar Newsletter
Want all the hottest music and gear news, reviews, deals, features and more, direct to your inbox? Sign up here.
Step 2
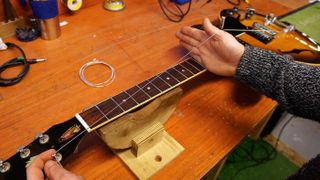
Correct string winding is absolutely essential and it’s the bugbear of many a guitar tech to work on a badly-strung guitar.
Here’s how to get it right. String through the bridge and ‘karate chop’ the 12th fret, this means that each string gets the same amount of windings each time.
Step 3
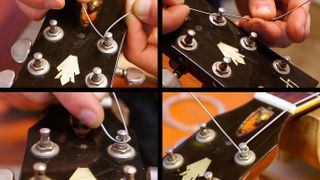
Here’s a neat way to self lock your string without tying it on. After a karate chop measuring the string, wrap the loose end under the first wind.
Kink the loose end up over the start wind, then wind the string under the start of the wind. Tune to pitch and repeat.
Step 4

With those string ends wrapped in that way it means they will only pull tighter when stretched. We now need to stretch these strings in.
Tune the guitar then stretch each string on its own; you’ll see how much it goes down in pitch. This is the windings settling down. Repeat stretching until the string stops dropping pitch.
Step 5
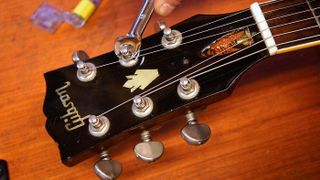
Are your tuners fastened onto the headstock properly? It’s a common question.
Tighten up the 10mm nut on the front (if your guitar has one) being careful not to over do it: these nuts can be very weak. If your guitar doesn’t have the nuts on the front, check that your bushing isn’t loose as that won’t help.
Step 6
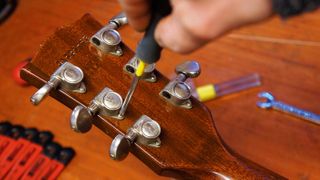
On the rear of the headstock many tuners have small screws helping to anchor them onto the headstock.
Make sure that these are doing their job properly. Don’t over-tighten these as they can shear off. If they free spin (very common on mahogany necks), you will have to repair the holes and then re-drill.
Step 7
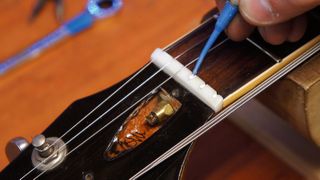
Any point of friction needs tending to. When you depress a tremolo or bend a string, it will move slightly through each of the friction points of your guitar.
Minimise this friction to attain tuning enlightenment. The nut slots can be lubricated with Big Bends Nut Sauce, or a similar product.
Step 8

It’s essential that your nut is cut right for the string size that you’re using.
With these Rotosound 13-54s we’ve enlarged the string slots quite a bit - but be warned: nut slot cutting is best left to a proper guitar tech as it requires specialised tools. This porous bone nut will hold grease for a good few string changes.
Step 9

Next, lubricate the bridge saddle. The string will still slide over this part of the guitar when you go wild on the tremolo, or go for a raging bend.
This 335 has roller saddles, we put 3-In-One light oil into that so it penetrates the moving parts better. Use Nut Sauce on other types of guitars.
Step 10

If your guitar has a Strat or Floyd Rose-type tremolo you need to lube the fulcrum points there too.
If you have the full Floyd Rose system, the clever locking nut and saddle string clamps have already minimised your string’s length thus eliminating almost all friction points.
Step 11

Do you have string retainers or a string retainer bar? Guess what? Those little fellas are another friction point so they will require lubing too.
Check for sharp edges that could pinch a string too. There are some clever Graphtech ones available, which get our ‘gold star’ for performance and never need lubing as they are graphite.
Step 12

It’s no surprise that this joining of the two halves of the guitar is critical, the join has to be solid not only for tuning stability but for sustain too.
If the neck can swivel or move back and forth in the neck pocket this needs reinforcement either with side shims or neck bolts instead of screws.
Jack runs an independent guitar setup and guitar repair service in Manchester, England. He serves the musicians of the Northwest of England, working on electric guitars, bass guitars, acoustic guitars and more. Jack has been writing the Fix Your Guitar column in Total Guitar Magazine since 2017.

“‘Would you like to tune your guitar?’ ‘Oh, no thanks, I’m trying to give up’”: The Tunerette is the healthy option for Clapton and Keef fans looking for that cigarette on the headstock look – and it tunes your guitar

"Offers a huge amount of options for all players of stringed instruments, and provides the highest accuracy available for any clip-on tuner": Peterson Stroboclip HDC review


![Justin Hawkins [left] of the Darkness plays an open G on his offset electric and closes his eyes as he performs onstage; soul-reggae icon Johnny Nash [right] frets a chord on his acoustic and wears a patched denim jacket.](https://cdn.mos.cms.futurecdn.net/hWzCjD9ZWQiPPjMtTWiFfa-840-80.jpg)


