How to master the Roland TR-8S
The complete tutorial for Roland's Rhythm Performer
Want all the hottest music and gear news, reviews, deals, features and more, direct to your inbox? Sign up here.
You are now subscribed
Your newsletter sign-up was successful
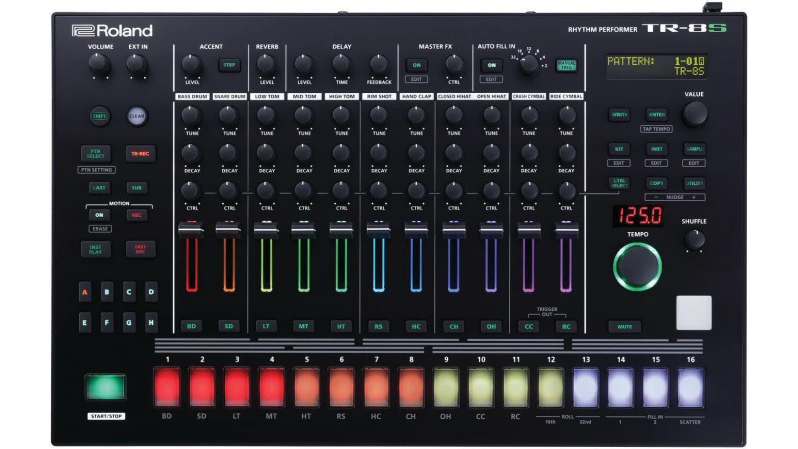
With the introduction of the TR-8S, Roland not only advanced the popular TR-8’s sequencing tools and iconic sound but added sample import (via SD card) and expanded the drum machine's editing features to a point where it truly is an instrument in its own right.
Between performance-oriented patterns and sophisticated sound design amenities, you’ll get the most from this beast once you understand how to mould its sonic resources to match your artistic identity.
Getting started with kit design
The TR-8S comes with 84 beautifully designed kits, covering nearly every genre and with spot-on re-creations of the classics found in the TR-8. It’s also stocked with 342 samples, including drums, percussion, hits, and synths. Most of these make appearances in the preset kits, which can be copied and customized. But the real fun begins when you start from scratch with this collection.
Article continues belowDespite being limited to a two-line LCD display, the menu is thoughtfully implemented with intelligent key-combination shortcuts, so you can quickly build a basic kit from scratch, then advance to more intricate edits as you gain confidence with the deeper features.
The initialized “blank” template is perfect for this, with one minor consideration: All drums are pre-routed to the delay and reverb sends. While this can be useful if you’re getting wild in a club, some drums—especially kick drums—get muddy when slathered in reverb and delay. To remedy this, take the time to edit the default kit into a “My Template” preset that has a slightly different set of initialized settings. Do this by scrolling through the kits until you reach the kits named “----” (the Roland default label).
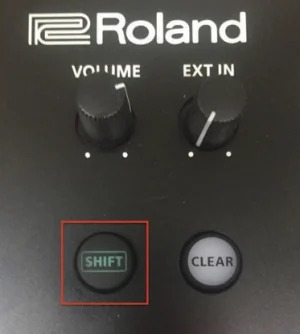
Pro Tip: Holding the shift button while turning the value knob lets you jump through presets by groups of 10 as you scroll.
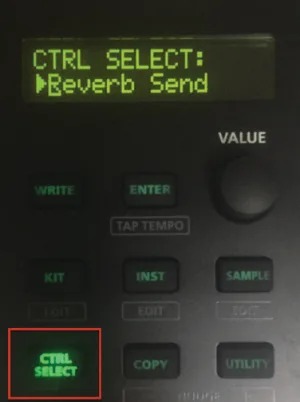
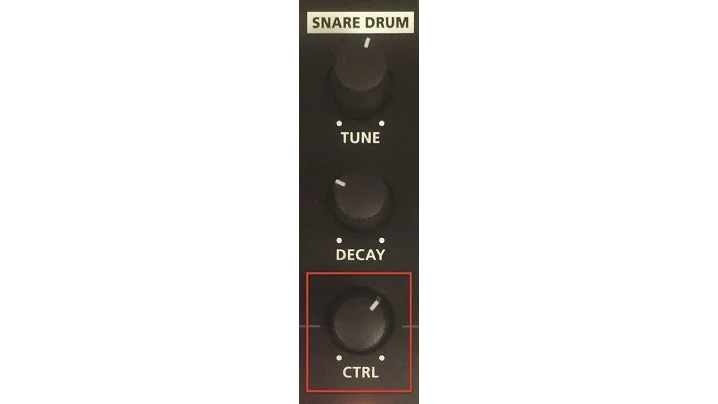
Once you load that kit, you’ll need to edit the sends for each of the instruments according to your needs. The fastest way to do this is with the CTRL Select parameter, which lets you quickly assign all of the front panel CTRL knobs to one of the primary instrument editing parameters, including panning and the effects sends. Press this and scroll to the delay and reverb sends, configuring them for your own style. Below are some guidelines for keeping your drum mix clean in a club or production environment.
Want all the hottest music and gear news, reviews, deals, features and more, direct to your inbox? Sign up here.
Bass/Kick. Remove (or greatly lower) all effects from the bass drum. This keeps it clean and punchy as the other drums play.
Snare. Small amounts of delay can be useful for adding polyrhythmic complexity. Reverb is a matter of context.
Toms/Congas. A touch of reverb adds flavor, but delay on complex patterns can sometimes introduce clutter.
Rimshot/Clap. These often benefit from either effect, depending on the texture of the original sound and its pattern. Claps and reverb go together like milk and cookies.
Hi-Hats. Adding reverb to hi-hats can sometimes drown a mix in shrill highs, so stick with delay only, and use restraint here.
Crash/Ride. A touch of ambience on crash and ride cymbals adds character and lets them sit back in a mix. Adding delay is another recipe for clutter.
Of course, these are simply general guidelines for the standard TR-8S drums, but addressing them in your personal template also lets you quickly assign customized sounds according to the type of effects you’ll want on them.
Understanding kits and effects
At this point, it’s worth checking out the specifics of the various global effects like delay, reverb, and master inserts. These global parameters are accessed by pressing Shift + Kit to enter the kit edit mode. This is also where you can assign specific drums to individual outputs (or set them for use as voltage triggers), customise the colour of instrument faders, configure sidechain compression or gating, or access the LFO and instrument mute configurations.
While many of these features, such as outputs and triggering, are self-explanatory and explained in the manual, the TR-8S effects, mute assignments, and LFO are worth a closer look.
Reverbs. Tight spaces such as Ambi and Room are great for adding spaciousness without overwhelming a mix. Mod is a real standout, with a bit of animation reminiscent of a more complex hall or plate. Essential parameters such as EQ, decay time, and diffusion are available for all modes.
Pro Tip: A good rule of thumb for reverb is to use short to medium decays for most production purposes and go all out with extreme settings for performances.

Delays. The first two delays are standard mono and stereo (ping-pong) effects, with level, delay time, and feedback accessible from the front panel and filter/damping tools deeper in the menu. The third delay is a simulated tape echo with impressive colouration features that include distortion, EQ, and options for panning the short, medium, and long “playback heads” discretely. Scroll to the end of the menu for Wow and Flutter controls that are worthy of closer inspection.
Pro Tip: The TR-8S lets you toggle tempo sync for the delay, although it’s default setting is Off.
Master FX. Inserted at the main stereo output, these effects process the entire mix of a kit. The nineteen modes are extensively customizable. Rather than cover them individually, I’ll discuss their applications more broadly.
Best drum machines 2020: our pick of the best grooveboxes for beginners and pros
The first six are EQ effects—lowpass, highpass, shelving EQ (low and high boost), and related hybrids. The seventh works as a parametric “isolator” for highlighting specific frequency ranges. These effects are often found on DJ mixers, so their applications are more performance-oriented. If you plan to use the TR-8S in a club, they’ll probably be your first choices.
Among the dynamics processors are two transient shapers that can be used to add punch and emphasize the percussive attacks of your kit, while the compressor gives your mix a more cohesive sound. From a performance standpoint, they may be too subtle for real-time knob twisting, but they’re a great way to make your grooves blend more smoothly with fully produced tracks in a DJ set.
The Distortion effects, which include overdrive and fuzz, are de rigueur for hardstyle, gabber, industrial, and some IDM sub-genres. A bit-crusher is also available for adding lo-fi aliasing to your kit.
The flanging and phasing effects sound great in a club, as does the SBF (side-band filter) that Roland pioneered on the V-Synth and more recently, the System-8. The final mode is a noise generator with an integrated filter that can be swept for dramatic build-ups and drops.

Pro Tip: Tucked into the parameters for every master effect is an additional CTRL parameter, often assigned to Balance. It’s easy to miss this when flying through the menu screen, but it’s crucial: This parameter lets you assign one of the Master Effect functions to the relevant front pane knob. For example, on the filters, it can be set to cutoff (called Depth) or Resonance, whereas on the phaser, it can govern rate, depth, resonance, or manual. The default Balance setting is simply a wet/dry knob. Pressing Enter moves the cursor to the selection field to change the active parameter.
Sidechaining. Sidechained dynamics processing can be applied to the stereo external inputs. There are two gating and six classic ducking modes, each with different timing and envelope characteristics. These are configured in the Ext In area of the kit editor.
The default kit template has the kick configured with a 1-step duration, the most familiar mode. That said, any drum (or even the trigger out) can serve as the sidechain source, allowing for more complex effects using short percussion (such as hi-hats) or the trigger.
Pro Tip: For more unusual results, try using one of the two gating modes with an eighth- or sixteenth-note hi-hat. This will chop the external input based on the pattern.
Mute Assignments. This powerful feature is sometimes referred to as “exclusive.” (In Ableton Live’s Drum Rack it’s called a “choke group.”) Hi-hats are the most common mute assignment, where the closed hat mutes the open hat: This is the standard for every classic drum machine and crucial for disco/house “oontz-oontz” patterns.

Although the factory kits make use of this appropriately, the empty kit template has no assigned mutes, so you’ll need to address that when you’re designing from scratch. In the mute section of the kit editor, select OH (open hat) and assign CH (closed hat) as its counterpart.
Other percussion instruments also rely on mutes for authenticity. For example, guiros have tap and slide components that are enhanced by assigning the tap to cut off the slide. Disco referee whistles (if you must use them) also benefit from having the short blast mute the longer blast. The creative possibilities of this feature are extremely powerful for enhancing grooves and reducing mix clutter.
Pro Tip: Crash cymbals are great for emphasizing the downbeat of a new section in your arrangement, but they can sometimes overwhelm a groove. Experiment with assigning the snare to mute the crash. You’ll retain the accent while choking the cymbal on beat 2, leaving room for the drums that follow.
LFO. This feature is among the most innovative tools I’ve encountered on a drum machine and may become a hallmark of the TR-8S sound. If you’re serious about making or customizing your own kits, it is essential to understand how it works.
The LFO is near the end of the kit editing menu and offers three parameters: Waveform, Tempo Sync (on/off ), and Rate. As you design your kit, be sure to set this up according to your musical goals: triangle waves will yield the most mainstream effect; sawtooth waves are cool for EDM and trance rises and falls, and tempo-synced sample-and-hold is fantastic for adding random stepped patterns for synthwave and techno. Slower rates are handy for adding subtle motion via triangle waves or dramatic build-ups with the sawtooth. Fast synced rates can be ideal for rhythmic effects in conjunction with the square or S&H waves.
After selecting your rate and waveform, the LFO will then be available for a mind-boggling array of destinations, one for each instrument in your kit.
Instrument design
Whether you’re working with the included sounds or importing your own samples, the customisation options for each element in a kit are vast. These parameters are determined by whether you’ve selected an Analog Circuit Behavior (ACB) drum model or a sample-based instrument.
Tune, decay, level, panning, and effect sends are common to both types of sounds, with dedicated tune and decay knobs on the front panel, and the drum fader controlling the level function directly.
ACB Editing. The ACB design tools are specialized according to the instrument selected. Below is a quick guide to the parameters specific to drum models from the 808, 909, 707, and 606.
Bass/Kick: The ACB kicks include an Attack parameter that affects the initial transients, adding more punch. The 808 and 909 included this parameter on the front panel; here, the parameter behaves identically. The 707 and 606 bass drums didn’t have editable attacks, so the results are unique to the TR-8S.
Snare: The 808 and 909’s Snappy parameter is present on the ACB versions (Figure 6). The similar 606 snare also includes it. On the 707, this feature functions a bit like a lowpass filter, but with a tad more EQ-like flavour.

Toms: All of the ACB toms now include a Color parameter, which is unique to the TR-8S. On the 808, 909, and 606 models, it adjusts the character of the noise, whereas on the 707 it affects the pitch behaviour. On the recent AIRA 808 “noise tom,” it governs resonance.

Pro Tip: Many of the included kits based on these ACB emulations have the CTRL knob preassigned to these parameters, but this can be reconfigured with the kit’s User option, which we’ll cover below.
Sample-based instrument editing
The TR-8S offers deep customization of sampled instruments, either from the onboard collection or imported from an SD card (see page 64, Importing Samples). In addition, there is a coarse tuning parameter that offers a ±24 semitone range, which is distinct from the front panel tune knob.
The Rate parameter works a bit like a fine-tuning control, with negative amounts inverting the sample direction. In practice, it helps to think of this as a continuously variable sample-reverse tool.
Pro Tip: Samples play back normally (according to the coarse and tune parameters) with a Rate value of 1.00. Reducing Rate to 0 lowers the pitch as the sample rate slows. Values below zero then increase the rate, simultaneously reversing the sound until it reaches -1.00, where the inverted sample plays back at its tuned setting.
Spread widens the sound by slightly detuning the left and right channels, while BitReduce lowers the resolution in a manner that is distinctly different from a bit-crusher.
Pro Tip: If you covet an SP-1200 but can’t find an affordable unit in working condition, apply a small amount of BitReduce to a sample-based kit with truncated sounds, then add a touch of bit-crushing on either the master FX or drum inserts.
The next set of parameters feature amp envelope functions, optimized for drum design with Attack, HoldMode, HoldTime, and HoldStep functions. Attack is self-explanatory and should only be increased when you want to soften a sound or create an unusual cabasa effect from a snare or cymbal. The Hold parameters function interdependently to determine the onset of the drum’s decay parameter, allowing the drum to play at full volume for a specified interval before the decay kicks in.
Pro Tip: Setting the HoldMode to Time delivers two specific tricks. Short (non-zero) time settings will create a compressor-like effect on impactful drums such as kick, snare, and toms, allowing them to play for a few milliseconds at maximum before the decay begins. Alternately, setting the decay to zero makes the hold time function like a gate for big, truncated drums. Switching HoldMode to Step lets you quantize this gate time.
The next set of parameters access the filtering tools for each instrument, selecting between lowpass and highpass, followed by cutoff, resonance, attack, decay, and envelope amount. At the end of this section is a velocity parameter for dynamic filter effects.

Pro Tip: Nearly any drum can be turned into a “Kraftwerk zap” by setting the cutoff to 0 with very high resonance, envelope amount to maximum, filter attack at 0 and filter decay between 1-10.
The last two sections are of particular interest, as they apply to both ACB and sampled instruments and are signature components of the TR-8S sound: the LFO and Inst FX.
The LFO’s two parameters determine the routing and depth of the global LFO described earlier on a per instrument basis, with numerous parameter destinations. For example, you can simultaneously modulate the snare tuning, tom reverb send, hi-hat delay send, bass drum highpass filter cutoff and rimshot panning, at individual depths, with the global LFO, and keep all of it synced to tempo.

The Inst FX section offers twelve insert effects that can be individually assigned to each kit instrument. These are essentially inline versions of the master effects, omitting the various distortion, flanger, and phaser selections. The remaining types let you apply, for example, a compressor on the kick, transient shapers on the snare and toms, bit-crushing on the hats and cymbals, and overdrive on the handclaps. With a bit of production knowledge, this lets the TR-8S sound quite polished without any additional studio processing.
Finalising the kit
When you’ve finished your custom kit, you can then set the front panel knobs to any desired starting point, including the specific values for each of the CTRL knobs, then save the kit to memory (Figure 10). Using this technique, you can perform your mixes as the groove plays, fading in the bass drum with a highpass filter, then adding the hi-hats with an LFO-based autopan that you can slowly reduce to their default panning, and so on.
Once you’ve created an assortment of kits, you can use them as starting points for further experimentation, thus creating your own unique sound as an artist. The SD card functions also allow you to save your finished kits, either as a full backup of the machine or individually, to create a library for mixing and matching.
Sequencing tips
Because the 808 paradigm has been the de facto pattern creation standard for more than 30 years, whipping up grooves on the TR-8S is utterly intuitive and requires minimal tutoring. Nonetheless, here’s a set of tips and tricks that may not be immediately apparent from the front panel.
1. Advancing from the TR-8, the TR-8S now offers up to eight one-bar variations (A-H) for every pattern. These variations can be unrelated, but they all use the currently selected kit.
2. You can select any variation as a pattern plays, and the sequence will shift at the end of a bar, just like switching patterns using the main buttons. This is extremely valuable in a live performance context.
3. If multiple variations are pressed simultaneously, they will play in alphabetical order, even if they’re not contiguous. For example, if you press A, B, D, and F at the same time, the variations will play in that order.
4. The Auto Fill In function can save you some time when you’re performing, by playing a separate fill in the pattern every 2, 4, 8, 12, 16, or 32 measures. These fills are selected by holding the On button and choosing either one of the eight variations, or pattern buttons 14-16 (which light up in green when the button is held). Buttons 14 and 15 select user-customizable fill patterns, whereas 16 selects Roland’s Scatter feature, adding one of ten glitch fills, as on the TR-8.
5. Scatter fills are configured in the pattern settings, by pressing Shift and PTN Select, then choosing the scatter type (1-10) and scatter depth (1-10). Other pattern settings include tempo, note-value, shuffle amount, and flam spacing. All of these parameters, variations, and fill-in selections are saved with the pattern.
6. You can put any velocity on any step for any instrument by holding the step and moving the Accent knob to any value from 0-127.
7. The motion sequencing section can automate nearly every knob on the front panel by simply turning Motion on and pressing Record when you’re ready. To erase automation for a specific knob, just hold the On button and touch the knob. Motion sequences can be created for every variation in a pattern.
8. Per-step parameter sequences (sometimes called “parameter lock”) can be created by turning on Motion Record with the sequence stopped, then pressing any step and turning a knob while holding down the button. This is useful for inputting melodies by automating the tune knob for any instrument. This can also be programmed while the sequence is playing, although here the behavior latches onto the last recorded value until it sees a new “parameter lock.”
9. There’s no practical limit to the number of instrument parameters that can be automated in a pattern, and global parameters can also be automated, such as Delay Time, MFX CTRL, and MFX On/Off. (Note that, early in the release of the TR-8S, automating too many parameters could cause the unit to stutter. This has been corrected in the latest firmware update.)
Importing samples
The TR-8S synthesis engine can process nearly any sound you import from the SD card. Here’s a quick guide to loading your own samples.
1. The SD Card format is FAT16, and you can format it from the TR-8S utility menu.
2. If you’ve already created your own kits or patterns, it’s essential to back everything up to an SD Card. (If you’re sticking with the built-in sounds, you can always do a full reset to return to the original collection of patterns and kits.)
3. In the utility menu, select Sample Import. Once loaded, these samples then show up at the beginning of the TR-8S instrument categories as Import for easy access (though this can be changed to one of the factory drum or custom user categories, if you prefer). Repeat this step until you’ve loaded your desired samples.
4. Select an empty kit. I like starting at 100, so I know exactly where my original kits are and there’s little chance of accidentally overwriting a preset.
5. Next, press the button for the drum you want to assign and press the Inst button to scroll through your samples. Repeat the process for each of the 11 drum slots.
6. Once you’ve assembled your drums, but haven’t edited anything yet, save the kit in this state by hitting the Write button.
Pro Tip: Until a kit is completed, consider incrementally saving each iteration to the next available slot any time you make a significant structural change. Because the TR-8S can’t undo, this is an easy way to get back to your last starting point (and you can always erase the unneeded copies once your kit is finished).
7. In the duplicated kit, start by examining the start points of your samples, increasing each one as needed (Figure 11). If there’s even the smallest amount of dead space at the beginning of a sample, it will seriously affect your grooves. To speed things up, try using a simple factory pattern and edit each drum as the pattern plays, writing the new start points for each drum.
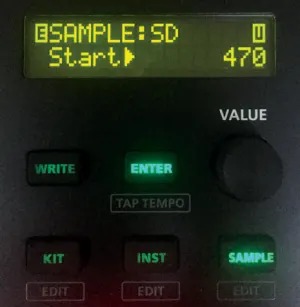
Pro Tip: A great way to add sharper transients to drums is to tinker with the start point until a click appears. This is especially noticeable with kicks and toms.
8. The five sample editing parameters are very straightforward: Start, end, gain, instrument category, and sample name. Set these up as needed, then use the tips and tricks to customize your original kits.
Electronic Musician magazine is the ultimate resource for musicians who want to make better music, in the studio or onstage. In each and every issue it surveys all aspects of music production - performance, recording, and technology, from studio to stage and offers product news and reviews on the latest equipment and services. Plus, get in-depth tips & techniques, gear reviews, and insights from today’s top artists!
