How to ditch the piano roll and use a sequencer plugin
Fire up a step sequencer and you'll find your MIDI parts heading in a whole new direction
If you’re stuck in a creative rut, one of the best ways to get out of it is to take a different approach to your production process.
If, for example, you find that your piano roll or MIDI controller aren’t leading you in new directions, how about trying a dedicated sequencer plugin to generate ideas that you wouldn’t otherwise have come up with? Monoplugs’ B-Step CM is just such a plugin, free with every issue of Computer Music. Let's see what you can do with it…
For more inspiring productivity ideas, check out the Creativity Power-Ups cover feature in the June 2018 edition of Computer Music.
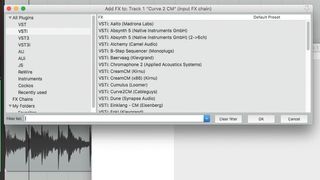
Step 1: Load any instrument plugin in your DAW - we’ve called up Curve 2 CM - and load B-Step CM to serve as its MIDI input. If you don’t know how your DAW handles MIDI routing, check out its manual. Here in Reaper, it’s as simple as choosing a MIDI In FX plugin as the input on the Curve 2 channel.
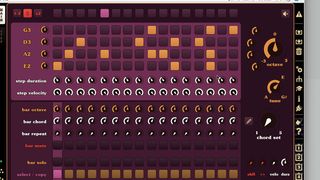
Step 2: Program a sequence into B-Step CM’s upper rows and columns, and start playback in your DAW to hear Curve 2 triggered by it. Mess with the sequence for a while. This different approach leads you to work in a slightly unconventional way, making you more likely to come up with something new.
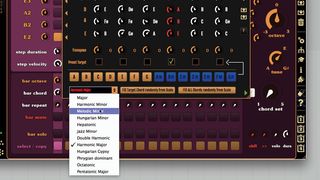
Step 3: These same four notes are getting old, so click the pencil icon next to the Chord Set selector. You can select a scale in the bottom left - we go with Melodic Minor. Click Fill All Chords Randomly From Scale or check certain chords as the Preset Target in turn and select a chord for each. By default, the currently-playing sequence is the fourth chord, confusingly.
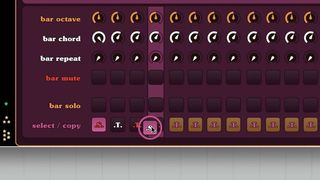
Step 4: In the bottom half of the interface, we have the bars - basically a way of sequencing your sequences. Turn the leftmost Bar Chord selector to select from one of the seven chords you just programmed. To start cycling through the bars, right-click and drag from the leftmost Select/Copy button through to the fourth. This copies the sequence to the other three slots, and starts cycling between the four.
Get the MusicRadar Newsletter
Want all the hottest music and gear news, reviews, deals, features and more, direct to your inbox? Sign up here.
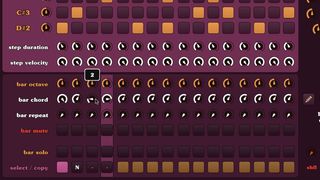
Step 5: Now choose other Bar Chord values for the next three selectors to get a progression going. It can be tricky to get this right - but that’s half the fun! To get some variation here, we can change the octave for each note in the sequence, or choose the Bar Octave for each bar. You can choose the octave for individual steps in the left-hand Steps tab.
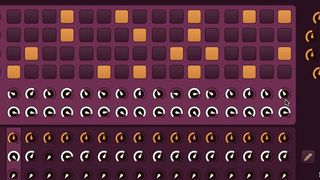
Step 6: What’s missing? Different note lengths! Back in the Main tab, choose a different Step Duration for certain steps, and tweak some Step Velocities too. Your changes will only apply to one bar out of the cycling four. Use the Select/Copy buttons to either select each bar for editing or copy one to another by right-click-dragging.
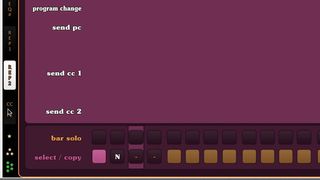
Step 7: If this quick B-Step CM session has kicked off an idea, you can record it to MIDI and start using or refining it. Or, if you like this way of working, click B-Step CM’s bottom-left star icons to uncover deeper features. Here, you’ve got more creative options, such as Step Probability, Start Position, Repeat options and more.
Computer Music magazine is the world’s best selling publication dedicated solely to making great music with your Mac or PC computer. Each issue it brings its lucky readers the best in cutting-edge tutorials, need-to-know, expert software reviews and even all the tools you actually need to make great music today, courtesy of our legendary CM Plugin Suite.

MusicRadar deals of the week: Score over £400 off PRS and Epiphone guitars, $100 off Yamaha and Roland pianos, and so much more

“For those who think they know Joel’s story, as well as those who are not as familiar, I believe this two-part film is both a revelation and a surprise”: New Billy Joel doc is on the way


