How to design an expressive synth patch for performance
Learn to use velocity and aftertouch to transform a static sound into something genuinely ‘playable’…
Synthesizer presets are generally designed to be played via a MIDI keyboard controller, so when creating synth patches for live performance, it makes sense to use these handy controls to modulate parameters. And even if your keyboard skills suck, drawing in per-note modulation within a MIDI region is an awesome way to create dynamic riffs and evolving sequences.
When playing a piano, the strength with which you strike a key will determine how loud and bright the resulting note is. The equivalent to this in the MIDI world is velocity data: the harder you press down on a MIDI key or drum pad, the higher the velocity value sent to your virtual instrument. Velocity is typically used to control volume - the lighter your key press, the lower the resulting note’s volume - but in reality, velocity can be used to control any synth parameter. Use it to modulate oscillator panning for width; apply velocity-dependent modulation amounts for more dynamic responses; or make a filter close with higher velocity values - the more aggressive the playing, the more dubbed-out the sound.
Aftertouch (pressure sensitivity) is the MIDI data your keyboard outputs when further pressure is applied to a key after it’s been struck. Map it to the tuning of your oscillators for a different take on pitch slides, or use it to modulate other modulators - for example, route an LFO to modulate a band-pass filter, then control that LFO’s depth or rate with aftertouch.
Your MIDI keyboard’s modulation wheel is another great synth parameter controller. While many ready-made patches are designed with vibrato pre-assigned, the mod wheel can control pretty much any parameter, so go further and use it for distortion amount, LFO rate, wavetable position, filter resonance, envelope mod depth and beyond.
To unlock more synth programming secrets, pick up the September 2018 edition of Computer Music.
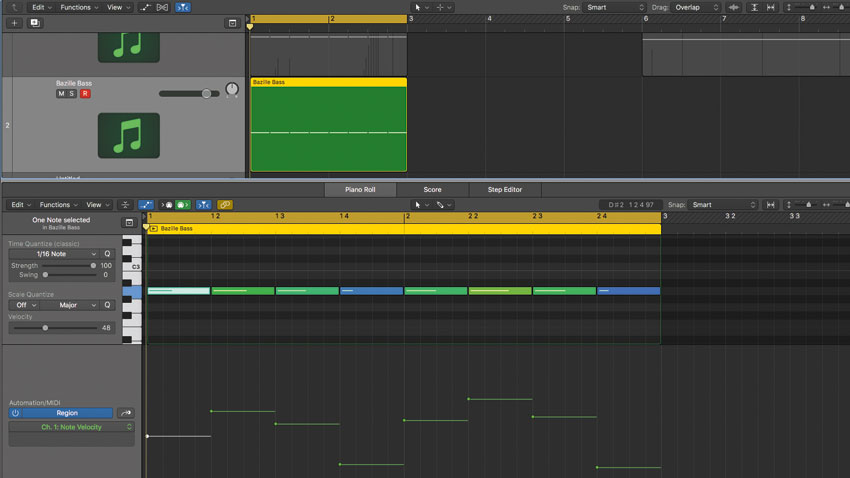
Step 1: Load an instance of u-he’s Bazille CM in your DAW, then call up the Bazille Bass preset. Although the sound of this midrange bass is OK as it is, we can use velocity and pressure modulation to turn a simple riff into something a lot more dynamic and evolving. We program a 1/4-note-long A2 note riff, and vary the velocity values of the notes.
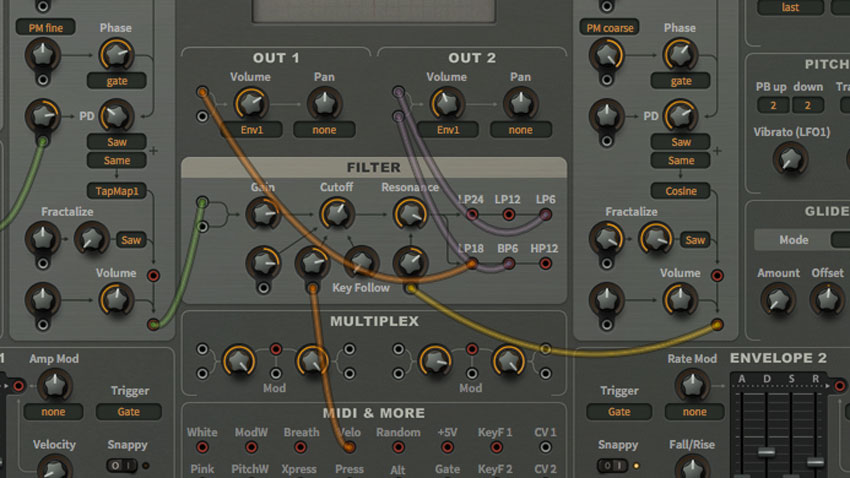
Step 2: Navigate to Bazille CM’s MIDI & More panel. By patching the Velocity MIDI modulator’s output (its red connector) into one of the Cutoff’s grey input ports, then applying mod depth via the knob, the filter cutoff amount will change depending upon the incoming note’s velocity value.
Get the MusicRadar Newsletter
Want all the hottest music and gear news, reviews, deals, features and more, direct to your inbox? Sign up here.
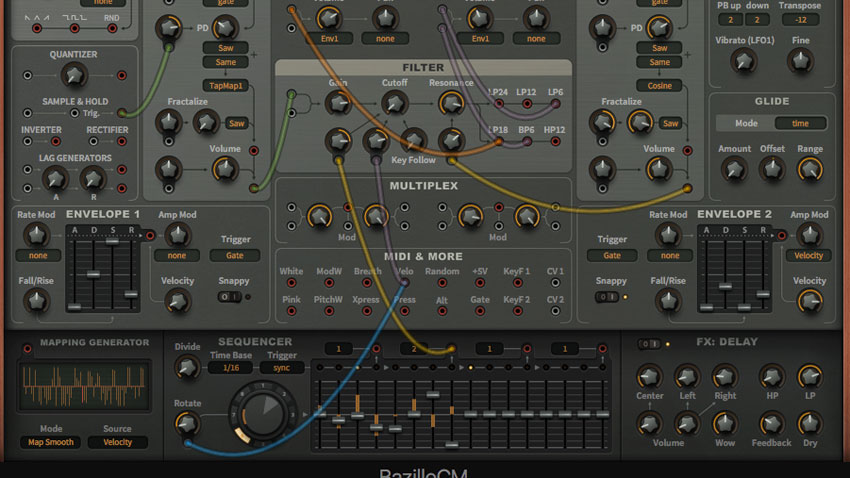
Step 3: Next, use note velocity to scan through the Sequencer’s different Snapshots (essentially eight independent sequences), then use those sequencer signals to wobble the filter cutoff frequency. First, patch the Velocity modulator to the Sequencer’s Rotate input, then route the Sequencer’s second output to a Cutoff mod input, then increase the Mod Depth.
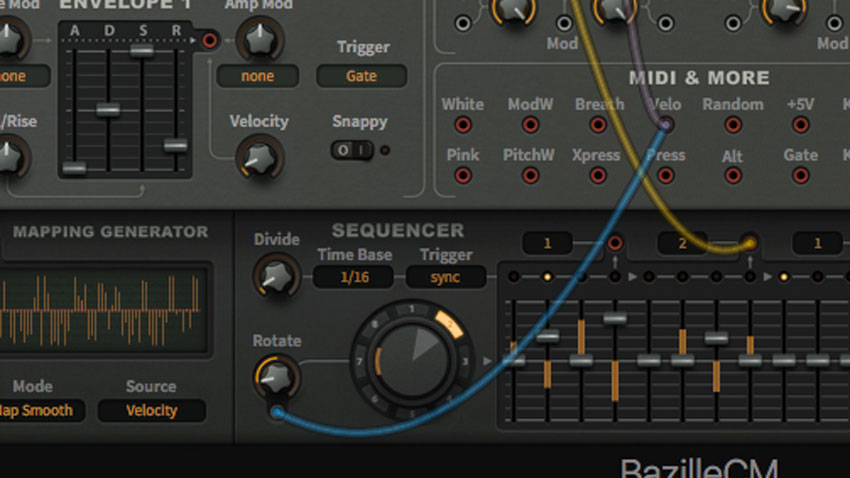
Step 4: The Sequencer’s Rotate control lets you cycle through different snapshots by clicking numbers on the dial. Within these snapshots, we can program different sequencer values. Now, different velocity values trigger different sequencer patterns, giving an evolving sound - perfect for this sequenced bass riff.
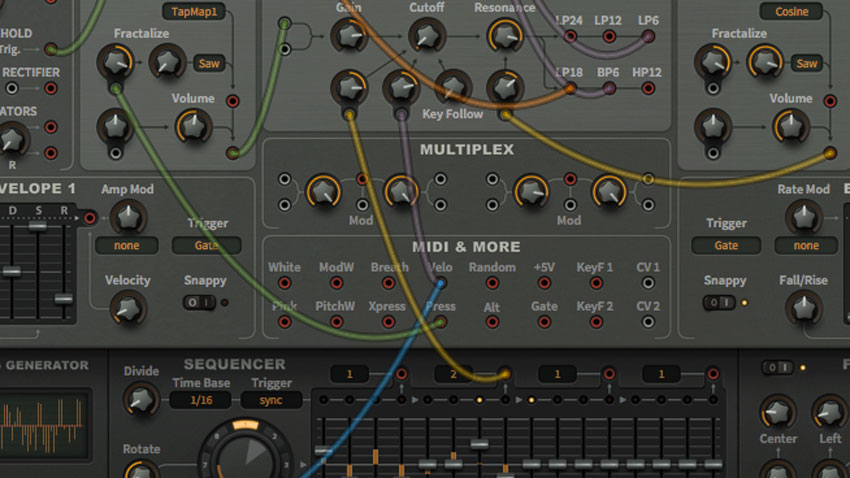
Step 5: Let’s turn our attention to aftertouch modulation, which can give our patch a more expressive sound. We take the Press modulator’s output and connect it to Osc 1’s Fractalize mod input, then turn the amount up. In a nutshell, the Fractalize control modulates one waveform with multiple cycles of another. Time to dial in some aftertouch modulation…
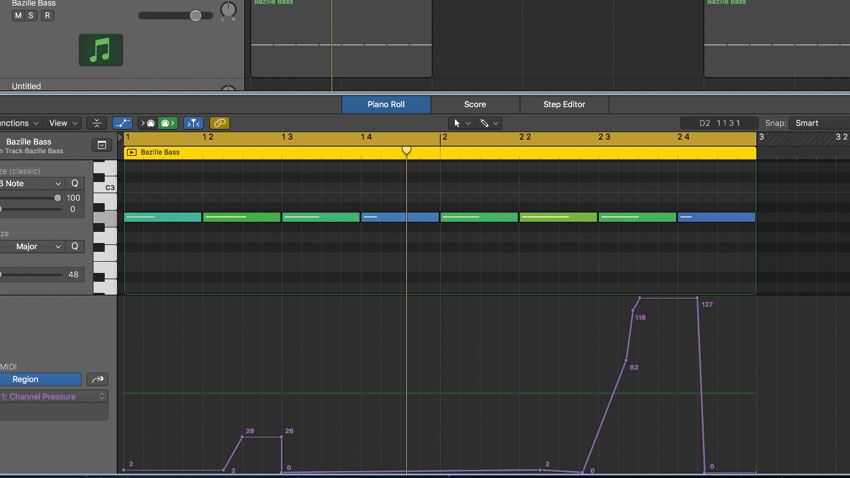
Step 6: Within our MIDI region, we record some aftertouch movement, creating a short sweep at the end of the first bar and a longer one at the end of the phrase. This modulation creates a resonant, hard sync-style sweep. Although still a simple one-note pattern, our riff now has a much more interesting and ‘performed’ feel thanks to some choice MIDI modulation.
Computer Music magazine is the world’s best selling publication dedicated solely to making great music with your Mac or PC computer. Each issue it brings its lucky readers the best in cutting-edge tutorials, need-to-know, expert software reviews and even all the tools you actually need to make great music today, courtesy of our legendary CM Plugin Suite.


