How Cubase's Arranger Track can help you to build songs
Sometimes the old ways are the best
Steinberg’s Cubase can rightly be thought of as the founding father of the linear timeline DAW. The first version appeared on the Atari ST way back in 1989, ushering in the standard blocks-on-a-timeline song arrangement approach so familiar to us all today. So, you’d expect all the necessary tools for flinging songs together in the traditional way of cutting, pasting and moving blocks of audio and MIDI data around the screen.
However, there’s an additional trick up Cubase’s sleeve when it comes to trying out new arrangement ideas, and it harks back to the numerical, pattern-based methods employed by its erstwhile rival, Emagic Creator (the ancestor of Logic Pro X). Combining the best of both approaches, Cubase’s Arranger Track enables you to define regions of your song as named Arranger sections that can then be strung together into a list of events.
You can swap regions around any way you like, and once the Arranger Track is activated, the program will play them back in the assigned order. Ideas can be saved and compared quickly and easily to determine whether or not that extra four-bar tag works coming out of the second chorus into the bridge, for example. Here, we show you how it's done.
For more advice on arrangement, check out the December 2018 edition of Computer Music.
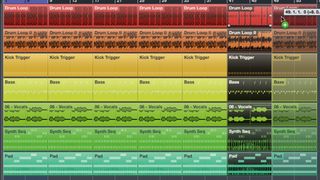
Step 1: Here we have a simple track made up of beats, a bassline, a vocal sample and a couple of synths. It’s essentially an eight-bar loop at the moment, so to thrash out an arrangement, we need to define some sections. We start by selecting all regions in the loop and repeating the whole thing a few times.
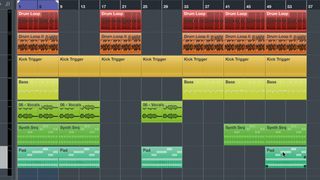
Step 2: Now we go through each new section and remove a few regions to create multiple versions of the loop made up of different combinations of parts. For example, here we’ve made one that just includes vocal and synths, another with just the beat, a third with only the vocal and pad, and so on.
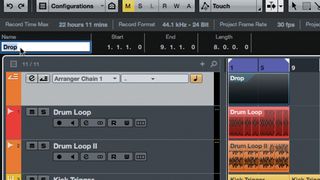
Step 3: Next, select Project > Add Track > Arranger to create an Arranger track (you can only have one per project). With the pen tool, click and drag along the Arranger track for the length of the first section. This creates our first Arranger region. Click the Name field in the upper left corner and type in a suitable name.
Get the MusicRadar Newsletter
Want all the hottest music and gear news, reviews, deals, features and more, direct to your inbox? Sign up here.
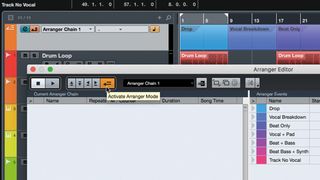
Step 4: Continue to define and name regions for the remaining sections in the project, then click the Arranger track’s e button to bring up its editor. You should now see a list of the defined sections or ‘Arranger Events’ in the right hand column. Click the Activate Arranger Mode button to enable the Arranger Track.
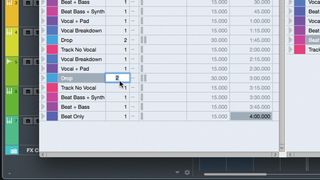
Step 5: Double-clicking or dragging any of these events into the left hand column places them into the current Arranger chain. If you hit Play with the Arranger active, the sections will play in the specified order. Type numbers into the Repeats column to set how many times that section will play back before moving on to the next event in the list.
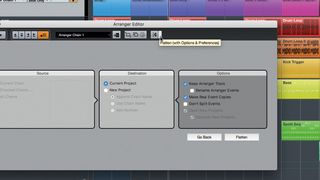
Step 6: When you’ve arrived at an arrangement you like, you can make it permanent by clicking the Flatten button. This translates the order of events into a regular layout of regions in the existing project, or exports it out to a new project. There are also options to keep the Arranger Track active in the rendered project, or remove it after flattening.
Computer Music magazine is the world’s best selling publication dedicated solely to making great music with your Mac or PC computer. Each issue it brings its lucky readers the best in cutting-edge tutorials, need-to-know, expert software reviews and even all the tools you actually need to make great music today, courtesy of our legendary CM Plugin Suite.

