Going hybrid part 3: triggering loops, timed phrases and backing tracks
Add another layer to your performance

In the final tutorial in our hybrid series, we’ll be giving you tips and advice on how to run backing tracks and timed phrases to a click track alongside your one-shot drum and percussion sounds.
Many people cringe at the thought of using a backing track live, as it’s viewed as cheating. We’re not suggesting that you’re about to start miming - rather, using hybrid technology to bring additional parts to your set. It’s not uncommon to see bands - whether it’s in your local or on the Pyramid stage at Glastonbury - filling out their sound with instrumentation from samples when it just isn’t logistically possible to have live musicians onstage (a string section, for example). So, read on to learn what you need to know to start adding loops to your live set.
1. Previously, we’ve focused on triggering sounds that don’t rely on any time-based synchronisation outside of your physical playing. The difference with triggering a synth loop or any other musical phrase rather than a one-off sound, is that it needs to be in time. In order to achieve this, there needs to be central ‘clock’ for everything to adhere to.
When playing with other musicians, that’s you - from the moment you count in the song the band is able to react to fluctuations in your timing (and you to theirs) to keep everything locked together.
Of course, a loop can’t do this, so it’s up to you to lock to the loop, with the help of a click track. There are multiple ways of doing this, and which method you choose will depend on the hardware you’re using, but we’ll be looking at some of the more straightforward options.
Many people cringe at the thought of using a backing track live, as it’s viewed as cheating. We’re not suggesting that you’re about to start miming - rather, using hybrid technology to bring additional parts to your set
2. First, you need to prepare the part you need to trigger. Let’s imagine you’re a band with no keyboard player, but you’re playing a song that needs some synth pads and effected loops that are distinctive aspects of the tune. These will normally be created in DAW recording software, then exported to your module for triggering. If this is something you’re unfamiliar with, enlist your bandmates or someone who has used this type of software before to help.

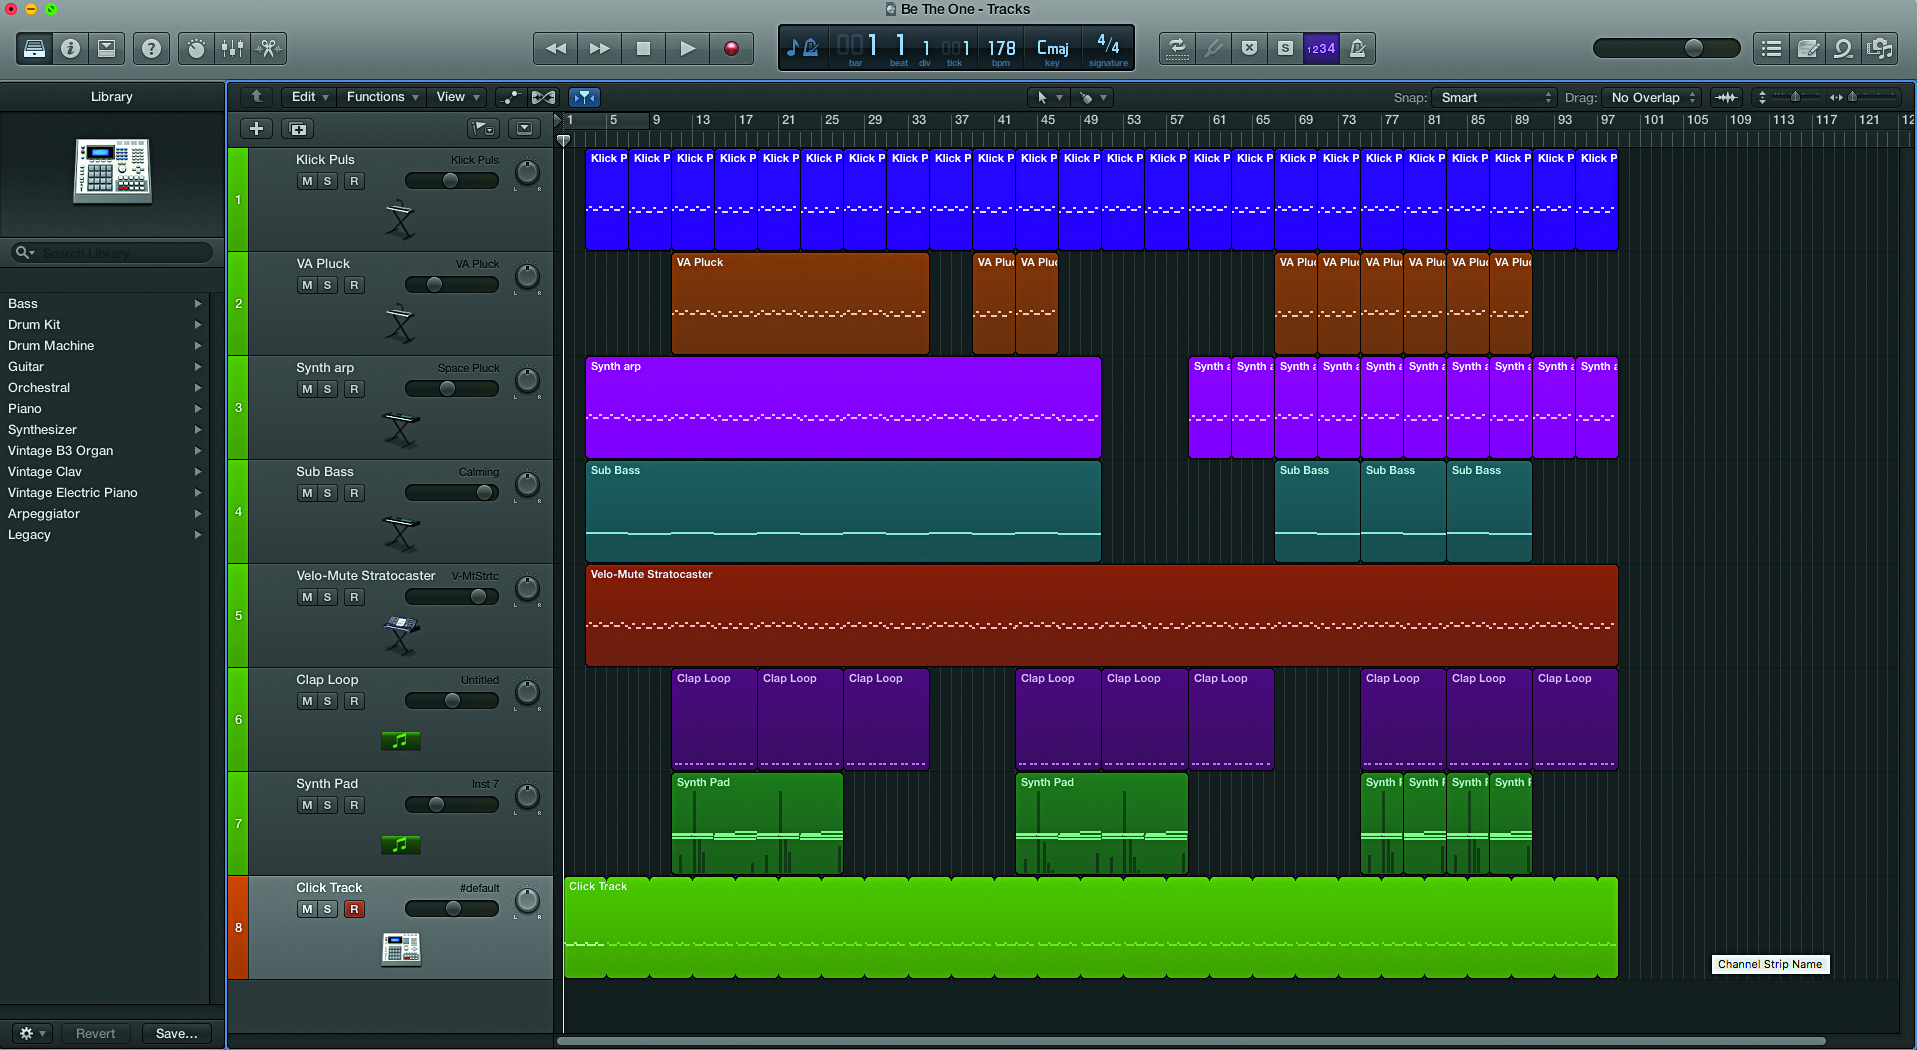
Above, is a screengrab of a project containing the parts that will make up our backing track. The track has been compiled to a click, so there is also the option of exporting the individual phrases as .wav files, enabling you to trigger each part live. However, in this instance, the intention is to hit a pad at the start of the song to start the backing track, so the whole project will be exported as one single .wav file. The BPM of the project matches the tempo of the backing tracks so that we can line up bars of the music. Note the gap at the start of the track: this will allow you to add a click count-in before the song actually starts.
Get the MusicRadar Newsletter
Want all the hottest music and gear news, reviews, deals, features and more, direct to your inbox? Sign up here.
3. Once you’re happy with the balance of the individual instruments, you’re nearly ready to export. First though, we need to apply a click. This can be added using the software drum machine in your DAW (digital audio workstation) using a drum machine plugin. Choose sounds that are easy to hear, and not related to the instruments in your track, and draw in a click. Then loop it to match the length of the song, remembering to leave a gap of one or two bars at the start for your count-in.
When you play live, you’ll want the audience to hear the track, but not the click
4. When you play live, you’ll want the audience to hear the track, but not the click. Meanwhile, you’ll need to hear both the track and the click clearly. On more advanced modules, this is made easy with multiple, assignable outputs. This method is a compromise in that your audience will hear a mono version of your track, and you will hear the click in one ear. However, it will work on simple pads with only one set of outputs such as the Roland TM-2. So, with the elements of your backing track panned centrally, pan your backing track to the right, and output your file.
5. Import the .wav file into your module, and assign it to a pad that you wish to use to trigger it. For our example, we’re using the ‘head’ zone of our first drum trigger input. If your module allows it, turn off your dynamics so that the sound’s volume won’t be affected by your playing dynamics, and set the sample playback to be monophonic.
Next you need to set up the outputs. Send the left output of your module to your PA’s mixing desk. This is what the audience will hear. Now, if you were to leave the right output of your module with nothing plugged in, it will sum your file to give a mono version of the track, and your audience will hear the click through the PA.
To stop this from happening, you need to plug a jack lead into the right output too. In our set-up, we’re sending it to a small mixer. The mixer allows us to plug in our in-ear monitors and hear the track and click on one channel, as well as the standard monitor feed of the rest of the band and vocals on another, and we can balance the volume of our two sources using the mixer’s level controls.

I'm a freelance member of the MusicRadar team, specialising in drum news, interviews and reviews. I formerly edited Rhythm and Total Guitar here in the UK and have been playing drums for more than 25 years (my arms are very tired). When I'm not working on the site, I can be found on my electronic kit at home, or gigging and depping in function bands and the odd original project.


