GarageBand power tips: 20 hacks and tricks to try today
Apple’s 'gateway DAW' is more powerful than you think
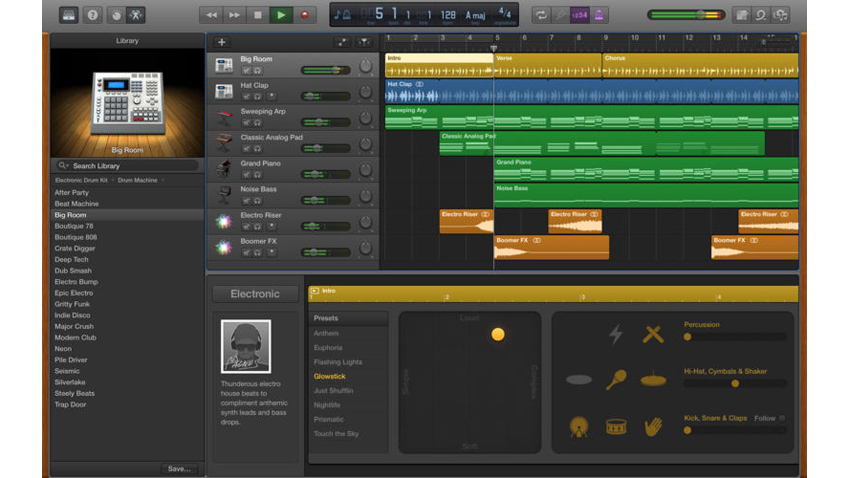
GarageBand is a pretty easy DAW to get to grips with, but beneath its user-friendly surface there's a surprising amount of powerful functionality.
If you want to take your GarageBand know-how to the next level, read on.
- Just getting started? These are the best beginner DAWs
1. Master of groove
GarageBand can help with iffy timing. Choose Track > Configure Track Header (or hit Alt+T and tick the Groove Track box), mouse over the left edge of your drum track and click the yellow star to make it the ‘groove master’. All other tracks now have checkboxes in their headers - tick the dodgy ones and they should now follow the timing of the drums more closely.
2. A different Drummer
Made available with GarageBand 10.2, Drummer Loops are essentially Drummer performances captured as Apple Loops and stored in the loop library. The advantage is that you can flick through the parts with your project running and only drag in the ones you like, after which they can be edited in the Drummer Editor, just like regular Drummer regions.
3. Secret sampling
GarageBand’s 'hidden' sampler, AUSampler, lets you drag and drop audio files into it to build new instruments. Create a Software Instrument track and click the Smart Controls button, then open the Plug-ins pane to the left of the control panel. You’ll find AUSampler (which can also load EXS24 files) in the popup plugin menu.
4. Remote control
If you have an iOS device, you can use Apple’s free Logic Remote iOS app to control GarageBand remotely. You can navigate and mix projects, record new tracks and even play software instruments from an iPhone or iPad connected to the same network as your computer. The Download Logic Remote option in the GarageBand menu will take you to the app’s iTunes Store page.
5. Master blaster
When mixing, you can display the Master track in the main window to add effects and automation to the master stereo bus. Select the Show Master Track option in the Track menu, and access the plugin slots by clicking the Output tab in the Smart Controls pane. The automation lanes for all tracks can be revealed by pressing the A key.
Get the MusicRadar Newsletter
Want all the hottest music and gear news, reviews, deals, features and more, direct to your inbox? Sign up here.
6. Pitch perfect
If you find yourself restricted to a particular key because you only have one version of a particular Apple loop, select Show Transposition Track from the Track menu and you can transpose whole sections of your project by plotting points on a curve. This affects Software Instrument tracks, pitched Apple Loops and audio tracks with the Follow Tempo and Pitch box checked.
7. Auto-arranging Drummer
GarageBand’s Arrangement Track is useful for trying out new layouts of existing projects (reveal it by selecting Show Arrangement Track from the Track menu), but if you set up an array of arrangement markers at the start of a project, then add a Drummer Track, the Drummer Track will automatically populate your arrangement with different regions for each section. Very cool!
8. Get help
The Quick Help button, represented by a question mark in the top left corner of the transport bar, enables GarageBand’s ‘self-help’ mode, offering yellow text boxes that explain the function of the object currently under the mouse pointer. If you hover over the Quick Help button itself when enabled, a set of tips for the app’s main working areas are displayed.
9. Production on the go
If you start a project on GarageBand for iOS, you can use the app’s Smart Touch instruments to quickly get down some ideas on the move, then import the song into GarageBand for OS X via the File > iCloud menu. This is a one-way deal, though - songs won’t go from Mac to iOS, because the Mac app has capabilities that just aren’t possible yet on an iPad or iPhone.
10. Capture the whole band
With a multichannel audio interface connected, you can record audio onto multiple tracks simultaneously. With the Smart Controls panel open, click the header of each track and select an input channel for it in the Recording Settings panel. Then press Alt+T to configure the track headers, check the Record Enable checkbox, enable each track and hit Record!
11. Beyond Musical Typing
It may have been intended as a way to enter musical notes without a MIDI keyboard in sight, but Musical Typing has another trick up its sleeve that will have you tapping out sophisticated beats…
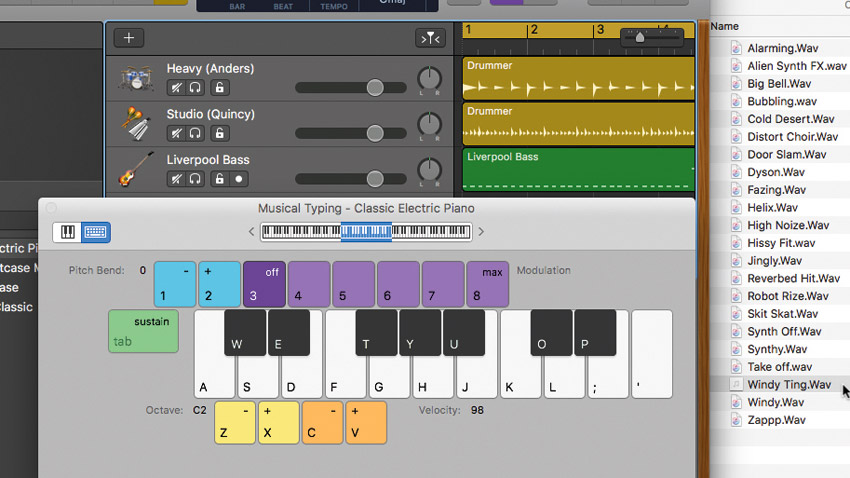
Step 1: GarageBand’s Musical Typing keyboard - summoned either from the Window menu or using the Cmd+K keyboard shortcut - can be used to quickly assign audio samples to keys on your MIDI keyboard. Start by locating the samples you want to assign in Finder.
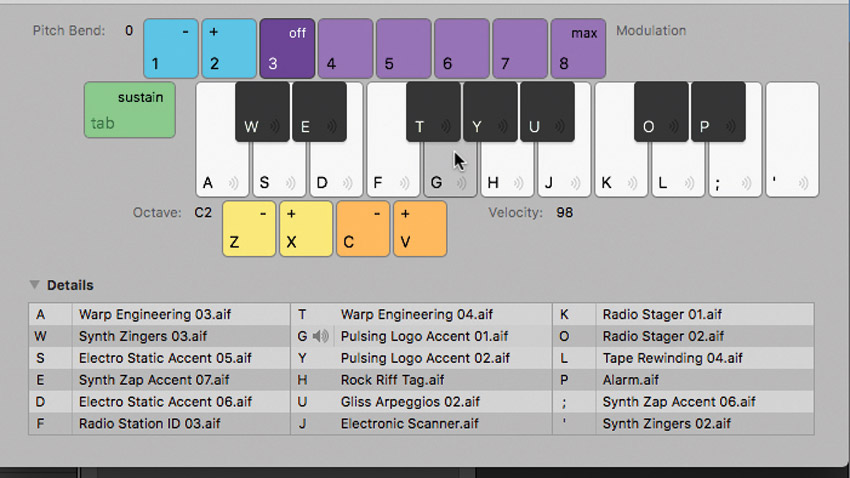
Step 2: On a Software Instrument track, open the Library pane and browse to Legacy/GarageBand/Sound Effects/Radio Sounds. Look closely and you’ll see a small icon on each virtual key of the Musical Typing keyboard. Click the Details triangle to reveal the names of the audio files already assigned to them.
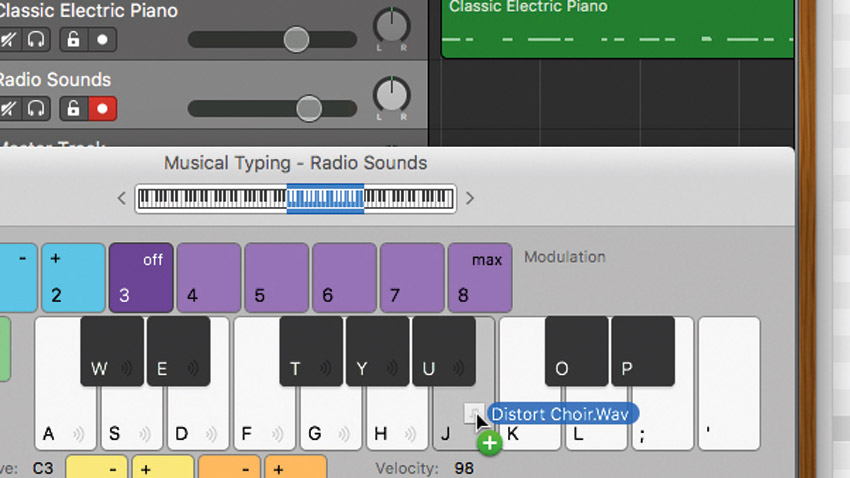
Step 3: Adjust the octave range to display some empty slots, then drag the samples over one at a time and drop them onto the keys you want to trigger them with. The name should appear in the table if you’ve been successful, and the sound should now be assigned to that key.
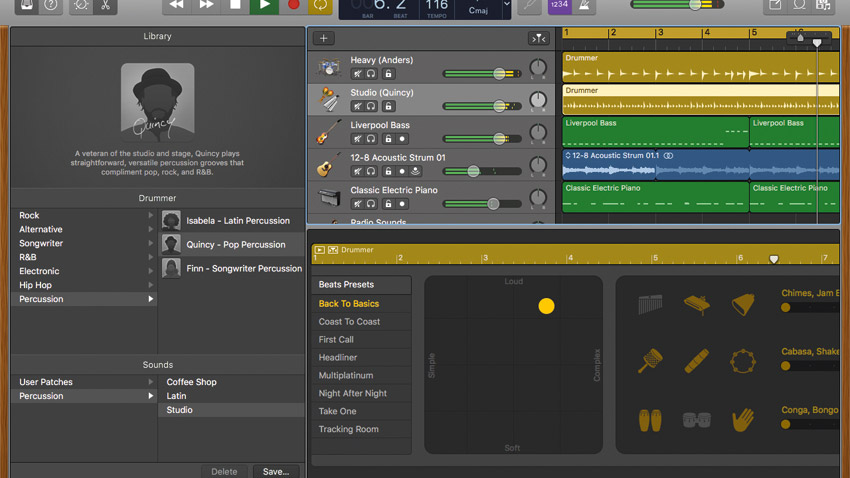
12. Pure percussion
GarageBand for OS X is an incredibly powerful music-making tool. The latest update - version 10.2 - brings three new percussion players to the Drummer track menu, opening up a plethora of professionally-played percussion grooves with which to enhance your rhythm tracks. The Drummer interface has been slightly redesigned, so you’ll find the new players in the Library pane to the left.
13. Colour shift
GarageBand’s colour-coding of regions is based on the type of material they contain. MIDI regions are green, Drummer regions are yellow, recorded audio regions are blue, and imported audio regions are brown. But here’s a nifty trick: pressing Ctrl+Alt+G converts all brown regions to blue ones, enabling you to adjust their tuning and timing via the Follow Tempo and Pitch feature.
14. Loud and proud
Make sure your mixes are loud enough to compete with commercial tracks by checking the Auto Normalize checkbox (Preferences > Advanced > Auto Normalize). This will ensure that your projects are exported at full loudness when you mix them down. A range of export options are available from the Share menu, including sharing to Soundcloud, iTunes or bouncing to disc or CD.
15. Smart enough
The Smart Controls panel provides quick and easy-to-navigate access to the parameters of the currently selected instrument or plugin that you’re most likely to need. The layout depends on the kind of instrument or effect you have loaded up, and you can use the buttons at at the top of the panel to switch between the Smart Controls and the Channel EQ.
16. DIY Apple Loops
GarageBand ships with loads of Apple Loops, but making your own is simplicity itself. Just record a part that you think would make a good loop, trim it to the right length and give it a suitable name. Then select File > Add Region to Loop Library. Your loop will then be accessible via the Loop Browser within any other project, and will follow the tempo like any other Apple Loop.
17. Template tectonics
Using the factory templates to start a project can save a lot of set-up time. However, you could get going even faster when inspiration strikes by creating your own customised project templates. Set up your template, save it and drag it into the dock, then click to launch it.
18. Tuning up
GarageBand features a built-in tuner, accessed via the button to the right of the LCD display in the transport bar. This examines the incoming audio signal, whether it’s from a connected mic or guitar input, and displays its pitch on a circular readout, so you can use it to check whether your instrument is in tune before you record it.
19. Coy arp
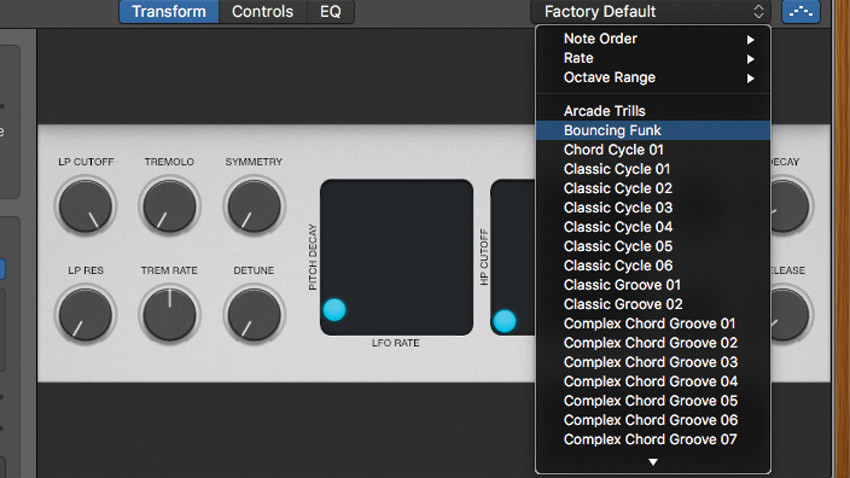
For Software Instrument tracks, the top-right corner of the Smart Controls panel houses a button that looks a bit like the flying saucer from Space Invaders. Click this to enable a hidden, preset-based arpeggiator. A generous library of presets is accessed via an adjacent popup menu, from which you can also edit note order, rate and octave range.
20. Amps and pedals
GarageBand’s selection of virtual pedals and amps can liven up any sound in your project. Here’s how…
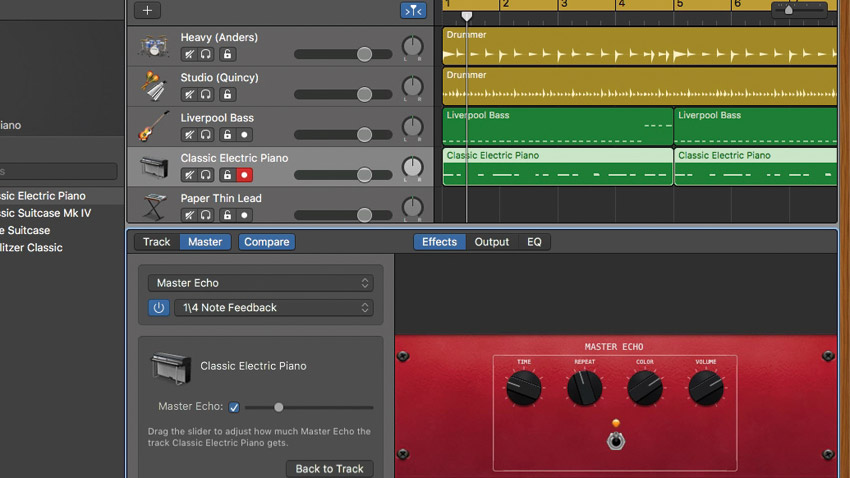
Step 1: Stompboxes and cabinet models can transform any track. Here we have a Rhodes electric piano part, programmed in MIDI, that could do with spicing up a bit. Let’s start by adding a Pedalboard. Select the track header, then open the Smart Controls pane.
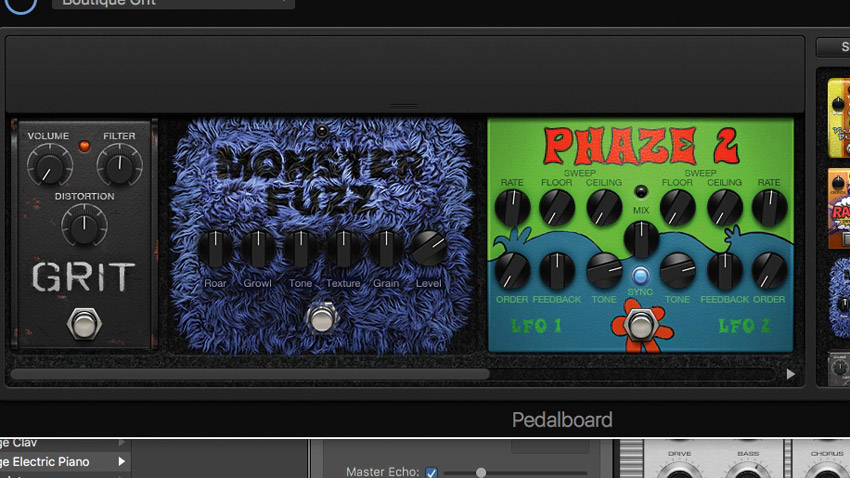
Step 2: Click the Track button in the top-left corner of the panel, then click an empty slot in the plugin rack and select Pedalboard from the Amps and Pedals section of the Plug-in menu. Load a preset combination of pedals. We’re using Boutique Grit here.
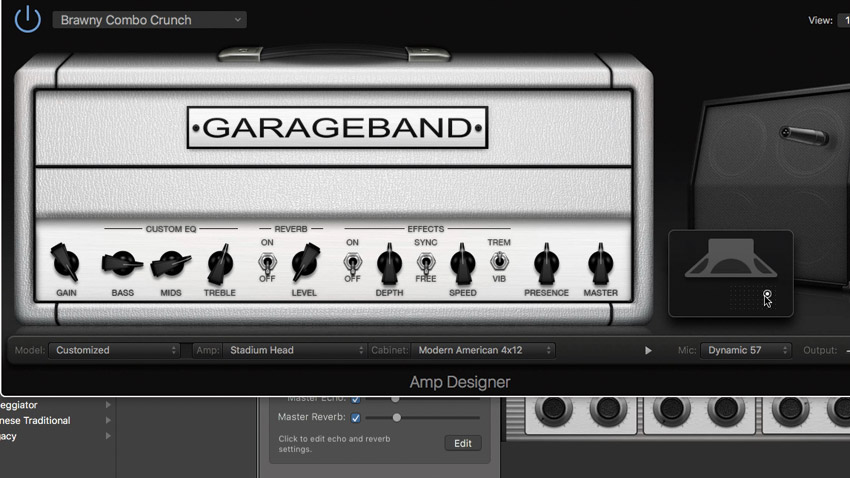
Step 3: In the next slot, insert an Amp Designer to make it sound like we’re sending the sound out through an amplifier and miking up the cab. You can choose preset combos, swap amps and cabs around, change mics, and even adjust the mic position to vary the sound.

Computer Music magazine is the world’s best selling publication dedicated solely to making great music with your Mac or PC computer. Each issue it brings its lucky readers the best in cutting-edge tutorials, need-to-know, expert software reviews and even all the tools you actually need to make great music today, courtesy of our legendary CM Plugin Suite.

